Level Triggered Event
Overview and Key concepts
The level triggered object may be used to introduce triggers on a changing level. "Levels" are mostly periodically varying quantities, but can be quite general, for example: water height (tidal level), darkness events (dark / light), wind speed or direction, etc.
The level data may either consist of a large data set with data for all relevant model times, or it may be a shorter dataset which is repeated periodically.
It is possible to add triggers on the level, allowing you to execute some custom logic whenever, for example, the water level drops below 1.0m, the wind speed rises above 3 m/s, or when the darkness level switches from dark (0) to light (1) or vice versa.
The Data Tab
On the data tab, you enter the source data set that the level triggered event will interpolate. You then add triggers to the Triggers tab, that determine at which point in this data set an event should happen.
Interpolation
The interpolation option determines how data values will be calculated for model times that do not exactly correspond to a row in the table, based on the given data.
-
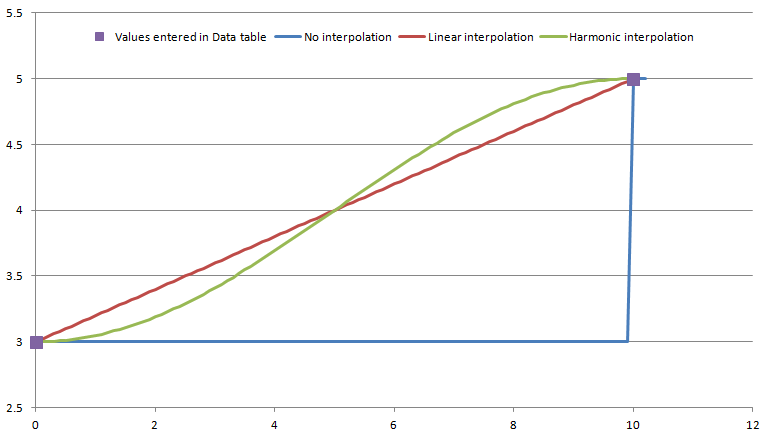
No interpolation (steps)
At all times from the time in one row (inclusive) until the time in the next row (exclusive) the parameter will be assumed to have the value in that row. -
Linear interpolation
The level triggered event parameter will increase or decrease linearly between two consecutive rows. -
Harmonic interpolation
The level triggered event parameter will be interpolated by fitting a cosine function through two consecutive table rows.
Graphically, the difference between the interpolation options is shown below, assuming you have entered a data row at time 0 and a data row at time 10, with wind speed values of 3 m/s and 5 m/s respectively.
Offset
The offset can be used shift the whole Data table by a certain amount. For example, if the first entry in the table has time 0 and the times in the table increase by 60 with every time step, you can skip the first 60 rows of the table by setting the offset to 3600. This will consider the row with time 3600 to correspond to model time 0 for this run, the row with time value 3660 to model time 60, etc. This option is useful if you have multiple years of data in the table, and you wish to set up your model (for example using the Experimenter) such that different scenarios or replications use different years from the dataset.
Repeat Period
Can be used to repeat the dataset after a certain time interval. For example, if you have a daily repeating sequence, set this value to 24 hours (converted to the time units in your model). This means that the table will wrap around after 24 hours, using the value for time 0 instead of 24 hours, time 1 hour instead of 25 hours, etc. When the dataset has enough data for the whole model run, leave this value at zero.
Rows / Table
These fields allow you to quickly change the size of the table, so that you can copy / paste in your dataset.
The Triggers Tab
The Triggers tab allows you to enter the trigger levels at which you want your custom logic to be executed.
To add a trigger, click the  Add button at the top of the tab. This will add a new trigger at the bottom of the window.
Name
All triggers have a name, which must follow the FlexSim conventions for naming objects. The name is not used during modelling, it is only so that you can easily identify different triggers while editing the triggers on this page.
At level
The level at which the trigger should fire. As the model time runs, FloWorks will interpolate between the points of your dataset as entered on the Data tab, and potentially execute the trigger code each time the (interpolated) level reaches or crosses the level specified in this field.
When
This condition field allows you to execute the trigger only when a certain requirement is met. By default, the trigger will fire any time the (interpolated) level is reached. The default drop down options are as follows:
-
Only when rising through level
The trigger will only fire when the level rises through the trigger level, that is, when it is strictly lower before the trigger time, and will be strictly higher after the trigger time. -
Only when falling through level
The trigger will only fire when the level falls through the trigger level, that is, when it is strictly higher before the trigger time, and will be strictly lower after the trigger time. -
Only when passing through level
The trigger will only fire when the level rises or falls through the trigger level, i.e. when either of the previous two cases occurs. -
Only when reaching level from above
The trigger will only fire when the level reaches the trigger level from a higher value, that is, when it is strictly higher before the trigger time. This is different from the case of "falling through level", in that "reaching level from above" will also execute the trigger code if the level remains constant for some time after the trigger time, whereas "falling through level" will only execute when the level continues to fall. -
Only when reaching level from below
Similar to the previous option, the trigger code will only be executed when the level before the trigger time was lower, whether the level continues to rise or not. -
Always fire
The trigger will fire whenever the level reaches the trigger level, independent of whether the level was reached from above, below or from a stationary situation, and whether it will continue to rise, fall or remain constant.
In addition, you can write your own custom logic. For the parameters, see the Trigger parameters section below. The requirement code should return a value of true (trigger can be scheduled) or false (ignore the trigger).
Run logic
This code field specifies the logic you want to run when the trigger level is reached and the "When" requirement is fulfilled.
Re-order grip
You can use the "grips" (the gray dots at the left hand side of the trigger) to drag the trigger up or down. Release the mouse button and press Apply to effectuate the new order.
Trigger parameters
For both the "When" requirement and the "Run logic" trigger code, the following parameters are available:
| Event Parameter | Explanation |
|---|---|
| level | The current level, at which the trigger is considered for evaluation or is being evaluated. |
| inmode | The direction of change immediately before reaching the trigger level (see below). |
| outmode | The direction of change immediately after reaching the trigger level (see below). |
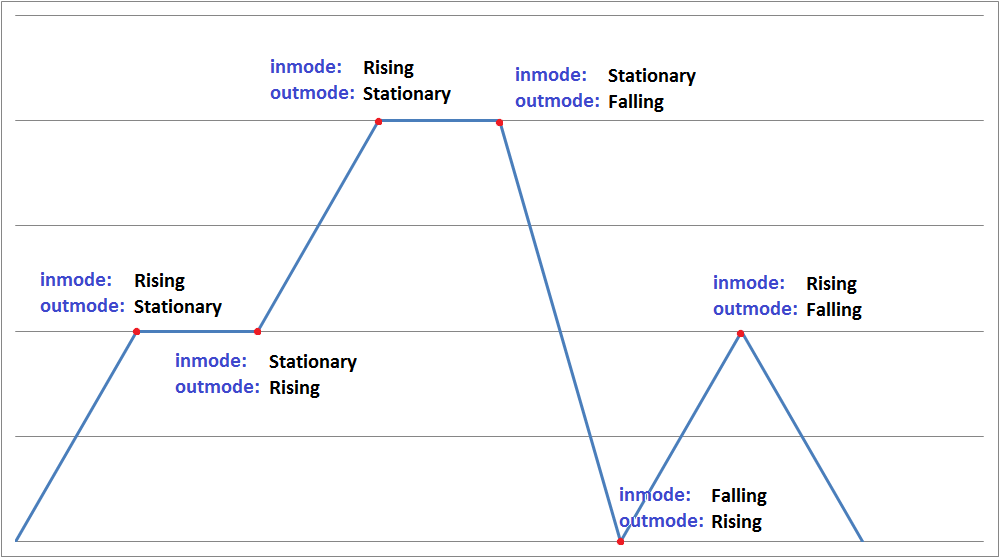
The inmode and outmode parameters will have one of the following values:
| Value | Meaning for inmode | Meaning for outmode |
|---|---|---|
| MODE_RISING (1) | The trigger level is reached from below | The trigger level rises after the trigger moment |
| MODE_FALLING (2) | The trigger level is reached from above | The trigger level falls after the trigger moment |
| MODE_STATIONARY (3) | The trigger level is reached from the same value | The trigger level stays at the same value after the trigger moment |
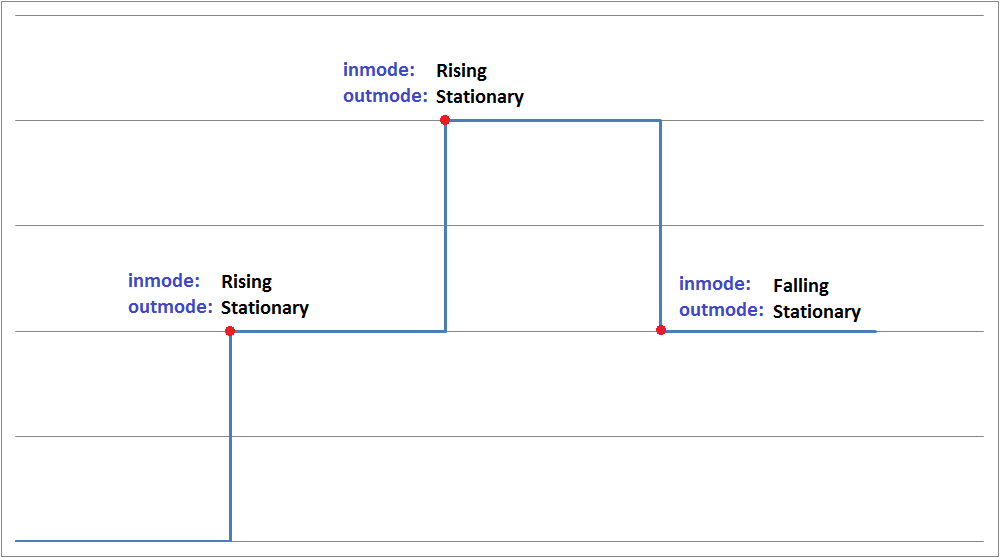
Special case: No (Stepwise) interpolation
When "no interpolation" is used, the level is considered to remain at the same value throughout each interval and will instantaneously jump to the next value at the end of the interval.
In this case, trigger events can only occur at a level value specified in the table (e.g. if the level is 0 for time 0 through 100, and 1 for time 100 through 200, a trigger at level 0.5 will not fire).
The "outmode" parameter will always be set to MODE_STATIONARY, and the "inmode" parameter will never be MODE_STATIONARY but always MODE_RISING or MODE_FALLING.