Task 1.2 - Merging and Slug Building
Task Overview
Merge conveyors can organize items flowing from multiple infeed conveyor lines. The most common purpose of merging is to combine items from multiple conveyor lines into a single line, which then sends the items downstream for further processing.
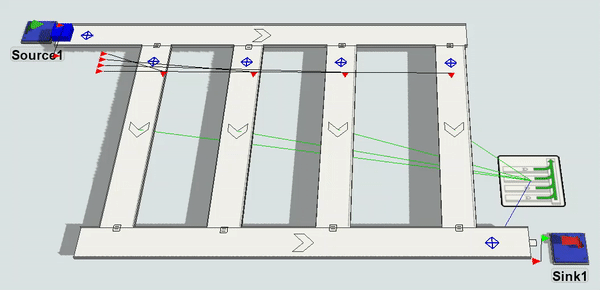
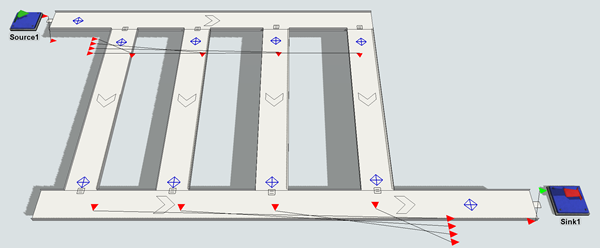
In this tutorial task, you'll continue using the model you built in the previous task. You'll add a merging lane and then later change the diverting lanes to build slugs of items that will be released once certain conditions are met. You'll later add a merge controller that will make the conveyors release their slugs round robin.
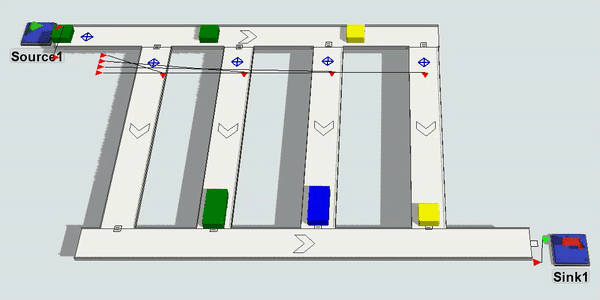
When you're finished, your model will function similar to the following image:
Key Concepts About Global Types
In this tutorial task, you'll be introduced to the global types feature of conveyor objects. This feature makes it easy to quickly update custom properties and logic on several conveyor objects at once. See Controlling Logic and Properties With Global Types for more information.
In this tutorial task, you'll create a global type that uses slug-building logic. Then, you'll assign the slug-building conveyor type to the diverting conveyors. Creating a slug-building type will make it easy to quickly apply the same slug-building logic to several conveyors at the same time. In the last step of the tutorial, you'll also create a global type for transfers to help reduce gapping.
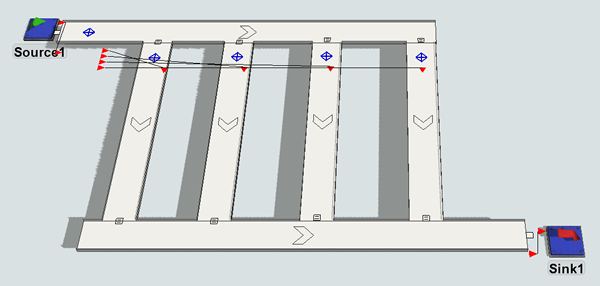
Step 1 Add a Merging Lane
In this step, you'll change the 3D model layout to add a merging conveyor line:
- Using the model you created in the previous tutorial task, delete the following
objects:
- The 2 queues at the end of the last conveyor
- The last conveyor (and the decision point on the last conveyor)
- The sinks at the end of each conveyor
- Make a copy of the horizontal conveyor and place the copy at the bottom of the diverting conveyors. Make sure the diverting conveyors snap together to the new conveyor.
- For clarity, rename the conveyors as follows:
- Add a Sink to the right end of the merging conveyor and create a port connection (A-connect) from the conveyor to the sink.
- Double-click the Source to open its properties window.
On the Source tab, change the
Inter-Arrivaltime to
5. - On the Triggers tab, click the Edit
Properties button
 next to
the On Creation trigger. Click the arrow next to the
Set Label picklist to open its properties. Change the
Value box to
next to
the On Creation trigger. Click the arrow next to the
Set Label picklist to open its properties. Change the
Value box to duniform(1,4)so that it will only create four types of flow items. - Press OK to save the changes.
| Conveyor | New Name |
|---|---|
| The horizontal conveyor at the top | MainConveyor |
| The horizontal conveyor at the bottom | MergingConveyor |
| First diverting conveyor | Slug1 |
| Second diverting conveyor | Slug2 |
| Third diverting conveyor | Slug3 |
| Fourth diverting conveyor | Slug4 |
Go ahead and run the model now if you'd like to get a sense for how the system works before you've added the slug-building logic.
Step 2 Add Simple Area Restriction
You can possibly use area restriction to control the flow of items in a conveyor system. In this step, you'll restrict access to the merging conveyor so that only one flow item can enter the conveyor at a time.
This is the first step in the tutorial where you will use a global type with a conveyor object. Global types make it easy to quickly update custom properties and logic on several conveyor objects at once. See Controlling Logic and Properties With Global Types for more in-depth information.
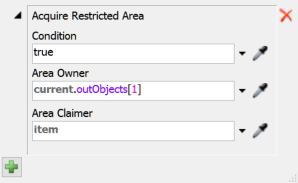
To create this logic, you'll create a decision point type that uses a picklist option called Acquire Restricted Area on the On Arrival trigger. Using this logic, the decision point will request access to the merging conveyor (the restricted area) for every arriving flow item. If the requested area is not available, the decision point will hold the flow item until the area becomes available. You'll add decision points to the end of each slug-building conveyor (Slug1, Slug2, etc.) and assign this global type to them.
Lastly, you'll add a decision point to the end of the merging conveyor. Once you connect this decision point to the other decision points, it will be able to control the restricted area. You'll add a picklist option Release Restricted Area to this decision point that will fire any time a flow item passes over it. It will send a message to the upstream decision points to release the next flow item in line.
To create this logic:
- In the Toolbox, click the Add button
 to open a menu. Point to
Conveyor System, then select Decision
Point Type to open the Decision Point Type properties window.
to open a menu. Point to
Conveyor System, then select Decision
Point Type to open the Decision Point Type properties window. - In the name box at the top of the window, change this decision point type's name to AcquireArea.
- In the Triggers group, click the
Add button
to open a menu. Select On Arrival.
- Next to the On Arrival box, click the
Add button
to open a menu. Point to Area Restriction, then select
Acquire Area.
- You'll use the default settings, so merely confirm that the settings match the following image:
- Drag 4 Decision Points from the Library and position them at the end of each slug-building conveyor (Slug1, Slug2, etc.).
- Drag one more Decision Point from the Library and position it at the end of the merging conveyor.
- Create port connections (A-connects) from the decision points on the slug-building conveyors to the decision point on the merging conveyor.
- Click one of the new Decision Points to select it. In Quick Properties, in the Decision Point Type menu, select AcquireArea to apply the global type you just created to this decision point.
- Repeat the previous step for the other decision points on the slug-building conveyors.
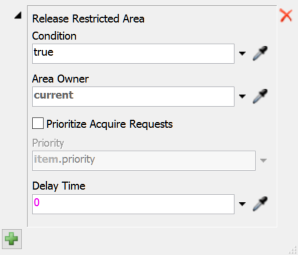
- Double-click the newly-added decision point that is on the end of the merging conveyor to open its properties window.
- On the Decision Point Type tab, click the
Add button
to open a menu. Select On Arrival.
- Next to the On Arrival box, click the
Add button
to open a menu. Point to Area Restriction, then select
Release Area.
- You'll use the default settings, so merely confirm that the settings match the following image:
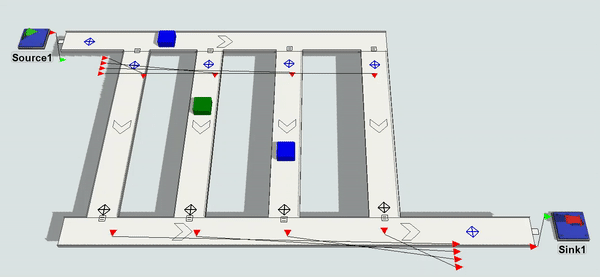
Reset and run the simulation model. Notice that only one item can enter the merging conveyor at a time.
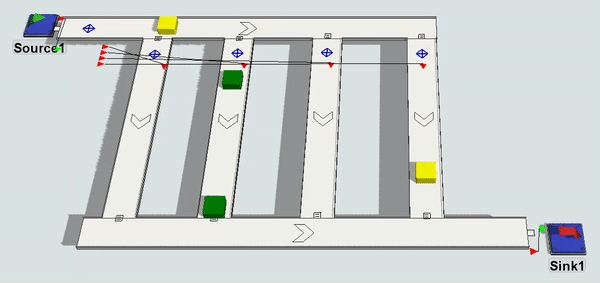
Step 3 Create a Slug-Building Conveyor Type
Notice how in the simulation model you built in the previous step, items began to accumulate on some of the conveyors. Eventually, this accumulation of items would probably cause the conveyors to get backed up and jammed. Another solution to increase throughput is to use a merge controller to coordinate the merge. The merge controller explicitly builds slugs of target quantities in the merge lanes, and then releases them in a coordinated fashion. Slugs are a queue of accumulated items on a conveyor that will eventually be released downstream as a single group. Building slugs of items can maintain high rates of throughput while keeping equipment speeds as slow as possible.
In FlexSim, you can design a conveyor that builds slugs and waits to release them based on a specific set of criteria such as:
- What percentage of the conveyor must be filled before a slug is ready for release
- The number of items that must be on a conveyor before a slug is ready for release
- The amount of time that must elapse in building the slug before a slug is ready for release
In this step, you'll learn how to build and release slugs based on the number of accumulated items, but hopefully it will also be clear how to adapt this system to use one of the other slug-building methods.
First, you'll create a global type for slug-building conveyors. Then, you'll assign the slug-building conveyor type to the slug-building conveyors. Creating a slug-building type will make it easy to quickly apply the same slug-building logic to several conveyors at the same time.
These conveyors will build slugs of at least four items. Once the slug has at least four items, the conveyor will release the slug to the merging conveyor.
To create this slug-building system:
- Delete the 5 decision points you added in the previous step (the ones at the end of the slug-building conveyors and the merging conveyor).
- Open the Toolbox. Click the Add button
 to open a menu. Point to
Conveyor System, then click Conveyor
Type to open the Conveyor Type Properties.
to open a menu. Point to
Conveyor System, then click Conveyor
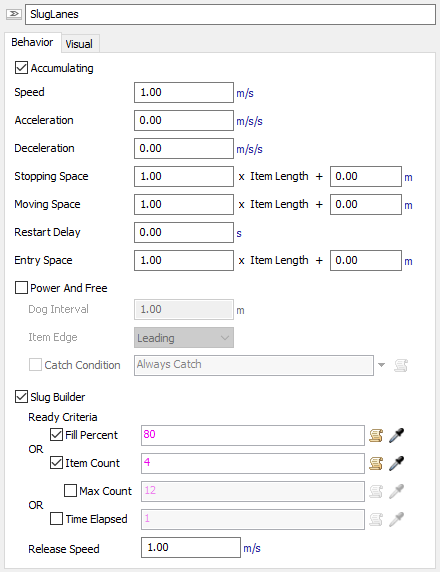
Type to open the Conveyor Type Properties. - In the name box at the top of the window, change this conveyor type's name to SlugLanes.
- Check the Slug Builder check box.
- Confirm that the Item Count check box is checked. Type
4in the box next to it. - Press the OK button to save the changes. Notice that the SlugLanes type now shows up in the Toolbox (under Conveyor System, then Conveyor Types).
- In the 3D model, click the Slug1 conveyor to select it. In Quick Properties, click the Conveyor Type menu and select SlugLanes to assign this conveyor to the new conveyor type.
- Repeat the previous step to assign the SlugLanes type to all the slug-building conveyors (Slug1, Slug2, etc.). (Do not change the conveyor type of the main conveyor or the merging conveyor.)
Try running the model and notice that the conveyors will build a slug of 4 items before releasing them.
Step 4 Add a Merge Controller
You'll notice that sometimes slugs get released simultaneously. At this point the slug-building lanes are completely independent of each other. Each lane builds a slug and then immediately releases it. Consequently, released slugs will run into each other on the merge lane. This would not be ideal in a real system because the boxes would bump into each other and potentially get knocked off the conveyor. FlexSim does not implement the conveyor system using a physics engine that could bump items off a conveyor. Instead, boxes simply wait on the slug build lane until there is an available slot to enter the merge lane. Either way, this is not ideal. To get the simulation to work the way it should work in a real system, you need a merge controller to coordinate the releasing of slug lanes to avoid collision on the merge lane.
In this step, you'll add a merge controller that will control how the slugs are released. For this example, you'll set the merge controller to use a strict round robin ordering system (slugs can only be released in a specific order, one after another).
You'll need to add a decision point to the merging conveyor in order for the merge controller to work effectively. When a slug clears the decision point, it will tell the merge controller than the merging conveyor is ready to accept another slug.
To add a merge controller to your conveyor system:
- Drag a Decision Point from the Library and place it near the end of the merging conveyor lane.
- Drag a Merge Controller from the Library and put it next to the end of the merging conveyor.
- Create a port connection (A-connect) from the Merge Controller to the decision point on the merging conveyor. Create additional port connections (A-connects) from the Merge Controller to each of the slug-building conveyors (Slug1, Slug2, etc.).
- Double-click the Merge Controller to open its properties window.
- Click the arrow next to the Release Strategy box to open a menu. Select Round Robin.
- Depending on the order in which you connected the conveyors to the merge controller, you might need to reorganize the conveyors listed in the Lane Clear Table so that it will merge the Slug4 lane first, then the Slug3 lane, etc. (You might also need to expand the column sizes so that you can read the full conveyor names.) To change the release order, right-click the lane you want to move and select the appropriate movement form the table.
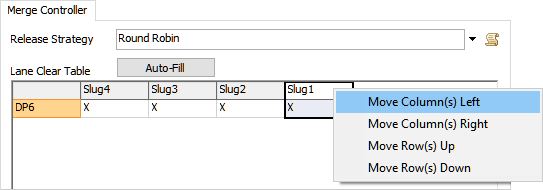
Run the simulation. Notice that the fourth lane will get released first, then the third lane, and so forth. Even if a lane is ready for release, it will need to wait for its turn in the round robin schedule.
Conclusion
Now that you've learned some of the techniques for creating effective merging conveyor systems, you'll learn how to add and remove gaps in between flow items in a conveyor system. Gapping will be covered in the next tutorial. Continue on to Tutorial Task 1.3 - Adding and Removing Gaps.