Task 1.3 - Tasks Using Lists
Task Overview
In this task, you'll learn how to build tasks using lists in a process flow. Lists have the advantage of allowing you to sort or prioritize tasks using your own custom criteria. This tutorial will also include a discussion of the pros and cons of building tasks with lists.
When you're finished, your simulation model will operate similar to the following model:
Step 1 Copy and Modify the 3D Model
In this step, you'll copy the system you used to build the basic Process Flow logic. When you're finished, your 3D model should look similar to the following image:
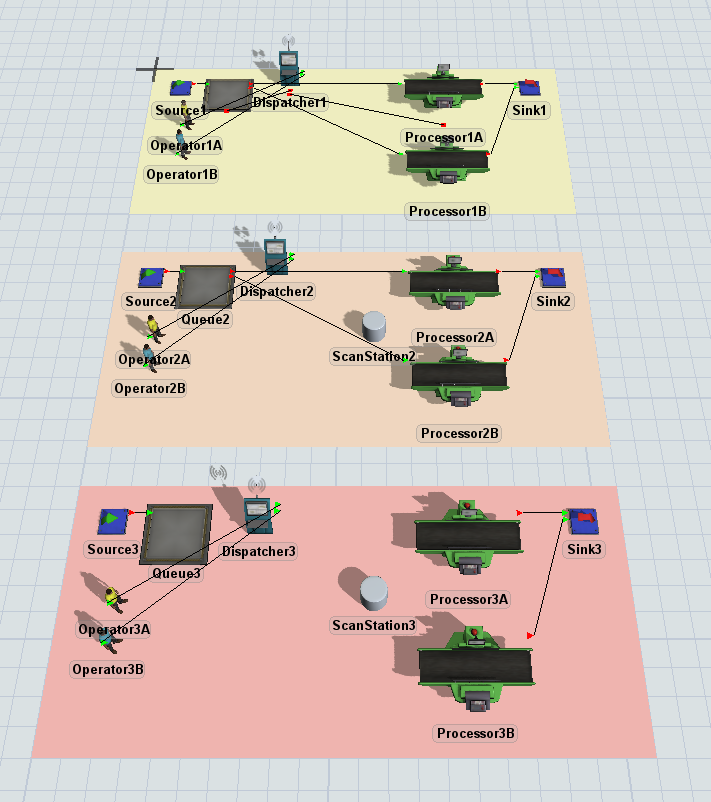
- Click the BasicProcessFlowLogic plane to select it. (It's the orange one.)
- Press Ctrl+C to copy the plane and all the objects on it. Click somewhere blank in the model to de-select the original plane. Press Ctrl+V to copy the plane.
- With the copied plane selected, in Quick Properties, change the name of the plane to ListLogic.
- Click the arrow next to the color box to open the color selector menu. Choose the lightest shade of red.
- Rename each of the 3D objects on the copied plane, replacing any 2 numbers with a 3, such as Queue3, Operator3A, Processor3A, etc.
- Now remove the port connections from Queue3 to Processors 3A and 3B. (Press and hold the Q key while clicking two connected objects to remove this connection.)
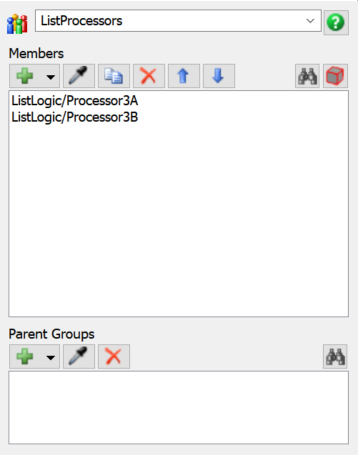
- Right-click Processor3A to open a menu. Point to Object Groups and select Add to New Group.
- In the group properties window, change the name of the group to ListProcessors. (You can re-navigate to this properties window by going to the Toolbox tab, next to the Library tab, and finding the Group under your Groups section, and double-clicking on the group.)
- Click the Sampler button
 to enter sampling mode.
 - In the 3D model, click Processor3B to sample it and add it to the group.
- Close the group properties window.
Check to ensure that your 3D model looks similar to the image shown at the beginning of this step.
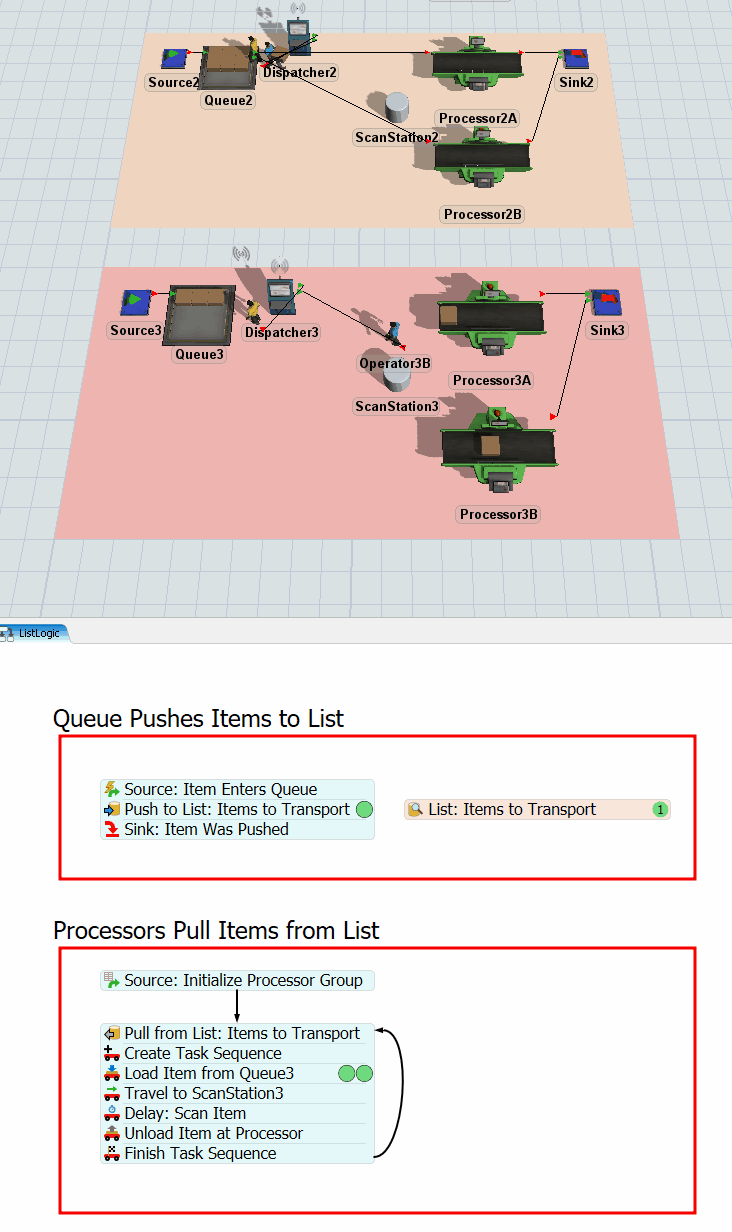
Step 2 Create Tasks Using Lists
In this step, you'll add activities to a general process flow to build a process flow that uses lists to create transportation task logic.
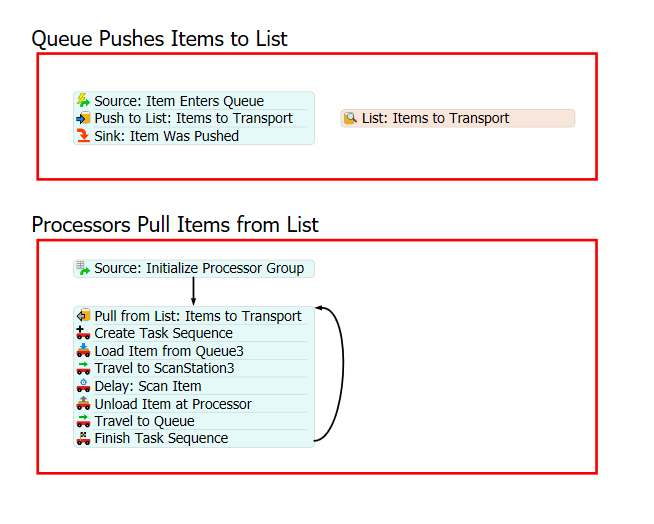
When you're finished, your process flow should look similar to the following image:
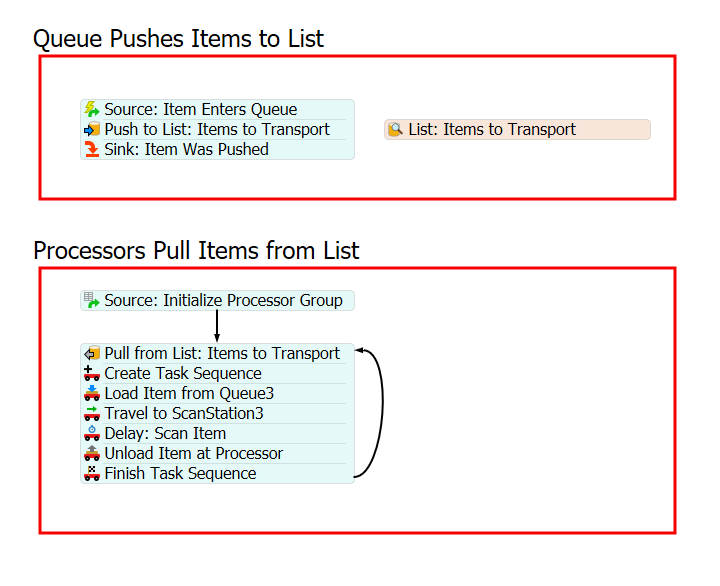
For now, you'll merely add and connect these activities to the process flow. You'll edit the properties to add the functionality in a later step.
To add and connect these activities:
- On the main toolbar, click the Process Flow button to open a menu. Select Add a General Process Flow.
- Click a blank space in the process flow so that nothing is selected. In Quick Properties, change the name of the process flow to ListLogic.
- With the process flow open and active, drag two Process shapes from the Library (under Flowchart).
- In Quick Properties, change the name of the first shape to Queue Pushes Items to List.
- Click the arrow next to the Color box to change it to red. You'll use red because it matches the color of the ListLogic plane.
- Change the name of the second shape to Processors Pull Items From List. Repeat the previous step to change the color of the second shape to red as well.
- In the Queue Pushes Items to List shape, add the
following activities to create a stacked block:
- An Event-Triggered Source (under Token Creation)
- A Push to List (under Shared Assets)
- A Sink (under Basic)
- Add a List shared asset to the right of the stacked block.
- Rename the activities and shared assets as follows:
- In the Processors Pull Items From List shape, create a Schedule Source (under Token Creation)
- Under the newly-created stacked block, create a second stacked block with the
following activities:
- A Pull from List (under Shared Assets)
- A Create TS (under Task Sequences)
- A Load (under Task Sequences)
- A Travel (under Task Sequences)
- A Delay (under Task Sequences)
- An Unload (under Task Sequences)
- A Finish TS (under Task Sequences)
- Rename the activities and shared assets as follows:
- Create a connector going from Source: Initialize Processor Group to Pull from List: Items to Transport.
- Create a connector going from Finish Task Sequence that loops back to Pull from List: Items to Transport.

| Activity | New Name |
|---|---|
| List | List: Items to Transport |
| Source (Event Triggered) | Source: Item Enters Queue |
| Push to List | Push to List: Items to Transport |
| Sink | Sink: Item Was Pushed |
| Activity | New Name |
|---|---|
| Source (Schedule) | Source: Initialize Processor Group |
| Pull from List | Pull from List: Items to Transport |
| Create TS | Create Task Sequence |
| Load | Load Item from Queue |
| Travel | Travel to ScanStation |
| Delay | Delay: Scan Item |
| Unload | Unload Item at Processor |
| Finish TS | Finish TS |
Check to make sure your process flow looks similar to the image shown in the beginning of this step.
Step 3 Create the Push to List Logic
One thing to keep in mind when working with lists is that they are slightly more complex because you are usually working with more than one flow. The term flow here refers to two different streams of tokens that will move through the process flow. One flow of tokens will manage the flow of items in the 3D model, pushing them to the task list when they're ready for transport. Another flow of tokens will manage the flow of the operators in the 3D model, directing them to pull items from a list and complete a series of tasks.
In this step, you'll edit the properties for the activities in the Queue Pushes Tasks to List process flow. These activities will essentially control the flow of items that need to be transported. Simply put, when a flow item enters the queue, it will get pushed to a list where it will wait indefinitely until it can be transported.
The following is an overview of how each activity and shared asset will function:
| Activity | Explanation |
|---|---|
| List: Items to Transport | This list will store a reference to all the flow items in Queue3 that are ready to be transported to a processor. |
| Source: Item Enters Queue | The Event-Triggered Source is an event-listening activity that will listen to events in the 3D model. When a flow item enters Queue3, this activity will create a token and release it to the next downstream activity. You'll assign a label to this token named FlowItem that will contain a reference to the specific flow item that triggered the event. |
| Push to List: Items to Transport | This activity will push all flow items that are in the queue onto the Items to Transport list. When the items get pushed to the list, they will retain the reference to the specific flow item using the FlowItem label. |
| Sink: Item Was Pushed | This activity removes the token from the process flow. You'll use its default settings. |
To create this functionality:
- Click the Source: Item Enters Queue activity to select
it. Click the Exclamation Point button
 to enter sampling mode.
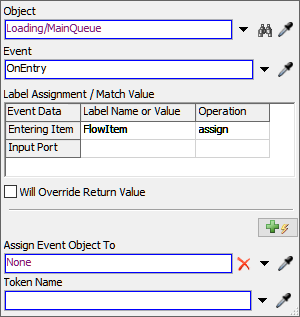
 - In the 3D model, click Queue3 to open a menu. Select Queue3: On Entry.
- In Quick Properties, in the Label Assignment table, click the cell that is on the Entering Item row under the Label Name or Value column. Type FlowItem.
- Click the cell that is on the Entering Item row under the Operation to open a menu. Select assign.
- Click the Push to List: Items to Transport activity to
select it. Click the Exclamation Point button
to enter sampling mode.
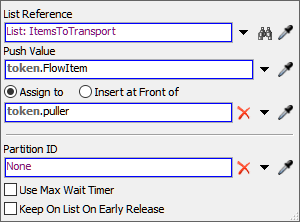
- Click the List: Items to Transport shared asset to select it. A blue line will now link this activity to the shared asset.
- In Quick Properties, click the arrow next to the Push Value box to open a menu. Point to Token Label, then select FlowItem.
In the next step, you'll set up the logic that will cause the operators to pull items from the list and begin the transportation tasks.
Step 4 Create the Pull from List Logic
In this step, you'll edit the properties for the activities in the Processors Pull Tasks From List process flow. In the previous step, you learned how process flows that use lists usually have more than one flow of tokens. In this process flow, one flow of tokens will control the flow items and one will control the processors and operators.
In this step, you'll design the logic that controls the processors and operators. This set of activities will pull an item from the list and tell an operator to transport that item. Notice how in the previous process flow, the tokens represented flow items. In this process flow, the tokens will represent the processors making requests for items.
The following is an overview of how each activity and shared asset will function:
| Activity | Explanation |
|---|---|
| Source: Initialize Processor Group | When the simulation starts, this activity will create a token for each processor in the ListProcessors group. It will assign one of the members of the processor group to a label on each of those tokens. |
| Pull From List: Items to Transport | This activity will pull a flow item from the Items to Transport list. You'll assign the token a label called TransportedItem that will contain a reference to the flow item that was pulled from the list. |
| Create Task Sequence | This will initialize the sequence of tasks to be assigned to the dispatcher and then operators. |
| Load Item from Queue | This activity tells the operator which flow item needs to be picked up and where it is located. |
| Travel to ScanStation | This activity will tell the operator to travel to the ScanStation3 object. |
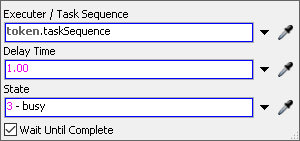
| Delay: Scan Item | This activity will simulate the amount of time that it takes to scan the flow item in the computer. You'll set the delay to 1 second. |
| Unload Item at Processor | This activity tells the operator where to unload the flow item. When this task is finished, the token will loop back to the Pull From List activity and the process will repeat itself. |
| Finish Task Sequence | This activity designates the series of tasks as finished, so the operator can be assigned a new task sequence. |
To create this logic:
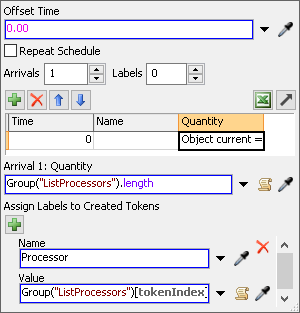
- Click the Source: Initialize Processors Group activity to select it. In Quick Properties in the Arrivals table, click the cell under the Quantity column. With that cell selected, click the arrow next to the Arrival 1: Quantity box and type Group(“ListProcessors”).length.
- In this properties window, click the plus sign to add a new label to the created tokens. In the Name box, write Processor. Now in the Value box type, Group(“ListProcessors”)[tokenIndex].
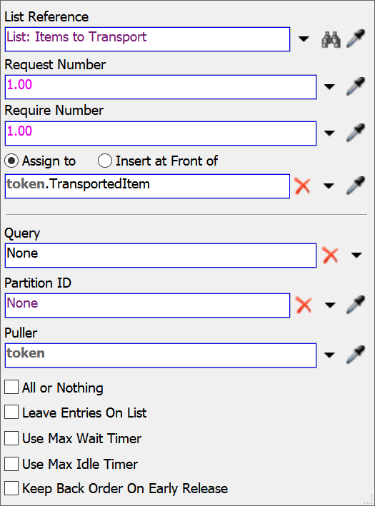
- Click the Pull from List: Items to Transport activity
to select it. Click the Exclamation Point button
next to the activity to enter
sampling mode.
- Click the List: Items to Transport shared asset to select it. A blue line will now link this activity to the shared asset.
- In Quick Properties, under the Assign To button, delete
the current text and type
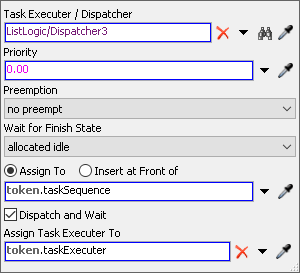
token.TransportedItem. - Click the Create Load Unload Task activity to select it.
In Quick Properties, next to the Task Executer / Dispatcher box,
click the Sampler button
to enter sampling mode.
- In the 3D model, click Dispatcher3 to open a menu. Select ListLogic/Dispatcher3. Leave the rest of the options in the Create Load Unload Task activity as their defaults.
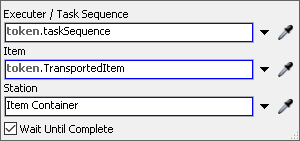
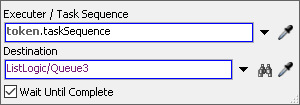
- Click the Load Item from Queue activity to select it. In the Quick Properties make sure the default for Executer / Task Sequence reads token.taskSequence.
- Click the arrow next to the Item box to open a menu. Point to Token Label and select TransportedItem.
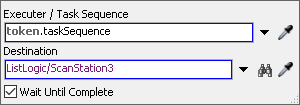
- Click the Travel to ScanStation activity to select it. In the Quick Properties make sure the default for Executer / Task Sequence reads token.taskSequence.
- Next to the Destination box, click the
Sampler button
to enter sampling mode.
- In the 3D model, click ScanStation3 to open a menu. Select ListLogic/ScanStation3.
- Click the Delay activity to select it. In the Quick Properties make sure the default for Executer / Task Sequence reads token.taskSequence.
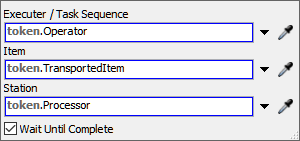
- Click the Unload Item at Processor activity to select it. In the Quick Properties make sure the default for Executer / Task Sequence reads token.taskSequence.
- Click the arrow next to the Item box to open a menu. Point to Token Label and select TransportedItem.
- Click the arrow next to the Station box to open a menu. Point to Token Label and select Processor.
- We can leave the Finish Task Sequence with its default settings.
Reset and run the model:
As you can see, the process flow that uses a list can do everything that the process flow that only uses resources can do. The two models operate identically. The only disadvantage of using the list logic is that it is a little more complicated to set up initially. Lists require you to think through your logic more thoroughly.
But what are some of the advantages of using a list? One main advantage of using lists is that you can build in some fairly complex logic into it. You can use lists to prioritize certain tasks, to assign tasks to operators based on list fields, to sort tasks, and much more. The next step will demonstrate how you can use lists to sort transportation tasks by priority.
Step 5 Use Labels to Prioritize Tasks
In this step, you'll use lists to add a priority level to flow items. The operators will transport flow items with a high priority before flow items that do not have a high priority. To create this logic, you'll add a label to all of the flow items called RushOrder. This label will have either a true or false value (where 1 is true and 0 is false) to indicate whether the flow item is a rush order or not. You'll set it so that 30% of the items are rush orders. You'll also change the color of the rush order items to red so that you can see the logic more visibly.
Lastly, you'll edit the properties of the Pull From List: Items to Transport activity so that the operators will transport rush order items first. You'll create this logic by adding a query to this activity where items with a higher RushOrder value will get pulled from the list first.
To create this logic:
- In the 3D model, double-click Source3 to open its properties window.
- On the Triggers tab, click the Add button
 to open a menu. Select the
On Creation option to add this trigger.
to open a menu. Select the
On Creation option to add this trigger. - Next to the OnCreation box, click the
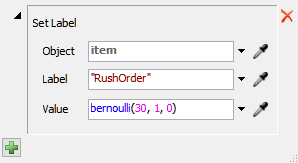
Add button
to open a menu. Point to Data, then select
Set Label. A picklist options window will appear.
- In the Label box, delete the current text and type
"RushOrder". - In the Value box, delete the current text and type
bernoulli(30, 1, 0). - On the Triggers tab, click the Add button
to open a menu. Select the
On Exit option to add this trigger.
- Next to the OnExit box, click the
Add button
to open a menu. Point to Visual, then select
Set Color By Case. A picklist options window will
appear.
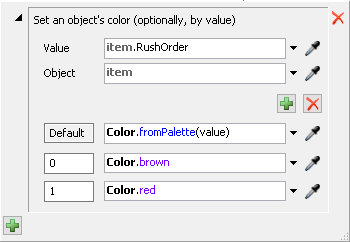
- In the value box type item.RushOrder. Make sure the Object box says item.
- Click the Add button box twice to create two new entries.
- In the box right under the one that reads Default, write
the number
0. In the box right below that write1 - Now in the box next to the number
0, click the black arrow, and select the option Color.brown. - In the bottom box below that, click the black arrow and select the option Color.red. The window should appear as follows.
- Press the OK button to save the changes and close the properties window.
- Returning back in the Quick Properties for the list shared asset, click the Advanced button to open the list properties.
- On the Fields tab, click the
Add button
to open a menu. Select Label to add a label field to the
list.
- In the Label Field box, delete the current text and
type
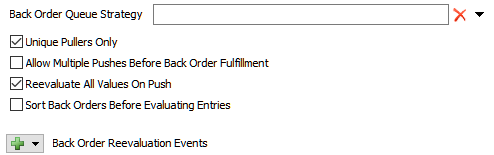
RushOrder. - On the Back Orders tab, check the Reevaluate All Values On Push checkbox.
- Click the OK button to save the changes and close the window.
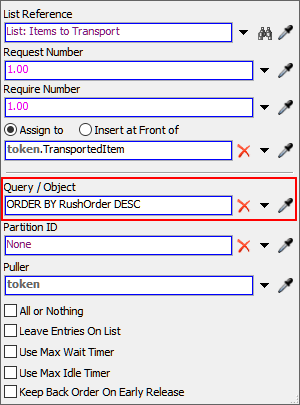
- In the ListLogic process flow, click the Pull from
List: Items to Transport activity to select it. In Quick Properties, click the
arrow next to the Query / Object box to open a menu. Point
to ORDER BY (Sort) and select
RushOrder. In the query that now shows up in this box,
change the
ASCtoDESC. - Before you run the model, it might help to open the list entries so that you can view it during the simulation run. Click the List: Items to Transport shared asset to select it. In Quick Properties, click the View Entries button.

Reset and run the model. Pay attention not just to the 3D model, but what is happening on the list's entries as well.
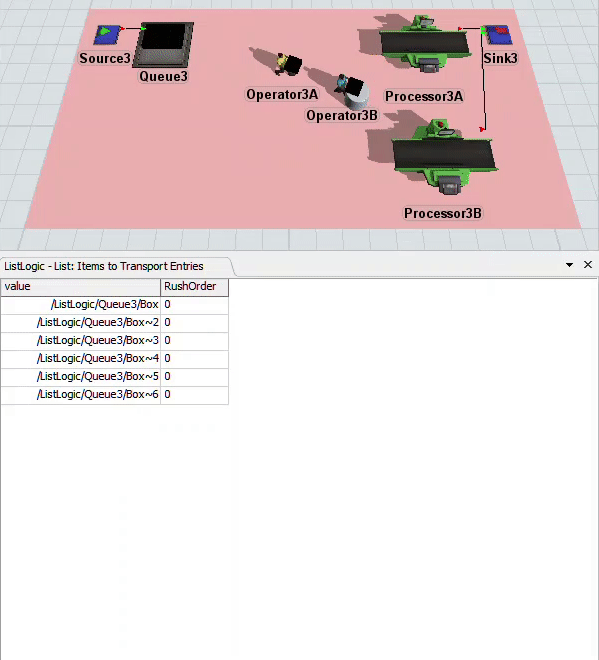
Notice that the operators always prioritize transporting the red rush order items before other items. If they don't pick up a rush order item immediately, it's usually because the rush order item arrived in the queue after the operator's token reached the Pull from List activity.
Lists enable you to build this kind of complex task logic. They can be ideal for systems in which task executers need to sort, filter, or prioritize tasks.
Step 6 Add an Additional Task
As you noticed in the previous task, every once in a while the task executers don't pick up one of the rush order flow items in the queue. This problem is caused by subtle timing issues where the rush order item arrived in the queue after the task executer had already begun the loading task. You can fix this problem by simply adding a Travel activity before the Pull From List activity. That way, the task executer will travel back to the queue before pulling an item from the list, which will ensure that high priority items are always picked first.
When you're finished, your process flow will look similar to the following image:
To make these changes:
- With the process flow open and active, drag a Travel activity between the Unload and Finish Task Sequence activities
- Rename this activity Travel to Queue.
- In Quick Properties, check to make sure the Executer / Task Sequence box reads token.taskSequence.
- Next to the Destination box, click the
Sampler button
to enter sampling mode.
- In the 3D model, click Queue3 to open a menu. Select ListLogic/Queue3 to sample it.
Reset and run the model:
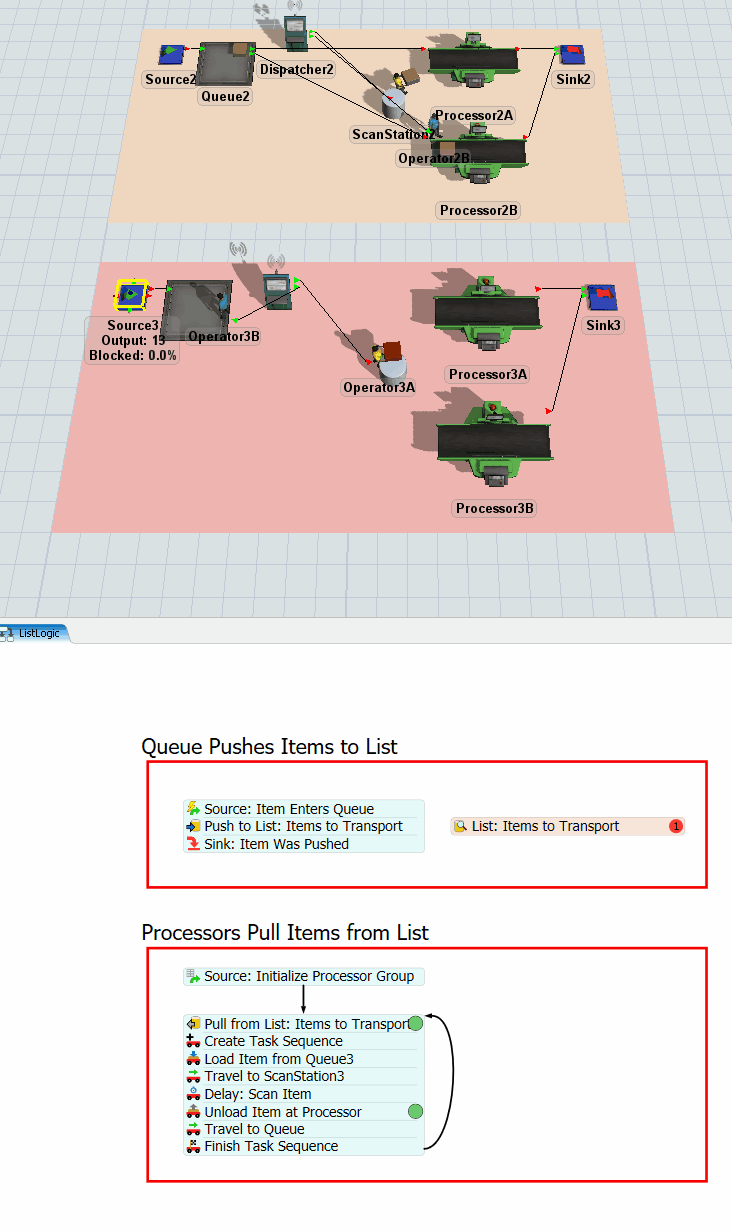
Now the operators always pick up the rush order items whenever one is in the queue. The key take-away from this step is to remember that task order and sequencing is important. It can affect the behavior of operators in subtle, but important ways.
Conclusion
Now that you've built transportation tasks using lists in a process flow, you can see that it has a few important things to note:
- You can sort and prioritize tasks - Lists give you the ability to create more complex task logic, such as determining which tasks should be completed first.
- More Complex - Lists can sometimes be a little more complicated to set up because you have to think through how your logic will work on a deeper level. There's more elements or token flows that you have to consider when setting up your list logic. For example, you have to think through the logistics of which events in the simulation model will cause something to be pushed to a list and which events will cause something to be pulled from that list. You also have to think more carefully about what the tokens in the process flow will be linked to in the 3D model. (For example, do they represent flow items or task executers, etc.).
- Might not always behave like you expected - Sometimes the timing of events or the sequence of tasks can affect the behavior of the operators in ways that you didn't expect. However, process flows are fortunately fairly easy to troubleshoot and fix when unexpected behaviors occur.
Up to this point, you've learned how to use local lists to create task logic. In the next tutorial, you'll learn how to use global lists to explore even more possibilities for building different types of task logic. Continue to Tutorial Task 1.4 - Tasks Using Global Lists.