Task 4.2 - Create Clones Using Copy and Paste
Task Overview
In the previous tutorial task, you built a sticker machine that could run continuously while a roll operator refilled rolls of stickers. Now that you've successfully created one sticker machine system, you need to simulate a plant that has multiple sticker machines. That means you'll need to make clones of the objects in your 3D model as well as the process flows that control them.
There are many different ways you can clone objects and process flows in a simulation model, but some methods are more efficient than others. This task will guide you through the method that most people intuitively consider using when they need to make clones: copy and paste. This task will teach you some best practices that can be useful if you intend to use the copy and paste method.
The copy and paste method will work well for small models or simple process flow logic. However, by the time you are finished with this task, you might begin to see how the copy and paste method can become difficult to manage and scale once you begin building complex simulation models. The next tutorial task will teach an alternative method that uses process flow instances to clone process flow logic on multiple objects.
Step 1 Copy and Paste Multiple 3D Objects
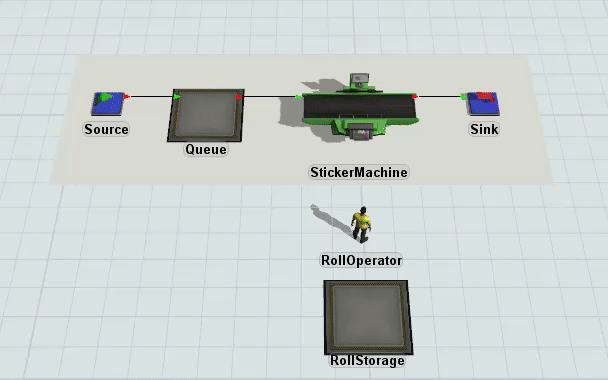
The first two steps in this task will cover the copy and paste method for cloning 3D objects and process flows. In this step, you'll learn how to copy multiple 3D objects and process flows at the same time. This step of the task will also demonstrate how to use a few visual objects and tools to organize your different sticker machine systems so that you don't confuse one system for another.
One visual object that you'll use in this step is the plane. Planes are useful because:
- They can act as containers for objects in the 3D model, making it easier to maintain the model. When you set up a plane as a container, you can move, copy, or delete all the objects inside the plane at the same time.
- You can use a plane as a visual reference to organize sections of your 3D model. You can change the color of planes to distinguish one area in your model from another, which also helps with model maintenance.
In this step, you'll use a plane to make the process of copying your sticker systems a little easier. You'll also use planes to visually distinguish one sticker system from another.
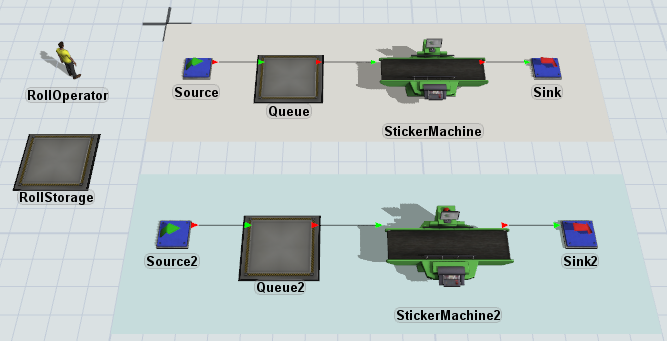
When you're finished with this step, your 3D model should look approximately like the following image:
To copy your sticker system:
- Make sure your simulation model is open and that you can clearly see the 3D model view.
- In the Library under the Visual group, drag a Plane into your model and position it under the objects.
- Click the plane to select it. Using the colored cones, resize the plane so that it is centered underneath all the objects, except the RollOperator and RollStorage queue.
- In your 3D model, hold the Shift key and draw a box over all the objects to select them. A red box will appear around the selected objects.
- Hold the Ctrl key and click the Plane to deselect it. It will still have a yellow border around it to indicate that it is the currently highlighted.
- On the main menu, click View, then Edit Selected Objects. This tool will open in the right pane (where you normally see Quick Properties).
- Under the Edit group, click the Move into Highlighted button.
- Click the X in the corner of the Edit Selected Objects pane to close this tool and return to Quick Properties.
- Hold the Shift key and click in a blank area of the model to deselect the objects.
- Test to ensure that you successfully moved the objects into the plane by clicking the plane and moving it around. If you were successful, all the objects should move together when you move the plane. Move the plane so that it is to the right of the RollOperator and RollStorage queue.
- In the 3D model, hold the Shift key and draw a box around the Plane and all the objects inside it. A red box will appear around the selected objects.
- Press Ctrl+C to copy it to the clipboard.
- Position your mouse in the approximate area of the model where you want to place the copied objects. Press Ctrl+V to paste the plane.
- Hold the Shift key and click in a blank area of the model to deselect the objects.
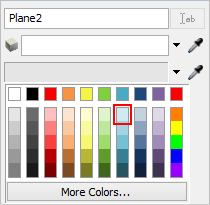
- Click the second Plane to select it. In Quick Properties, change its name to Plane2.
- Then, click the arrow next to the color box to open the color selector. Select the lightest blue color.
- Rename all of the objects inside Plane2 so that there is a 2 after the object name. For example, Source should become Source2, Queue should become Queue2, etc.

Check that your 3D model looks similar to the image at the beginning of this step.
Step 2 Copy and Paste the Process Flows
Now that you've successfully copied your 3D objects, you'll copy the process flows in this step. You'll update the actual activity properties in a later step.
This step will also demonstrate other visual tools that you can use to keep your process flows organized and easy to maintain. Fortunately, flowchart shapes act just like planes do in the 3D model: they can act as containers so that you can easily move, copy, or delete all the activities inside the shape. Like planes, you can change the visual display of flowchart shapes to help you keep your process flow well-organized. In this step, you'll change the color of the copied shapes to match the light blue color of the second plane you created in the 3D model in Step 1.
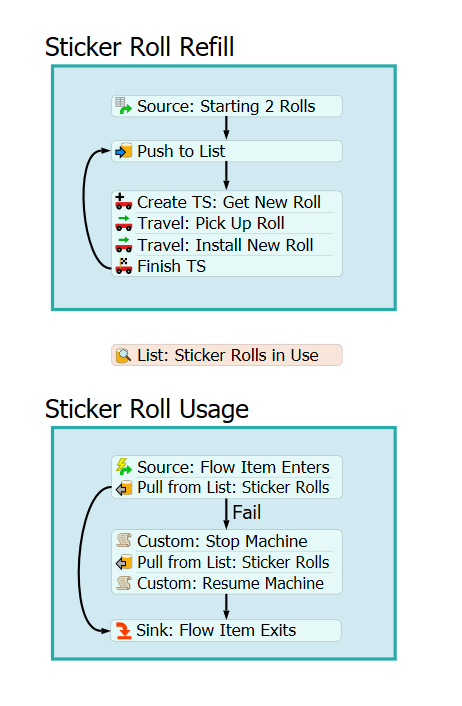
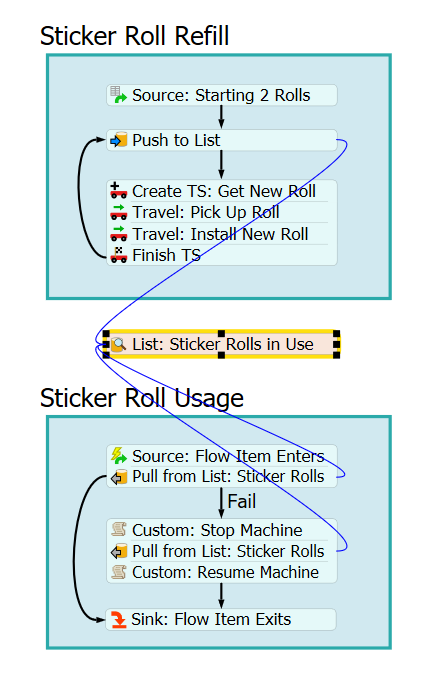
When you're finished, your copied process flows should look like the following image:
To create these copies:
- With the process flow open, click the Sticker Roll Refill shape to select it.
- Press Ctrl+C to copy it to the clipboard.
- Position your mouse in the approximate area of the process flow where you want to place the copied shape. Press Ctrl+V to paste the shape.
- Rename this shape Sticker Roll Refill 2.
- With Sticker Roll Refill 2 still selected, in Quick Properties check the Fill checkbox.
- Click the arrow next to the Color box to open the color selector. Select the lightest blue color (to match the color of Plane2).
- Repeat steps 1-6 for the Sticker Roll Usage shape (renaming it Sticker Roll Usage 2).
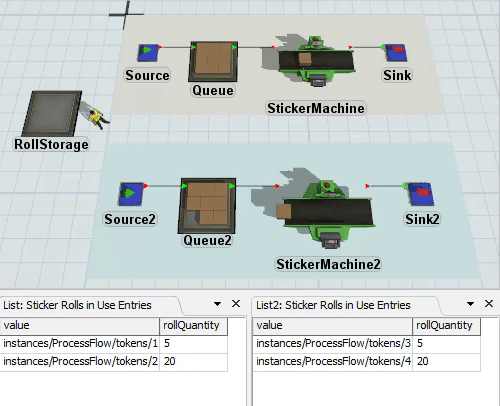
- Click the List: Sticker Rolls in Use to select it.
- Press Ctrl+C to copy it to the clipboard.
- Position your mouse in between Sticker Roll Refill 2 and Sticker Rolls Usage 2. Press Ctrl+V to paste the list.
- Rename the list List 2: Sticker Rolls in Use.
Check that your process flow looks similar to the image at the beginning of this step.
Step 3 Update the Copied Process Flow Activities
In this step, you'll update the properties of the activities in the copied process flows. Be aware that you might want to split the model view between the process flow and the 3D model for this step.
To update the properties in this process flow:
- In the Sticker Roll Refill 2 process flow, click the
Push to List: Sticker Rolls. (Notice that it is still
linked to the list in the original process flow.) In Quick Properties:
- Click the Sampler button
 next to the
List Reference box to enter sampling mode.
next to the
List Reference box to enter sampling mode. - Click List 2: Sticker Rolls in Use to link it to the Push to List activity.
- Click the Sampler button
- Repeat the previous step for the two Pull from List activities in the Sticker Roll Usage 2 process flow.
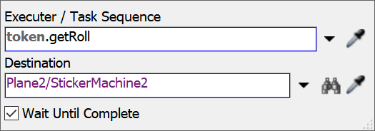
- Click the stacked block of Task Sequence activities in the Sticker Roll Refill 2 process flow to select them.
- In Quick Properties under Travel:
Install New Roll, click the Sampler button
next to the
Destination box to enter sampling mode. Click
StickerMachine2 in the 3D model to open a menu. Select
Plane 2/StickerMachine2 from the menu.
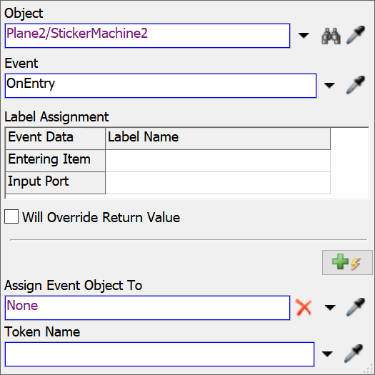
- Click the first stacked block in the Sticker Roll Usage 2 process flow to select it.
- In Quick Properties under Source:
Flow Item Enters:
- Click the Sampler button
next to the
Object button.
- Click StickerMachine2 in the 3D model to open a menu. Select StickerMachine2: On Entry from the menu.
- Click the Sampler button
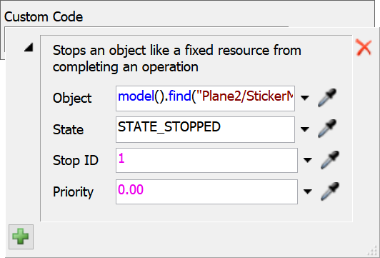
- Click the second stacked block in the Sticker Roll Usage 2 process flow to select it.
- In Quick Properties under Custom:
Stop Machine:
- Click the Edit Properties button
 next to the
Custom Code box.
next to the
Custom Code box. - Click the Sampler button
next to the
Object box to enter sampling mode.
- Click StickerMachine2 in the 3D model to select it.
- Click the Edit Properties button
- Repeat the previous step for the Custom Code: Resume Machine activity.
Step 4 Run and Test the Simulation Model
Now it's time to test the model to make sure that it's running correctly. Before you run the model, open the entries for both of the Sticker Rolls in Use List so that you can see the lists in action.
Now reset and run your model and watch it in action.
The two sticker machine systems should operate nearly identically.
Conclusion
Now that you've tried cloning your simulation model using the cut and paste method, you are probably aware of some of its advantages and disadvantages. In the next task, you'll learn an alternative method for cloning simulation models using process flow instances. Hopefully after the next step, you'll see how using process flow instances is superior to the cut and paste method. Continue on to Tutorial Task 4.3 - Create Clones Using Instances.