Storage Object
Overview and Key Concepts
The Storage Object is a parent class of several objects that are used to store flow items in a two dimensional grid of storage locations, called slots. These slots are organized, first by bay, then by level, and finally by position/slot number.
The Storage Object is an abstract class, meaning you do not create instances of this specific class directly. Rather, the Storage Object is a parent class of the Rack, Floor Storage, Gravity Flow Rack, Push Back Rack, and Drive In Rack classes. Thus, when you create an instance of one of these classes, you are inherently creating an instance of a Storage Object.
The Storage Object is a Fixed Resource. However, fixed resource functionality is turned off by default. You can enable it through the Flow Tab, or merely by connecting other fixed resources to it using an 'A' connection. When fixed resource logic is enabled, the storage object receives flow items through its input ports until its maximum content value is met. When each flow item enters the rack, it executes the minimum dwell time function for that item. This function returns the minimum stay time for that flow item. The rack starts a timer for that amount of time. After the timer expires, the rack releases the flow item.
Events
For information on events, see the Event Listening page.
The Storage Object is a Fixed Resource, and uses the standard events that are common to all fixed resources. See Fixed Resources - Events for an explanation of these events.
The Storage Object has the following additional events:
Minimum Dwell Time
This event occurs when the Minimum Dwell Time field is evaluated. It is only evaluated if a storage object's Use as Fixed Resource checkbox is selected.
It has the following parameters:
| Parameter | Type | Description |
|---|---|---|
| Item | Object | The entering item, which will be assigned a dwell time |
| Port | int | The input port number for the entering item |
This event returns the minimum dwell time for the specified item.
On End Dwell Time
This event occurs when an item has reached its minimum dwell time. After this event, the storage object will release the item. It is only evaluated if the storage object's Use as Fixed Resource checkbox is selected.
It has the following parameters:
| Parameter | Type | Description |
|---|---|---|
| Item | Object | The item that has just completed its dwell time |
On Slot Assign
This event occurs when an item is assigned to a specific slot in this object, i.e. when the Storage.Item.assignedSlot property of the item is set.
It has the following parameters:
| Parameter | Type | Description |
|---|---|---|
| Slot | Storage.Slot | The assigned slot |
| Item | Object | The assigned item |
On Slot Entry
This event occurs when an item enters a specific slot. It occurs at essentially the same time as the On Entry event, however, it is executed after a slot has been assigned. The slot is therefore a parameter of the event.
It has the following parameters:
| Parameter | Type | Description |
|---|---|---|
| Slot | Storage.Slot | The associated slot |
| Item | Object | The entering item |
On Slot Exit
This event occurs when an item exits a specific slot. It occurs at essentially the same time as the On Exit event, however, it is executed specifically associated with the slot that is being exited. The slot is therefore a parameter of the event.
It has the following parameters:
| Parameter | Type | Description |
|---|---|---|
| Slot | Storage.Slot | The associated slot |
| Item | Object | The exiting item |
Slot Assignment Strategy
This event occurs when the respective Slot Assignment Strategy field is evaluated.
It has the following parameters:
| Parameter | Type | Description |
|---|---|---|
| Item | treenode | The entering item, which will be assigned a bay or level |
The execution of this field is responsible fore finding a proper slot to place the item into, and assigning the item to that slot by setting the Storage.Item.assignedSlot property.
States
The Storage Object does not implement any states. Instead, use the content graph to get statistics.
Statistics
The Storage Object uses the standard statistics that are common to all fixed resources. See Fixed Resources - Statistics for an explanation of these statistics.
Properties
The Storage Object has six tabs with various properties. The last three tabs are the standard tabs that are common to all 3D Objects. For more information about the properties on those tabs, see:
The Storage Object additionally includes a Flow tab. While this tab primarily includes the same properties as any standard Fixed Resource's Flow Tab, the Storage Object includes additional properties that enable standard fixed resource logic. These unique properties are explained in the Flow section below.
The remaining two tabs, the Storage Object tab and the Dimensions tab are unique to Storage Objects. The properties on these tabs will be explained in more detail in the next sections.
The Storage Object Tab
The Storage Object Tab includes the following properties.
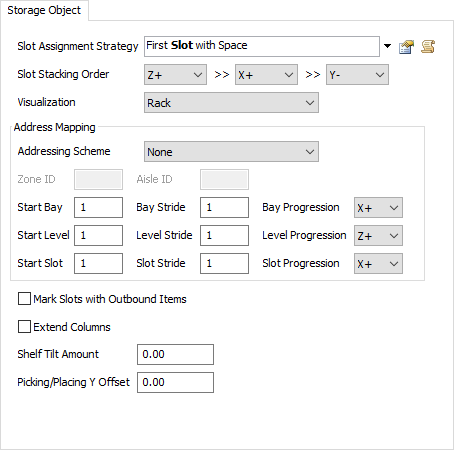
Slot Assignment Strategy
The Slot Assign Strategy is evaluated when a flow item arrives in a storage object and must be assigned a slot. Note that the slot assignment strategy is evaluated only if a flow item is placed into the storage object without having been assigned a slot. If the flow item has already been assigned a slot, through setting the Storage.Item.assignedSlot property, then that assigned slot will take precedence and the slot assignment strategy will not be evaluated.
Slot Stacking Order
The Slot Stacking Order defines how items will be stacked within an individual slot. The user can define one or more axes by which to stack items. The items will be stacked in the order of the axes defined. Example settings are shown below.
| Slot Stacking Order | Sample |
|---|---|
| X+ >> Y+ >> Z+ | 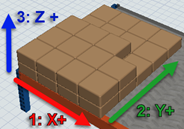 |
| Z+ >> X+ >> Y- | 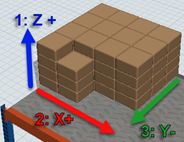 |
Note that the slot stacking order is only visible on Racks and Floor Storage objects. For Gravity Flow Racks, Push Back Racks, and Drive-In Racks, the stacking order is inherent in the nature of the rack type.
Visualization
The object's Visualization defines how a storage object should appear in the 3D view. Choose from a list of pre-defined (or custom-defined) visualizations that are defined on the Storage System in the toolbox.
Addressing Scheme
The object's Addressing Scheme defines which of the Storage System's potentially multiple addressing schemes is applicable to this storage object. Note that you only need to define this property if your model accesses slots directly by their address, specifically using the Storage.system.getSlot() method.
Zone ID
The object's Zone ID defines the zone ID of the object, in relation to its address scheme. The Zone ID, in conjunction with the Aisle ID, allow you to uniquely address slots in a storage object.
Aisle ID
The object's Aisle ID defines the aisle ID of the object, in relation to its address scheme. The Aisle ID, in conjunction with the Zone ID, allow you to uniquely address slots in a storage object.
Start, Stride, and Progression
For the object's bays, levels, and slots, you can define start, stride, and progression settings. These properties work in combination to enable unique addressing of the slots. The Start properties define the number (or letter) that is associated with the first bay/level/slot in the storage object. The Stride properties define how many addresses to skip over when progressing from a given bay/level/slot its next neighboring bay/level/slot. The Progression properties are used to define the direction in which the bays/levels/slots progress, relative to the storage object's local coordinate system.
Below are some examples of how you might use these properties to properly define your addressing system.
- Distinguish Left and Right Side of an Aisle - In many warehouses, the left vs. right side of an aisle are distinguished by the even-odd-ness of the bay numbers. For example, even bay numbers may indicate that the shelf is on the left side of the aisle, while odd bay numbers indicate a shelf on the right side. To accomplish this, you give the storage object on the left side a Start Bay of 2, and a Bay Stride of 2. This means that the "first" bay in that object is numbered 2, the next bay is numbered 4, and so forth. For the object on the right side of the aisle, you give it a Start Bay of 1, and a Bay Stride of 2. This means that the "first" bay in that object is numbered 1, the next bay is numbered 3, and so forth. Thus you can define even bays on the left and odd bays on the right.
- Define Proper Bay Progression for Both Sides of an Aisle - The Bay Progression property allows you to make sure that bay numbers "progess" properly for storage objects on both sides of an aisle. As a picker travels down an aisle, the bay numbers on the right side should progress the same as those on the left side. However, if storage objects in an aisle are oriented so that their pick faces are directed into the aisle, the default Bay Progression setting (X+) causes their bay numbers to increase in opposite directions. Thus, by changing the Bay Progression of one of the storage objects in an aisle to X-, you can make the bay numbers increase in the same direction.
- Define Level "1" Above the Ground - In some warehouses, or in specific racks, you are not allowed to store items on the floor. Further, level "1" is the first level above the ground. In FlexSim, the "first" level of a storage object is at the base of the object, i.e. on the floor. Thus, to customize the object for this situation, first define all slots on this "ground" level as unstorable, then set the object's Start Level to 0. This means that the first level with storable slots, which is above ground, will be numbered 1.
Mark Slots with Outbound Items
This checkbox will highlight slots that have outbound items in a red color.
Extend Columns
If this box is checked, the object's support columns will be drawn extending above the top shelf. This property is not applicable with Floor Storage objects.
Shelf Tilt Amount
This number defines the amount of tilt of items placed in a given slot of the rack. This mostly used in Gravity Flow and Push Back Racks, products slide down from the back of the rack to the front. This property is not applicable with Floor Storage objects.
Picking/Placing Y Offset
This value is used to configure how close transport objects come to the storage object when they drop off or pick up flow items from the rack. This is especially useful if operators are used to drop off and pick up from the rack, because often they will walk into the middle of the rack to get a flow item. Specify a value of 1, for example, and the operators will keep better distance from the rack when dropping off and picking up flow items. This property is not applicable with Floor Storage objects.
Flow Speed
Flow Speed is only visible on Gravity Flow or Push Back Racks. This property defines the speed by which items flow down the rack. Unless using fixed resource logic, this property is purely for animation purposes, and does not affect model results.
The Dimensions Tab
The Dimensions Tab lets you define the dimensions of the slots that make up the storage object. Bay, level, and slot sizes and counts can be defined individually or across the entire object.
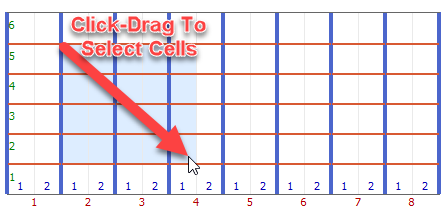
The main pane at the top of this tab displays the dimensions of the bays, levels, and slots as they appear when facing the object's pick face. There are also color-coded numbers showing bay, level and slot numbers.
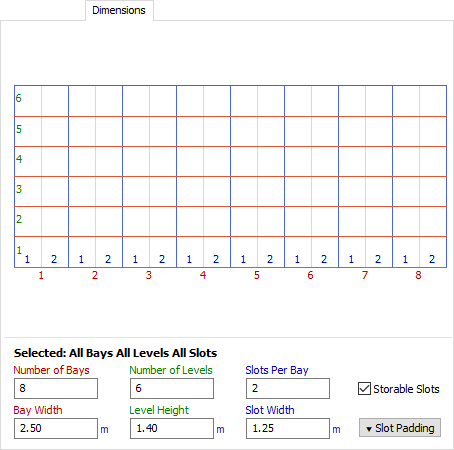
If you have not selected any specific cells in the main pane, then any inputs you define will apply across the entire object. If, on the other hand, you select specific cells, then the inputs you define, if applicable, will apply to the specific cell(s) you have selected.
To select a specific set of cells, just press the mouse button at the top corner of the target area, and drag the cursor to the bottom corner. This will select the set of cells contained within the encompassed area.
Number of Bays/Levels/Slots
Defining the number of bays/levels/slots will change how many bays/levels/slots should be in the selected set of cells, or in the entire object.
Bay Width / Level Height / Slot Width
You can also change the corresponding sizes of bays, levels, or slots through their corresponding input controls at the bottome of the window.
Storable Slots
You can also make a set of cells "unstorable" by clearing the Storable Slots checkbox. When a slot is not storable, the pane will show a red X over that slot. You cannot assign items to that slot, and it will be excluded by default from slot searches that are done with the Storage.system.findSlot() method.
Slot Padding
Pressing the Slot Padding button on the right will expand a pane of controls for defining the padding of slots. A slot's padding defines how much space on the edges of a slot cannot be used for item storage. You can individually define the amount of padding for all 6 sides of your slots.
The Flow Tab
Use as Fixed Resource
If checked, the object will perform fixed resource logic, receiving items through its input ports, and releasing items to exit through its output ports.
Minimum Dwell Time
This field returns a value of how long a flow item must stay in the rack before it is released to continue downstream. You can also return a value of -1 from this function so the rack will not release the item at all, and then implement your own releasing strategy using the releaseitem() command.
Maximum Content
This number defines how many flow items the rack will be allowed to hold at a given time.
For the remaining properties on this tab, see the Fixed Resource Flow Tab.