Excel Interface
Overview and Key Concepts
The Excel Interface was designed to make importing and exporting multiple worksheets from more than one workbook very fast and easy to do. You can also create your own custom Import/Export code.
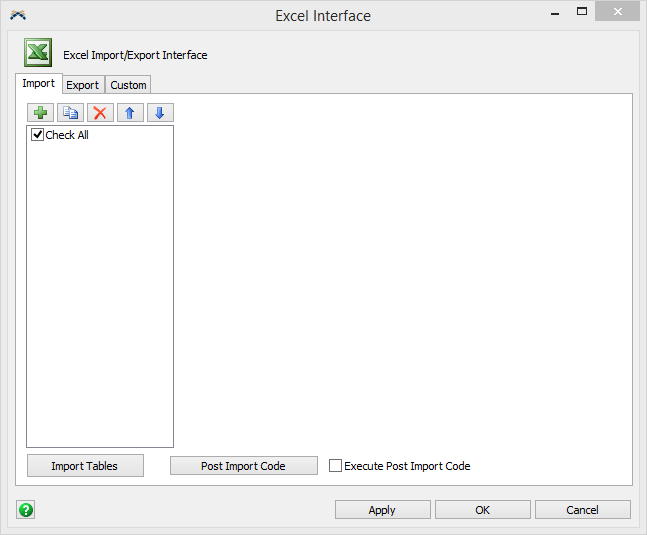
You can access the Excel Interface from the Toolbox.
Excel Import
The Excel Importer is capable of automating much of the import process in terms of the table size and cell data type. If you allow the Excel Importer to be more automated in its implementation, it is extremely useful for importing data that will change over time.
Excel Export
The Excel Exporter allows you to export multiple tables to multiple different Excel workbooks. The controls and features of this page are the same as the Excel Importer page. See the documentation above for more information on this page.
Custom Import/Export
The custom Import/Export page allows you to write your own custom code to import and export to Excel workbooks. There is sample code in the picklists on importing and exporting from Excel.
The Import Tab
The Import tab has the following properties:
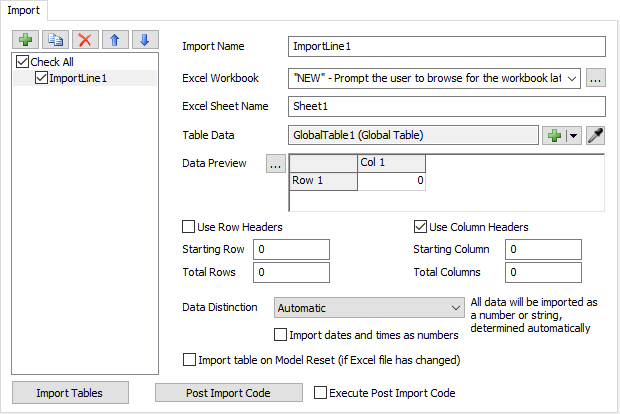
Import Lines (list)
Displays all of the import lines for the Excel Importer. You can use the Add and Duplicate buttons to add additional lines. You may also rearrange lines to group import lines that are importing from the same Excel workbook (this will improve speeds greatly as opposed to trying to switch back and forth between the same workbooks).
Import Tables
The Excel Importer will go in order (from the top) through each checked line of the Import Lines window and execute the import based on its properties specified on the right side.
Excel Workbook
The Excel Workbook is where you define the name of the Excel workbook file that contains the information that you want to import. There are four ways to enter information into this column:
- Unknown workbook name or location ("NEW") - If the name or location of the workbook that you want to use are unknown or will change over time then you can select the "NEW" option. Using "NEW" in this field will cause the browse window to open, prompting the user to find the Excel file they want to use when executing the import. This is an extremely useful option when the input data will change with different runs or users.
- Same as the previous location (Blank) - If you want to continue to use the same workbook as the previous import line then you can leave this field blank. This is the recommended option when you are importing information from multiple sheets in the same workbook. You can reorder import lines using the arrows on the left side of the window in order to group imports that use the same workbook.
- Absolute Path (ABSOLUTE) - If the location and the name
of the workbook will not change for the entire use of the model then you can enter the
absolute path of the Excel workbook. For example
C:\tempdirectory\myfile.xls. If the file is unable to be found, the import will be stopped and you'll have the option to skip the file or manually select a file to import. - Relative Path (RELATIVE) - If your Excel file is in the
same directory as your model, or in a sub directory, you can enter the relative path of
the Excel file, or browsing for the file will give the relative path to the file.
Alternatively, you can enter the relative path with respect to the install directory of
FlexSim. For example
userprojects\myproject\myfile.xls. If the file is unable to be found, the import will be stopped and you will have the option to skip the file or manually select a file to import.
Excel Sheet Name
The name of the Excel sheet that contains the import information. For example
Sheet1. If the Excel Importer does not find the name of the sheet because it does not
exist in the workbook or has been entered incorrectly, the import will pause and alert you
of the problem. You will then be given the option to exit the import completely or skip the
offending import row and continue with the next one.
Table Data
Use the  or
or  to select the table in FlexSim that should receive the data from the import. Alternatively, there are
 buttons located throughout the software that will
automatically select the table.
buttons located throughout the software that will
automatically select the table.
Data Preview
A preview of the current table data in FlexSim will be displayed here. To open the data in a table editor, click on the ... button.
Headers
Implementing headers will cause the Excel Importer to import the column and or row names for the table. This is useful for helping you to identify the columns and rows later in FlexSim. The row or column for the header information is automatically calculated. The header information should always come before any data distinction information or actual data.
Starting Row and Starting Column
The starting row and starting column fields determine where the Excel Importer will look on the Excel sheet for the data it needs to import. Enter the starting location for your data in these cells not the location of the headers or data distinction information. If you leave the values for these cells at 0, the Excel Importer will automatically adjust where it imports the data from. If you always leave your data at the top left of the worksheet you will never need to enter a value other than 0 in these cells regardless of whether or not you have headers or data distinction information in front of the data.
Total Rows and Total Columns
The Total Rows and Total Columns fields determine the amount of rows and columns that the Excel Importer will import. If you set these entries to 0 the Excel Importer will automatically calculate the number of rows or columns for you. Letting the Excel Importer calculate the number of rows or columns for you is a great way to allow the developer and or user of the model to add or delete rows and/or columns from the table as necessary without having to worry about changing any other values.
Data Distinction
Data distinction determines how the Excel Importer will extract values from the Excel workbook. There are three commands that the Excel Importer can use to read Excel data:
excelreadnum()- If the specified cell contains number data, this command returns the number. Otherwise, it returns 0.excelreadstr()- If the specified cell contains text data, this command returns the text. Otherwise, it returns the value displayed in the cell as text.excelrangeread()- This command reads all cells in a specified range. If a cell in that range contains text data, this command extracts the text. Otherwise, it extracts the value as a number.
When you import a spreadsheet, you must choose a data distinction mode. The mode you choose will tell the Excel Importer which of the three commands (or what combination) it should use to extract data from a spreadsheet. The modes are described in the following list:
- Numeric - The Excel Importer uses the
excelreadnum()command to extract each cell's value. - Automatic (default) - The Excel Importer uses both
excelreadnum()andexcelreadstr()to extract each cell's value. It then analyzes both results to determine whether the cell contains string or number data, and based on that, which result to put in the table. - Per Column - For all the cells in a given column, the
Excel Importer gets the value in the first non-header row (the beginning of the column), which
must be a number. Depending on that value, the Excel Importer will use
excelreadnum()orexcelreadstr()to extract the data in that column. The cell containing this value is excluded from the final table in FlexSim. - Per Row - For all the cells in a given row, the Excel Importer
gets the value in the first non-header column (the beginning of the row), which must
be a number. Depending on that value, the Excel Importer will use
excelreadnum()orexcelreadstr()to extract the data in that row. The cell containing this value is excluded from the final table in FlexSim. - Text - The Excel Importer uses the
excelreadstr()command to extract each cell's value. - Values Only (very fast) - The Excel Importer will use the
excelrangeread()command to read in all values of the table.
For the Automatic mode, the Excel Importer will attempt to determine whether the
cell contains text or number data. While this process works fairly well, the Excel Importer will
occasionally be wrong. For example, a cell with number data, formatted as a fraction, will
be imported as text like "1/5" rather than a number like 0.20.
Empty cells will be read in as a string. In order to correctly import a worksheet, you may
need to change the formatting in Excel or the data distinction mode.
For the Per Column and Per Row modes, the Excel Importer reads the first value in a row or column and uses that value to determine how to extract the remaining values in that row or column. The Excel Importer recognizes four possible values:
- Numeric Data - The Excel Importer will extract the data in
this row/column using
excelreadnum() - Text Data - The Excel Importer will extract the data in this
row/column using
excelreadstr() - Flexscript Data - The Excel Importer will extract the data in
this row/column using
excelreadstr(). If importing into a table, the Excel Importer will toggle this cell's node as FlexScript. - C++ Data - The Excel Importer will extract the data in this
row/column using
excelreadstr(). If importing into a table, the Excel Importer will toggle this cell's node as C++. If this occurs, you will be prompted to compile the model after the import is complete.
The Values Only mode uses the excelrangeread() command.
This command imports text cells the same way excelreadstr() does. However, all
other values, including dates and times, are interpreted as raw numbers. You can use the
VALUE() function in Excel to see the raw number for any non-text cell.
The following table shows some examples of how an Excel cell might be extracted with each of the three commands:
| Cell Value | Cell Format | excelreadnum() |
excelreadstr() |
excelrangeread() |
|---|---|---|---|---|
| 1.54 | Number | 1.54 |
"1.54" |
1.54 |
| 10 | Number | 10.0 |
"10" |
10.0 |
| 2/8/2016 | Date | 42408.0 |
"2/8/2016" |
42408.0 |
| some text | Text | 0 |
"some text" |
"some text" |
| 1/5 | Fraction | 0.20 |
"1/5" |
0.20 |
The Import Dates and Times as Numbers option is only available for the Automatic Data Distinction setting. When checked, the importer will import cells from Excel that are formatted as dates and times as numbers. It will also convert the number to be useable by FlexSim which is the number of seconds since Jan 1 1601.
Import Table on Model Reset
If checked, FlexSim will re-import this table when the model is reset. This will ONLY occur if the Excel file has been changed since the last time the table was imported.
Post Import Code
After all the import lines are executed, the Excel Importer can execute Post Import Code. You can write custom code in this trigger to do any additional operations after all tables have been imported.
Execute Post Import Code
If checked, the Post Import Code will be executed once all tables have been imported.
Importing to a Bundle
Global Tables may be set to use a bundle to store their data. Or, when using the Other table type, you can select a node in the tree that has bundle data. In these cases the import will create the correct fields in the bundle for the imported data. Due to the way bundles work, there are a few restrictions when importing to a bundle:
- Automatic Data Distinction - When automatic data distinction is used, the importer will only look at the datatype of the first cell in a column and set the entire column's data type to that type. This is because rows in a bundle column may not have differing data types.
- Column Data Distinction - Selecting Column will cause the importer to behave as if using Automatic Data Distinction. This is because rows in a bundle column may not have differing data types.
- Row Headers - As bundles do not have row headers, checking Use Row Headers has no affect on the import.
- Column Headers - Bundles must have a Column (or field) name. Therefore, Use Column Headers is always used whether checked or unchecked.
- Flexscript/C++ Data - Bundles cell cannot be toggled as FlexScript/C++.
The Export Tab
The Export tab has the following properties:
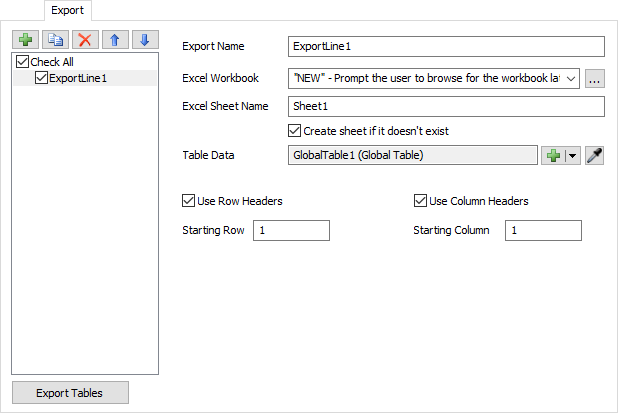
Unlike the Excel Importer, the Excel Exporter does not use any data distinction when writing to the Excel file. The data type is taken from the FlexSim node data type.
Create sheet if it doesn't exist
Check this box to have the Excel Export tool create the specified sheet if that sheet doesn't exist in the workbook.
Table Data
Use the or
to select the table in FlexSim that will be exported to Excel.
Starting Row and Starting Column
The starting row and starting column fields specify which cell in Excel the data from FlexSim will start being exported to.
There is no Number of Rows or Number of Columns fields. The export will take the entire table.
The Custom Tab
The Custom tab has the following properties:
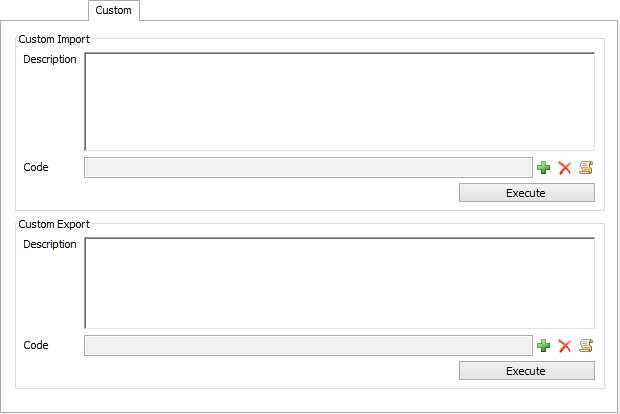
Description
This field has no impact on the custom import/export. It is purely for the user's information.
Code
Enter your own code to import/export from Excel.
To execute your custom import or export code through a flexscript node or trigger, call the following:
		treenode excelauto = Model.find("Tools/ExcelAuto");
		executefsnode(getvarnode(excelauto, "CustomImport"),NULL);
		// or
		executefsnode(getvarnode(excelauto, "CustomExport"),NULL);