Arrow
Overview and Key Concepts
The Arrow object is an arrow you can put anywhere in your process flow. The Arrow object is for display only, meaning that it doesn't have any other function or purpose other than visual display.
You can redirect the Arrow object by using the two red control points, and you can resize it by clicking the endpoints.
![]()
Connectors
Arrows do not allow incoming or outgoing connectors. They are for visual use only.
Properties
The following image shows properties for the Arrow objects:
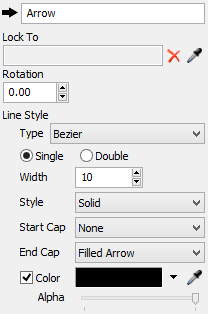
Name
Used to change the name of the object. See Name for more information about this property.
Lock To
You can use the Lock To box to attach the Arrow object to an
activity in your process flow. When the Arrow is locked to an object, it will move when that
activity is moved. Use the Sampler button
 to select the activity the Arrow object
should be locked with.
to select the activity the Arrow object
should be locked with.
Rotation
The Rotation property actually has no effect on Arrow objects since the rotation is set by the control points. It is only here as a standard property that automatically comes with most display objects.
Type
Use the Type menu to select different arrow styles. In this version of FlexSim, the two available styles are straight and Bezier. Future FlexSim versions might have more styles.
Single or Double
You can use the Single or Double options to switch to from a solid black line or a double line (which looks like it has a white stripe running through it).
Width
Use the Width box to set the width of the line.
Style
Use the Style menu to select the line style (such as a solid, dashed, or dotted line).
Start Cap
Use the Start Cap menu to select the visual style of the start of the line. You can give the start of the line a shape such as a square, a circle, or another arrowhead.
Color
If you check the Color checkbox, it will enable a few properties that can control the arrow's color:
- You can change the color of the arrow by using the color selector or using the
Sampler button
to select a
color from any object in your simulation model or process flow.
- The Color Alpha slider changes the transparency of the Arrow object.