Create Object
Overview and Key Concepts
The Create Object activity creates one or more objects in the 3D simulation model. This activity can also create Task Executers and Task Executer flow items and connect them to a travel network using the Destination property. Once created, a reference to the created object(s) will be added to the label specified in the Assign To property.

Connectors
The Create Object activity only allows one connector out. See Adding and Connecting Activities for more information.
Properties
The following image shows properties for the Create Object activity:
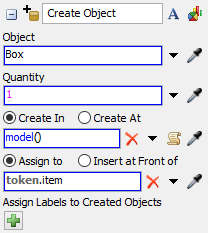
Each of these properties will be explained in the following sections.
Name
Used to change the name of the activity. See Name for more information about this property.
Font
The Font button
 opens a window to edit the activity's
background color and font properties. See
Font for more information
about this property.
opens a window to edit the activity's
background color and font properties. See
Font for more information
about this property.
Statistics
The Statistics button
 opens the activity's statistics
window. See Statistics
for more information about this property.
opens the activity's statistics
window. See Statistics
for more information about this property.
Object
Use the Object box to specify what type of object should be created. By default, it will create a flow item with a Box shape, but there are many other possibilities. If you click the arrow next to the Object box, the menu will list a variety of different objects that can be created. If needed, you can dynamically set this property as the rank of a flow item in the Flowitem Bin.
You can also use the Sampler button
 to select an object in the model. When
you select an object in the model, the Create Object activity will create a copy of this
object.
to select an object in the model. When
you select an object in the model, the Create Object activity will create a copy of this
object.
Quantity
Use the Quantity box to determine how many objects will be created. This should be an integer value (a whole number).
Destination
Use the Destination box to determine where the object(s) will be located when created. By default, the destination is the object referenced by the entering token's destination label, but it can be changed to be a different token label, object in the model or other destination. Some of the possible destinations can be:
- Object in the Model - The object will be created in
an object in the model. For example, you could create a flowitem inside of a processor.
Use the Sampler button to select an
object in the 3D simulation model.
- Model - The object will be created inside the model with its X,Y,Z coordinates at 0,0,0. If you are creating a task executer object, it will be connected to the Default Navigator. To use this option, click the arrow next to the Destination box and select Model from the menu.
- Outside the Model - The object can be created
outside of the model if you would prefer to move the object into the model manually
later. Click the Remove button
 so that
the Destination box will read None.
so that
the Destination box will read None. - Network Node - The object will be created on a
network node. If you are creating a task executer object, it will
be connected to the Default Network Navigator. Use the Sampler button
to select the network node in the 3D
simulation model.
- AGV Control Point - If you have the AGV module installed in FlexSim, you can set the destination to an AGV Control Point. If you are creating a task executer object, it will be created at the control point and will be connected to the AGV Network.
- A* Navigator - If you have the A* module installed in FlexSim, you can set the destination to an A* (or AStar) Navigator. If you are creating a task executer object, it will be created at the A* Navigator and be connected to it.
Assign To
Assigns a reference on the specified label/node to the created task sequence. See the Assign To section of Common Properties for more information.
Assign Labels to Created Objects
Allows you to add labels to the created objects. For more information on assigning labels, see the Assign Labels activity.