Shared Process Flow Properties
Introduction
Some of the process flow objects have properties that they share in common. Each of these properties will be discussed in more detail in the following sections.
Name
All the activities and process flow objects have a Name box that you can use to edit its name. You can find this setting in Quick Properties under the Activity Properties group. By default, the name of the activities and other process flow objects will be based on what kind of activity or object it is, as shown in the following image:
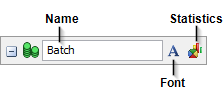
In the example above, the activity is named Batch because it is a Batch activity.
You can change the name of the activity by clicking inside the Name box and typing a new name. After you've changed the name, it will update the display name on the activity.
Be aware that you can also change an activity's name by double-clicking the activity name in the process flow.
Font
Clicking the Font button
 opens a pop-up box where you can edit the
activity's visual properties, as shown in the following image:
opens a pop-up box where you can edit the
activity's visual properties, as shown in the following image:
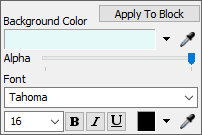
This pop-up box has the following properties:
- Apply to Block - This button will cause the background color and font of the selected activity to be copied to all activities that are stacked together with this activity.
- Background Color - You can change the color of the
activities by using the color selector or using the Sampler
button
 to select a color from any object in
your simulation model or process flow.
to select a color from any object in
your simulation model or process flow. - Alpha - Sets the transparency of the activities.
- Font - These properties control the text on activities and resources:
- Font - The font menu has 13 common fonts available.
- Size - Changes the font size.
- Style - You can make the text bold, italicized, or underlined.
- Color - You can change the color of the text by
using the color selector or using the Sampler button
to select a color from any object in
your simulation model or process flow.
Statistics
The Statistics button
 opens the activity's statistics dialog
box. You can use this dialog box to turn recording for statistics on or off for this
particular activity. See
Process Flow
Statistics for more information.
opens the activity's statistics dialog
box. You can use this dialog box to turn recording for statistics on or off for this
particular activity. See
Process Flow
Statistics for more information.
Max Wait Timer
Some activities have the Max Wait Timer properties, as shown in the following image:
The Max Wait Timer properties are available for activities that might hold a token for a period of time until a specific condition or event occurs in the process flow or simulation model. You can use this timer to:
- Set a maximum wait time that the activity will hold the token for
- Determine when the wait time will begin
- Decide what will happen to the token if it reaches the maximum wait time
For example, an Acquire Resource has a Max Wait Timer. Tokens that enter the Acquire Resource will request access to the resource and will wait in the Acquire Resource activity until the resource becomes available. You could set the Max Wait Timer to expire if the token is unable to get access to the resource after 5 minutes. Then, when timer goes off, you could possibly set the token to create a label named failed and then continue to the next downstream activity.
The Max Wait Timer properties are available on the following activities:
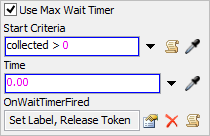
By default, only the Use Max Wait Timer checkbox is available at first. Then, when you check the Use Max Wait Timer checkbox, the other properties will become available:
Start Criteria
The Start Criteria box is only available for Batch, Join, and Synchronize activities.
The Batch activity collects incoming tokens and sorts them into groups of tokens (batches). When a batch is ready, the Batch activity will release it to a downstream activity. If you decide to use the Max Wait Timer with a Batch activity, you can cause the Batch activity to release a batch early if a certain amount of time has passed. You'd also use the Start Criteria box to determine when the timer should begin running.
By default, the timer is set to begin running as soon as a batch is created. You can change the value in this box if needed. For example, if you change the Start Criteria to collected > 3, the timer will begin when the fourth token in the batch is collected.
This behavior is similar for the Join and Synchronize activities, except that they form waves (a group representing one token from each incoming connector) instead of batches. You can similarly release the entire wave early with this timer.
Time
Use the Time box to set the length of time the Max Wait timer will run. The time is measured in simulation time units. You can enter in a fixed time or create a time dynamically using the menu next to the box.
OnWaitTimerFired
Use the OnWaitTimerFired settings to determine what should
happen to the token if the Max Wait Timer expires. You can click the
View Properties button
 to view and edit the default settings, as
shown in the following image:
to view and edit the default settings, as
shown in the following image:
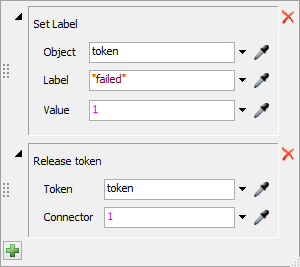
By default, the Set Label operation will create a label on the token that is called failed and assign it a value of 1 (which will represent a value that is set to true). The Release token operation will then release the token through connector 1. (See Adding and Connecting Activities - Number of Outgoing Connectors for more information about connector numbers.)
You can edit these default operations or delete them using the
Delete button  next to each one. You can also add your own custom operations using the
Add button
next to each one. You can also add your own custom operations using the
Add button  to open
a menu and select other operations.
to open
a menu and select other operations.
Max Idle Timer
The Max Idle Timer works almost identically to the Max Wait Timer. It has many of the same available settings, as shown in the following image:
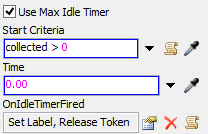
The main difference is that it measures how long a token has been idle in the activity, meaning how long it has gone without receiving any tokens and/or values.
See Max Wait Timer for more information about these properties.
This property is available on the following activities:
Executer / Task Sequence
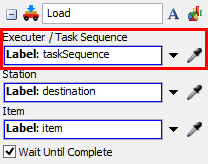
The Executer / Task Sequence box is available on most of the Task Sequence activities. You can use this box to determine which task executer or task sequence should receive the task. If you choose to give this task to a task executer, a new task sequence will be automatically created with this task and then it will be sent to the task executer.
You can:
- Assign a specific, fixed task executer in the 3D model
- Dynamically assign the task executer during a simulation run using labels
- Assign the task executer using the current command if you are in a task executer or sub flow process flow type
- Append this task to an existing task sequence
Each of these different options will be explained in the following sections.
Fixed Task Executers
To assign this task to a specific task executer, use the
Sampler button
to select a task executer in the 3D model. During the simulation run, the assigned task
executer will always perform this task.
Dynamic Task Executers - Labels
If needed, you can make sure this task is assigned dynamically to a task executer during a simulation run. In other words, you can change these settings so that a different task executer might be assigned to the task based on different conditions during the simulation run.
One way to dynamically assign a task executer is to use the task executer that is listed in a label on a token. To reference a label on a token, you can use the Label keyword:
- Click inside the Executer / Task Sequence box and type token. .
- Because the Executer / Task Sequence box uses the Universal Edit Feature, a menu will appear after you type token. in this box that will list all the available labels in the process flow. You can select a label from the menu to auto-complete the label name. Either double-click a label name or use the arrow keys and press the Enter key to select the label name. Alternatively, you can just finish typing the full label name after the colon. Be aware that the label name does not need to be in quotation marks (" ") and it is case sensitive.
The Current Command
You can use the current command in Executer/Task Sequence box to dynamically assign the task to the task executer that is currently attached to a specific instance of the process flow. Be aware that this command can only be used for the Task Executer or Sub Flow process flow types. The keyword current will reference the task executer object attached to the process flow. See Process Flow Instances for more information.
Adding the Task to an Existing Task Sequence
If needed, you can add this task to an existing task sequence that was previously created by a Create Task Sequence activity.
The Create Task Sequence activity will create a reference to the created task sequence and assign it to a label on the token. This label can then be used in the Executer / Task Sequence box to add the task to the end of that task sequence.
If you add any of the task activities to the end of a Create Task Sequence activity or another task activity, the newly added task activity will automatically put the correct label name in the Executer / Task Sequence box. This can make creating task sequences more convenient. However, if you need to add it manually:
- Click inside the Executer/Task Sequence box and type token. .
- A menu will appear after you type token. in this box. Type the same name of the label used in the Create Task Sequence activity's Assign To property.
Assign To
The Assign To property creates a reference to a new value(s) or object(s) that is created by the activity. These references are usually assigned to a label on a token, but they may be assigned to other labels or nodes. When using the token.LabelName syntax, the label will be created on the token if it does not currently exist. Otherwise, you will need to ensure that the node you pass in to the Assign To already exists. This can be done by using the object.labels.assert("LabelName") or aNode.subnodes.assert("NodeName") commands.
The reference may be to a single object or value, or it may be to multiple. For instance, pulling entries off of a list may result in one entry or multiple. If multiple entries are pulled, an array will be created with each entry in the array being one of the pulled values.
Creating a reference point allows other activities to easily reference created objects,
values pulled from a list, task sequences etc. However, an Assign
To label/node is not required for and may be removed by clicking the
Remove button
.
The value(s) will be set in one of two methods:
Assign
If the Assign box is checked, any data stored on the label or node that was passed into the Assign To box will be overwritten by the new value.
Insert at Front
If the Insert at Front box is checked, any data stored on the label or node that was passed into the Assign To box will remain and the new value(s) will be added to the front. This will cause the data to become an array with the most recent value as the first entry in the array.
Label Matching/Assignment
The Label Matching/Assignment table will become available on an event-listening activity when that activity is listening for a standard event. You can use this table to assign the value to a token label, match a token label's value, or match a value to. The Event-Triggered Source will assign the label to the token it creates; the Wait for Event activity will assign the label to the token that entered the activity and triggered the event-listening.
You can leave this table blank if you don't need to do any operations.
Parameter Rows
The rows in the Label Assignment table will vary depending on the specific event that the activity is listening for. Each simulation event has a set of parameters (sets of information) that it uses. For example, the following image shows the Label Assignment table for the OnEntry event on a fixed resource:
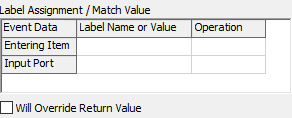
In this example, notice that the first row is the Entering Item. This row is a reference to the item that is entering the fixed resource. The second row is Input Port which is a reference to the port number from which the fixed resource received the flow item.
Most of the time, the name of the row will be descriptive enough to give you a good idea of its reference point.
Label Name or Value
The text in the cells under the Label Name or Value column depends on the option set in the Operation column (as described below). If the operation is set to match, assign or insert at front then the text defines the name of the token label. When using a Wait for Event you can use dot syntax (periods), to separate label names to reference labels on objects that the token has a reference to. For example, if the entering token has a label called operator which references another token or a task executer object in the model you can enter operator.item to reference a label on the operator.
If the operation is match value then the text defines the number,
string or object reference. This value is evaluated on reset. To define an object reference use
FlexScript. For example, Model.find("Processor1") You can also
define dynamic numbers or strings using FlexScript. For example,
Table("GlobalTable1")[1][1] or
"Text" + string.fromNum(Table("GlobalTable1")[1][1])
To use the previous example, you could create a label called item or itemID to refer to the entering item. You could also match the input port the item entered through to port 1, or 2.
Operation
If you click on any cell under the Operation column, it will open a menu. The option you choose will determine what operation will be performed when the event is triggered. The menu has the following options:
- none - The default value. Does nothing with the text in the Label Name or Value column.
- match - This will match the label's existing value to the parameter that is being referenced. The token will only finish the activity when the event fires AND the event's parameter matches the value of the token's label. For example, you may be tracking an item through the system. The token's item label points to the flow item in the model. You want to catch when that specific item enters a fixed resource (like a queue) in the model. To do that, you can subscribe to the OnEntry event of the fixed resource, and then for the Entering Item row of the table, enter item in the Label Name or Value column, and match as the operation. This option is not available for the Event-Triggered Source.
- match value - This will match the involved parameter value to the value in the Label Name or Value column.
- assign - This will assign the involved parameter value to the token's label value.
- insert at front - This operation is like the assign, except that if the label already has a value, it will make the label value into an array and push the new value to the front of the array. You can use this option if perhaps you are looping and you want to accumulate values into an array on the label. This option is not available for the Event-Triggered Source.
Will Override Return Value
Event-listening activities have the ability to override the return value of events they listen to. For example, you may want to perform some complex logic using Process Flow to define the Process Time of a Processor. To do this, first check the Will Override Return Value checkbox in the activity's properties. Next define the set of activities that determine the return value. Here you must make sure that none of these activities will cause any type of delay, such as a waiting operation or explicit Delay activity. Otherwise the return value will not be calculated properly. At the end of your block of activities place a Finish activity. The Finish activity allows you to define a return value for your overridden function and then destroys the token. In our example, the return value will become the Process Time of the Processor.
Change Rule
The Change Rule properties will become available on an event-listening activity when that activity is listening for a value change event. You can use these properties to determine the conditions that will trigger the event. Usually this will be a statistical change of some sort. When these conditions are in place, the Event-Triggered Source activity will create a token and release it to the next downstream activity; the Wait for Event activity will release the token to the next downstream activity.
The following image shows the Change Rule properties:
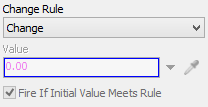
The following sections describe the different Change Rule properties:
Change Rule
You will use the Change Rule menu to determine the conditions that will trigger an event. The menu has the following options:
- Change - The event will be fired whenever the value changes at all.
- Increase - The event will be fired whenever the value increases.
- Decrease - The event will be fired whenever the value decreases.
- Arrive At Value - The event will be fired whenever the value changes to a specific user-defined value.
- Increase To Exact Value - The event will be fired whenever the value increases to a specific user-defined value.
- Decrease To Exact Value - The event will be fired whenever the value decreases to a specific user-defined value.
- Increase To Or Through Value - The event will be fired whenever the value changes from being less than a user-defined value, to being greater than or equal to that value.
- Decrease To Or Through Value - The event will be fired whenever the value changes from being greater than a user-defined value, to being less than or equal to that value.
- First Increase - The event will be fired whenever the value changes from decreasing to increasing.
- First Decrease - The event will be fired whenever the value changes from increasing to decreasing.
Value
Defines the user-defined value associated with the Change Rule. This is only needed for change rules with required values, such as Arrive at Value.
Fire If Initial Value Meets Rule
If checked, the event will fire immediately (finishing the activity) if when the token first arrives, the value already meets the defined rule. For example, if are listening to a Zone's OnContentChange event, and you've defined the Change Rule as Arrive At Value with a Value of 5, then when the token arrives, if the Zone's content is already at 5, the event will immediately fire and the token will pass through the activity. This field is only applicable if the Change Rule uses an involved value, and if the activity is a Wait for Event.