Additional View Attributes Reference
Introduction
This document describes in detail the different GUI attributes you can use when creating custom GUIs. This describes attributes used for each view type and how those attributes affect the behavior of the control. Please read the topic on Key Concepts About GUIs before referencing this topic.
View Window Classes
In this topic, we will occasionally refer to FlexSim window classes versus Windows common controls. The difference between these two can be subtle but are nonetheless important. FlexSim uses the standard Microsoft Windows interface for its windowing system. Within that interface there is an ability to register custom window classes and define special functionality for those windows. There is also the ability to use Windows common controls, which are standard window classes that have already been defined by Windows like buttons, comboboxes, etc. FlexSim uses many of the common controls, but it also has created some of its own window classes. These two categories, and which FlexSim view types fit in which category, are listed below. There are several view attributes in the "general" category that will only work on FlexSim registered controls. This will be mentioned under each attribute's description.
The terms view and control are used interchangeably. They basically describe a window control in FlexSim.
Many of the attributes described below can contain flexscript code that is executed. Unless otherwise stated, when adding such a flexscript attribute, you can choose whether you want to toggle the node as flexscript. If you toggle the node as flexscript, then FlexSim does not need to build the node's flexscript code when the function is executed. This results in a faster execution time, but also requires more memory to store data in the tree, and it causes FlexSim's global "Build all flexscript" function to take more time. As a rule of thumb, if the function is executed in "user" time, meaning it is an operation that is explicitly done by the user, like pressing a button or selecting a combobox option, FlexSim can build the flexscript fast enough so the user notices no difference, so you don't need to toggle the node flexscript. However, if it is an operation that is executed quite often, like a hotlinkx, or an OnDraw, then it might be wise to toggle the node as flexscript to increase refresh rates.
Windows Common Controls
FlexSim Registered Controls
Other Controls Used by FlexSim
- Script (code editor)
- Histogram
- Pie Chart
- Line Chart, Bar Chart, Scatter Plot
There are also some controls available in the GUI builder's icon grid that are made up of a combination of one or more of the controls mentioned above. These controls will not be documented in this topic since they are simply a combination of functionality for controls that are documented here.
General Attributes
Below is a list of general attributes that can be added to almost every view type.
alignrightmargin,alignbottommargin
These attributes signal that the control's margin is "locked" to the right or bottom margin of the control's container window. They should container number data, and the value represents the offset distance from the container window's right or bottom margin, in pixels, that the control's margin will be "locked" to. For example, if you give a button control an alignrightmargin attribute with a value of 10, then as you resize the window, the button will automatically resize so that its right margin is 10 pixels from the right edge of the window.
alignrightposition,alignbottomposition
These attributes signal that the control's position is "locked" to the right or bottom margin of the control's container window. They should container number data, and the value represents the offset distance from the container window's right or bottom margin, in pixels, that the control's position will be "locked" to. For example, if you give a button control an alignrightposition attribute with a value of 100, then as you resize the window, the button's x position will automatically change so that its button's position (or left side) is 100 pixels from the right edge of the window.
aligncenterx, aligncentery
These attributes signal that the control should be center aligned with its container control. The attributes should contain number data, and their value represents an offset from the center position.
grayed
This attribute causes the control to be disabled, graying the control and disallowing the user from manipulating the control. It should container number data; 1 means grayed, 0 means not grayed. Once a control has been initialized, the "grayed" state of the control will not change by simply changing the value of the grayed attribute. Because of this, and because the "grayed" state of a control is very dependent on certain parameters of objects, and can change during the life of the window, it is usually more practical to use the windowgray() command to change the "grayed" state of a control. This command does not require you to even have a grayed attribute, so the grayed attribute, for the most part, is unneeded.
hidden
This attribute designates that the control will be hidden from the user. For the same reasons as with the grayed attribute, this attribute is usually unneeded and can be replaced with the windowshow() command.
coldlink
This attribute is used to link a control with a value in the model. For example, an edit control with a coldlink to the max content of a queue will show the max content as a text in the edit control. It is a "cold" link because it is only refreshed when the window is opened, and only applied when the Apply or OK button is pressed. The coldlink attribute should contain text data that is a path to the node that holds the linked data. The path starts at the coldlink node itself. Refer to Key Concepts About GUIs for more information on the syntax of this path. You can use the applylinks() command to apply or refresh the coldlink. The first parameter is a node that is the start location for a recursive search. The second parameter is optional. The command will recursively search the window's tree structure and find any coldlinks (and hotlinks) and apply the coldlinks to the object's attributes. If the optional second parameter is 1, then instead of applying the coldlinks to the object, the applylinks() command will refresh the window's values as defined by the object's values.
hotlink
This attribute is used to link a control with a value in the model, just like the coldlink mentioned above. It is a "hot" link because the value shown in the control is continuously refreshed each time the window is repainted. Otherwise the hotlink is exactly the same as the coldlink.
coldlinkname
This attribute is just like the coldlink, except it links with the name of the node specified by the coldlink's path.
hotlinkname
This attribute is just like the hotlink, except it links with the name of the node specified by the coldlink's path.
coldlinkx
This attribute is like a coldlink, except that instead of holding text data with a path to the involved node, the coldlinkx holds flexscript code. The flexscript function should return a reference to the node that the view should link to. If 0 is returned, then nothing will be applied or refreshed for the control. Within the function there are 3 access variables. c is a reference to the control itself. i is a reference to the object focus of the view (the same as node(">objectfocus+",c)). eventdata is either 1 or 0. If 0, then the coldlinks function is being executed in order to refresh the control according to the object's variable. If 1, then the coldlinkx is being executed in order to apply the value to the object's variable. Please note that when the coldlinkx function is called, the return value, or in other words the reference to the linked node, is not remembered by the window. Each time the control needs to be refreshed or applied, the coldlinkx function is called again. This means that the coldlinkx function can actually be called many times throughout the life of the window.
hotlinkx
This attribute is just like the coldlinkx, except that it is refreshed every time the window is repainted.
menupopup
This attribute is only applicable for FlexSim registered controls. By adding this attribute you can define the menu that will appear when the user right-clicks on the control. The attribute should contain sub-nodes. Each sub-node is a menu option of the popup. The sub-node's name defines what the menu item's text will be. The sub-node should have text data. The text data defines a flexscript function that will be executed when the option is selected. Within the flexscript function the is one access variable, c. c is a reference to the menu option sub-node. Some commands that might be used within the flexscript function are listed below. For detailed information on each command, refer to the command documentation.
ownerobject(c)
This returns a reference to the ownerobject of the menu option, or the view node itself.
selectedobject()
This will return a reference to the highlighted (yellow) object of the view. For example, if the view is an ortho view, and the user right-clicks on an object in the ortho view and selects a popup menu option, the flexscript function can access the highlighted object with selectedobject(ownerobject(c)).
Standard views that use this attribute include the ortho and perspective windows, the library icon grid, and the table view in the labels tab of an object's properties window.
Right now there is no known way of dynamically customizing the popup menu based on what the user clicks on.
If there is no menupopup attribute specified for a FlexSim registered control, then the standard FlexSim popup menu will appear.
tooltip
This attribute defines a tip that will pop up when the mouse hovers over the control for a certain amount of time. The attribute should have text data containing the text that should be shown.
style
This attribute is a special attribute that connects directly with windows control styles. When each control is created, it is given a default style, which is a 32-bit field that is passed to Windows where each bit represents a certain flag that affects the control's appearance or behavior. The style attribute can override the default style that FlexSim gives the control. Window styles are documented online on Microsoft Developer Network (MSDN). Go to www.msdn.com and search for Window styles. This will provide list of default window styles. There are also styles specific to each Windows common control. For example, you can search for Button Styles and it will show a list of all the styles you can give a button control.
The style attribute can have any number of sub-nodes. Each sub-node's name defines a windows style for that control, such as WS_DISABLED or WS_BORDER. The sub-node may contain optional number data. If the number data is 0, then that will signal for FlexSim to set the bit flag low, or 0, in case the FlexSim default is for the bit flag to be high. If no number data is specified, then FlexSim will set that flag as a high bit.
An example of using the style attribute is to have a checkbox with the style BS_PUSHBUTTON. This will cause the checkbox to instead look like a button that is depressed when checked. The ortho window's tool bar uses this style for radio buttons in its mode panel.
To create a modal window, use viewwindowtype 4 (Dialog) and add the subnode FS_MODAL.
exstyle
This attribute is much like the style attribute, except it defines windows extended styles, which are styles not introduced until Windows 3.1 I believe. These styles begin with WS_EX_ instead of WS_ and are also documented on MSDN.
OnClick
This attribute only applies to FlexSim registered controls. It is fired when the user clicks anywhere inside of the control. This includes when the user clicks the mouse and when the user releases the mouse. There are two access variables. c is a reference to the control node. i is a clickcode: 2 means left mouse button down, 3 mean left up, 4 mean right down, 5 means right up, and 1 means double-click. Some commands that you might use within the OnClick are: cursorinfo(), selectedobject().
OnMouseButtonDown
This attribute only applies to FlexSim registered controls. It is fired when the user presses the left mouse button in the view. There is one access variable, namely c, which is a reference to the control node.
OnMouseButtonUp
This attribute only applies to FlexSim registered controls. It is fired when the user releases the left mouse button in the view. There is one access variable, namely c, which is a reference to the control node.
OnKeyDown
This attribute only applies to FlexSim registered controls. It is fired when the control has keyboard focus and the user presses a key on the keyboard. There is one access variable, namely c, which is a reference to the control node. You can also query what key went down using lastkeydown(), or query whether any key is down with iskeydown().
OnKeyUp
This attribute only applies to FlexSim registered controls. It is fired when the control has keyboard focus and the user presses a key on the keyboard. There is one access variable, namely c, which is a reference to the control node. You can also query what key went down using lastkeydown(), or query whether any key is down with iskeydown().
OnMouseWheel
This attribute only applies to FlexSim registered controls. It is fired when the control has keyboard focus and the user scrolls the mouse wheel. The control also needs to have an OnMouseWheelDelta attribute with number data. When the user scrolls the mouse wheel, FlexSim will set the value of the OnMouseWheelDelta value according to how much the user has scrolled, and then will call the OnMouseWheel function. Within the function, c access the OnMouseWheel attribute itself.
OnMouseWheelDelta
This attribute is used as described in the OnMouseWheel attribute above.
OnDrop
This attribute only applies to FlexSim registered controls. It is fired when the user drags an object from an icon grid and drops it on the view. The attribute should have text data containing flexscript code that fires when the object is dropped. Within the function, you have access to the object that was dragged with dropnodefrom(), and the object that it was dropped onto with dropnodeto().
OnFocus
This attribute is fired when the control receives keyboard focus. You can access the control that just lost focus using nodefromwindow(eventdata).
OnKillFocus
This attribute is fired when the control loses keyboard focus.
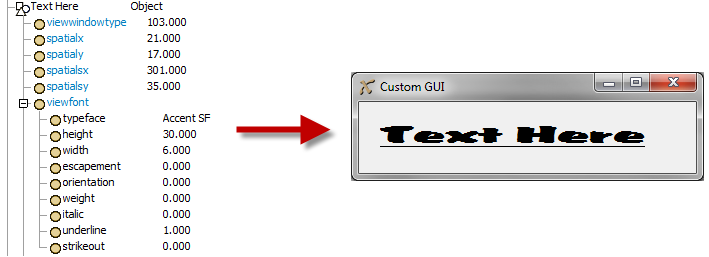
viewfont
This attribute only applies to Windows Common Controls. It defines the font that the control will use. The viewfont attribute is a wrapper around the Windows API CreateFont() command. Add this attribute and give it sub-nodes defining the different parameters that will be passed into CreateFont(), as shown in the figure below. You can refer to Microsoft's Windows API documentation for more information on this.
viewbackgroundcolor
For windows common controls, the viewbackgroundcolor attribute defines the text background of the control. For a 3D view, it defines the background color of the scene. The attribute should have 3 sub-nodes, each with number data between 0 and 1 corresponding to the red, green and blue components respectively.
color
For Windows Common Controls, the color attribute defines the text color of the control. The attribute should have 3 sub-nodes, each with number data between 0 and 1 corresponding to the red, green and blue components respectively.
Control Specific Attributes
3D (Ortho/Perspective)
The ortho/perspective view type is a 3D view. The GUI builder's ortho and perspective views include many default attributes that are not documented in detail here, but you can experiment with those attributes from within the GUI builder, as well as look at the standard ortho view and its settings window to see what attributes do what. We document below attributes essential to an understanding of the ortho and perspective views.
- viewfocus - This attribute defines what the ortho view is "looking at". It should contain text data with a path to the node containing the objects to be viewed.
- viewprojectiontype - The viewprojectiontype attribute specifies whether the view is an ortho or a perspective view. It has number data, 1 signifying ortho, 0 signifying perspective.
- viewpointx,viewpointy,viewpointz, viewpointrx, viewpointry, viewpointrz - These attributes specify the focal point and viewing angle of the view.
- viewmagnification - This attribute is only used with ortho views, and specifies the magnification or "zoom" of the view.
- viewpointradius - This attribute is only used with perspective views, and specifies the camera's distance from the focal point.
- OnDropNode - This attribute should contain text data and defines flexscript code that will be executed when the user holds a key down while click-dragging from one object drawn in the view to another.
Button
The button control is a push-able button. Below are attributes that can be used in a button control.
- apply - If the apply attribute is added to the button, then FlexSim will call applylinks() on the button's owner view when the button is pressed. The attribute needs no data.
- close - If the close attribute is added to the button, then FlexSim will close the button's owner view when the button is pressed. The attribute needs no data.
- bitmap - the bitmap attribute specifies a bitmap to be shown on the button. It should contain text data specifying a file path to the bitmap, starting at the FlexSim main directory. If the bitmap attribute is present then the name of the button will not be shown. The file can be a bmp, jpg, png, or ico file.
- coldlink, hotlink, coldlinkx, hotlinkx - The link attributes can be added to the button. They work as documented above and designate what will be shown as the button's text.
- OnPress - The OnPress attribute specifies code that will be executed when the button is pressed. It should have text data containing flexscript code. Within the code, c accesses the button view.
Checkbox
The checkbox control is a button that has two states, check or unchecked. Below are attributes that can be used with the edit control. A box with a check in it appears, with text to the right of the box. The text of the checkbox is defined by the name of the control node. Below are attributes that can be used with the checkbox control.
- coldlink, hotlink, coldlinkx, hotlinkx - The coldlink and hotlink attributes link the state of the checkbox to a value in an attribute of the object. The node that the cold/hotlinks link to should hold number data and have a value of 1 or 0. 1 will cause the box to be checked, 0 will cause the box to be unchecked. You can also explicitly check the box with setchecked() or get whether it is checked with getchecked() (1 means checked, 0 means unchecked).
- itemcurrent - The itemcurrent attribute is actually added to the checkbox when an instance is created. Usually it signifies whether the box is checked, but it may not always. Use getchecked() to get the check state of the box.
- style - A style that may be useful with the check box is the BS_PUSHLIKE style. There is also a style for having the box be to the right of the text.
Combobox
A combobox is a box containing a dropdown list from which you can select options. Below are listed some of the attributes you can use with comboboxes.
- items - The items attribute is a required attribute. It should contain subnodes. Each subnode represents an option in the combobox. The subnode's name specifies the text that will be shown in the option. You can manually add subnodes and give them names if your combobox options do not change. Often you will want the options in the combobox to be dynamic. You can do this by writing code in an OnOpen or the OnPress trigger that populates the items attribute dynamically. Access the items attribute with the items() attribute command, clear the contents of it, then add nodes into the items attribute with nodeinsertinto(), then set their names with setname(). Once you've populated the list, set the itemcurrent attribute's value to the rank of the option that you would like the combobox to reference by default, then call comborefresh() to refresh the combobox windows options according to the new items list.
- itemcurrent - The itemcurrent attribute is also a required attribute. It should have number data, and it specifies which attribute is currently selected.
- OnSelect - The OnSelect attribute is a trigger that fires when the user selects an option in the combobox. The attribute should have text data with flexscript code specifying what to do when the user selects the option. Within this trigger you will want to access the value of the itemcurrent attribute to find out which option the user selected.
- OnPress - The OnPress attribute is a trigger that fires when the user clicks the arrow at the right of the view, right before the combo box displays its list of items. This is a good place to execute code to dynamically change the contents of items.
DateTimePicker
- format - This attribute specifies how the DateTimePicker will display the given date or time. This attribute only works if the view has the DTS_APPCANPARSE style.
- coldlink/coldlinkx/hotlink/hotlinkx - This attribute should be a link to a node with number data on it, or return a number respectively. The numerical value is the date/time value that will be displayed. The number should be in unix time, which is the number of seconds since Jan 1st 1601. For example, 13024569600 would be 8:00:00 AM Wed 25 Sep 2013. You can get the current unix time with the command applicationcommand("getunixtime").
- OnSelect - The OnSelect attribute lets you execute flexscript code when the user changes the date or time.
- OnKillFocus - The OnKillFocus attribute lets you execute flexscript code when the user clicks off of the datetimepicker.
- style - The following styles are available to this view: DTS_TIMEFORMAT, DTS_LONGDATEFORMAT, DTS_SHORTDATEFORMAT, DTS_SHORTDATECENTURYFORMAT, DTS_UPDOWN, DTS_APPCANPARSE.
Dialog
The following attributes can be added to a dialog view type, or the view node for the main window.
- menucustom - This attribute acts much like the menupopup attribute, except the menu will appear at the top of the window instead of appearing when the user right-clicks in the view.
- menuview - This attribute allows you to have the standard FlexSim menu appear at the top of the window. The attribute should have number data and be set to 1 to have the menu appear.
- objectfocus - This attribute will specify a path to the object that a given window instance will point to. The createview() command contains a parameter that specifies the objectfocus, the objectfocus attribute will be filled with that parameter when the window is opened.
- OnOpen - This attribute allows you to specify flexscript functionality that will fire when the window is opened. It is fired when the window is initially opened, as well as when the window is restored after a compile, as well as when the window is "redirected" to point to a new object if the user switches the window to point to another object. You may use this trigger to initialize settings in controls that may not have a coldlink.
- OnPreOpen - This attribute allows you to execute functionality before the window is created. The OnPreOpen is fired after the tree structure for the window is created, but before the window itself is initialize. Unlike OnOpen, it is not executed after a compile or when the window is redirected. You could use the OnPreOpen to modify the structure of the window before it is opened, such as adding or removing tab windows, or adding or removing any controls from the tree structure of the window.
- OnClose - This attribute contains text data with flexscript code that will be executed when the window is closed.
- palettewindow - This attribute will cause the window's title bar to be smaller and look more like a tool window. The window will also always appear on top of other windows. The attribute needs no data.
- windowtitle - This attribute defines the title of the window. It should have text data defining the title.
- style - To create a modal window, add the subnode FS_MODAL to the style attribute.
Graph
The graph control lets you show data in a graph format. It can be presented as a pie chart, a bar graph, a line graph, a histogram, or a scatter plot. The graph is updated on the fly, so you can have real-time model data be shown as the model runs. Below are attributes that can be used with the graph.
- viewfocus - The viewfocus attribute is required. It should have text data containing a path to a node that contains data for the graph. The structure of the data depends on the type of graph. If the graph is a pie chart, then the view focus node should have text data that specifies the name of the chart. If the graph is a line graph, scatter plot, or bar graph, then again the viewfocus node should have text data that specifies the title of the chart, and the viewfocus should have sub-nodes. Every odd-numbered sub-node will represent a point on the x axis, and every even-numbered sub-node represent its corresponding y value. If the graph is a histogram, then the viewfocus node should have three sub-nodes, each having number data. The first sub-node should be the minimum value of the histogram range. The second sub-node should be the maximum value of the histogram range. The third sub-node should be the number of "buckets" or divisions in the histogram.
- graphgrid - If this attribute is present, then a grid will be shown as a background for the graph. The width of the grid does not correlate to any set value range in the graph, but is rather for comparative purposes, for example to compare the height of two bars in the graph. The attribute does not need any data.
- graphtitle - If this attribute is present, then the grid will show a title for the graph. This is usually the text data on the viewfocus node except in the case of a histogram, where it is the text data on the graphhistodata focus. The attribute does not need any data.
- graphaxes - If this attribute is present, then the grid will show the min and max values of the x and y range for the graph. The attribute does not need any data.
Groupbox
The groupbox is a control that groups several other controls together with a heading an a border around it. There are no special attributes for the groupbox.
Edit
The edit control shows text that can be edited by the user. If no special attributes are given to the control, then it will show the name of the control as its text. Below are attributes that can be used with the edit control.
- coldlink, hotlink, coldlinkx, hotlinkx, coldlinkname, hotlinkname - The coldlink and hotlink attributes are most common with this type of control. They connect the text of the edit control with the value of an attribute or variable node of the object. They work as documented above and define what will appear in the text of the control. If the linked node contains number data, then the value will be copied into the control's text with the precision that the user specified in the main Edit menu. When the link is applied, the value in the edit control's text field is copied back to the linked node. You can also use setviewtext() and getviewtext() to explicitly get and set the text of the control.
- style - One style that may by useful for the edit control is the ES_READONLY style. This causes the edit's text area to be gray and uneditable, but with the depressed border unlike a static, signifying a value that is feedback to the user but not an input from the user. ES_NUMBER will cause the field to only accept numbers and gives an alert if the user tries to enter a character.
Histogram Attributes
To create a histogram, you should add the following attributes. For an example of the structure needed for a histogram, view the tree of any FlexSim object and go to the tree at >stats/staytime/stats_staytimehisto.
- graphhistodata - If this attribute is present, then the graph will show a histogram. The attribute should have text data containing a path to a node that contains "bucket" sub-nodes. The number of sub-nodes should be the number specified by the viewfocus plus 2. The first sub-node will be designated as the "underflow" node, where any values less than the minimum range value of the histogram will be added to this node. The last node is "overflow" for values that are greater than the histogram's maximum range. Every other sub-node represents the histogram value for the "bucket" for the sub-node's corresponding interval.
- graphhistointervaldata - You can also allow FlexSim to calculate a confidence interval on the mean of the histogram data by adding this attribute. This attribute should contain text data with a path to a node with 5 sub-nodes. The node itself should have number data that is either 1 or 0. If 1, the confidence interval will be shown on the graph. The first three sub-nodes are used by FlexSim and should have number data. The 4th sub-node should be the percent confidence, and the 5th sub-node should have number data with the value 1, telling FlexSim to automatically calculate the interval.
- graphbars - This attribute signifies that the graph will be shown as bars. The attribute needs no data.
HTML
The HTML window is used in GUIs such as the Start Page, Online Content Page, and Dashboards.
- html - The html node in the view's variables node will be the html that is displayed on the view.
- OnPreLoad - The OnPreLoad node in the view's eventfunctions node (must be toggle as Flexscript) will be executed prior to the html being loaded on the page.
Icongrid
The icongrid control provides a drag-drop mechanism for the user. The library icon grid is an icongrid control. The GUI builder also uses icongrids to drag-drop controls and attributes into the GUI. Below are attributes that can be used with the icongrid.
- viewfocus - The viewfocus attribute is a required attribute. It should have text data that contains a path to the view focus of the icon grid. The icongrid will display each subnode of the view focus as a draggable rectangle. In order for a given sub-node to be displayed, it must have object data, and it must have a picture attribute. If not, the object will not be shown at all in the icongrid. The picture attribute of the object may contain text data that specifies a path to a bitmap file, starting in the FlexSim main directory. The file can be a bmp, jpg, png, or ico file. If the path is valid, then the picture will be shown in the object's rectangle. Otherwise, only the name of the object will be shown.
- viewwindowsource - This attribute is required if you want the icongrid to be draggable. It should have number data with the value of 1, meaning yes you want the user to be able to drag objects from the icongrid onto other views.
- cellwidth - This attribute allows you to define the width, in pixels, of each rectangle in the icongrid. It should have number data containing the desired width.
- cellheight - This attribute allows you to define the height, in pixels, of each rectangle in the icongrid. It should have number data containing the desired height.
- displaygroup - This attribute lets you display just a sub-group of the view focus. The attribute should have text data specifying a name for the sub-group, like "Manufacturing". Then, each object in the view focus should also have a displaygroup attribute with text. If the displaygroup of the object matches the displaygroup of the icongrid, then the object will be shown in the icongrid. To change the group that you want shown, just change the text of the incongrid's displaygroup attribute, then call repaintview() on the icongrid.
- viewhidealllabels - This attribute causes the objects' names not to be shown, but only their pictures. The attribute should have number data with a value of 1.
- viewbackgroundcolor - If this attribute is present, then the icongrid will not be shown as a set of raised buttons, but instead will just paint the pictures and names on top of a background you specify. The attribute should have 3 sub-nodes, each with number data between 0 and 1 corresponding to the red, green and blue components respectively.
- depresshighlighted - If this attribute is present, then the view's highlighted object will have a sunken border instead of a raised border. The attribute does not need any data. To access the view's highlighted object, use the selectedobject() command.
- picturealignleft - If this attribute is present, then each object's icon will be shown to the left of the object's name, instead of above it and in the center. The attribute should have number data specifying the width, in pixels, to make available to the left of the object's name for the object's picture.
- OnDrag - This attribute allows you to execute code when an object is dragged from the icongrid onto another view. The attribute should have text data with flexscript code. Within the function, c gets access to the icongrid, i gets access to the view on which it was dropped, dropx(), dropy(), and dropz() get the drop location if the view is a ortho, perspective, dropnodefrom() gets access to the object that was dragged, and dropnodeto() gets access to the object it was dropped onto if one exists. Please note that if no OnDrag attribute exists, then a copy of the object will be made in the dropped view's focus or in dropnodeto() if it exists.
Line Chart, Bar Chart, Scatter Plot Attributes
If the graph is not a pie chart or histogram (and it has a graphxy attribute), then the sub-nodes of the focus node will be interpreted as paired values to be plotted on the x and y axes of the chart. Odd-numbered sub-nodes represent x values and even-numbered sub-nodes represent y values. Use the following attributes to define how those values will be drawn. The attributes can be combined as needed.
- graphxy - Add this attribute to make each sub-node pair be interpreted as an x/y value. If this attribute is not present, then each sub-node (not sub-node pair) will be interpreted as a y value, and the points will be evenly distributed across the x-axis, the first point with the x value 1, the second with x-value 2, and so forth. You may want to leave this attribute out if you want to display a bar chart where the bars are evenly distributed across the x axis.
- graphlines - Add this attribute to have a line drawn between consecutive points in the graph. The attribute needs no data.
- graphpoints - Add this attribute to have a dot drawn at each point in the graph. The attribute needs no data.
- graphbars - Add this attribute to have a bar drawn from 0 to the y value at each point in the graph. The attribute needs no data.
- graphstep - If this attribute and the graphlines attribute are present, then each line will be drawn first horizontally and then vertically to the next point, creating a stair-step effect instead of diagonal lines.
- gridx, gridy - If the graphgrid attribute is present, then you can also add a gridx and/or gridy attribute, which specifies the x/y grid interval.
- graphscatterdata - This attributes causes the structure of the data to be redefined. The attribute should have two sub-nodes, each containing text data defining a path to a container node. The first sub-node's focus node contains a list of "x" data points, and the second sub-node's focus node contains a list of "y" data points. Each point on the graph consists of an x-value from the first focus node paired with a y-value from the second focus node. If this attribute is present, then the viewfocus attribute will be ignored.
- dataseries - The dataseries node is actually not an attribute on the graph control. Instead, it should be placed in the same container as the focus node (>viewfocus+/../). If the graph control sees that this node is present, then it will split the graph up into several uniquely colored data series. This allows you to have a line graph with multiple colored lines, or a bar graph with multiple colors and a legend. The dataseries node should have sub-nodes, each representing one data series. The name of each sub-node will be shown in the graph's legend. Each sub-node should also contain number data that signifies how many points are in that data series. The value of the sub-node specifies an "up-to" point in the data. Take for example a line chart with 20 points. Normally the graph will simply draw a red line between each point in the graph. However, let's say you want to split the 20 points into 3 categories. The first 7 points represent the content graph for Object A, the next 10 points represent the content graph for Object B, and the last 3 points represent the content graph for Object C. To split these data series, add a node called dataseries to the content graph's container node. Then add three sub-nodes, named Object A, Object B, and Object C. Then give each sub-node the respective values: 7, 17, 20. This designates Object A's series as points 1-7, Object B's as points 8-17, and Object C's as points 18-20. The graph should now show three uniquely colored lines, as well as a legend.
Listbox
The listbox is similar to the combobox, except the options are not displayed in a window that drops down. Instead, then list is displayed in the window itself. Below are attributes that can be used with the listbox control.
- items - The items attribute is required on the listbox. It represents the list of options in the list box. It acts just like the items attribute in the combobox.
- itemcurrent - The itemcurrent attribute is also required. It also acts just like the itemcurrent attribute of the combobox.
- OnSelect - The OnSelect attribute is a trigger. It acts just like the OnSelect attribute of the combobox.
Panel
The panel control is like a groupbox but with a different border. You can give the panel a sunken border or no border at all. Below are attributes that can be used with the panel control.
- beveltype - The beveltype attribute specifies what the border of the panel should look like. The attribute should have number data with a value between 0 and 2. A value of 0 will cause no border to be drawn. A value of 1 causes a one pixel sunken border to be drawn. A value of 2 causes a 2 pixel border to be drawn.
- bitmap - You can give the panel a bitmap. To do this, add the bitmap attribute, give it the path to the bitmap file (like buttons\up_arrow.bmp), then give the panel a viewfocus attribute with the following text: "..>bitmap". This will cause the bitmap to be shown on the panel. The file can be a bmp, jpg, png, or ico file.
- color - You can also have the panel show a certain color. To do this, give the panel a color attribute as well as a viewfocus attribute. If the color you want to display resides on the object itself, then the text of the viewfocus should be something like: "@>objectfocus+>visual/color". If you would like to store the color on the view itself, then give the color attribute three subnodes, each with a number value between 0 and 1 representing the red, green and blue values respectively.
- splitterx, splittery - The splitterx and splittery attributes designate the panel as a container for two resizable subcontrols. You should use one or the other but not both attributes. The attribute does not need data. To set up a splitter panel, add then the attribute, then add two subcontrols to the panel by dropping them inside the panel. The way the panel works is, if the mouse clicks and drags on any portion of the panel that is not part of a subcontrol, then the subcontrols will be resized. Thus you want to have the sub-controls take up the entire area of the panel except for a small "resizer" bar in the middle of the panel. As an example, drag a panel into your GUI and then give it a size of 200 x 200. Then drag two buttons into the panel. Give the first button a location of (0,0) and a size of (100,200). Give the second button a location of (105, 0) and a size of (95,200). Then give the panel a splitterx attribute. Then press F5 to go into preview mode. Notice the 5 pixel wide bar in the middle. Click it and drag the mouse right or left. Notice that the buttons will be resized as you drag. This example is not a very practical example, but the panel can be used with any controls. For a more useful example, look at the picklist code editor, which uses a splittery panel to show the template code and actual code simultaneously (VIEW:/standardviews/picklistedit).
Pie Chart Attributes
To create a pie chart, add the following attributes.
- graphpie - This attribute signifies that the graph will be shown as a pie chart. The attribute needs no data.
- graphpiedata - This attribute should have text data the contains a path to a node with sub-nodes. Each sub-node's name will be show in the pie chart's legend, and should have number data that is the value for that item in the pie chart. The sum of all sub-nodes of the focus node will represent a full 360 degree circle, and the each sub-node's value represents a chunk of the pie.
Radiobutton
The radiobutton control is much like a check box in that it can have two states, but it also has some extra functionality where only one radiobutton can be checked at one time within a container of radiobuttons. It allows the user to choose one of several options. Below are attributes that can be used with the radiobutton control.
- coldlink, hotlink, coldlinkx, hotlinkx - The coldlink and hotlink attributes link the state of the radiobutton to a value in an attribute of the object. The node that the cold/hotlinks link to should hold number data and have a value of 1 or 0. 1 will cause the button to be checked, 0 will cause the button to be unchecked. You can also explicitly check the box with setchecked() or get whether it is checked with getchecked() (1 means checked, 0 means unchecked). Radio buttons present a problem because in order to have them work using just cold/hotlinks, you would need to connect each one to an individual node's value. Hence you would need 5 nodes in the object's attributes with only one having the value of 1 and the rest having 0. What users often want instead of this is to have a set of radiobuttons that reflect one value. For example, if a node has value 1, then radio button 1 should be checked; for value 2, radio button 2 should be check, and so forth. In order to do this you would need to write your own code in a coldlinkx or in the OnOpen of the window. Alternatively, you can use a combobox control. The combobox control fulfills the same functional requirement of choosing one of several options, but packages it all into one control that can be linked to a value on one node.
- itemcurrent - Again, the itemcurrent attribute is added to the radiobutton automatically when an instance is created. Usually it signifies whether the box is checked, but it may not always. Use getchecked() to get the check state of the box.
- style - Again, it may be useful to use the BS_PUSHLIKE style here.
Script
The script control uses the Scintilla text editor. This is a flexible code editor that provides FlexSim with many code editing features. To learn more about the Scintilla text editor, go to www.scintilla.org. Below are attributes that you can add to a script control.
- coldlink - The coldlink attribute links the text of the script control to the text of a node on the object. It works as documented in the general section above.
- noformat - The noformat attribute causes the script control to be unformatted, meaning no code highlighting, line numbers, or folding will be done to the text of the control.
You can explicitly get the text of the control with getviewtext(), and set it with setviewtext(). You can also use a script control to display template code using the codetotemplate() command, which fills the template text of the control based on the code of a node, and the templatetocode() command, which modifies the code on a node based on the changes that the user has made to the template text. If you use the script control to show template code, you should give the control a noformat attribute.
Scrollbar
- OnDrag - This attribute allows you to execute code when the scroll bar is dragged.
- vertical - If this attribute is added, the scrollbar will be a vertical scrollbar. This attribute needs no data.
Spincontrol
- viewfocus - This attribute defines what the field the spinner is tied to.
- OnClick - This attribute is a Flexscript toggled node in the eventfunctions node. It is called when the user mouse downs and mouse ups on the control.
- OnMouseMove - This attribute is a Flexscript toggled node in the eventfunctions node. It is called after the user mouses down on the control, and before they mouse up.
Static
The static (or label) control is a control that simply shows text. If no special attributes are given to the control, then the name of the control will be shown as its text. Below are attributes that can be used with the static control.
- coldlink, hotlink, coldlinkx, hotlinkx, coldlinkname, hotlinkname - The coldlink and hotlink attributes allow you to have the text be dynamic based and attribute of the object. They work as documented above and define the text of the static control. Because the text of the static control is not editable, the links are not applied as they would be for other controls. You can also use setviewtext() and getviewtext() to explicitly get and set the text of the control.
- bitmap - The bitmap attribute causes the static control to show a bitmap instead of text. The attribute should have text data that defines a path to the bitmap file, starting at the FlexSim main directory. The file can be a bmp, jpg, png, or ico file. If the file is a bmp, you can specify within the bitmap file certain areas a "transparent", meaning the standard background color of the view will show through. To do this, the bitmap must be created in index color mode 24 bits per pixel, and the color that Windows will designate as transparent is the color R:192 G:192 B:192.
Statusbar
The statusbar control adds a status bar to the bottom of another window. You can set the text of the statusbar with setviewtext(). Below are attributes you can use with the status bar:
- coldlink, hotlink, coldlinkx, hotlinkx - These attributes link the text of the status bar to the value on a node. They work as documented above.
Tabcontrol
The tabcontrol is a control that contains sub-controls that are each a tab page. To add a tab page, drag a control into the tab. Below are attributes that can be used with the tabcontrol.
- pagelist - The pagelist attribute allows you to have an external source for the pages of the tab control. The attribute should have text data specifying a path to a node that contains subnodes. Each of the subnodes should contain text data that is a path to the page control. The pagelist attribute is used quite often in object Properties windows.
- itemcurrent - The itemcurrent attribute is required. It allows you to know which tab is currently selected. It should contain number data whose value will be set whenever the user chooses a tab.
- OnSelect - The OnSelect attribute lets you execute flexscript code when a tab page is selected. The attribute should have text data that will be fired when the user selects a tab. Within the code, c accesses the tabcontrol view. Use get(itemcurrent(c)) to get the currently selected page.
Table
The table control is a window that allows the user to see and edit a table or list of data. Below are attributes you can use with the table control.
- viewfocus - The viewfocus attribute is required for the table control. It specifies what the table will "point at". It is like the objectfocus attribute. It should have text data that is a path to the node that contains the table information. There are two options for the structure of the table node itself. It can be a list, meaning it contains a number of subnodes. If the table node is a list, then the table control will show just one column of data, and the text in each entry is the data, either text or number, of each of the subnodes in the list. The row headers of the table are defined by the names of each subnode. The other option is to have the table node be an actual table. In this case the table node contains a set ofsubnodes. Each subnode is one row in the table, and it contains subnodes, each being an individual entry in the table. The number of columns that will be shown in the table is defined by the number of subnodes of the first row. Row headers again are defined by the names of each row node. Column headers are defined by the names of the subnodes of the first row node. Please note that with a table, it is a direct view into the table data. This means that any changes made in an entry in the table will be applied as soon as you click off of the entry. This is different than using coldlink in other controls, where changes are only made when the user hits the Apply button. This is why the table control uses the viewfocus attribute, because it is a direct view into the data of a model, just like an ortho or perspective control.
- dataentry - If you add a dataentry attribute to a table control, then this will allow the user to quickly traverse the table entries using the Tab and Enter keys as well as the arrow keys. This attribute will usually be used. The only time you may not want it is if you may want the user's Tab, Enter and arrow keystrokes to be captured within the entry itself, for example if a table entry may contain multi-line code.
- noformat - Like the script control, the table control uses the Scintilla text editor. By adding the noformat attribute, Scintilla features like code highlighting, line numbers, folding, etc. are disabled. Usually this attribute should be present as it makes quick table editing easier.
- cellwidth - This attribute specifies the default column width, in pixels, of the table. The attribute should have number data with the value in pixels. The cellwidth attribute can also contain subnodes. Each subnode should have number data that defines the column width of an individual column. The first subnode defines the column width of the row header column, the second subnode defines the first column's width, and so forth.
- cellheight - This attribute specifies the height, in pixels, of each row in the table. Unlike table columns, all table rows must be the same.
- drawlines - The drawlines attribute allows you to customize how lines between columns and rows are drawn. The attribute should have number data with a value between 0 and 3. A value of 1 will cause no separation lines to be drawn at all. A value of 1 causes both column and row separation lines to be drawn. A value of 2 causes only column separation lines to be drawn. A value of 3 causes only row separation lines to be drawn.
- list - The list attribute designates the table as a list of node names. The attribute needs no data. The table will have only one column (no row headers column). In the single column, only the names of each subnode of the table will be shown.
Trackbar
The trackbar control is a control that allows you set numeric values by visually dragging a locator along a trackbar. This control is also known as a slider. Below are attributes that can be used with the trackbar.
- coldlink,hotlink, coldlinkx, hotlinkx - These attributes link the tracker to a value on a node. They work as documented in the general section above.
- itemcurrent - The itemcurrent attribute is a required attribute. Its value holds the current value that has been selected for the tracker.
- rangemin, rangemax - The rangemin and rangemax attributes specify the min and max values of the tracker. They should have number data specifying the min and max values respectively.
- rangeexp - This attribute tells the tracker to exponentially increase the value as the locator is dragged to the right, instead of linearly. It should have number data specifying the factor to exponentially increase by. The run speed control at the bottom of the FlexSim window uses this attribute.
- OnSelect - This attribute allows you to execute code when the user drags the locator to a given position. The attribute should have text data with flexscript code specifying what to do. Within the function, c will access the tracker control. To get the currently selected value, access the value in the itemcurrent attribute.
Tree
The tree view into flexsim's tree. Below are attributes that can be used with the tree control. For the most part, necessary attributes are added automatically for you. This will document only the attributes that you will need to know about.
- viewfocus - The viewfocus specifies the focus of the tree view. It should have text data with a path to the node that will be the head of the tree.
- cellwidth - The cellwidth attribute lets you specify how wide, in pixels, each node's name will be shown.
- noformat - If this attribute is present, then when text data is edited it will not be formatted for code.
- viewpointx - This attribute is required and has number data specifying the x viewpoint, in pixels, of the tree view.
- viewpointy - This attribute is required and has number data specifying the y viewpoint, in pixels, of the tree view.
Treeview
This control is not to be mistkan for the FlexSim Tree. The treeview control can be seen in such GUIs as the Excel Interface and the Breakpoints window.
- coldlinkx, hotlinkx - These attributes can be used to execute code to update the treeview.
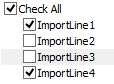
- items - The items attribute is required for this control. It contains all of the items that will be displayed in the control. It is important that each item has number data. The check boxes set and get their state based on the number in each item (1 or 0). Items may have subnodes which will create a parent/child display in the treeview.
- itemcurrent - The itemcurrent attribute is required for this control. It contains the currently selected item.
- OnPress - The OnPress trigger is called when the user clicks on a check box.
- OnSelect - The OnSelect trigger is called when the user selects one of the items in the tree.
- style - Styles that are important with this control are TVS_CHECKBOXES, TVS_SHOWSELALWAYS, TVS_FULLROWSELECT, TVS_DISABLEDRAGDROP, TVS_EDITLABELS, TVS_HASBUTTONS, TVS_HASLINES, TVS_LINESATROOT, TVS_SINGLEEXPAND.