Task 2.2 - Customize the Task Sequence
Task Overview
At this point in the tutorial, you've essentially re-created the standard transportation logic that task executers use to load and unload 3D objects in the model. You didn't need to create a process flow to create this logic because it was already possible using the logic available on 3D objects alone.
The real power of process flow is when you want to create a custom task sequence for your task executers. Process flow makes it much easier to create custom task sequences for your simulation model. In this tutorial task, you'll customize the basic task sequence you created in the previous tutorial task to add custom logic. You'll build a custom task sequence in which the operators will go to the supply closet to get cleaning supplies and clean the processor after every item has been processed and transported.
When you're finished, your simulation model will look and function similar to the following image:
Step 1 Add Additional Tasks to the Task Sequence
In this step, you'll edit the task sequence to make it a little more complicated. You'll add additional task activities that will make the operators clean the processors after they finish transporting the flow items to the next destination.
If you look at the process flow activities available in the Library, you'll notice that there are many possible logical functions to choose from. But these activities are only the most common types of logical functions that are available in FlexSim. You can use the Custom Code activity to implement any of the other additional pre-programmed logic that is already available in FlexSim. You can also use it to create custom FlexScript code if needed. In this step, you'll use the Custom Code activity to turn the processors on and off before and after cleaning.
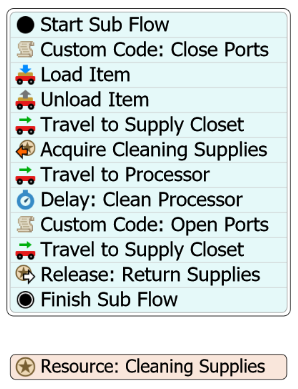
You'll only add and rename the new task activities for now. You'll edit the properties in a later step. When you're finished, your process flow should look similar to the following image:
To add the activities:
- Press the Reset button on the simulation control bar to stop the current simulation run.
- To avoid confusion, close the two instances of the process flow so that only the TransportItems process flow is open.
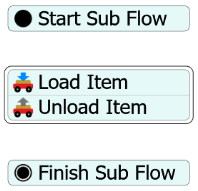
- In the process flow, click the stacked block of activities to select it.
- Click the Scissors button
 in between the
Start Sub Flow and Load Item
activities to separate them. Separate the Unload Item and
Finish Sub Flow activities as well.
in between the
Start Sub Flow and Load Item
activities to separate them. Separate the Unload Item and
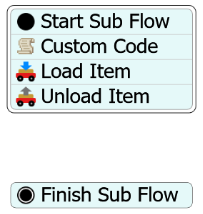
Finish Sub Flow activities as well. - From the Library, under the Basic group, drag a Custom Code activity after the Start Sub Flow activity to make a stacked block.
- Drag the stacked block that contains the Load Item and Unload Item activities to add it to the end of the Custom Code activity.
- After the Unload activity, add the following activities to the stacked block (in
this order):
- A Travel activity (under the Task Sequences group)
- An Acquire Resource activity (under the Shared Assets group)
- A Travel activity (under the Task Sequences group)
- A Delay activity (under the Basic group)
- A Custom Code activity (under the Basic group)
- A Travel activity (under the Task Sequences group)
- A Release Resource activity (under the Shared Assets group)
- Drag the Finish Sub Flow activity to the end of the stacked block.
- Add a Resource activity to the side of the stacked block without connecting it.
- For clarity, rename the new activities as follows:
| Activity | New Name |
|---|---|
| The first Custom Code | Custom Code: Close Ports |
| The first Travel | Travel to Supply Closet |
| Acquire | Acquire Cleaning Supplies |
| The second Travel | Travel to Processor |
| Delay | Delay: Clean Processor |
| The second Custom Code | Custom Code: Open Ports |
| The third Travel | Travel to Supply Closet |
| Release | Release: Return Supplies |
| Resource | Resource: Cleaning Supplies |
When you're finished, check to make sure your process flow looks similar to the image at the beginning of this step.
Step 2 Edit Activity Properties
In this step, you'll edit the properties of all the new activities you added to the task sequence. The following table provides an overview of how the activities in this process flow will function:
| Activity | Explanation |
|---|---|
| Start Sub Flow | All new tasks generated by the processor will create a token which starts here in the process flow. |
| Custom Code: Close Ports | This activity will close the processor's ports so that it stops receiving flow items until it has been cleaned. |
| Load Item | The operator connected to the processor's center port will load the flow item. |
| Unload Item | The operator will take the flow item to the downstream fixed resource connected to the processor's output port. |
| Travel to Supply Closet | The operator will travel to the supply closet. |
| Acquire Cleaning Supplies | The operator will get the cleaning supplies from the supply closet. |
| Travel to Processor | The operator will travel back to the processor. |
| Delay: Clean Processor | This activity will represent the amount of time it takes to clean the processor. |
| Travel to Supply Closet | The operator will return to the supply closet. |
| Release: Return Supplies | The operator will return the supplies to the supply closet. |
| Finish | When the sub flow is complete, the token will enter this activity and be destroyed, indicating the task is now complete. |
| Resource: Cleaning Supplies | This resource will represent the cleaning supplies that will be used to clean the processor. You'll set this resource so that it is globally accessible, which means that both operators (both instances) will use the same resource. Only one set of supplies will be available at a time. |
The steps will be logically organized by the activity types rather than the order they appear in the task sequence.
- Click the activity block to select it.
- You'll start by editing the two Custom Code activities so that they close and open
the processor's ports at the right point in the task sequence. In Quick Properties under
the Custom Code: Close Ports group, click the
Add button
 next to the Custom Code box to open a menu of available
picklists. Point to Control, then
Close and Open Ports to open its picklist options.
next to the Custom Code box to open a menu of available
picklists. Point to Control, then
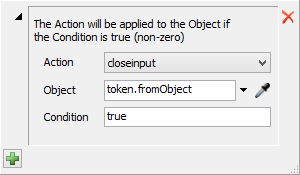
Close and Open Ports to open its picklist options. - Leave the Action menu set to closeinput so that it will close the incoming port of the current processor.
- Click the arrow next to the Object box to open a menu. Select token.labelName. In this box, change labelName to fromObject. This setting will make a dynamic reference to the object listed in the token's fromObject label. (This label assigns the current processor to this property. See Step 4 of Tutorial 1.1 as a reminder.) In other words, the incoming port from the current processor will be closed.
- Repeat steps 2-4 for the Custom Code: Open Ports activity with one small change: in the picklist options, select openinput in the Action menu. This will open the incoming port of the current processor after the operator finishes cleaning it.
- Now you'll edit the properties for all the Travel activities so that they are assigned to the correct operator. In Quick Properties for the Travel to Supply Closet activity, click the arrow next to the Executer/Task Sequence box to open a menu. Select current (Instance Object).
- Repeat the previous step for Travel to Processor and the second Travel to Supply Closet activities.
- Now you'll edit the properties for all the Travel activities so that they are
assigned to the correct Destination. In Quick Properties under the first
Travel to Supply Closet group, next to the
Destination click the Sampler
button
 to enter sampling mode.
 - Select the Supply Closet object in the 3D model to open a menu. Select Supply Closet from the menu.
- Repeat steps 8-9 for the second Travel to Supply Closet activity.
- In Quick Properties under the Travel to Processor
activity, click in the Destination box and type
token.fromObjectto make a dynamic reference to the object listed in the token's fromObject label. (This label assigns the current processor as the destination. See Step 4 of Tutorial 1.1 as a reminder.) - Next, you'll link the Resource: Cleaning Supplies
shared asset to the process flow. With the stacked block still selected, click the
Exclamation icon
 next to the
Acquire Cleaning Supplies activity to enter sampling mode,
then click the Resource: Cleaning Supplies shared
asset.
next to the
Acquire Cleaning Supplies activity to enter sampling mode,
then click the Resource: Cleaning Supplies shared
asset. - Click the Resource: Cleaning Supplies shared asset to select it. Click the Type menu and select Global.

Consider saving your model.
Step 4 Run the Simulation Model
Now it's time to run the simulation model to see the custom task sequence in action. Reset and run the simulation model:
As the model runs, you'll see the two operators traveling to the supply closet and cleaning the processor in addition to loading and unloading the flow items. The tokens in the process flow indicate which task each operator is currently working on.
At this point, you could possibly experiment with making two sets of cleaning supplies available to see if it speeds up the system's overall throughput. Or you could possibly design logic in which the operator only cleans the processor after every fifth item is processed.
Conclusion
This completes the task sequence process flow tutorial. Consider completing the other tutorials to get a deeper understanding of process flow instances, sub flows, and other important topics.