Working With Transfer Objects
Introduction to Transfer Objects
Whenever you connect a conveyor to another conveyor or to a fixed resource in the 3D model, FlexSim will automatically create a transfer between those objects. (See Connecting Conveyors for more information.) There are three kinds of transfer objects, as explained in the following table:
| Name | Description | Appearance |
|---|---|---|
| Transfers | Transfers are connections from one conveyor to another. They can affect how an item is transferred between conveyors, especially when merging lanes together. |  |
| Entry Transfers | Entry transfers are connections from a non-conveyor object (such as a source or other fixed resource) to a conveyor object. They can affect how an item is transferred to a conveyor. |  |
| Exit Transfers | Exit transfers are connections from a conveyor to a non-conveyor object (such as a sink or other fixed resource). Exit transfers have the ability to send for a transport (a task executer) to pick up items and deliver them to another object. Task executers can pick up items from a particular point on the exit transfer or a range of possible points along an exit transfer. |  |
Global Transfer Types
Like other conveyor objects, the logic of transfers can be defined either locally or globally. If you want the transfer's logic to be determined globally, you should create a global type for it. If you want the transfer's logic to be determined locally, set the transfer's type to Custom. See Controlling Logic and Properties With Global Types for more information.
Moving Entry or Exit Transfers
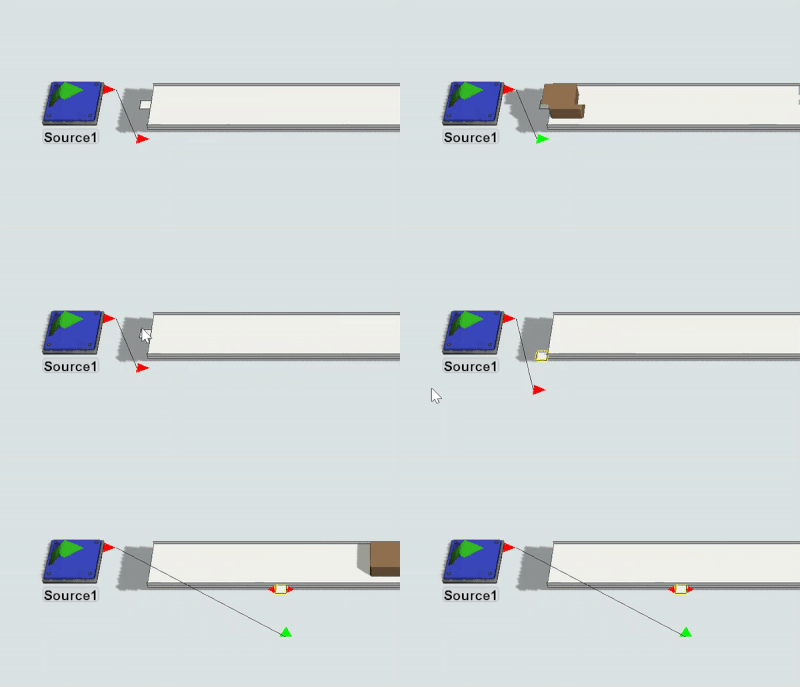
Flow items will enter or exit a conveyor from the place in the conveyor where the entry or exit transfer is positioned. You can move an entry or exit transfer by dragging it to a different position on the conveyor, as shown in the following image:
Expanding the Range of a Transfer
You can expand the range of entry and exit transfers if needed. The most common reason for expanding an exit transfer is to increase the range of possible pickup or drop-off points that a task executer can use to pick up items along a conveyor.
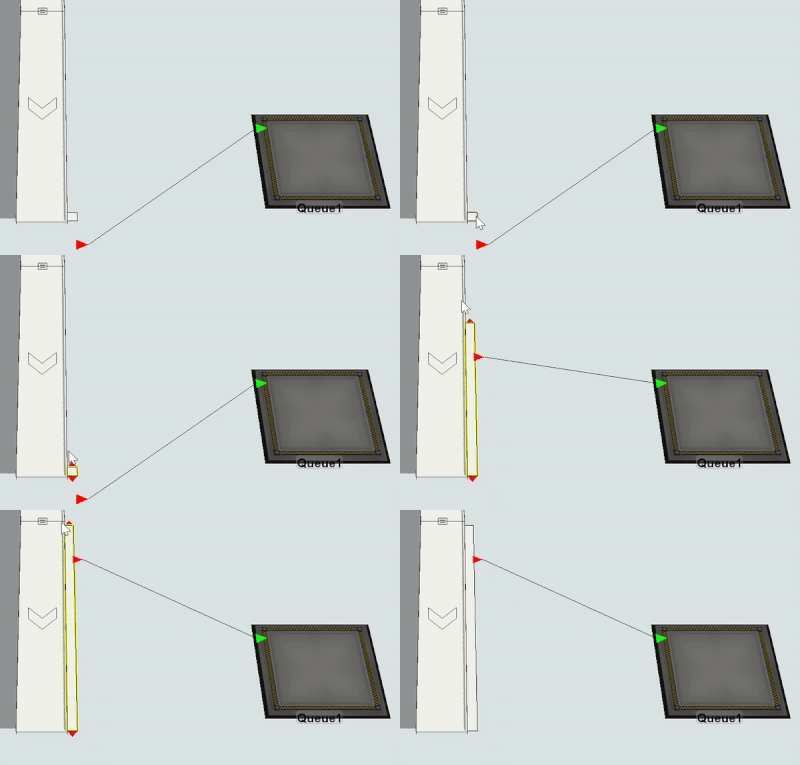
To expand the range of a transfer:
- Create a port connection (A-connect) from a conveyor to a fixed resource, such as a sink.
- An exit transfer will appear at the end of the conveyor. It will look like a white box with a port connected to the fixed resource.
- Click on the exit transfer and drag it to the desired position on the conveyor.
- Two red sizing arrows appear on both sides of the exit transfer when you click on it. Click either red sizing arrow and drag it away from the exit transfer until it reaches the desired size (range).
Using a Transport with Exit Transfers
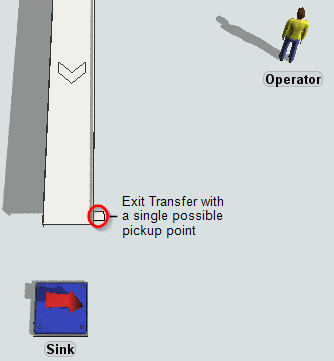
Exit transfers have the ability to send for a transport, or in other words a task executer, to pick up items and deliver them to another object. Task executers can pick up items from a particular point on the conveyor or a range of possible points along the conveyor, as shown in the two following images.
The following image shows an exit transfer with a single possible pickup point:
The following image shows an exit transfer with a wide range of possible pickup points:
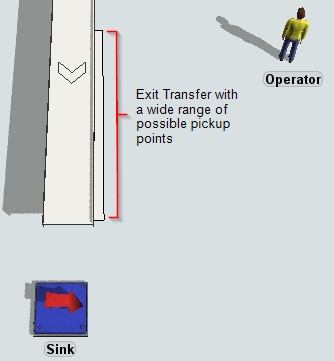
The task executer will begin traveling toward the exit transfer as soon as the center of an item arrives at the edge of the exit transfer on the conveyor. If the exit transfer has a wide range of possible pickup points, the task executer can pick it up anywhere along the exit transfer, as shown in the following image:
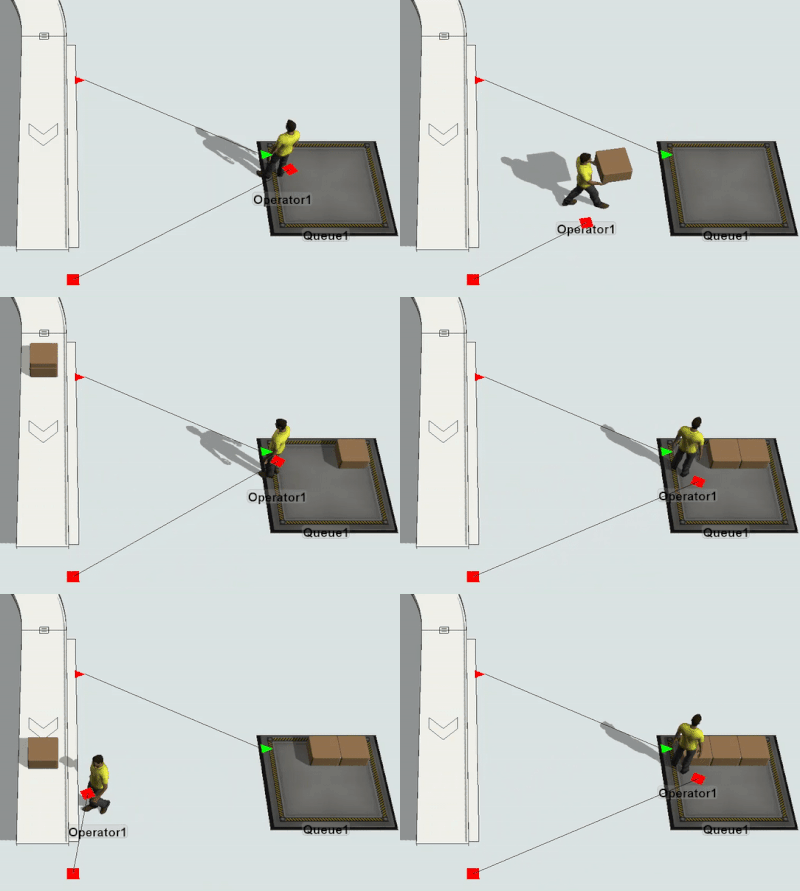
You also have the option of allowing the task executer to use continuous pickup point prediction, which means that the task executer will recheck the position of the item as it moves down the conveyor and alter its course to a different pickup point based on how the item is predicted to move along the conveyor.
To use a transport to pick up items and deliver them to another object:
- Create a center port connection (S-connect) from the exit transfer to a task executer, such as an operator.
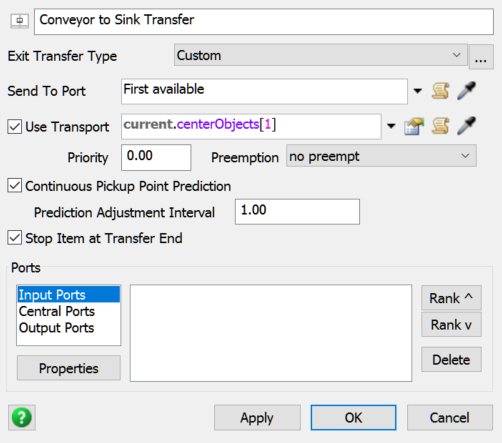
- Double-click the exit transfer to open the Exit Transfer Properties dialog box.
- Check the Use Transport check box. By default, the exit transfer will request a transport from the task executer because they share a center port connection. You can adjust these settings if desired.
- A task executer can modify its course while it is traveling to the item pickup point if there is a wide range of possible pickup points. The task executer can estimate and change where it can pick up an item based on the item's movement along the conveyor. To use this feature, check the Continuous Pickup Point Prediction check box.
- You can adjust how frequently the task executer updates its predictions by changing the value in the Prediction Adjustment Interval text box. The value you enter corresponds to the units of measurement for time that you used when you first created your simulation model.
- Click OK to save the settings. When you reset and run your model, the task executer will pick up the item from the conveyor and deliver it to a fixed resource.
Side Transfers and Inline Transfers
When you are transferring from one conveyor to another, the angle of the transfer affects the logic of the transfer. If you are merging a slug of items, the angle could affect whether the conveyor treats the transfer as a side transfer or an inline transfer. The following table explains some of the differences between side transfers and inline transfers:
| Side Transfer | Inline Transfer | |
|---|---|---|
| Default Definition | Any transfer angle that is greater than 45 will be treated like a side transfer by default. | Any angle that is less than 45 will be treated as an inline transfer by default. |
| Item Orientation | The orientation of the flow items will change after the transfer. The item's leading edge in the upstream conveyor becomes the side edge on the downstream conveyor and vice versa. | The orientation of flow items remain the same after the transfer. |
| Gapping | When a conveyor is transferring items from the side of the conveyor, it will add gaps between flow items. The width (transverse size) of an item on the upstream conveyor becomes the length (inline size) of the item on the downstream conveyor. | No gaps will be added between flow items. Items will transfer more smoothly from one conveyor to another because the angle of entry is smaller and more closely matches the direction of the merging conveyor. |
| Movement | While the item is being transferred, its movement is in-line with one of the conveyors, but is stopped relative to the other conveyor. | On an inline transfer, the movement of the item is in-line with both the upstream conveyor and the downstream conveyor throughout the transfer of the item. |
To change whether FlexSim treats a transfer as a side transfer or inline transfer, you'll need to change the angle threshold in the transfer type properties. The property that handles this setting is the Max Angle property.
The step-by-step process for changing the angle threshold is covered in Conveyors Tutorial 1.3 - Adding and Removing Gaps.