Key Concepts About Shared Assets
What Are Shared Assets?
A shared asset is a finite resource that tokens may claim or release at certain points in the process flow. There are three types of shared assets that have different purposes, as explained in the following table:
| Shared Asset | Explanation |
|---|---|
| Resource | Represents a limited supply of some resource that can be acquired and released. It can be used to simulate a supply of goods, services, time, materials, employees, etc. |
| List | Allows you to push or pull tokens, flow items, task executers, numbers, strings, etc. to a list. This is a useful asset for syncing multiple tokens within a process flow or as a more dynamic resource. Process flows can use a list that is local to the process flow itself or could be tied to a Global List in the simulation model. |
| Zone | Can collect statistical information not available for standard activities. It can also restrict access to a section of the process flow based on certain statistics or other criteria. |
Shared assets look a lot like standard activities but there are some distinct differences:
- Tokens do not physically move into a shared asset. Instead, you'll need to use activities like the Acquire Resource, the Push To List, or Enter Zone, which can indirectly interact with a shared asset.
- A shared asset cannot be part of a stacked block or snapped to any other activity.
- Shared assets are also colored differently than activities to indicate that they function a little differently, as shown in the following image:
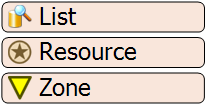
In general, shared assets impose constraints on tokens by making the token wait if the requested asset is unavailable. Consider completing Process Flow Tutorial 1 - Using Shared Assets for a hands-on guide to working with shared assets.
Global and Local Types
All shared assets have the ability to be defined globally or locally within their process flow. In the case of a General Process Flow, the shared asset will always be defined globally. If the shared asset is in a Fixed Resource, Task Executer or Sub Flow Process Flow, there may be more than one instance of the process flow at any given time. The two types behave as follows:
- Global - If the shared asset's type is set to Global, all tokens in all instances of the process flow will compete for the same asset.
- Local - If the shared asset's type is set to Local, then there will be a different asset for each instance of the process flow. Only tokens within the same instance will compete for the same asset.
For example, if a resource is defined as Local and it is referencing an operator in the 3D model and there are 3 instances of the process flow, then each instance will be associated with a different Operator. This means there will be 3 operators in the 3D model, one for each instance. When a token attempts to acquire a resource, it will only be able to acquire the operator associated with that instance.
Lists
List shared assets give you the ability to use an internal list inside a process flow or access a global list that is connected to a 3D model. See Key Concepts About Lists for more general information about using lists to connect flows and create other kinds of model logic.
To interact with a list in a process flow, you'll need to drag a list from the Library to the process flow. Then, you'll need to either set up the list's fields or link it to a pre-existing global list. You'll use the Push to List and Pull from List activities to push and pull to a list.
Resources
Resources can represent a finite supply of something in a simulation model. For example, you could use a resource to represent the employees who are available to work on a task. If all of the employees are currently busy working on a task, they can't be assigned to work on any additional tasks until they are done.
As another example, a resource could represent a set of tools or supplies that are available in a business system. If the tools or supplies are currently being used by one employee, they can't be used by another employee until the employee finishes using them.
To interact with a resource in a process flow, you'll need to drag a resource from the Library to the process flow. Then, you'll need to set up the resource by determining how many resources there should be and linking it to objects in the 3D model if needed. You'll use the Acquire Resource and Release Resource activities to acquire and release the resource(s). When a resource has been acquired, it can't be acquired by another process flow activity until the resource has been released.
Zones
You can use a Zone for two purposes:
- To collect statistics across multiple activities
- To then use those statistics to restrict access to those activities
For example, imagine that you wanted to simulate a self-serve copy center. Perhaps your copy center has a group of color-copy machines and a group of black-and-white copy machines. You don't have an unlimited number of copy machines, so there is obviously a limit to how many machines can be in use at the same time. If the copy center doesn't have enough copy machines available for all the customers that need to use them, a customer would have to wait in line until one becomes available.
In order to simulate this kind of logic in a process flow, you could use zones to restrict access to the machines. You could possibly create one zone for the color-copy machines and another for the black-and-white machines and you'd only allow a fixed number of tokens (representing customers) into a zone at a given time.
Imagine also that you want to collect data about things such as:
- The average number of color or black-and-white copy machines that are used in a given period of time
- The average wait time for customers who are waiting to use either color or black-and-white copy machines
- The average amount of time it takes for customers to complete their copies
Zones are capable of collecting this kind of statistical data as well.
Collecting Statistics
A Zone can be used to collect statistics for an area of your process flow. For example, suppose you made the process flow shown in the following image:
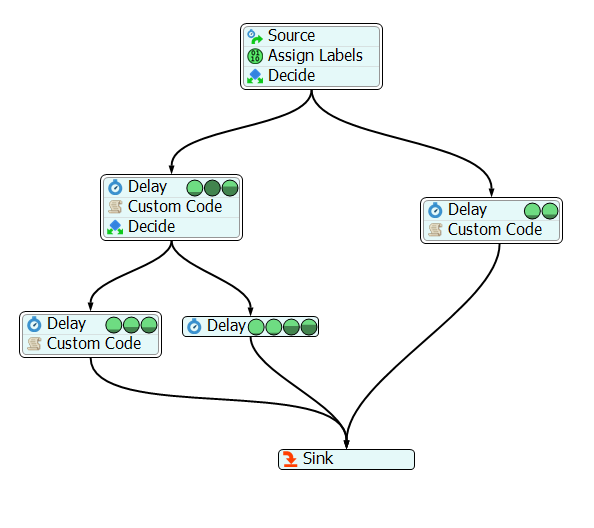
Suppose that you want to know statistics about just the left portion of the process flow, as shown in the following image:
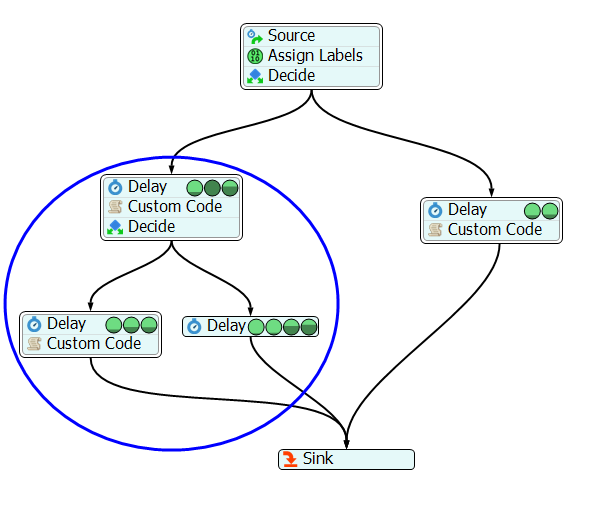
Specifically, say you wanted to know the answer to the following questions:
- What is the maximum content of the left side?
- What is the average content of the left side?
- How long, on average, does it take tokens to get through the left side?
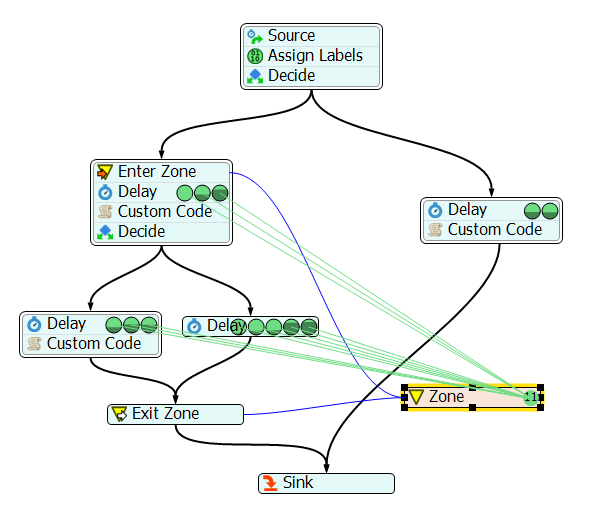
A Zone can be used to answer these questions. In order to create the statistical boundary shown in the preceding image, you would add an Enter Zone activity and an Exit Zone activity, along with a Zone, as shown in the following image:
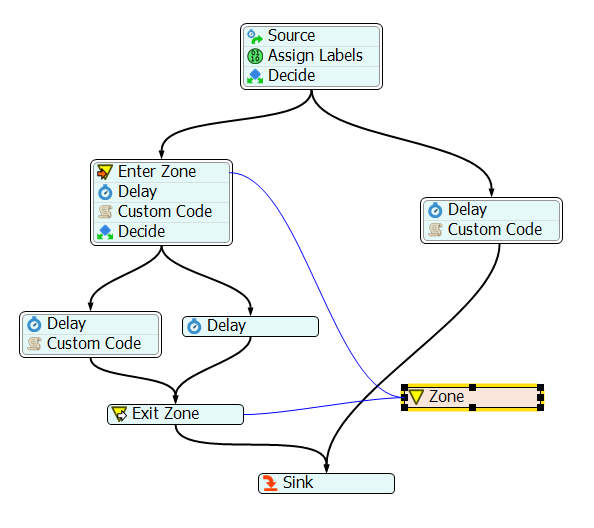
The Zone will automatically record the input, output, content and staytime for all tokens that enter and exit the Zone. The following image shows the process flow during a simulation run, with many activities in the Zone.
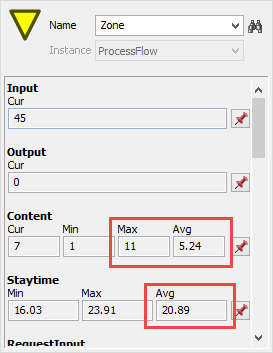
The next image shows the Zone's Statistics Window, with the maximum content, average content and the average staytime highlighted.
Restricting Access
Zones can be used to restrict access to a set of activities. For example, a Zone might represent a warehouse or a shipping container, and tokens might represent items. Any token that enters the Zone would take up space or weight (or both) within the Zone. Usually, there is some limit on space or weight. The Zone can be used to enforce those limits.
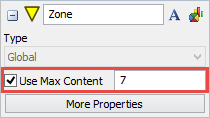
The simplest way to restrict access to a Zone is to limit the number of tokens allowed in the Zone. Using our previous example, suppose at most 7 tokens (which represent items) can fit in the Zone. The Zone has a Use Max Content option, shown in the following image, that enforces that rule:
The following image shows a snapshot during execution, with the max content set to 7:
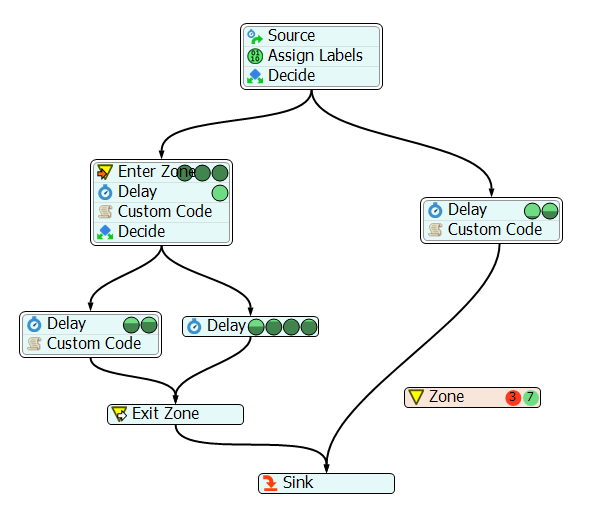
Notice that there are three tokens on the Enter Zone activity waiting to be allowed into the Zone, which currently has 7 tokens in it. Each token must wait for room to free up in the Zone before entering.