Task 3.1 - Build a Basic Sub Flow
Task Overview
In this tutorial task, you'll learn some of the basics about building a sub flow in the Process Flow tool. A sub process flow is a separate process flow that begins running when it is triggered by another activity or event in a different process flow. Think of sub flows as chunks of self-contained logic that will get executed when they are triggered by certain events in the simulation model or general process flow.
Sub flows can cut down on the need to create a certain block of process flow activities in multiple places throughout your process flows. You could use sub flows to perform calculations or to simulate more complex procedures that are triggered by specific activities or events in the main process flow. See Process Flow Sub Flows for more information about the key concepts related to sub flows.
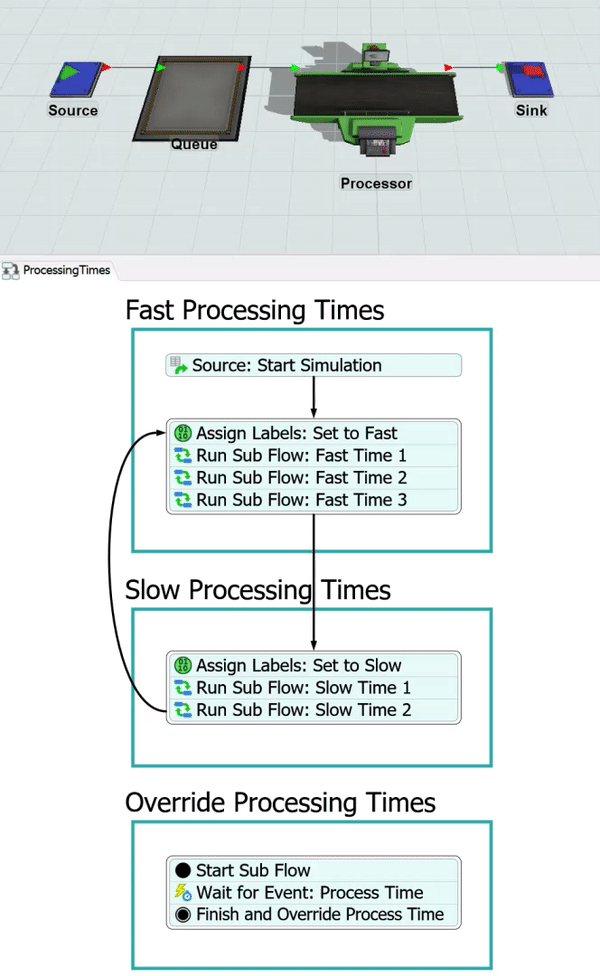
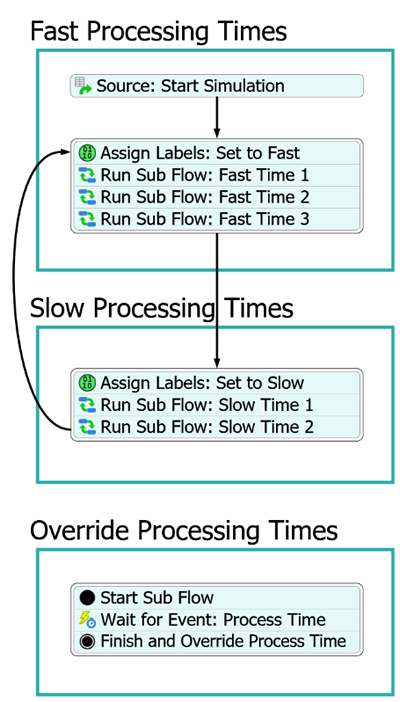
In this tutorial, you'll build an internal sub flow to dynamically determine a processor's processing time. When you're finished, your 3D model and process flow will look similar to the following image:
Basic Components of a Sub Flow
Sub flows begin when a Create Tokens or Run Sub Flow activity sends a token to a Start activity on the sub flow. The sub flow ends when it moves through all the activities in the sub flow and reaches a Finish activity.
Parent and Child Tokens
When a Create Tokens or Run Sub Flow activity sends a token to a sub flow, it usually creates a new token. Based on your own unique model logic requirements, you will have to decide what kind of relationship this newly created token in the sub flow should have with the token that created it in the main process flow. There are three basic options:
- Independent Tokens - Created tokens will have no association with the original token. As soon as the token has created the independent token, it will move to the next downstream activity in the main process flow. Independent tokens could potentially copy the labels from the original token if needed.
- Child Tokens - Created tokens will be child tokens of the original token. The original token in the main process flow will become the parent token. Child tokens could potentially have read or write access to the labels on the parent token.
- Sibling Tokens - Created tokens will be sibling tokens of the original token. In other words, they will have the same parent as the original token.
In this tutorial task, you'll work primarily with child and parent tokens. The child token in the sub flow will need to have access to the labels on the parent token in the main process flow.
Step 1 Build the 3D Model
In this step, you'll build a basic 3D model. When you're finished, your 3D model should look similar to the following image:
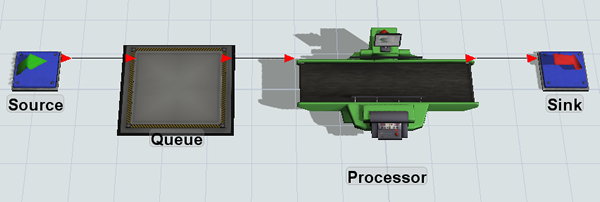
To build this model:
- Drag the following objects from the Library and place them in the model in this
order from left to right:
- 1 Source
- 1 Queue
- 1 Processor
- 1 Sink
- Move the objects so that they are roughly in the same layout as shown in the image at the beginning of this step.
- For clarity, rename the objects as follows:
- Create port connections (A-connects) from:
- Source to Queue
- Queue to Processor
- Processor to Sink
| Object | New Name |
|---|---|
| Source1 | Source |
| Queue1 | Queue |
| Processor1 | Processor |
| Sink1 | Sink |
Check to make sure that your model looks similar to the image shown in the beginning of this section.
Step 2 Add Activities to a Process Flow
In this step, you'll add activities to a general process flow to build a process flow that will change the processor's process times.
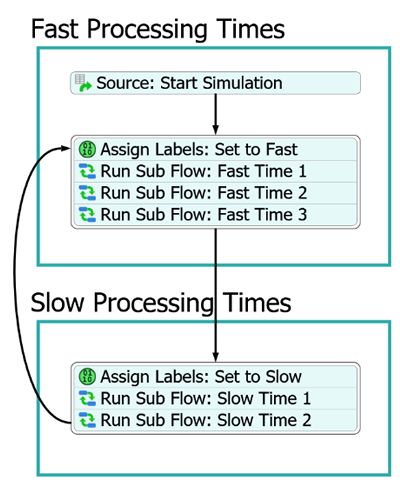
When you're finished, your process flow should look similar to the following image:
For now, you'll merely add and connect these activities to the process flow. You'll edit the properties to add the functionality in a later step.
To add and connect these activities:
- On the main toolbar, click the Process Flow button to open a menu. Select General Process Flow.
- In Quick Properties in the Process Flow Name box, delete the current text and rename the process flow ProcessingTimes.
- In the Library under the Flowchart group, add 3 Process shapes to the new process flow.
- For clarity, rename the three Process shapes as follows:
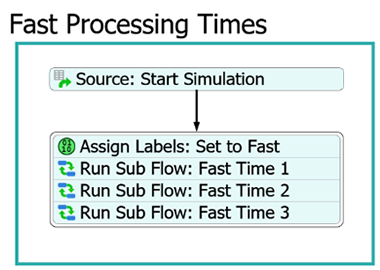
- Fast Processing Times
- Slow Processing Times
- Override Processing Time
- From the Library, add the following activities to the Fast
Processing Times shape:
- A Schedule Source activity (under Token Creation)
- An Assign Labels activity (under Basic)
- 3 Run Sub Flow activities (under Sub Flow)
- For clarity, rename these activities as:
- Create a connector from the Source to the
Assign Labels activity. (Hover your mouse over the bottom
middle of the activity until your mouse changes to a connector
 icon. Click and drag the connector until
it snaps to the other activity.)
icon. Click and drag the connector until
it snaps to the other activity.) - Join the Assign Labels and Run Sub Flow activities into a stacked block.
- From the Library, add the following activities to the Slow
Processing Times shape:
- An Assign Labels activity (under Basic)
- 2 Run Sub Flow activities (under Sub Flow)
- For clarity, rename these activities as:
- Create a connector from the end of the stacked block in the Fast Processing Times shape to the first activity in the Slow Processing Times shape.
- Create a connector that loops from the end of the Run Sub Flow: Slow Time 2 activity back to the Assign Labels: Set to Fast activity.
- From the Library, add the following activities to the Override
Process Times shape to create a stacked block:
- A Start activity (under Sub Flow)
- A Wait for Event activity (under Basic)
- A Finish activity (under Sub Flow)
- For clarity, rename these activities as:
| Activity | New Name |
|---|---|
| Source | Source: Start Simulation |
| Assign Labels | Assign Labels: Set to Fast |
| First Run Sub Flow | Run Sub Flow: Fast Time 1 |
| Second Run Sub Flow | Run Sub Flow: Fast Time 2 |
| Third Run Sub Flow | Run Sub Flow: Fast Time 3 |
| Activity | New Name |
|---|---|
| Assign Labels | Assign Labels: Set to Slow |
| First Run Sub Flow | Run Sub Flow: Slow Time 1 |
| Second Run Sub Flow | Run Sub Flow: Slow Time 2 |
| Activity | New Name |
|---|---|
| Start | Start Sub Flow |
| Wait for Event | Wait for Event: Process Time |
| Finish | Finish and Override Process Time |
Consider saving your simulation model.
Step 3 Edit the Activity Properties
In this step, you'll edit the properties for the activities in the process flow. The following is an overview of how each activity will function:
| Activity | Explanation |
|---|---|
| Source: Start Simulation | This Scheduled Source activity will create one token as soon as the simulation starts and sends the token to the Assign Labels activity. After it creates this token, it won't create any additional tokens. The one token will simply loop continuously through the other activities until the simulation ends. You'll use the default properties for this activity. |
| Assign Labels Activities | Both of the Assign Labels activities will create and set a label called
processTime that will be referenced by the sub flow as it controls the
processor's process time. The first Assign Labels activity will set the label to
2 and the second activity will set it to 10. |
| Run Sub Flow Activities | The Run Sub Flow activities will create a child token in the Start sub flow activity. The parent token will remain in the Run Sub Flow activity until the child token reaches the end of the sub flow. When the child token finishes the sub flow, the token will move to the next downstream activity. |
| Start Sub Flow | All Sub Flows need to begin with a Start activity, which receives the child token created by the Run Sub Flow activities. It then releases the child token to the next activity. |
| Wait for Event: Process Time | Wait for Event activities are event-listening activities. That means a token will wait at this activity until the event that is being listened to occurs. This activity will listen to the processor for the process time event. When the processor is ready to begin the process time, the token will get released to the Finish activity. You'll also set this activity to override the process time. |
| Finish and Override Process Time | The Finish activity will provide the processor with a process time return value. After it has provided this return value, it will destroy the child token and alert its parent token in the Run Sub Flow activity that the child token has finished the sub flow. |
To edit these properties:
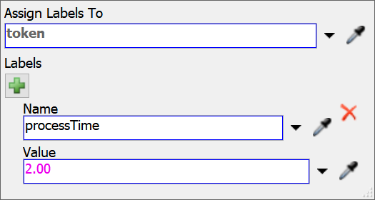
- In the Quick Properties for the Assign Labels: Set to
Fast activity, click the Add button
 to add a new label.
 - In the new label's Name box, delete the existing text
and type
processTime. - In the Value box and type
2.00to represent 2 simulation time units. - Repeat these steps for the Assign Labels: Set to Slow,
except this time change the Value box to
10to represent 10 simulation time units. - Click the Run Sub Flow: Fast Time 1 activity to select it.
- Click the Exclamation Point button
 next to this activity to enter
sampling mode. A blue line will appear to show that the activities are now linked.
next to this activity to enter
sampling mode. A blue line will appear to show that the activities are now linked. - Click the Start Sub Flow activity to sample it.
- Repeat the previous steps for all the Run Sub Flow activities.
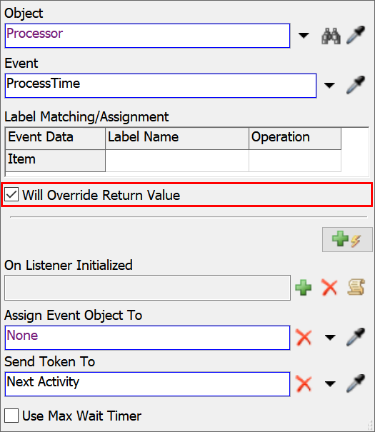
- Click the Wait for Event: Process Time activity to
select it. Click the Exclamation Point button
next to this activity to enter
sampling mode.
- In the 3D model, click the Processor to open a menu. Select Processor: Process Time from the menu to sample this event. The name of the processor will now appear next to the activity to show that they are linked.
- In Quick Properties for the Wait for Event: Process Time activity, check the Will Override Return Value checkbox.
- Click the Finish and Override Process Time activity to select it.
- In Quick Properties, click the arrow next to the Return Value box to open a menu. Point to Token Label, then select processTime.
Consider saving your simulation model.
Step 4 Run the Model
Reset and run the model.
You'll notice that Source creates a token at time 0, then the token enters the Set to Fast Time activity and its processTime label is set to 2. The token then moves to the first Fast Time 1 activity where a child token is created and sits at the Wait for Process Time activity in the sub flow.
As soon as the processor in the model receives an item, the Wait for Event releases the token and the process time is overridden. The child token is then destroyed and the parent token moves to the next Run Sub Flow activity to start the sub flow over again. This will continue as each item enters the processor. Once the token finishes Slow Time 2, it will move back to the top to continue the pattern again.
If you were to pause the simulation and click one of the tokens in the sub flow, you'd see a blue line showing the parent-child connection between tokens:

Not only was the logic easily created without any coding, but you can also visibly see where the processor is in its set of process times. This can be a valuable debugging tool or it can be useful for collecting statistics. Statistics could be gathered separately or collectively for an activity or area to record how long the processor spent in any given state.
Conclusion
In the next tutorial task, you'll learn about another way to build sub flows by adding multiple finish activities. Continue on to Tutorial Task 3.2 - Add Multiple Finish Activities.