Task 1.4 - Tasks Using Global Lists
Task Overview
In this tutorial task, you'll learn a system for building tasks that uses global lists and task sequences. A task sequence is a complete series of tasks that will eventually be dispatched to a task executer. When a task executer works on the task sequence, it will finish all of the tasks in the task sequence one by one without interruption (unless it is pre-empted away). You can push task sequences to a global list and then the task executer can pull tasks off the list when they are available to work on another task. (See the following section for an explanation of how global lists differ from local lists.)
You could think of a task sequence as a complete list of "to do" items that the operator will pull from a job board. The operator will complete all the tasks in the task sequence in the order they're listed. When the task sequence is complete, the operator will return to the job board and get a new "to do" list (task sequence) to work on.
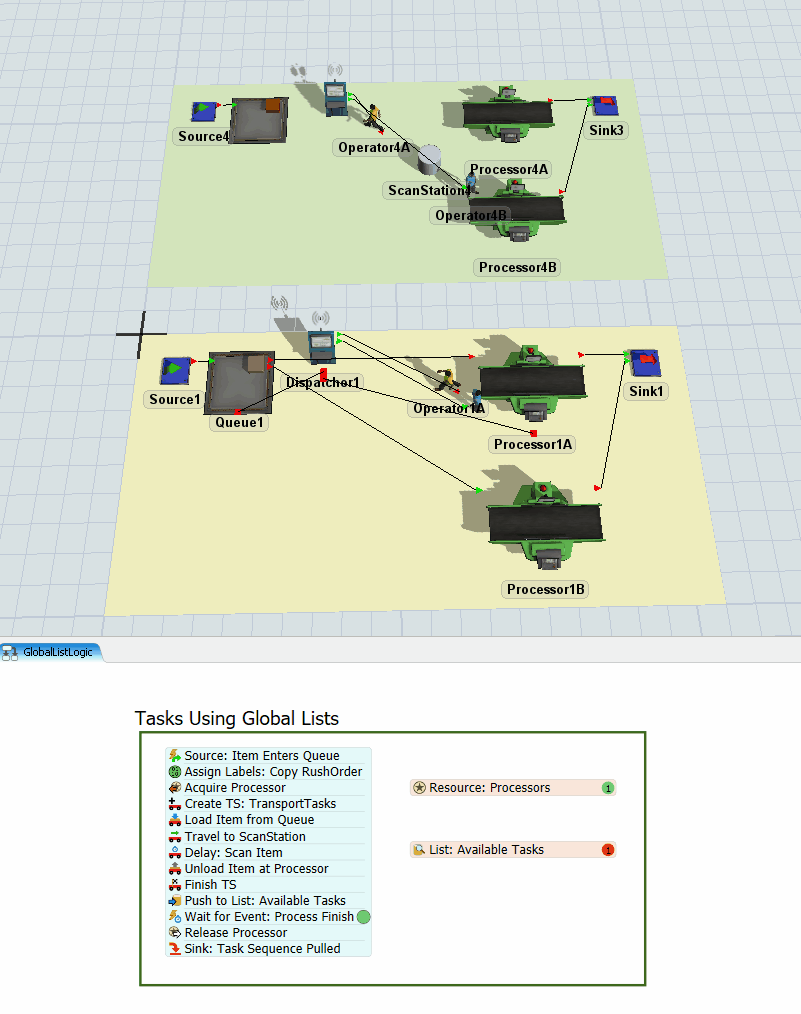
When you're finished, your simulation model will operate similar to the following model:
What are Global Lists?
How are global lists different from local lists in the context of this tutorial? Generally, the difference between a local list and a global list has to do with how accessible the list is across the various elements of the simulation model. The list you built in the previous tutorial was a local list because it was only accessible internally through the general process flow. That means that only tokens inside that local process flow could push and pull items from the list. Notice also that you simply set up a list by dragging a list shared asset into the process flow, but you didn't change any of its default settings or do anything to make it so that it could be accessed outside of that process flow.
In this tutorial, you'll create a global list in the Toolbox and then link it to a list shared asset in a process flow. Once you've made the list globally accessible, it can be used by both the process flow and the objects in the 3D model at the same time. The process flow will be able to push task sequences to the list and then the operators in the 3D model will be able to pull task sequences directly off the list whenever they are available to work on a new task. The operators will interact with the global list completely independently of the process flow.
Step 1 Copy and Modify the 3D Model
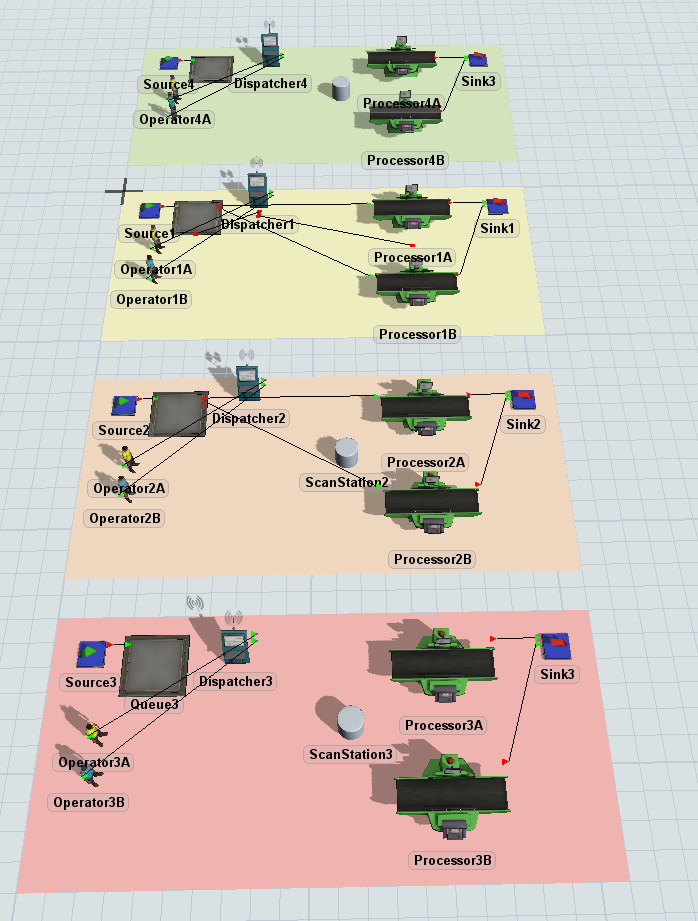
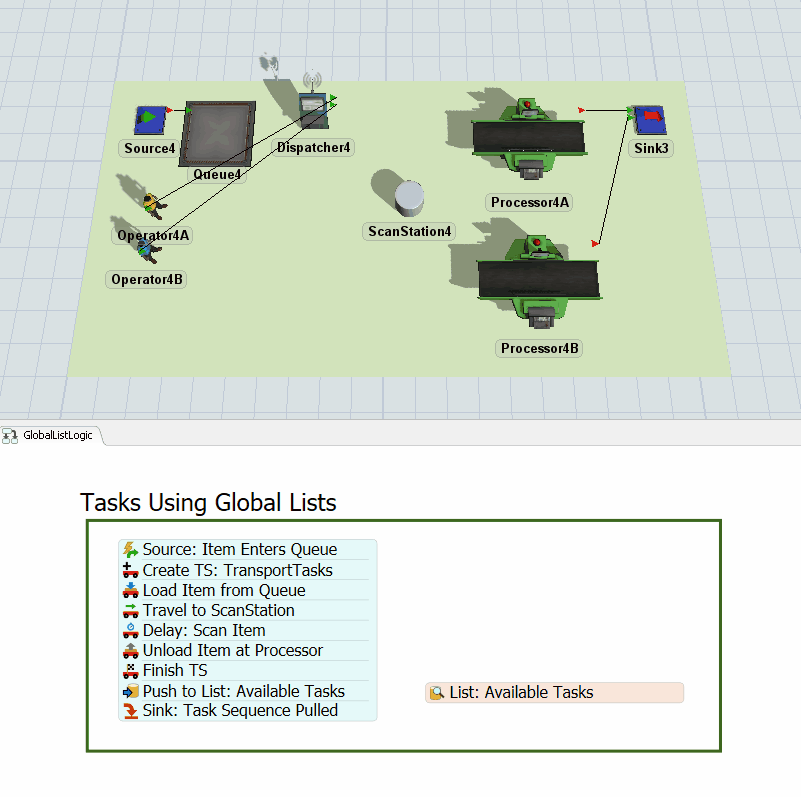
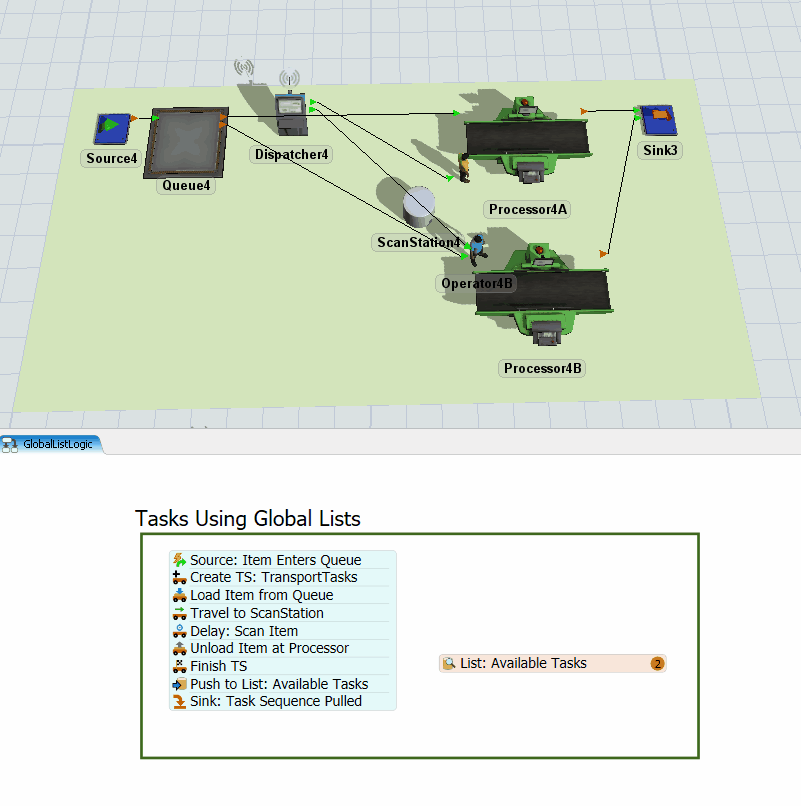
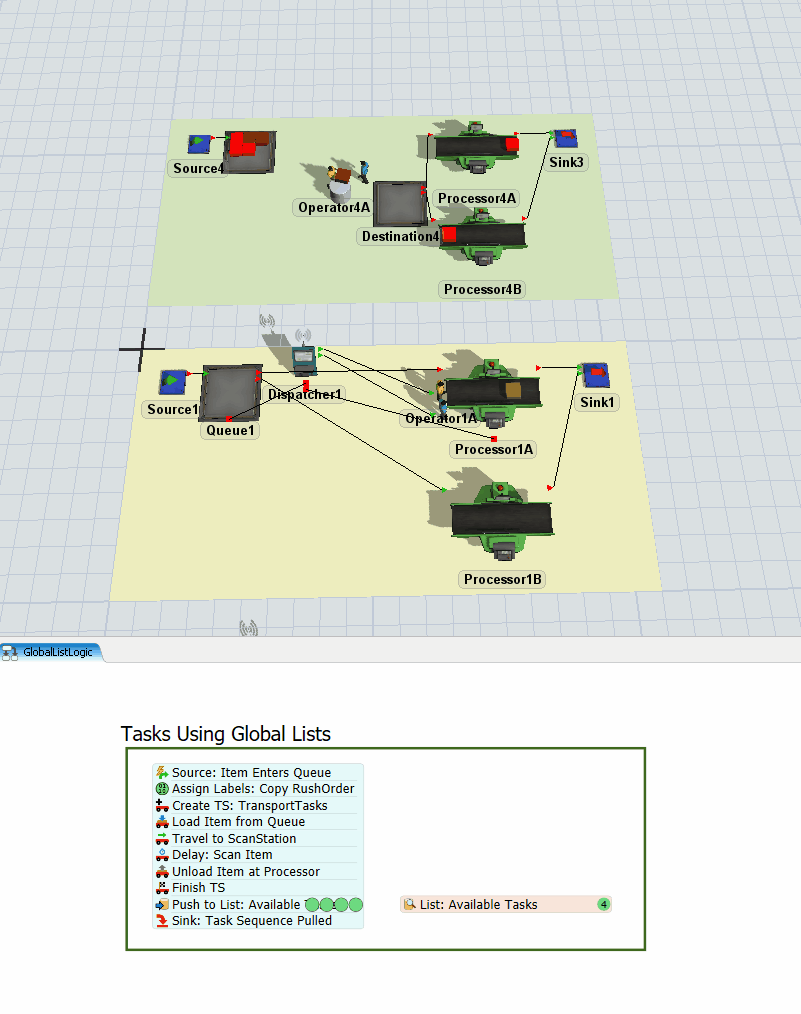
In this step, you'll copy the system you used to build the list logic. When you're finished, your 3D model should look similar to the following image:
To copy the plane:
- Click the ListLogic plane to select it. (It's the red one.)
- Press Ctrl+C to copy the plane and all the objects on it. Click somewhere blank in the model to de-select the original plane. Press Ctrl+V to copy the plane.
- Move the newly copied plane so that it is above the StandardLogic plane (the yellow one).
- With the copied plane selected, in Quick Properties, change the name of the plane to GlobalListLogic.
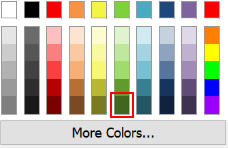
- Click the arrow next to the color box to open the color selector menu. Choose the lightest shade of green.
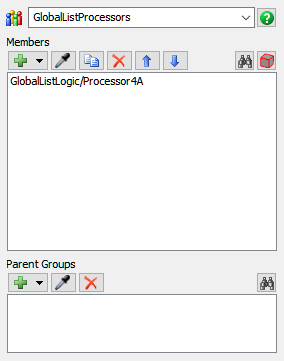
- Rename each of the 3D objects on the copied plane, replacing any 3 numbers with a 4, such as Queue4, Operator4A, Processor4A, etc.
- Right-click Operator4A to open a menu. Point to Object Groups and click ListOperators to remove this operator from that group.
- Repeat the previous step to remove the following objects from the following groups:
- Remove Operator4B from the ListOperators group
- Remove Processor4A from the ListProcessors group
- Remove Processor4B from the ListProcessors group
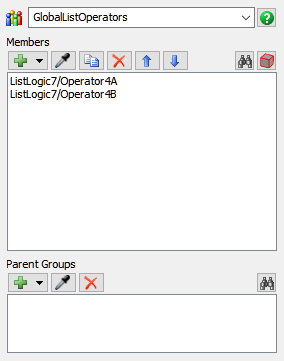
- Right-click Operator4A to open a menu. Point to Object Groups and select Add to New Group.
- In the group properties window, change the name of the group to GlobalListOperators.
- Click the Sampler button
 to enter sampling mode.
 - In the 3D model, click Operator4B to sample it and add it to the group.
- Close the group properties window.
- Right-click Processor4A to open a menu. Point to Object Groups and select Add to New Group.
- In the group properties window, change the name of the group to GlobalListProcessors.
- Close the group properties window.
Check to ensure that your 3D model looks similar to the image shown at the beginning of this step.
Step 2 Create a Global List
In this step, you'll set up the global list that will store the task sequences and you'll link that to the list in the process flow. You'll also set up the operators to pull task sequences from this list any time their On Resource Available trigger fires. This trigger fires any time an operator completes a task and is free to work on another task.
To create this logic:
- In the left pane, click the Toolbox tab to switch to the Toolbox.
- Click the Add button
 to open a menu. Point to
Global List, then select Task Sequence
List.
to open a menu. Point to
Global List, then select Task Sequence
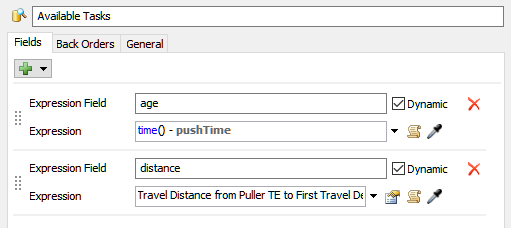
List. - In the list properties, change the name of the list to Available Tasks. You'll leave the fields on their default settings for now.
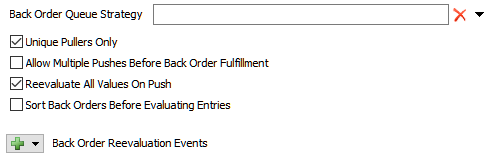
- Click the Back Orders tab and check the Reevaluate All Values on Push checkbox.
- Press the OK button to save the changes and close the window.
- In the 3D model, double-click Operator4A to open its properties window.
- On the Triggers tab, click the
Add button
to open a menu. Select On Resource Available.
- Next to the On Resource Available box, click the
Add button
to open a menu. Point to Use List, and then select
Pull from Task Sequence List.
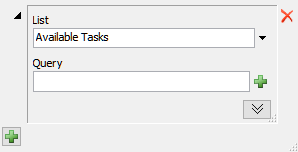
- In the picklist properties window, confirm that Available Tasks is listed as the global list the operator will use.
- Repeat the previous steps for Operator4B.
Consider saving your model at this point.
Step 3 Create Tasks Using Global Lists
In this step, you'll add activities to a general process flow to build a process flow that uses global lists to create transportation task logic.
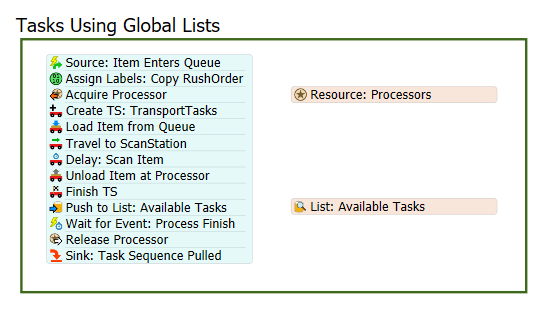
When you're finished, your process flow should look similar to the following image:
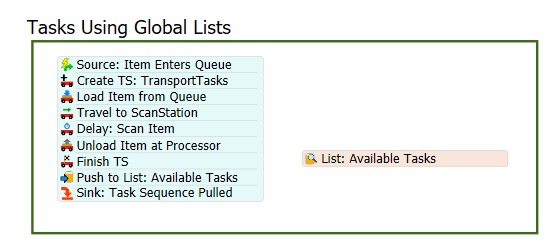
For now, you'll merely add and connect these activities to the process flow. You'll edit the properties to add the functionality in a later step.
To add and connect these activities:
- On the toolbar, click the Process Flow button to open a menu. Select Add a General Process Flow.
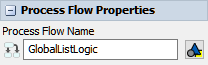
- Click a blank space in the process flow so that nothing is selected. In Quick Properties, change the name of the process flow to GlobalListLogic.
- With the process flow open and active, drag a Process shape (under Flowchart) into the process flow.
- In Quick Properties, change the name of the shape to Tasks Using Global Lists.
- Click the arrow next to the Color box to change it to dark green. You'll use green because it matches the color of the GlobalListLogic plane.
- In the Tasks Using Global Lists shape, add the
following activities to create a stacked block:
- An Event-Triggered Source (under Token Creation)
- A Create Task Sequence (under Tasks Sequences)
- A Load (under Task Sequences)
- A Travel (under Task Sequences)
- A Delay (under Task Sequences)
- An Unload (under Task Sequences)
- A Finish Task Sequence (under Task Sequences)
- A Push to List (under Shared Assets)
- A Sink (under Basic)
- Add a List shared asset to the right of the stacked block.
- Rename the activities and shared assets as follows:
| Activity | New Name |
|---|---|
| List | List: Available Tasks |
| Source | Source: Item Enters Queue |
| Create TS | Create TS: TransportTasks |
| Load | Load Item from Queue |
| Travel | Travel to ScanStation |
| Delay | Delay: Scan Item |
| Unload | Unload Item at Processor |
| Push to List | Push to List: Available Tasks |
| Sink | Sink: Task Sequence Pulled |
Check to make sure your process flow looks similar to the image shown in the beginning of this step.
Step 4 Create the Global List Logic
In this step, you'll set up the process flow logic that will control these tasks. This process flow will be quite similar to the list-based process flow you built in the previous tutorial task, but it will have a few key differences. The main difference is that you will build a task sequence and then push that task sequence onto a list. The task sequence will contain all the different tasks needed to complete the transportation task for the flow item that is associated with the task sequence. Then, the operators will pull the task sequences from the list whenever they are available to work on tasks.
The following is an overview of how each activity and shared asset will function:
| Activity | Explanation |
|---|---|
| List: Available Tasks | This list will store a reference to all the transportation task sequences that are available for operators to work on. You'll link this internal list to a global list in the next step. |
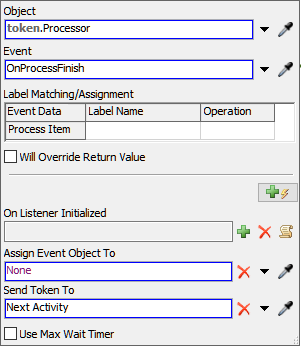
| Source: Item Enters Queue | The Event-Triggered Source is an event-listening activity that will listen to events in the 3D model. When a flow item enters Queue4, this activity will create a token and release it to the next downstream activity. You'll assign a label to this token named ItemToTransport that will contain a reference to the specific flow item that triggered the event. |
| Create TS: TransportTasks | This activity will create a task sequence named TransportTasks. This task sequence will be empty at this point, but as tokens move through the rest of the process flow, those tasks will be added to this task sequence. The task sequence will store the transportation tasks in the sequence they should be completed. Later, the task sequence will get pushed to the global list. |
| Load Item from Queue | This activity tells the operator which flow item needs to be picked up and where it is located. |
| Travel to ScanStation | This activity will tell the operator to travel to the ScanStation4 object. |
| Delay: Scan Item | This activity will simulate the amount of time that it takes to scan the flow item in the computer. You'll set the delay to 1 second. |
| Unload Item at Processor | This activity tells the operator where to unload the flow item. For now, you'll set this activity to only drop off flow items at Processor4A. |
| Finish TS | This activity declares the end of the sequence of tasks. |
| Push to List: Available Tasks | This activity will push the tasks in the TransportTasks task sequence onto the Available Tasks global list. |
| Sink: Task Sequence Pulled | This activity removes the token from the process flow. You'll use its default settings. |
To create this functionality:
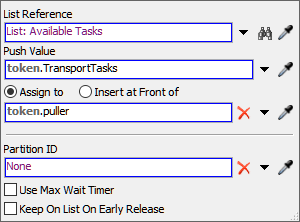
- In the process flow, click the List: Available Tasks shared asset to select it. In Quick Properties, click the arrow next to the List box to open a menu. Point to Global List, then select Available Tasks.
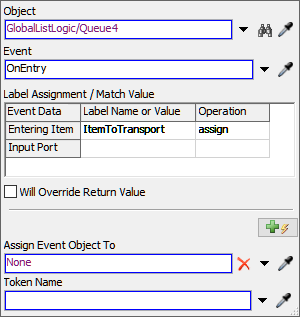
- Click the Source: Item Enters Queue activity to select
it. Click the Exclamation Point button
 next to the activity to enter
sampling mode.
next to the activity to enter
sampling mode. - In the 3D model, click Queue4 to open a menu. Select Queue4: On Entry.
- In Quick Properties, in the Label Assignment table, click the cell that is on the Entering Item row under the Label Name column. Type ItemToTransport.
- Click the cell that is on the Entering Item row under the Operator column to open a menu. Select assign.
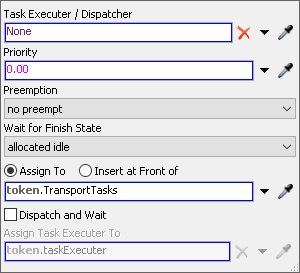
- Click the Create TS: TransportTasks activity to select
it. In Quick Properties, next to the Task Executer /
Dispatcher box, click the Delete button
 .
. - In the box under the Assign to option, delete the
current text and type
token.TransportTasks. - Make sure the Dispatch and Wait checkbox is unchecked.
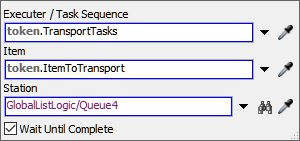
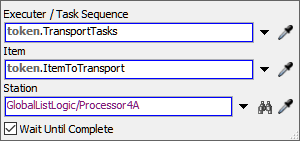
- Click the Load Item from Queue activity to select it. In Quick Properties, click the arrow next to the Task Executer / Sequence box to open a menu. Point to Token Label and select TransportTasks.
- Click the arrow next to the Item box to open a menu. Point to Token Label and select ItemToTransport.
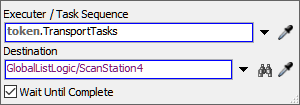
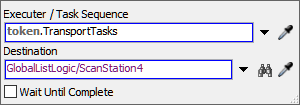
- Click the Travel to ScanStation activity to select it. In Quick Properties, click the arrow next to the Task Executer / Sequence box to open a menu. Point to Token Label and select TransportTasks.
- Next to the Destination box, click the
Sampler button
to enter sampling mode.
- In the 3D model, click ScanStation4 to open a menu. Select GlobalListLogic/ScanStation4.
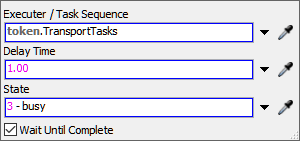
- Click the Delay: Scan Item activity to select it. In Quick Properties, click the arrow next to the Task Executer / Sequence box to open a menu. Point to Token Label and select TransportTasks.
- In the Delay Time box, delete the current text and type
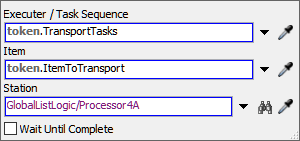
1.00. - Click the Unload: Item at Processor activity to select it. In Quick Properties, click the arrow next to the Task Executer / Sequence box to open a menu. Point to Token Label and select TransportTasks.
- Click the arrow next to the Item box to open a menu. Point to Token Label and select ItemToTransport.
- Next to the Station box, click the
Sampler button
to enter sampling mode.
- In the 3D model, click Processor4A to open a menu. Select GlobalListLogic/Processor4A.
- Click the Push to List: Available Tasks activity to
select it. Click the Exclamation Point button
next to the activity to enter
sampling mode.
- Click the List: Available Tasks shared asset to select it. A blue line will now link this activity to the shared asset.
- In Quick Properties, click the arrow next to the Push Value box to open a menu. Point to Token Label, then select TransportTasks.
Click the Finish TS activity to select it. In Quick Properties, click on the box below Task Sequence, and write token.TransportTasks in the box.

Reset and run the model:
As you can see, nothing is happening. The boxes are simply stacking up inside the queue and the operators are motionless. What went wrong?
If you take a look at the process flow, that offers the clue: notice that the tokens are forming a bottleneck inside the Load Item From Queue activity. That means something is happening in this activity that is preventing the tokens from moving to the next downstream activity. In the next step, you'll learn why this happening and how to fix the problem.
Step 5 Troubleshoot the Bottleneck
In this step, you'll fix the token bottleneck that is occurring in the process flow. To fix this problem, you need to keep in mind how the logic in this process flow differs from the logic used in other kinds of process flows you've built in this tutorial up to this point.
In the other process flows you've built, the operators performed each task as the tokens moved through various activities in the process flow in real time. In this process flow, you're using a different approach. Instead of completing the tasks in real time, the task are added to a task sequence and then pushed to a global list.
As was mentioned at the beginning of this tutorial, you could think of a task sequence as a complete list of "to do" items that will get posted to a collective job board (the global list). What you're doing in this process flow is building the instructions for the task executer to do later. The task sequence will wait on a global list until a task executer pulls it off the list and starts working on it.
The reason the global list process flow is experiencing a bottleneck is because the Load Item from Queue activity won't release the token to the next downstream activity. The activity is supposed to wait until the task is complete before it can move on by default. Since these tasks won't get completed in real time, you need to adjust the properties so that this task doesn't have to be complete before the token can move to the next activity.
To make these changes:
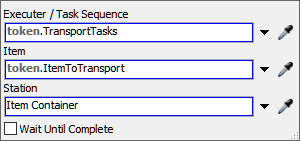
- Click the Load Item from Queue activity to select it. In Quick Properties, clear the Wait Until Complete checkbox.
- Click the Travel to ScanStation activity to select it. In Quick Properties, clear the Wait Until Complete checkbox.
- Click the Delay: Scan Item activity to select it. In Quick Properties, clear the Wait Until Complete checkbox.
- Click the Unload: Item at Processor activity to select it. In Quick Properties, clear the Wait Until Complete checkbox.

Reset and run the model:
As you can see, now the bottleneck is fixed and it runs nearly identically to the other simulation models that use different methods for setting up the logic.
Of course, at this point, you haven't set up the ability to work with a second processor or how to handle high priority flow items. Notice also that sometimes the operators load more than one flow item on the processor at a time because it's currently not restricted by an Acquire Resource activity. You'll set up logic to handle these kinds of issues in the rest of this tutorial.
Step 6 Add Task Sequence Priorities
Since pushing task sequences to a global list allows you to mix and match with the standard logic system, that means you can also integrate the task sequences with the priority and preemption capabilities of the standard logic system. You'll set up that logic in this step. You'll use the RushOrder label on the flow items to assign priority levels to the task sequences before they're pushed onto the list. You'll also get to see how these priority levels interact with the standard logic.
When you're finished, your process flow will look similar to the following image:
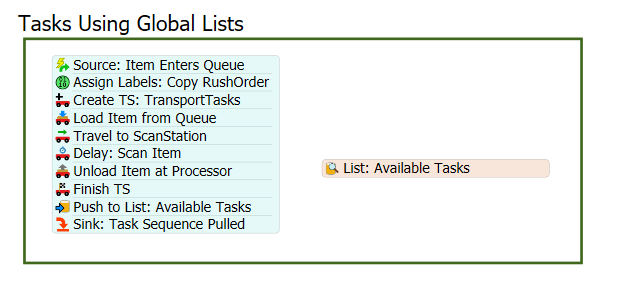
The following is an overview of how the new or edited activities and shared assets will function:
| Activity | Explanation |
|---|---|
| Assign Labels: Copy RushOrder | This activity will copy the RushOrder label from the flow item so that it is on the token as well. |
| Create TS: TransportTasks | You'll edit this activity so that it assigns a priority level to each task sequence based on the priority form the RushOrder label. |
| List: Available Tasks | You'll add an additional field to this list to track the task sequence's priority levels. |
To create this logic:
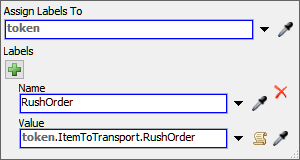
- With the process flow open and active, insert an Assign Labels activity (under Basic) after the Source: Item Enters Queue activity.
- Rename this activity Assign Labels: Copy RushOrder.
- In this activity's Quick Properties, click the Add
button to add a new label.
- In the Name box, type
RushOrder. - In the Value box, type
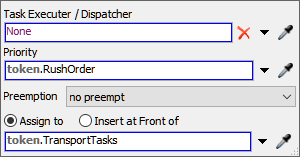
token.ItemToTransport.RushOrder. - Click the Create TS: TransportTasks activity to select
it. In Quick Properties in the Priority box, delete the
current text and type
token.RushOrder. - Click the List: Available Tasks shared asset. In Quick Properties, click the Advanced button to open the list's properties.
- On the Fields tab, click the
Add button
to open a menu. Select priority to add this field.
- Press the OK button to save the changes and close the properties window.
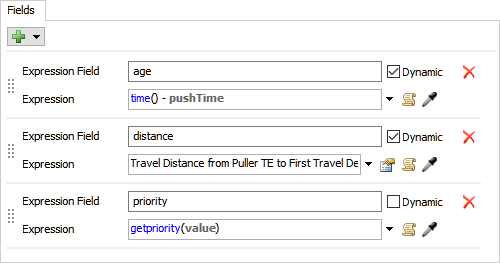
- In the 3D model, double-click Operator4A to open its properties.
- On the Triggers tab next to the On
Resource Available trigger, click the Edit
Properties button
 to open
the picklist options.
to open
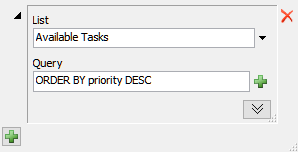
the picklist options. - Next to the Query box, click the
Add button
to open a menu. Point to ORDER BY (Sort), then select
priority. Change the
ASCtoDESC. - Press the OK button to save the changes and close the properties window.
- Repeat the previous steps for Operator4B.
Reset and run the model.

The global list system can handle priorities just as well as the system that used local lists. However, it has the additional advantage of working better with the priority levels of the standard logic. In other words, you can develop more sophisticated priority and preemption systems that can combine elements of standard logic with process flow logic.
Step 7 Add a Second Processor
In this last step, you'll add that second processor back in. Unfortunately, when you add the functionality for a second processor, you'll begin to see some of the disadvantages of building task sequences and then pushing them to a global task sequence list.
When you're finished, your process flow will look similar to the following image:
The following is an overview of how the new and edited activities and shared assets will function:
| Activity | Explanation |
|---|---|
| Resources: Processors | You'll link this shared activity to GlobalListProcessors group in the 3D model so that the processors in this group can be acquired, restricting them to one flow item at a time. You'll also set the resource's queue strategy so that it prioritizes flow items with a RushOrder value of 1. |
| Acquire Processor | This activity will attempt to acquire a processor before building the task sequence. If the processor is available, the token will acquire that resource and release the token to the next downstream object. When the resource is acquired, you'll assign the token a label named Processor that will contain a reference to the processor in the 3D model that was acquired. |
| Unload Item at Processor | You'll edit this activity so that it will use the Processor label to determine which processor should receive the flow item. |
| Wait for Event: Process Finish | This is an event-listening activity, which means it will listen to an object in the 3D model and release the token to the next downstream activity once the event occurs. This activity will wait for the processor to finish processing the item before releasing the token to the next activity. |
| Release Processor | This activity will release the processor so that it can accept another flow item. It will use the Processor label to release the processor. |
To add a second processor:
- In the 3D model, right-click Processor4B to open a menu. Point to Object Groups, then select GlobalListProcessors to add the processor to this group.
- In the process flow, insert an Acquire Resource activity (under Shared Assets) after the Assign Labels: Copy RushOrder activity.
- Insert a Wait for Event activity (under Basic) after the Push to List: Available Tasks activity.
- Insert a Release Resource activity (under Shared Assets) after the Wait for Event activity you just added.
- Add a Resource shared asset (under Shared Assets) and put it to the right of the stacked block of activities.
- Rename the following activities and shared assets:
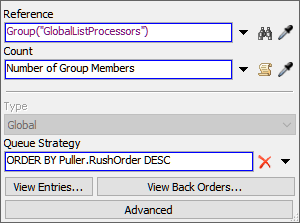
- Click the Resource: Processors shared asset to select it. In Quick Properties, click the arrow next to the Reference box to open a menu. Point to Group, then select GlobalListProcessors.
- In the Queue Strategy box, type
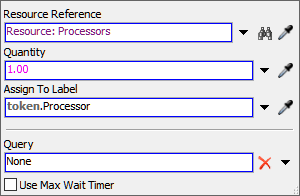
ORDER BY Puller.RushOrder DESC. - Click the Acquire Processor activity to select it.
Click the Exclamation Point button
next to the activity to enter
sampling mode.
- Click the Resource: Processors shared asset to sample it. A blue line will now link this activity to the shared asset.
- In Quick Properties, in the Assign to Label box, delete
the current text and type
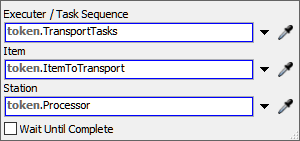
token.Processor. - Click the Unload: Item at Processor activity to select it. In Quick Properties, click the arrow next to the Station box to open a menu. Point to Token Label and select Processor.
- Click the Wait for Event: On Process Finish activity to select it. Click the arrow next to the Object box to open a menu. Point to Token Label and select Processor.
- Next to the Event box, click the
Sampler button
to enter sampling mode.
- In the 3D model, click Processor4A to open a menu. Select On Process Finish.
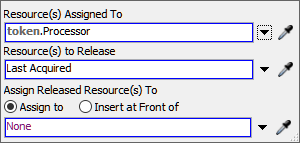
- Click the Release Processor activity to select it. Click the arrow next to the Resource(s) Assigned To to open a menu. Point to Token Label, then select Processor.
| Activity | New Name |
|---|---|
| Resource | Resources: Processors |
| Acquire | Acquire Processor |
| Wait for Event | Wait for Event: Process Finish |
| Release | Release Processor |
| Sink: Task Sequence Pulled | Sink: Item Released to Sink |
Reset and run the model.
While the global list system can handle having an additional processor without any problems, you've unfortunately lost some of the advantages of the global list system. For instance, notice that the process flow only creates and pushes two task sequences to a list at a time. Only two task sequences can get pushed onto the list at a time because only two processors can be acquired at a time. This reduces the effectiveness of the global list because it works better when the operator can choose from many tasks and focus on pulling pulls tasks based on the ones with that match certain criteria.
This problem could be prevented if somehow the processor could be dynamically assigned at the moment the operator pulls the task sequence from the global list, as opposed to being assigned before the task sequence is pushed to the list. However, there currently isn't an easy method for doing that in FlexSim.
Fortunately, you'll learn how to implement a fairly simple workaround for this problem in the next step.
Step 8 Troubleshoot the Processor Issue
In this step, you'll add a workaround for the problem that you encountered in the previous step when you tried to add a second processor. As you'll recall, the issue is that you can't dynamically assign a processor at the time the operator pulls the task sequence from the global list.
The workaround solution is to put a queue in front of the two processors so that it can store items when the operator unloads them. Then, you'll set the processors to pull flow items from the queue whenever they're ready for another item. You'll also set up the new queue so that rush order items are pulled first by the processor. Lastly, you'll modify the process flow to remove unnecessary activities and change the unloading destination for the flow items.
To make these changes:
- In the 3D model, add another Queue to the GlobalListLogic plane, placing it near the two processors. (You might need to move the Scanstation4 shape to make room.)
- Rename the new queue Destination4.
- Create port connections (A-connects) from Destination4 to Processor4A and Processor4B.
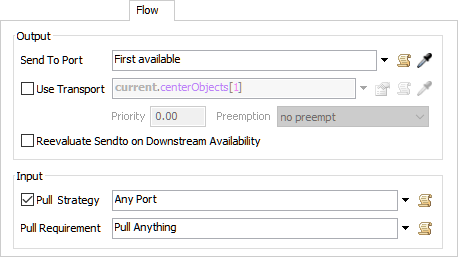
- Double-click Processor4A to open its properties window. On the Flow tab, check the Pull box. Click the OK button to save the changes and close the window.
- Repeat the previous steps for Processor4B.
- Double-click Destination4 to open its properties
window. On the Triggers tab, click the
Add button
to open a menu. Select On Entry.
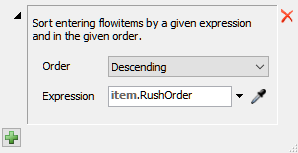
- Next to the On Entry box, click the
Add button
to open a menu. Point to Control, then
Sort by Expression to open a picklist window.
- In the Expression box, delete the current text and type
item.RushOrder. - Confirm that the Order menu currently displays Descending. Click the OK button to save the changes and close the window.
- In the process flow, delete the following activities and shared assets:
- The Resource: Processors shared asset
- The Acquire Processor activity
- The Wait for Event: Process Finish activity
- The Release Processor activity
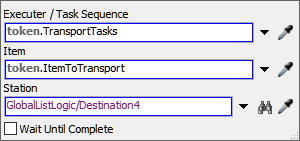
- Click the Unload: Item at Processor to select it. In
Quick Properties next to the Station box, click the
Sampler button
to enter sampling mode.
- In the 3D model, click the Destination4 queue to open a menu. Select GlobalListLogic/Destination4 to sample it.
Reset and run the model:
Now the task list holds many more than two tasks at a time because the system no longer has restrictions requiring you to assign the processor before the task sequence is built and pushed to the list. If items begin to accumulate in the Destination4 queue, the processors will pull the rush order items first. (You can test this by experimenting with longer processing times, if you'd like.)
Conclusion
Now that you've built transportation tasks using lists in a process flow, you can see that it has a few advantages:
- Designing look-for-work task systems - Using a global list, you could push task sequences to a list and then have an operator pull off task sequences based on certain criteria once they become available. In this example, you had operators pull higher priority tasks first, but you could possibly add even more complexity to the system. For example, you could have operators with a particular speciality pull off task sequences that require that speciality.
- Model scalability - This look-for-work system could scale well because you could potentially set up your model so that available task sequences from many different systems are put on one global list that is accessed by one pool of operators.
- Mixing and matching with standard logic - If you need to design a task system that uses the strengths of both process flow and standard logic, it might be helpful to use the task sequence method.
- Priorities and preemption - The other process flow systems don't have a way to assign tasks a priority level or preemption value that works well with the standard logic. The only way to assign priorities and preemption is to build a task sequence and assign that sequence a priority level or preemption value, then push it to a global list.
However, there are some disadvantages that come from using lists to build task logic:
- No dynamic decision-making - One disadvantage of this system is that task sequences can't be dynamically changed or updated once it's been pushed to a global list. Once a task sequence has been pushed to a global list, it can't be altered. For example, an operator can't make a dynamic decision about which processor to unload a flow item because that had to be pre-determined when the task sequence was built and pushed to the list. This particular weakness of the global list system potentially eliminates the advantages of the system.
This concludes the task logic tutorial. By now, you've hopefully gotten a good sense of the advantages and disadvantages of different methods for building task logic in a simulation model. When you are considering which system to use in your simulation projects, consider the unique needs of your system and the task logic method that will be best suited to that project.