Task 5.1 - Create a Custom Fixed Resource
Task Overview
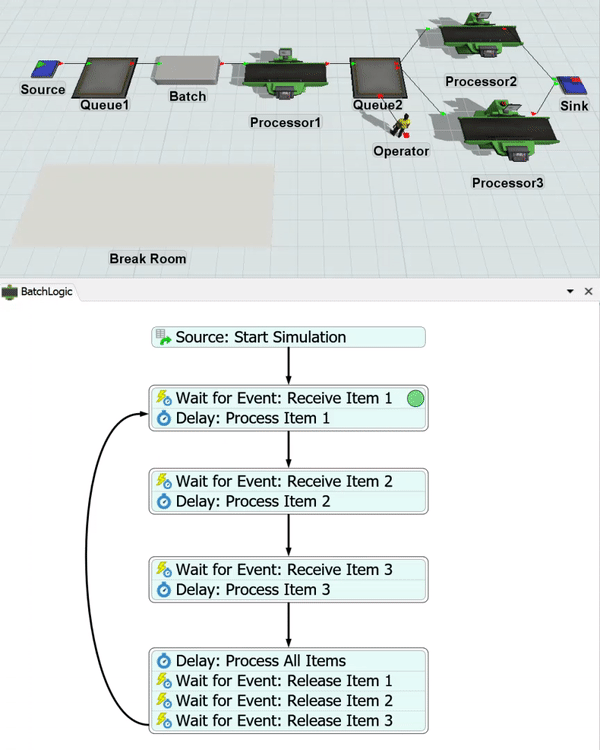
In this tutorial task, you'll learn how to use a fixed resource process flow to design the custom logic for a fixed resource. You'll add a BasicFR object to the model and attach it to a fixed resource process flow that will receive and process flow items in a batch. This tutorial will also cover common problems and pitfalls that come from designing custom fixed resources. When you're finished, your model will look similar to the following image:
Receiving and Releasing Items
BasicFR objects are a blank slate, which means that they do not have their own logic for receiving and releasing items. You will need to explicitly add this logic to the BasicFR object by creating a fixed resource process flow. You'll use the Receive Item and Release Item picklists on event-listening activities to handle this logic.
Be aware that if you were going to attach a standard fixed resource to a process flow (such as a queue or a processor), you wouldn't use the Receive Item and Release Item picklists. Instead, you would use the Close Ports and Open Port picklists. See Tutorial 2 - Task Sequences for an example of these picklists in context.
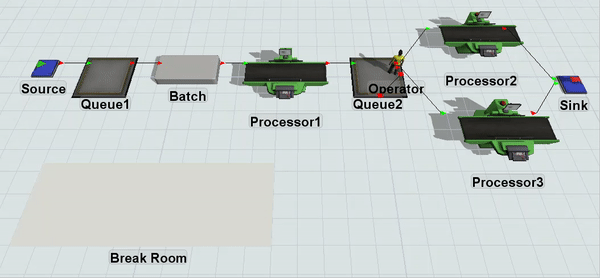
Step 1 Build the 3D Model
In this step, you'll build a basic 3D model. When you're finished, your 3D model should look similar to the following image:
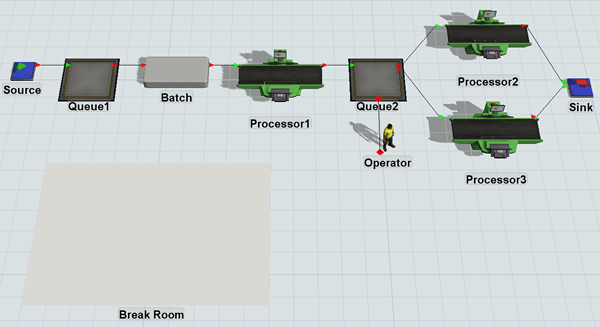
To build this model:
- Drag the following objects from the Library:
- 1 Source
- 2 Queues
- 1 BasicFR
- 1 Operator
- 3 Processors
- 1 Sink
- 1 Plane
- Move the objects so that they are roughly in the same layout as shown in the image at the beginning of this step.
- For clarity, rename the objects as follows:
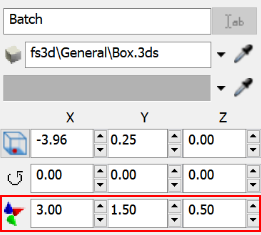
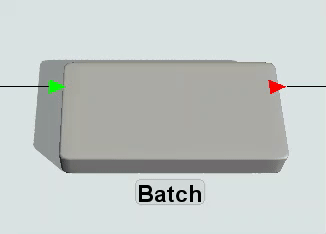
- Click the Batch to select it.
- In Quick Properties, change the Batch's size as follows:
- X-Size:
3.00 - Y-Size:
1.50 - Z-Size:
0.50
- X-Size:
- Create port connections (A-connects) from:
- Source to Queue1
- Queue1 to Batch
- Batch to Processor1
- Processor1 to Queue2
- Queue2 to Processor2 and Processor3
- Processor2 and Processor3 to Sink
- Create a center port connection (S-connect) from Queue2 to Operator
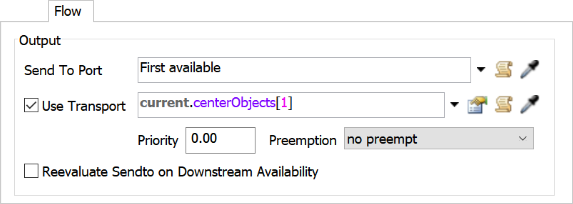
- Double-click Queue2 to open its properties window.
- In the Flow tab in the Output group, check the Use Transport checkbox and confirm that this queue will use the operator connected to its center port.
| Object | New Name |
|---|---|
| Source1 | Source |
| BasicFR1 | Batch |
| Operator1 | Operator |
| Sink1 | Sink |
| Plane | Break Room |
Check to make sure that your model looks similar to the image shown in the beginning of this section.
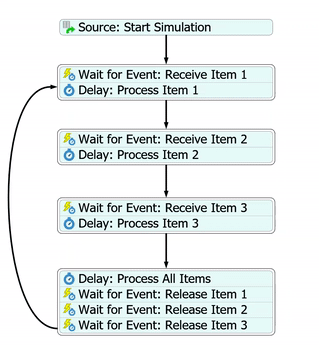
Step 2 Add Activities to a Fixed Resource Process Flow
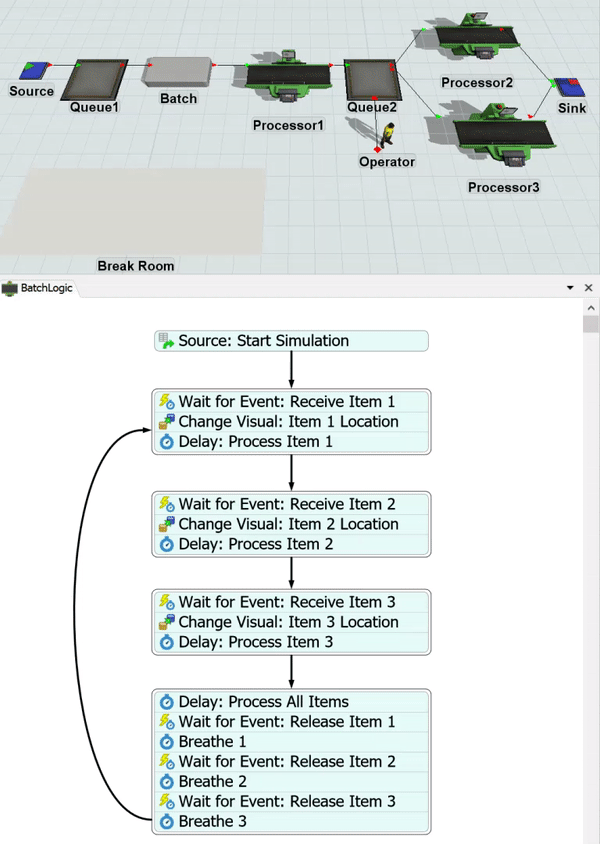
In this step, you'll add activities to a fixed resource process flow to build a custom fixed resource that will receive three flow items, process the items in a batch, and then release them to the next downstream resource. When you're finished, your process flow should look similar to the following image:
For now, you'll merely add and connect these activities to the process flow. You'll edit the properties to add the functionality in a later step.
To add and connect these activities:
- On the main toolbar, click the Process Flow button to open a menu. Point to Add a Fixed Resource Process Flow, then select Blank.
- In Quick Properties in the Process Flow Name box, delete the current text and rename the process flow BatchLogic.
- From the Library, add a Schedule Source activity (under Token Creation).
- From the library, add a Wait for Event activity and add a Delay activity at the end of this activity to create a stacked block.
- Repeat the previous step twice to create two more identical stacked blocks.
- From the Library, add the following activities to create one more stacked block:
- A Delay activity (under Basic)
- 3 Wait for Event activities (under Basic)
- For clarity, rename these activities as:
- Create a connector from the following activities:
- From the Source: Start Simulation to the Wait for Event: Receive Item 1 activity
- From the Delay: Process Item 1 to the Wait for Event: Receive Item 2 activity
- From the Delay: Process Item 2 to the Wait for Event: Receive Item 3 activity
- From the Delay: Process Item 3 to the Delay: Process All Items activity
- Create a connector that loops from the end of the Wait for Event: Release Item 3 activity to the Wait for Event: Receive Item 1 activity.
| Activity | New Name |
|---|---|
| Source | Source: Start Simulation |
| First Wait For Event | Wait for Event: Receive Item 1 |
| First Delay | Delay: Process Item 1 |
| Second Wait For Event | Wait for Event: Receive Item 2 |
| Second Delay | Delay: Process Item 2 |
| Third Wait For Event | Wait for Event: Receive Item 3 |
| Third Delay | Delay: Process Item 3 |
| Fourth Delay | Delay: Process All Items |
| Fourth Wait For Event | Wait for Event: Release Item 1 |
| Fifth Wait For Event | Wait for Event: Release Item 2 |
| Sixth Wait For Event | Wait for Event: Release Item 3 |
Consider saving your simulation model.
Step 3 Edit the Receiving Activities
In this step, you'll edit the properties for the activities that handle receiving items in the process flow. You'll have to first attach the Batch as an instance to the process flow. This will make it possible for you to use the current keyword to dynamically refer to the Batch. This makes it easier to scale more complex models: you can add additional BasicFR objects as attachments to the process flow without having to copy the process flow for each object.
The following is an overview of how each activity will function:
| Activity | Explanation |
|---|---|
| Source: Start Simulation | This Scheduled Source activity will create one token as soon as the simulation starts and sends the token to the Wait for Event activity. After it creates this token, it won't create any additional tokens. The one token will simply loop continuously through the other activities until the simulation ends. You'll use the default properties for this activity. |
| Wait for Event: Receive Items | Wait for Event activities are event-listening activities. That means a token will wait at this activity until the event that is being listened to occurs. In this process flow, the first three Wait for Event activities will listen to the Batch for the On Entry event. Because the Batch is a BasicFR object, you'll need to explicitly direct it to receive flow items. When the Batch receives a flow item, you'll assign a label named Item1, Item2, or Item3 that will store a reference to the flow item that triggered the event. |
| Delay: Process Times | You'll add a delay of 5 seconds to represent the amount of time the batch will process each flow item. |
To edit these properties:
- Click a blank space in the process flow to ensure nothing is selected. In Quick
Properties under the Process Flow Instances group, find the
Attached Objects (instances) list. Click the
Sampler button
 to enter sampling mode.
 - In the 3D model, click the Batch to sample it.
- Click the Wait for Event: Receive Item 1 activity to
select it. In Quick Properties, confirm that the Object box
displays
current (No Instance). - Next to the Event box, click the
Sampler button
to enter sampling mode.
- In the 3D model, click the Batch to open a menu. Select On Entry to sample this event.
- Now find the Label Matching/Assignment table. In the
Entering Item row under the Label
Name column, type
Item1. - Click in the cell under the Operation column to open a menu. Select assign.
- Next to the On Listener Initialized box, click the
Add button
 to open a menu. Point to Control, then
BasicFR, then Receive Item to
open the picklist options.
to open a menu. Point to Control, then
BasicFR, then Receive Item to
open the picklist options. - You'll use the default settings, so confirm the picklist options look similar to the following image:
- Repeat steps 4-11 for the Wait for Event: Receive Item 2 and Wait for Event: Receive Item 3 activities, except you should use the label names Item2 and Item3 on step 8.
- Click the Delay: Process Item 1 activity to select
it. In Quick Properties in the Delay Time box, delete the
current text and type
5.00. - Repeat the previous step for the Delay: Process Item 2 and Delay: Process Item 3 activities.

Consider saving your simulation model.
Step 4 Edit the Releasing Activities
In this step, you'll edit the properties for the activities that handle releasing items in the process flow. The following is an overview of how each activity will function:
| Activity | Explanation |
|---|---|
| Delay: Process Times | You'll add a delay of 5 seconds to represent the amount of time the batch will process each flow item. |
| Wait for Event: Release Items | The last three Wait for Event activities are the mirror image of the first three Wait for Event activities. These three activities will listen to the Batch for the On Exit event. Because the Batch is a BasicFR object, you'll need to explicitly direct it to release the flow items after they've been processed. To make sure that the Batch releases the correct item, you'll need to reference the labels named Item1, Item2, or Item3 that were created by the first three Wait for Event activities. |
To edit these properties:
- Click the Delay: Process All Items activity to select
it. In Quick Properties in the Delay Time box, delete the
current text and type
10.00. - Click the Wait for Event: Release Item 1 activity to
select it. In Quick Properties, confirm that the Object box
displays
current (No Instance). - Next to the Event box, click the
Sampler button
to enter sampling mode.
- In the 3D model, click the Batch to open a menu. Select On Exit to sample this event.
- Next to the On Listener Initialized box, click the
Add button
to open a menu. Point to Control, then
BasicFR, then Release Item to
open the picklist options.
- In the Specify the item to release box, change the
current text to
token.Item1. - Repeat the steps 3-8 for the Wait for Event: Release Item
2 and Wait for Event: Release Item 3 activities,
except you should use the label names
token.Item2andtoken.Item3for step 8.

Consider saving your simulation model.
Step 5 Test the Model
You might not have realized it, but your custom fixed resources has a few problems with it at this point. Try resetting and running the model and see if you can notice what the problem is on your own. If you get stuck, the rest of this step will explain the problem.
If you're still unsure about the problem, try this:
- Reset and run the model.
- Wait until the Batch pushes flow items to Processor1.
- Pause the simulation model and try moving one of the flow items on Processor1. You'll notice that there are actually three items in the processor:
There's really two problems occurring here. First, you can't see the boxes in the Batch. Since the process flow didn't explicitly set the location for the boxes, they get swallowed up by the Batch and can't be seen. If you could see them in the Batch, you'd also see that all three flow items would appear in the same space (the same way they do on Processor1). This has to do with the way FlexSim automatically offsets objects.
Second (and more importantly), you will notice that the Batch releases all three flow items at the same time and then jumps to the beginning of the next batch. Releasing the flow items simultaneously causes the processor to process three items at the same time, which is the wrong behavior. This behavior is caused by the way FlexSim's event handling works.
You'll learn how to solve these two problems in the next two steps.
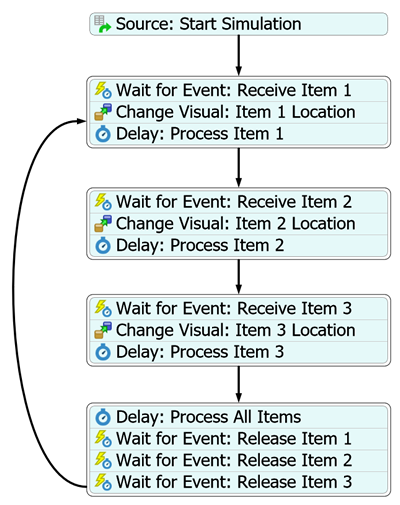
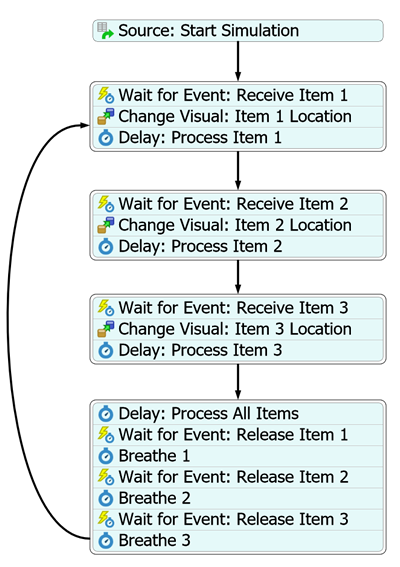
Step 6 Change the Flow Item Visuals
In this step, you'll fix the problem with the flow item visuals in the Batch object. You'll fix this by adding three Change Visual activities (one for each item) to the activity blocks that control how the batch receives items. You'll use the Change Location picklist options to set the flow item offsets inside the Batch activity. When you're finished, your process flow will look similar to the following image:
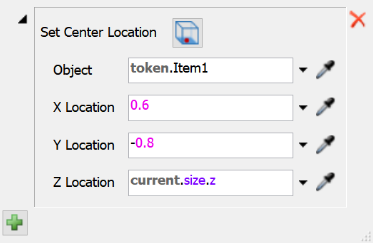
One FlexScript expression you'll see in this step is the current.size.z
expression. This expression gets the Z position of the item containing the flow item (the
Batch) and puts the flow item on top of the container object so that it doesn't get
swallowed up by the object.
To change the flow item visuals relative to the Batch:
- Hover your mouse over the line separating the Wait for Event: Receive Item 1 and the Delay: Process Item 1 activities. When the line turns yellow, double-click it to open the Quick Library.
- Under the Visual group, click the
Change Visual button
 to add this
activity.
to add this
activity. - Repeat these steps to insert Change Visual activities between the next two stacked blocks as well.
- For clarity, rename these activities as:
- Click Change Visual: Item 1 Location to select it. In
Quick Properties next to the Change Visual box, click the
Add button
to open a menu. Select
Set Location to open some picklist options.
- Set the picklist options as follows:
- In the Object box, type
token.Item1 - In the X Location box, type
0.6 - In the Y Location box, type
-0.8 - In the Z Location box, type
current.size.z
- In the Object box, type
- Repeat the previous steps for the Change Visual: Item 2
Location but this time, use the following settings:
- In the Object box, type
token.Item2 - In the X Location box, type
1.5 - In the Y Location box, type
-0.8 - In the Z Location box, type
current.size.z

- In the Object box, type
- Repeat the previous steps for the Change Visual: Item 3
Location but this time, use the following settings:
- In the Object box, type
token.Item3 - In the X Location box, type
2.4 - In the Y Location box, type
-0.8 - In the Z Location box, type
current.size.z

- In the Object box, type
| Activity | New Name |
|---|---|
| First Change Visual | Change Visual: Item 1 Location |
| Second Change Visual | Change Visual: Item 2 Location |
| Third Change Visual | Change Visual: Item 3 Location |
Try running the model to see how this changes the way flow items stack up in the Batch:
Step 7 Add Breathe Activities to the Process Flow
As you'll recall from the step in which you tested the model, the Batch is having a problem in which it releases all the flow items to the downstream processor at the same time. This problem is caused by the way FlexSim's event handling works. What is happening is that when the Processor is ready to receive its next item, it opens its input ports, which causes the first item to exit the Batch. When the Batch's On Exit event fires, it causes the rest of the Wait for Event activities to fire as well, releasing all the items simultaneously. All of this event-listening logic occurs before the processor even knows that it has received an item and close its input port. Consequently, all the items are released and exits immediately while the processor's input port is open.
This same problem can crop up in other scenarios. Within the Process Flow tool it usually happens when a listened event is fired on a Wait For Event or Event-Triggered Source, and that is followed by one or more other activities that themselves may cause events in the model to fire, without any delays between the original triggered event and the subsequent event triggering logic. The logic happens so fast that it doesn't give the original event enough time to "breathe" and finish what it was doing. In these cases, you can fix the problem by adding a Breathe activity, which is a Delay activity set to delay for 0 seconds. This will allow the original triggering event to finish what it was doing before the token moves on.
When you're finished, your process flow will look similar to the following image:
To add these breathe activities:
- Hover your mouse over the line separating the Wait for Event: Release Item 1 and the Wait for Event: Release Item 2 activities. When the line turns yellow, double-click it to open the Quick Library.
- Under the Basic group, click the
Delay button
 to add this activity.
 - Repeat these steps to add two more Delay activities after the Wait for Event: Release Item 2 and the Wait for Event: Release Item 3 activities.
- For clarity, rename these activities as:
- In Quick Properties, set the Delay Time for all three
Breathe activities to
0.00.
| Activity | New Name |
|---|---|
| First Delay | Breathe 1 |
| Second Delay | Breathe 2 |
| Third Delay | Breathe 3 |

Try resetting and running the model. This time you should notice that the flow items leave the batch one at a time rather than all at once:
It may seem a little counter-intuitive that you need to use a Wait for Event activity to
receive and release items. You might ask yourself if it would be easier to use the
releaseitem() command on a Custom Code activity before each Wait for Event:
Release Item activity.
The problem with this approach is that it may actually cause the item to exit before the command is even finished executing. By the time the token gets to the Wait for Event: Release Item 1 activity, item 1 will already have exited. Because the event being listened to will have already fired, the token will get stuck waiting forever.
The solution to this problem is to use the OnListenerInitialized trigger on the Wait for Event activity. This allows you to keep the logic firing in the correct order. It allows you to execute the event-listening logic first, followed by the logic that receives/releases the item.
Conclusion
So far, you've learned how to create the logic for a custom fixed resource in the Process Flow tool. In the next task, you'll learn how to create the logic for a custom task executer. Continue on to Tutorial Task 5.2 - Create a Custom Task Executer.