Creating 3D Object Groups
Overview of 3D Object Groups
The Groups tool allows you to organize and classify 3D objects that have a common logical function into distinct groups. For example, you could create groups for different types of processors. Perhaps you have a set of processors that represent welding stations and a set of processors that represent painting stations. You could create two separate object groups for these different types of stations.

After you've created an object group, you can then link that group to a resource shared asset in a process flow. (See Key Concepts About Shared Assets for more information about resource shared assets.) During a simulation run, the resource can then select any member of an object group if it is currently free. For example, the process flow can pull operators from a group to assign them to work on a particular task or it can pull processors from a group to select which processor should be the destination for a flow item.
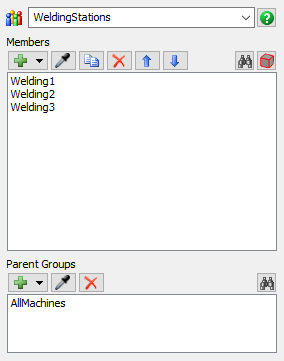
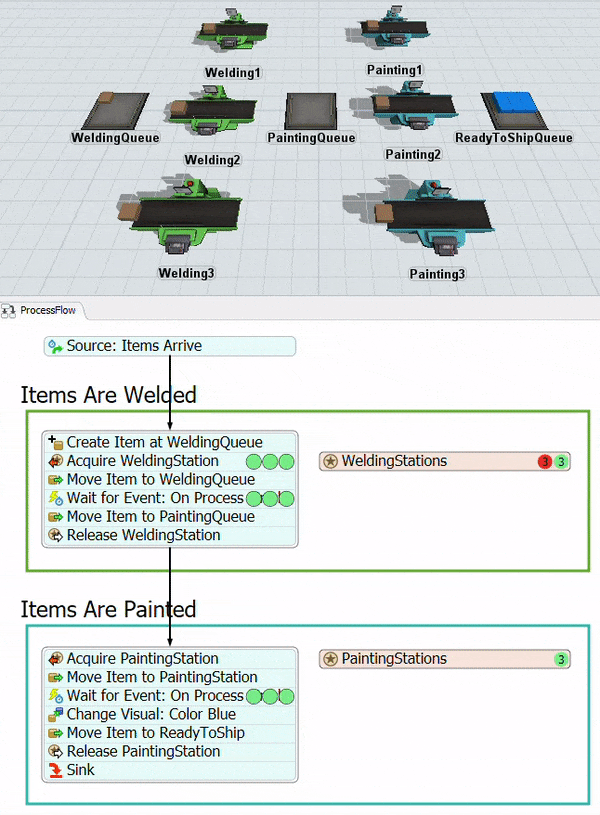
The following example shows two groups of processors: a WeldingStations group and a PaintingStations group. Each group is linked to resource shared assets in a process flow, which controls the model's logic. When those processors are free, they can be acquired by a flow item. If no processors in a specific group are free, the flow items will wait at a queue:
Key Concepts About Groups
The following sections explain a few key concepts to keep in mind about 3D object groups.
3D Object Groups Help Your Model Scale Easily
The Groups tool helps you to scale your model's logic more easily as it grows in complexity. If you add or remove 3D objects from your model, you can add or remove them from the group without needing to update the logic you've set up in your process flows.
For example, if you decide to add additional welding stations or remove a painting station, you could simply add or remove these processors from their respective groups. The resource shared assets that links to these groups in the process flow would not be impacted by these changes. You'll save time while building your model by not having to update the model's logic every time you add or remove 3D objects.
Groups Work Well with the Experimenter Tool
Groups are also important if you're going to run an experiment using the Experimenter tool. The Experimenter tool has the option to test the different statistical outcomes based on the number of objects you have in a particular group. For example, you can run experiments to determine the ideal number of staff or machines needed to maintain a particular throughput or to reduce delays.
Objects Can Belong to More Than One Group
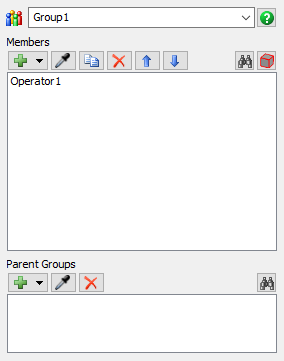
Keep in mind that a single 3D object could potentially belong to more than one group if needed. For example, perhaps you create a group of operators who are trained in operating the welding machines and another group of operators who are trained in operating the painting machines. You could create separate groups for each type of operator. However, if you had an operator with training in both areas, you could make that operator a member of both groups.
Groups Can Belong to Parent Groups
A parent group is a group that contains one or more sub-groups. To return to the example used in the Overview section of this topic, you could create another object group called AllMachines that contains both the WeldingStations group and the PaintingStations group as child groups.

You can use parent groups if you want to create a hierarchy of related groups if it's important to your simulation model's logic in some way. For example, you could use the AllMachines group to possibly shut down all of the machines when it is closing time.
People objects create parent groups by default. When you add one of these 3D objects to your simulation model, this object will automatically be added to a generic group based on the type of object it is (locations, staff, transports, etc.). If you later create a more specific group for one of these types of objects, the generic group will become the parent group for the more specific group.
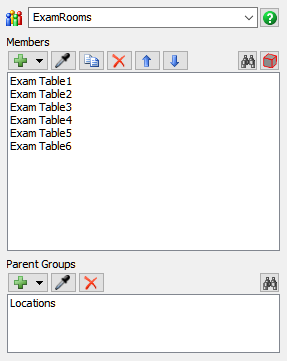
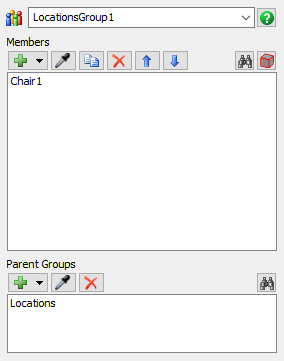
For example, when you add an exam table to a simulation model, this object will automatically belong to the generic Locations group. If you then created a new group called ExamTables and put all of the exam tables into this group, the ExamTables group would become a child of the Locations group by default.
Types of 3D Object Groups
The Groups tool allows you to create several different types of 3D object groups. With the exception of general 3D object groups, most of these group types are used by the people objects, which is a specific category of objects in the 3D object library.
The following sections will explain the different types of groups in more detail:
General Groups
General 3D object groups are for groups of 3D objects that are not people objects. When you add a non-people object to a group, you will usually add it to a general 3D object group.
In the Toolbox, these groups will show up in the Groups folder:

General groups do not have any parent groups by default, but you can create parent groups if that is helpful for keeping your model organized or if it is crucial to the function of your model's logic. See Creating Parent Groups for General 3D Object Groups for more information.
Location Groups
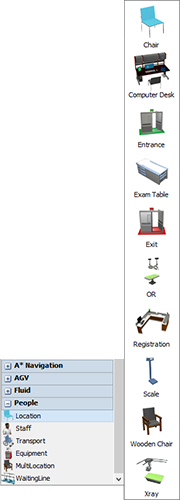
Location groups are for groups of people objects that are location objects. Location objects are a specific sub-category of object that are found in the people category of the 3D object library.
When you add a location object to a 3D model, it is automatically added to the Locations group in the Toolbox. The Locations group can be found in the Toolbox under the Groups folder in a sub-folder of the People folder. If you add a location object to a custom group, that custom group will also show up in the Toolbox under this sub-folder:
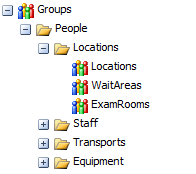
By default, any custom location groups you create will have the Locations group as a parent group:

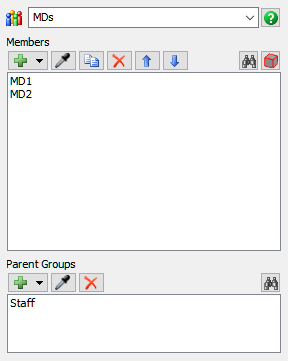
Staff Groups
Like location groups, staff groups are for groups of people objects that are staff objects. Staff objects are a specific sub-category of object that are found in the people category of the 3D object library.
When you add a staff object to a 3D model, it is automatically added to the Staff group in the Toolbox. The Staff group can be found in the Toolbox under the Groups folder in a sub-folder of the People folder. If you add a staff 3D object to a custom group, that custom group will also show up in the Toolbox under this sub-folder:
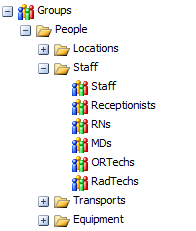
By default, any custom staff groups you create will have the Staff group as a parent group:
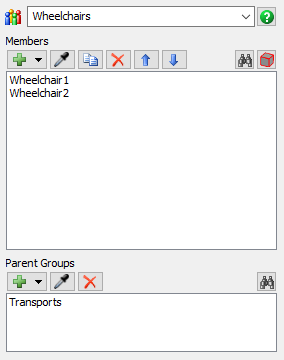
Transport Groups
Like location and staff groups, transport groups are for groups of people objects that are transport objects. Transport objects are a specific sub-category of object that are found in the people category of the 3D object library.
![]()
When you add a transport object to a 3D model, it is automatically added to the Transports group in the Toolbox. The Transports group can be found in the Toolbox under the Groups folder in a sub-folder of the People folder. If you add a transport 3D object to a custom group, that custom group will also show up in the Toolbox under this sub-folder:
![]()
By default, any custom transport groups you create will have the Transports group as a parent group:
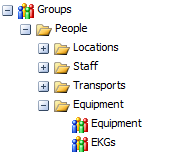
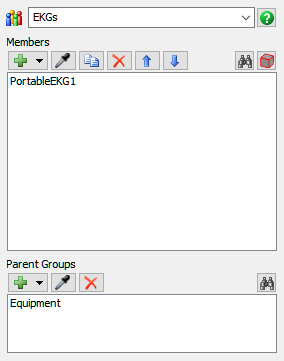
Equipment Groups
Like location and staff groups, equipment groups are for groups of people objects that are equipment objects. Equipment objects are a specific sub-category of object that are found in the people category of the 3D object library.
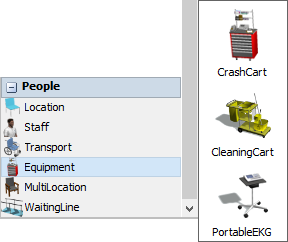
When you add an equipment object to a 3D model, it is automatically added to the Equipment group in the Toolbox. The Equipment group can be found in the Toolbox under the Groups folder in a sub-folder of the People folder. If you add an equipment 3D object to a custom group, that custom group will also show up in the Toolbox under this sub-folder:
By default, any custom equipment groups you create will have the Equipment group as a parent group:
Creating a General 3D Object Group
To create a general 3D object group:
- Add the objects that will become members of the 3D object group to your simulation model.
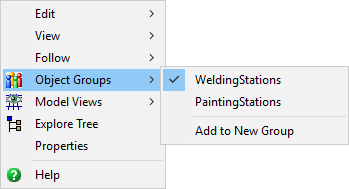
- Right-click one of the objects to open a menu. Point to Object Groups, then select Add to New Group.
- The new group's properties window will now open. In the properties window, change the name of the group to be more descriptive.
- Confirm that the 3D object you selected is listed as a member of this group. Close the group properties window when you are finished.
As an alternative, you can also create new groups inside the Toolbox the same way you add normal tool components. See Using the Toolbox - Adding a New Tool Component for more information.
Creating a People Object Group
The method for creating a new people-based 3D object group is similar to the process for creating a general group, but the menu options are slightly different. To create a 3D object group for one of the people-based objects:
- Add the objects that will become members of the 3D object group to your simulation model.
- Right-click one of the objects to open a menu. The menu options will be slightly different depending on the sub-category of people object you have right-clicked. For example, if you right-clicked a location object, the menu option you want will display Add a New Location Group. If it is a staff object, the menu will display Add a New Staff Group, and so forth. Select the correct menu option based on the type of object for which you want to create a group.
- The new group's properties window will now open. In the properties window, change the name of the group to be more descriptive.
- Confirm that the 3D object you selected is listed as a member of this group. Close the group properties window when you are finished.
Adding Group Members
You can add additional group members using the right-click menu or by sampling a group member from within the group properties window. While either method will work for general 3D objects, the first method is the preferred method if you are working with people objects.
Adding Group Members with the Right-Click Menu
Be aware that the menu options for adding general 3D objects and people objects are slightly different. To add additional members to a general or people 3D object group using the right-click method:
- Right-click the object in the 3D model to open a menu.
- If the object is a general 3D object, point to Object Groups and then select the name of the group to which you want to add this object.
- If the object is a people object, the menu options will depend on the sub-category of people object you have right-clicked. For example, if you right-clicked a location object, the menu option you should point is Location Groups, then you will select the name of the location group to which you want to add this object. If it is a staff object, you will need to point to the menu option Staff Groups, then you will select the name of the staff group to which you want to add this object, and so forth.
- The object will now be added to the group you selected. If needed, you can confirm that this object was added to the correct group by right-clicking the option a second time and navigating to the correct object group again. If the object is a member of that group, it will display a check box next to its name.
- Repeat these steps as needed to add additional objects to the group.
Adding Group Members from Group Properties
To add additional members to a group from the group properties window:
- In the Toolbox, find the group to which you want to add an object. Double-click the group name to open its properties window.
- In the group properties window, click the Sampler
button
 to enter sampling mode.
 - In the 3D model, click the 3D object you want to add to the group to sample it. It will then appear as a member in the group list.
- Repeat these steps as needed to add additional objects to the group. Close the group properties window when you are finished.
- If you were working with a people object group, you will need to open the generic parent group (such as the Locations group, the Staff group, etc.) and remove that object from the generic parent group. See the next section about Removing Group Members for more information.
Removing Group Members
You can remove group members using the right-click menu or by removing the group member from within the group properties window. Both methods work equally well for both general 3D objects and people objects.
Removing Group Members with the Right-Click Menu
Be aware that the menu options for removing general 3D objects and people objects are slightly different. To remove members from a general or people 3D object group using the right-click method:
- Right-click the object in the 3D model to open a menu.
- If the object is a general 3D object, point to Object Groups and then select the name of the group from which you want to remove this object.
- If the object is a people object, the menu options will depend on the sub-category of people object you have right-clicked. For example, if you right-clicked a location object, the menu option you should point is Location Groups, then you will select the name of the location group from which you want to remove this object. If it is a staff object, you will need to point to the menu option Staff Groups, then you will select the name of the staff group from which you want to remove this object, and so forth.
- The object will now be removed from the group you selected. Repeat these steps as needed to remove additional objects from the group.
Removing Group Members from Group Properties
To remove members from a group using the group properties window:
- In the Toolbox, find the group from which you want to remove an object. Double-click the group name to open its properties window.
- In the group properties window, click the name of the object you want to remove from the members list to select it.
- Click the Remove button
 to remove the object from the list.
 - Repeat these steps as needed to remove additional objects from the group. Close the group properties window when you are finished.
Creating Parent Groups for General 3D Object Groups
If needed, you can great parent groups for 3D object groups. (See Key Concepts About Groups at the beginning of this topic for an explanation of parent groups.)
To create a parent group for a 3D object group:
- First create the parent group. When creating this group, you should probably add the group from the Toolbox the same way you add normal tool components because that will create an empty group with no members. See Using the Toolbox - Adding a New Tool Component for more information.
- In the group properties window, change the name of the parent group to be more descriptive.
- Click the Sampler button
to enter sampling mode.
- In the Toolbox, find the list of available groups. Click the group you want to add as a child group to sample it.
- The group should now show up in the list of group members with a name beginning with the text Group: to indicate it is a group and not a 3D object.
- Repeat this process as necessary to add additional child groups. Close the group properties window.
Linking 3D Object Groups to Process Flows
The final step in working with object groups is to link those groups to a resource shared asset in a process flow. The method for doing this will depend on whether you are working with a general object group or a people object group, although the processes are very similar.
Linking General 3D Object Groups to Process Flows
To link a general 3D object group to a process flow:
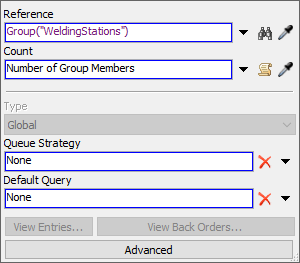
- With your process flow open and active, add a Resource (under Shared Assets) to your process flow.
- Make sure the Resource is selected. In Quick Properties, click the arrow next to the Reference box to open a menu. Point to Group, then select the name of the group you want to link to this shared asset.
- Notice that the Count box should automatically update
to display
Number of Group Members.
As an alternative, you could use the Sampler button
to sample one of the 3D objects in the 3D
model that is a member of the group you want to link to the resource. The menu that opens
will display all the groups to which this object belongs.
Linking Location Groups to Process Flows
To link a people location group to a process flow:
- With your process flow open and active, add a Location Resource shared asset to your process flow.
- Make sure the Location Resource is selected. In Quick
Properties next to the Location box, click the
Sampler button
to enter sampling mode.
- In the 3D model, click one of the members of the location group you want to link to
the resource to open a menu. Select the name of the group you want to link to sample it.
Location groups will show a location icon
 in front of its name.
As an alternative, you can click the arrow next to the Location box in Quick Properties and navigate to the group you want to link through the menu.
Linking Staff Groups to Process Flows
To link a people staff group to a process flow:
- With your process flow open and active, add a Staff Resource shared asset to your process flow.
- Make sure the Staff Resource is selected. In Quick
Properties next to the Staff box, click the
Sampler button
to enter sampling mode.
- In the 3D model, click one of the members of the staff group you want to link to the
resource to open a menu. Select the name of the group you want to link to sample it.
Staff groups will show a staff icon
 in
front of its name.
in
front of its name.
As an alternative, you can click the arrow next to the Staff box in Quick Properties and navigate to the group you want to link through the menu.
Linking Transport Groups to Process Flows
To link a people transport group to a process flow:
- With your process flow open and active, add a Transport Resource shared asset to your process flow.
- Make sure the Transport Resource is selected. In Quick
Properties next to the Transport box, click the
Sampler button
to enter sampling mode.
- In the 3D model, click one of the members of the transport group you want to link to
the resource to open a menu. Select the name of the group you want to link to sample it.
Transport groups will show a transport icon
 in front of its name.
As an alternative, you can click the arrow next to the Transport box in Quick Properties and navigate to the group you want to link through the menu.
Linking Equipment Groups to Process Flows
To link a people equipment group to a process flow:
- With your process flow open and active, add a Equipment Resource shared asset to your process flow.
- Make sure the Equipment Resource is selected. In Quick
Properties next to the Equipment box, click the
Sampler button
to enter sampling mode.
- In the 3D model, click one of the members of the equipment group you want to link to
the resource to open a menu. Select the name of the group you want to link to sample it.
Equipment groups will show an equipment icon
 in front of its name.
As an alternative, you can click the arrow next to the Equipment box in Quick Properties and navigate to the group you want to link through the menu.