Tree Properties
About the Tree
The tree window helps you browse for a node in the tree. The purpose of selecting a node is dependent on the context of the situation. Sometimes you will use this window to select a start node for a find/replace operation. Sometimes you will use this window to select an experiment variable in the Experimenter. You may also select objects or nodes in the Global Variables window. Select the node you want by clicking on it in the tree view, then click on the Select button. The window will then close and return to the original calling window.
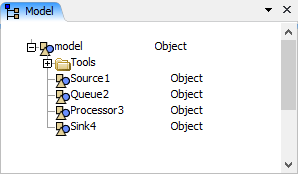
FlexSim is completely designed around the concept of a tree structure. All information in FlexSim is contained within the FlexSim tree, including the library objects, commands, and all model information. This tree hierarchy is made of individual nodes that link together and hold information.
Nodes
A node is the building block of a FlexSim tree. All nodes have a text containing the name of the node. Nodes can simply be a container for other nodes, can be a keyword used to define an attribute of an object, or may have a data item.
The data item types which may be attached to a node are: number, string, object, or pointer. To attach data to a node, right-click on the node and go to the Insert menu option. You will see the four options to add data to a node. There are also shortcut keys for adding number, string(text), object, or pointer data. These are the keys N, T, O, and P. To add data to a node using a shortcut key, click on the node, then press the appropriate key. Nodes can also hold executable code. To make a node executable, first add string data to the node, and then toggle the node as either a C++ or a FlexScript node. To toggle a node as one of these types, right-click on the node and go to the Build menu.
The symbols for the different types of nodes are shown here:
| Icon | Description |
|---|---|
 |
Standard |
 |
Object |
 |
Attribute/Variable |
 |
Function (FlexScript) |
 |
Function (FlexScript, not built) |
 |
Function (C++) |
 |
DLL Linked Function |
 |
Global C++ Function |
 |
Simple Data |
Adding and Deleting Nodes
Nodes can be added and deleted from the tree. To delete a node, simply click the node and then hit the delete key. To insert a node, right-click on an existing node and choose Edit > Insert. This will add a new node immediately after the node that was clicked on. The shortcut for this operation is to hit the spacebar after first highlighting a node.
Nodes can also contain a sub list of nodes called the content branch. If a node contains
sub nodes it can be expanded by pressing the  button. To insert a node into the content of an existing node, choose the option Edit, then
Insert Into (or hit the Enter key as a shortcut).
button. To insert a node into the content of an existing node, choose the option Edit, then
Insert Into (or hit the Enter key as a shortcut).
A node that has object data may contain a second sub list of nodes that are contained in
a separate branch of the tree. This sub list of nodes is called the object attribute tree,
and contains data that describes the properties of the object. A node containing object data
may typically be referred to as an object node. When you click on an object node you will
see a greater than symbol  to the left
of the node. Clicking on this button will open the object attribute tree branch.
to the left
of the node. Clicking on this button will open the object attribute tree branch.
The following picture shows an expanded object attribute tree for the Queue object in the library tree.
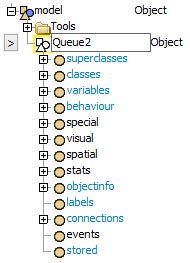
For nodes with object data, the attribute tree can contain many special attribute nodes. If a node is inside an object and has the name of a key attribute, it will have a special meaning to the object. The actual meaning of the attribute depends on what the attribute is and the object type. As an example, there are attributes for an object's position: 'spatialx', 'spatialy', 'spatialz'. The list of available attributes in FlexSim is found in attribute hints.
In addition to containing all model, library, and project information, the FlexSim tree also stores all windowing and interface information. All open windows, menus, toolbars and buttons have a corresponding representation in the FlexSim tree. We call these types of nodes view objects.
General Organization Trees
FlexSim's root tree structure is split up into two parts. These are the Main Tree and the View Tree.
The main tree contains the Executive data, the Library, and the Model.
The view tree contains information on windows, editors, and other user interfaces. It also manages active windows.
Main Tree
To view the main tree, click the Tree button on the main toolbar. A new tree window will appear. In Quick Properties you'll see a Tree Navigation section. Click on Main.
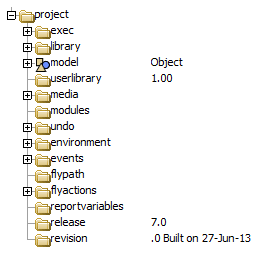
The main tree holds many of the higher level functions in FlexSim. It also includes the following crucial sub trees: exec, library, model, undo, media.
- Exec - This tree contains simulation executive data. This includes the simulation time, the eventlist, as well as other information with running a model.
- Library - The library of objects used by the model.
- Model - The simulation model.
- userlibrary - All loaded custom user libraries.
- Media - Stores Images, 3D models and Sounds.
- Undo - Holds undo history. A numerical value for this node is the limit on the number of undo steps. If there is no numerical data, undo will be disabled. Undo functionality may also be globally disabled.
View Tree
To view the view tree, click the Tree button on the main toolbar. A new tree window will appear. In the Quick Properties window you'll see a Tree Navigation section. Click View.

The view tree contains data for creating, storing, and using graphical user interfaces for objects.
- Active - This stores all of the currently open windows for the interface.
- Standardviews - All of the non-property windows are stored here.
- Popups - Popups are used throughout FlexSim, mostly for trigger and picklist options as well as utility purposes.
- Pages - Stores all of the Object Property Windows.
- Picklists - Preset code for picklist options.
Keyboard Shortcuts
The following table explains the keyboard shortcuts available in the tree:
| Shortcut | Explanation |
|---|---|
| Spacebar | Insert a new node after. |
| Enter | Insert a new node into. |
| N | Add number data to the highlighted node. |
| T | Add string (text) data to the highlighted node. |
| O | Add object data to the highlighted node. |
| P | Add pointer data to the highlighted node. |
| Shift + Delete | Delete all data from the highlighted node. |
| Backspace and Delete | Delete the node. |
The Tree Navigation Group

This panel allows you to navigate between sections in the FlexSim tree.
- Model - A subset of the main tree, this contains all of the objects used in the currently open model.
- Main - The main tree contains many of the higher level functions in FlexSim.
- View - The view tree contains all of the GUIs in the FlexSim interface.
| Button | Explanation |
|---|---|
 |
Captures the current view and adds that node to the list of preset views. Saving a view allows you to quickly jump back and forth between different sections of the tree. |
 |
Updates the currently selected view to the camera's current position/rotation |
 |
Removes the selected view from the list |
Views that are saved are persistent even after FlexSim closes. Views that are added from the Model get saved into the Tools/TreeNavigation folder and will be available to anyone who loads that model. Views that are added from anywhere else in the main tree or from the view tree are saved in the User Prefs and will be available whenever FlexSim is open under your user.
Rename the preset view by entering a new name in the name field.
Name Width
Controls the name width of nodes in the tree.
The Search Group
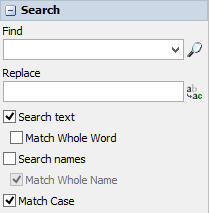
The Search allows you to search through text and node names in the tree. The Search will begin at the highlighted node in the active tree window. If no node is highlighted, the search will begin at the top of the active tree window. The search recursively searches through all subnodes and object attribute nodes.
Replace allows you to replace all occurrences of the found text. This can be applied to text and/or node names.
Find
Finds the specified text (or press the Enter key in the field).
Replace
Finds the above text and replaces it with the specified text (or press the Enter key in the field).
Search text
Searches through all text under the selected node.
Match Whole Word
If checked, only finds whole word matches of the text (meaning characters immediately before and after the search text must be non-alphabetic characters).
Search names
Searches through all node names under the selected node.
Match Whole Name
If unchecked, the search will return any node name that contains the searched text.
Match Case
If unchecked, the search will find all text/names containing the search text, regardless of capitalization. For example, if you search for "myvariablename", the results will still return all nodes containing "MyVariableName".
The Find Results Window
Once a search is begun, the Find Results window will appear:

Double-click on a result to view the text in a Code Editor window. You may also right click the result to Edit Code or explore the tree.
Nodes toggled as FlexScript will have an S to the left of the node path. Nodes toggled as C++ will display a C and nodes toggled as DLL linked will display a D.
The Node Properties Group
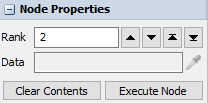
When a node is highlighted in the tree, the Node Properties panel will appear, displaying rank of the node.
Rank
This specifies the rank of the highlighted node in its parent's tree. Enter a new rank number or use the up and down arrows to rerank the node.
Data
If the node has coupling data, the Data field will display the coupling's associated
node. Use the Sampler button  to select the
node to create a coupling with.
to select the
node to create a coupling with.
Clear Contents
Destroys all subnodes of the highlighted node.
Execute Node
Calls nodefunction or executefsnode on the node, executing its associated FlexScript, C++ or DLL code.