Flow Tanks
Overview and Key Concepts
The flow tank is the most general and widely used fluid container in FloWorks. It can receive and send material at the same time. You can specify the maximum capacity of the tank, or let FloWorks calculate the capacity of a cylindrical or rectangular tank based on the actual size in the model. Apart from triggers that fire when the tank is full or empty, you may define additional triggers which fire when the content of the tank hit that certain percentage.


An initial content can be specified for the tank - the content will be set to this initial value every time the model is reset. This is very useful if your model only requires a specific amount of material that needs to be released into the system (immediately or eventually) but no more material will ever be created. If, on the other hand, you want a (potentially) unlimited stream of incoming material, use a flow source instead.
Visualization
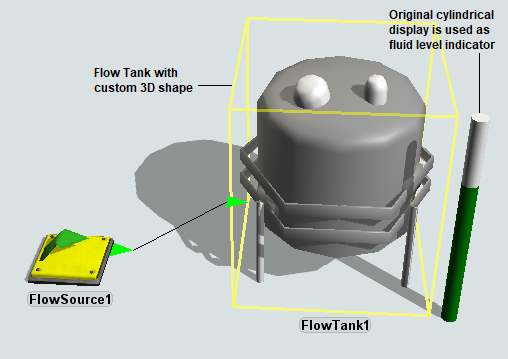
When you initially create a flow tank in the model, it is shown as a simple cylinder. The unfilled part of the tank will be drawn in the object's own color, the filled part will take the color of the product that the tank contains. You may want to set a different 3D shape for the tank, for example the one that is found in fs3d\Fluid\FluidTank.3ds. However, this visualization will not show the content of the tank graphically. In that case you can use the gray cylinder shape as a fluid level indicator. The shape and position of the level indicator can be set on the Level Indicator tab in the properties, this is described in more detail in the Properties section below.
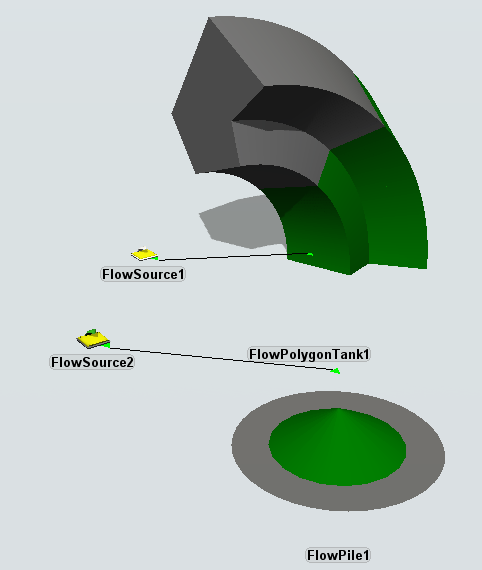
In some cases you may want to model the geometry of a real-life situation in more detail. For example, you may be releasing bulk material onto a pile which settles into a conical shape. Or you may be filling a specific shape with a polygon surface area, in coastal protection construction. FloWorks provides two additional versions of the flow tank, which are functionally identical to the regular flow tank. They only differ in the geometry of the tank and therefore their Settings Tab will vary slightly. These differences are described in more detail in the Properties section below.
Events
The flow tank uses the standard events that are common to almost all FloWorks objects. See FloWorks Triggers for an explanation of these events.
The flow tank, and most other content holding objects such as the polygon tank, pile and mixer, have the following additional events:
On Empty
This event occurs every time the content of the tank reaches zero where it was not zero before. Usually this will happen because the outflow exceeded the inflow and the tank ran out of content, but the event also triggers when the content was non-zero and you set it to zero by a trigger option or code. Note that when the content was already zero, the trigger will never fire; this includes when the tank resets to an empty state at the start of the simulation.
It has the following parameters:
| Event Parameter | Explanation |
|---|---|
| mode | The mode: rising or falling. For the On Empty trigger this will always be falling - it is provided only for consistency with general level triggers which can happen at any level. |
On Full
This event occurs every time the content of the tank reaches the maximum content. Usually this will happen because the inflow exceeded the outflow and the tank ran out of ullage, but the event also triggers when the content was below the maximum content and you set it to the maximum by a trigger option or code. Note that when the tank was already full, the trigger will never fire; this includes when the tank resets to a full state at the start of the simulation.
It has the following parameters:
| Event Parameter | Explanation |
|---|---|
| mode | The mode: rising or falling. For the On Full trigger this will always be rising - it is provided only for consistency with general level triggers which can happen at any level. |
States
For statistical purposes, the source's FloWorks state profile will be in one of the following states at various points during a simulation run:
- Empty - The tank is empty and there is no net flow (the flow is zero or inflow rate is equal to the outflow rate).
- Full - The tank is full and there is no net flow (the flow is zero or inflow rate is equal to the outflow rate).
- Filling - The tank is not full and the inflow rate exceeds the outflow rate.
- Releasing - The tank is not empty and the outflow rate exceeds the inflow rate.
- Not empty - The tank is neither empty nor full but there is no net flow (the flow is zero or inflow rate is equal to the outflow rate).
Properties
The tanks have seven tabs with various properties. Some of these are adaptations of standard property pages, some are specific to the tank. We first give an overview of the tabs, the tank specific settings are described in more detail in the subsequent sections.
- The Settings Tab
In addition to the standard settings, this page contains the settings for the tank geometry described below. - The Flow Tab
The standard Flow Tab, where input and output can be set independently. - The Level Indicator Tab
Controls the appearance of the level indicator. - The Triggers Tab
With the additional On Empty and On Full triggers described above. - The Trigger Levels Tab
Custom event trigger levels between Empty and Full. - The Labels Tab
- The General Tab
Two standard tabs common to all fixed resources.
Geometry Settings
In addition to the standard Settings properties, the Settings tabs for the tanks also contain the following fields.
Initial content
The amount of material that is in the tank when the model is reset.
Maximum content
The maximum amount of material that this tank can hold at any time.
Reset Maximum Content
Automatically calculate the maximum content based on the tank geometry. For regular flow tanks, this calculates πhr2, where h is the height of the tank and r its radius. The radius is determined by the x-size of the object, the y-size is ignored. If the level indicator is set to Rectangular, the maximum content is calculated according to xyz where x, y, z are the dimensions of the tank.
The maximum content is converted to model fluid units - for example if your length units are meters and the fluid units are liters, the maximum content will be set to the value described above times 1000, since 1 m3 = 1000 L.
For polygon tanks, the maximum content is calculated based on the product angle and the radius. The radius is determined by the x-size of the object, the y-size is ignored.
This button is not available for polygon tanks, because in general the surface area of the tank may be any set of coordinates and the tank may be straight or curved.
Tank shape
For the polygon tank, the Tank Shape controls allow you to specify the geometry of the tank. The surface area of the tank is always a polygon whose coordinates are specified in the table to the right. Note that FloWorks will not automatically order the coordinates to create a simply connected shape. To change the number of coordinates in the ground surface, enter the desired number of vertices and click "Refresh number of vertices". There must be at least three vertices.
The tank can be straight of curved. For a straight tank, you need to specify the height. For a curved tank, the curvature radius and angle need to be given.
Product angle
For the conical flow pile, the product angle determines how "steep" the pile will look. Note that this is not the top angle, but the angle that the product makes with the ground surface.
The angle is allowed to be approximately in the range 10 – 80 degrees. The maximum height of the pile is automatically determined based on the radius (r, the object x-size) and product angle (θ) according to hmax = r tan(θ).
Level indicator
The Level Indicator tab has the following properties:
Draw Level Indicator
If this is checked, the level indicator bar will be drawn on the object.
Rectangular
If this is selected, the level indicator bar will be drawn as a colored box.
Cylindrical
If this is selected, the level indicator bar will be drawn as a colored cylinder.
Position, Rotation, and Size
Here you can set the position, rotation, and size of the bar based on X, Y, and Z values.
| Field | Description |
|---|---|
 |
Change the position of the object. |
 |
Change the rotation of the object. |
 |
Change the size of the object. |
Trigger levels
You can define an arbitrary number of triggers levels. Each trigger level consists of:
- A name.
- This is not used by FloWorks, but helps you identify the reason for the trigger when multiple triggers are defined at the same level.
- A level.
- The (absolute) content that triggers the logic. The level may be equal to zero, to the maximum content, or any intermediate value.
- A condition.
- Even when the tank content matches the level, the trigger may still be skipped when the condition is not met.
Built-in examples include that the trigger level must be reached from above, from below or from a static level ('restart').
Typically the condition will check the
modevariable, which is equal to one of the following values:MODE_RISINGindicates that the level was lower than the trigger level and is still rising. This constant is#defined as 1.MODE_FALLINGindicates that the level was higher and is still dropping. Equal to 2.MODE_RESTART_RISINGindicates that the level was constant (inflow = outflow) but is about to start rising. Equal to 3.MODE_RESTART_FALLINGindicates that the level was constant but is about to start dropping. Equal to 4.
- Run logic.
- This code will be executed when the tank content matches the trigger level and the condition evaluates to true.
On Trigger Level: Trigger Levels and Process Flow
Because the number of trigger levels is dynamic, you cannot wait for a specific level in Process Flow. To be able to use Wait For Event or Event-Triggered Source activities, the flow tank has an On Trigger Level event. Any time the tank content reaches a level for which at least one trigger is present, the following happens:
- For each trigger, the trigger condition be evaluated. If it is met, the trigger's "Run Logic" will be executed.
- The object's On Trigger Level is executed with the current tank level and current mode (rising, falling, etc.).
If you wish to use a Wait For Event or Event-Triggered Source to respond to trigger levels, you should listen for the On Trigger Level Event. You can assign the level and mode (rising, falling, restarting, etc.) to a label and check for the correct level in a Decide, or use the "match (value)" options to wait for a specific trigger.
Custom coding
You may control the behavior of the flow source dynamically by writing FlexScript, for example in a Script window or by changing the code behind one of the options in an object trigger.
The flow tanks are instances of the FlowTank class, see the class reference
for information about its properties.