Task 4.4 - Change Instances Simultaneously
Task Overview
In this task, you'll improve your original fixed resource process flow so that it will include an animation of the sticker rolls as they are being transported and loaded by the RollOperator. As the sticker machine uses the rolls, they will shrink in size.
You'll also see how easy it is to make major modifications to a fixed resource process flow and update all attached instances simultaneously. As you'll see by the end of this tutorial, using process flow instances makes it much easier to make major changes to a large, complex model.
Step 1 Create Sticker Roll Flow Items
The first step will be to create sticker roll flow items in the 3D model. You'll add a second Source object that will create the sticker rolls and put them inside the Roll Storage Queue. Then you'll modify the flow items in the Flow Item Bin so that they look more like rolls of stickers.
To add the sticker rolls to the 3D model:
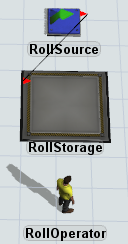
- In your 3D model, drag a Source from the Library and place it above the RollStorage queue in the center of the model.
- In Quick Properties, rename the Source as RollSource.
- Create a port connection (A-connect) between RollSource and RollStorage.
- Double-click RollSource to open its advanced properties.
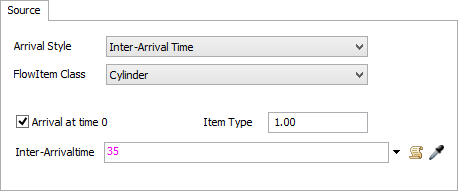
- On the Source tab:
- Click the FlowItem Class menu and select Cylinder.
- Check the Arrival at time 0 box.
- In the Inter-Arrivaltime box, type
35.
- Press the OK button to save the changes.
- In the Toolbox next to the FlowItem
Bin, click the Expand button
 .
. - Double-click the Cylinder to open it in the FlowItem Bin.
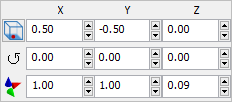
- In the viewer, click the Cylinder to select it. Then, use the blue colored cone to resize the cylinder so that it looks more like a roll of stickers.
- In Quick Properties change the cylinder's
X-size and Y-size
 to 1.
to 1. - Close the FlowItem Bin.
Consider saving your simulation model.
Step 2 Create a Global List
In this step, you'll create a global list that will contain all of the sticker rolls that are in storage. To create the global list:
- Double-click the RollStorage queue to open its properties.
- On the Triggers tab, click the Add button
 to open a menu. Select On Entry.
 - Next to the OnEntry trigger box, click the
Add button
to open a menu. Point to Lists, then select
Push to List to open the picklist properties.
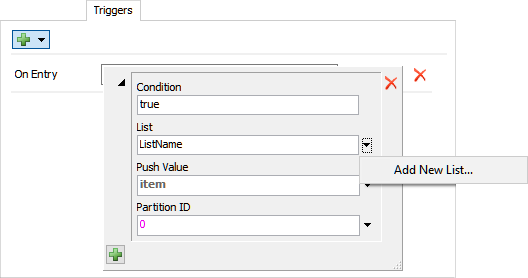
- Click the arrow next to the List box to open a menu. Select Add New List to create a new list.
- In the top box in the List Properties dialog box, rename the new list Rolls in Storage.
- Press the OK button to save the changes and close the new list.
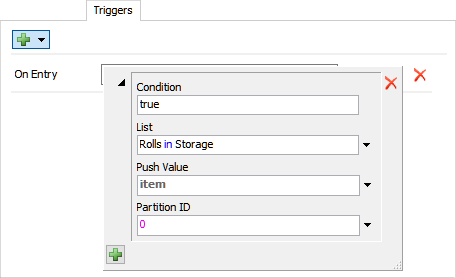
- Back in the RollStorage queue properties window on the
Triggers tab, click the Edit
Properties button
 next to
the OnEntry trigger box.
next to
the OnEntry trigger box. - Click the arrow next to the List box to open a menu. Click Rolls in Storage to select the new list.
- Press the OK button to save the changes.

Consider saving your simulation model.
Step 3 Add Activities to Roll Refill Process Flow
In this step, you'll add some new activities to the Sticker Roll Refill Process Flow to create the sticker roll animation. Be aware that you might need to adjust the size of the Roll Refill shape in order to fit all the activities into the shape.
For now, you'll only add the activities, rename them, and create connections between them. You'll change the property settings for the activities in a later step.
When you're finished, your process flow should look like this:
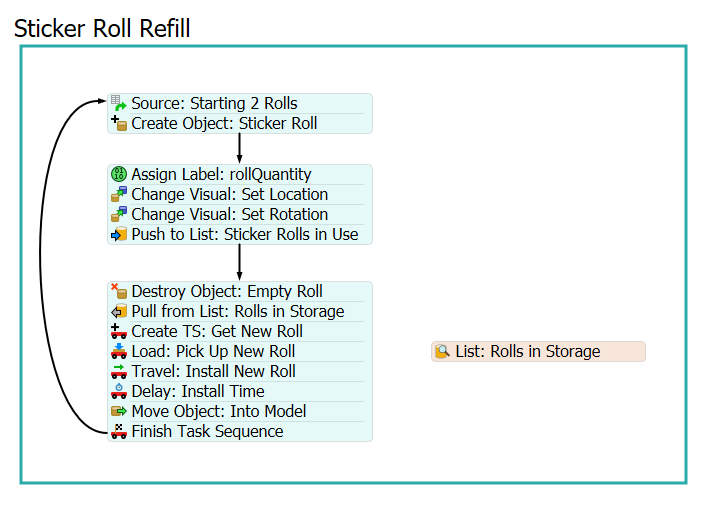
To create this process flow:
- Make sure the Sticker Roll Logic fixed process flow is open and active.
- Delete all the connections between activities in the Sticker Roll Refill shape for now. You'll reconnect the activities in a later step.
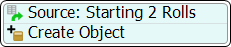
- Add a Create Object activity (under Objects) after the Source: Starting 2 Rolls to create a stacked block.
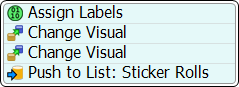
- Add an Assign Labels activity (under Basic) in between the first stacked block and the Push to List: Sticker Rolls activity without joining it to any activity.
- Add two Change Visual activities (under Visual) to the end of the Assign Labels activity to create a second stacked block.
- Drag the Push to List: Sticker Rolls to the end of the second stacked block.
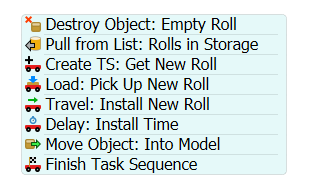
- Add a Destroy Object activity (under Objects) in after the second stacked block without joining it to any activity.
- Delete the Travel: Pick Up Roll activity.
- Add a Pull from List activity (under Shared Assets) to the end of the Destroy Object activity to create a third stacked block.
- Click the block of Task activities and use the scissors icons to separate all the activities so that they are no longer connected.
- Drag the Create Task Sequence activity to the end of the third stacked block.
- Add a Load activity (under Task Sequences) to the end of the third stacked block.
- Drag the Travel activity to the end of the third stacked block.
- Add a Delay (under Task Sequences) to the end of the third stacked block.
- Add a Move Object (under Objects).
- Add a Finish Task Sequence(under the Task Sequences) to the end of the third block.
- Add a List asset (under Shared Assets) to the right side of all the activities without joining it to any activity.
- For clarity, rename the following objects:
- Create the following connections:
- From the first stacked block to the second block
- From the second stacked block to the third block
- From the third stacked block looping back to the second block
| Object | New Name |
|---|---|
| Create Object | Create Object: Sticker Roll |
| Assign Labels | Assign Label: rollQuantity |
| Change Visual (1st) | Change Visual: Set Location |
| Change Visual (2nd) | Change Visual: Set Rotation |
| Push to List: Sticker Rolls | Push to List: Sticker Rolls in Use |
| Destroy Object | Destroy Object: Empty Roll |
| Pull from List | Pull from List: Rolls in Storage |
| Load | Load: Pick Up New Roll |
| Delay | Delay: Install Time |
| Move Object | Move Object: Into Model |
| Finish TS | Finish Task Sequence |
| List | List: Rolls in Storage |
Check to make sure your process flow looks similar to the image at the beginning of this step.
Step 4 Change the Roll Refill Logic
In this step, you'll edit the properties of the activities in the Sticker Roll Usage process flow. The following is an overview of how the activities in this process flow will function:
| Activity | Explanation |
|---|---|
| Source: Starting 2 Rolls | You'll replace the rollQuantity label with a new label called rollNumber. Recall that in this process flow, there will only be two tokens that loop through the process flow continuously. Based on the token index, the rollNumber label will assign the first token a value of 1 and it will assign the second token a value of 2. The process flow will use this label to place the two rolls in the correct location in the model so that they don't overlap in the 3D view. |
| Create Object: Sticker Roll | This activity will create a cylinder flow item object (the sticker roll) and put it inside the model. You will also add a new label named rollObject that will keep a reference to the specific roll that was created in the 3D model. |
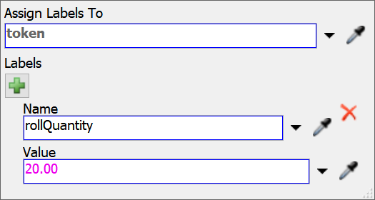
| Assign Label: rollQuantity | Since you still need the rollQuantity label in order for the process flow to function correctly, you'll add that label to tokens with this activity. As a reminder, the rollQuantity label sets the number of stickers that are on each roll. You'll set the initial value to 20. |
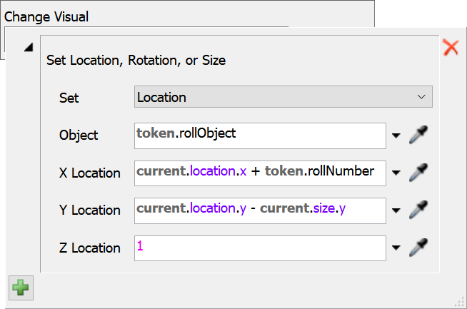
| Change Visual: Set Location | This activity will set the location of the sticker rolls that have been loaded
on the sticker machine in the 3D model so that they appear to be next to the sticker
machine. This activity will use a few different labels and commands to create this
effect:
|
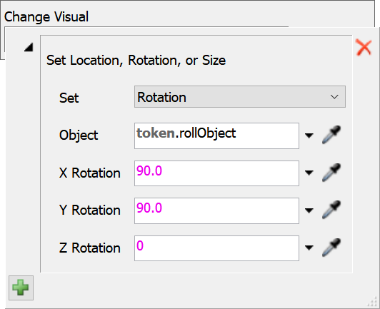
| Change Visual: Set Rotation | This activity will set the rotation of the first two sticker rolls so that they appear to be upright next to the sticker machine. |
| Push to List: Sticker Rolls in Use | You won't make any changes to this activity. As a reminder, when a new roll is installed on the sticker machine, that roll is added to the List: Sticker Rolls in Use. When a roll is empty (because the rollQuantity has been reduced to 0), the token will move to the next activity. |
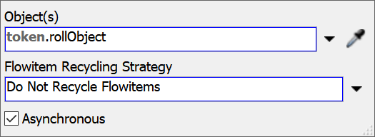
| Destroy Object: Empty Roll | This activity will destroy the empty roll once it is depleted. it will use the rollObject label to identify the sticker roll that should be destroyed. |
| Pull from List: Rolls in Storage | This activity will pull a roll from the global Storage Rolls list and assign it to the token's rollObject label. |
| Create TS: Get New Roll | You'll point the task executer to the RollOperator in the 3D model. As a reminder, this activity will create a new task sequence, which is a series of tasks that will be assigned to the RollOperator. The task sequence is called getRoll. By creating a new task sequence every time a roll of stickers is empty, you'll prevent the RollOperator from being interrupted or diverted to work on other tasks while it is picking up and installing the new roll of stickers. |
| Load: Pick Up New Roll | The RollOperator will pick up a new sticker roll. The activity will tell the RollOperator to pick up the 3D object referenced in the token's rollObject label. |
| Travel: Install New Roll | You won't make any changes to this activity. As a reminder, this activity will tell the RollOperator to travel back to the sticker machine with the new roll. |
| Delay: Install Time | This activity will simulate the amount of time it takes the RollOperator to install the sticker roll on the sticker machine. You'll use an exponential distribution to get this time. |
| Move Object: Into Model | Once the RollOperator returns to the sticker machine, the new roll will be moved into the model. Its location in the model will be based on the settings in the Create Object activity earlier in the process flow. |
To create this functionality:
- Click the first stacked block in the Sticker Roll Refill shape to select it.
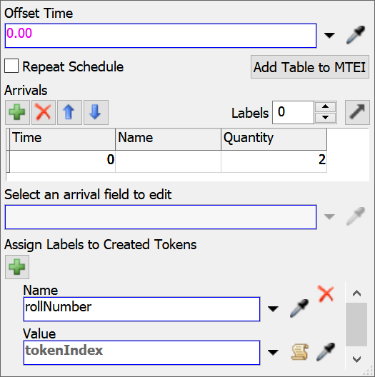
- In Quick Properties under Source: Starting 2 Rolls:
- Find the Assign Labels to Created Tokens group. In the Name box, change the name of the label to rollNumber.
- Click the arrow next to the Value box to open a menu. Select Token Index.
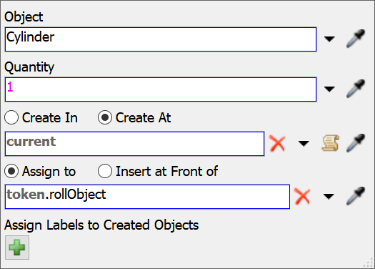
- In Quick Properties under Create Object: Sticker Roll:
- Click the arrow next to the Object box to open a menu. Point to Flowitems, then select Cylinder.
- Click Create At option to select it. Click the arrow next to the box below it to open a menu and select current.
- Make sure the Assign to option is selected. In
the box directly underneath, type
token.rollObjectto change the label name.
- Click the second stacked block in the Sticker Roll Refill shape to select it.
- In Quick Properties under Assign Label: rollQuantity:
- Click the Add button
to add a new label.
- In the Name box, type rollQuantity.
- In the Value box, type 20.
- Click the Add button
- In Quick Properties under Change Visual: Set Location:
- Click the Add button
next to the
Change Visual box to open a menu. Select
Set Rotation, Size, or Location to open the
picklist options.
- In the Object box, delete the current text and
type
token.rollObject. - In the X Location box, type
current.location.x + token.rollNumber. - In the Y Location box, type
current.location.y - current.size.y. - In the Z Location box, type
1.
- Click the Add button
- In Quick Properties under Change Visual: Set Rotation:
- Click the Add button
next to the
Change Visual box to open a menu. Select
Set Rotation, Size, or Location to open the
picklist options.
- Click the Set menu and select Rotation.
- In the Object box, delete the current text and
type
token.rollObject. - In the X Rotation box, type
90.0. - In the Y Rotation box, type
90.0. - In the Z Rotation box, type
0.
- Click the Add button
- Click the third stacked block in the Sticker Roll Refill shape to select it.
- In Quick Properties under Destroy Object: Empty Roll:
- Click the arrow next to the Object(s) box to open a menu.
- Point to Token Label then select rollObject.
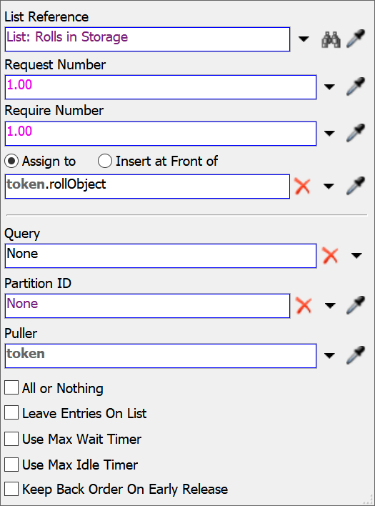
- In the process flow, click the No Link icon
 next to the
Pull from List: Rolls in Storage activity to enter sampling
mode. Click the List: Rolls in Storage asset to link them
together.
next to the
Pull from List: Rolls in Storage activity to enter sampling
mode. Click the List: Rolls in Storage asset to link them
together. - Make sure the third stacked block is still selected. In Quick Properties under Pull from List: Rolls in Storage, verify that the Assign to option is selected. Click the arrow next to the box under this option to open a menu. Point to Token Label then select rollObject.
- In Quick Properties under Create TS: Get New Roll:
- Click the
 Sampler button next to
Task Executer / Dispatcher and select the RollOperator in the 3D model.
Sampler button next to
Task Executer / Dispatcher and select the RollOperator in the 3D model.
- Click the
- In Quick Properties under Load: Pick Up New Roll:
- Click the arrow next to the Item box to open a menu. Point to Token Label, then select rollObject.
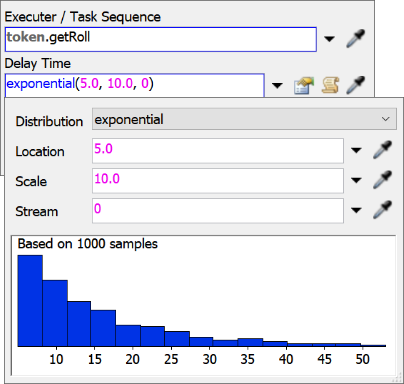
- In Quick Properties under Delay: Install Time:
- Click the arrow next to the Delay Time box to open a menu. Point to Statistical Distribution and select exponential to open the Distribution Chooser.
- In the Location box, type
5. Keep all other settings the same.
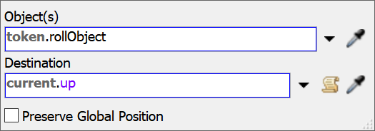
- In Quick Properties under Move Object: Into Model:
- Click the arrow next to Object(s) to open a menu. Point to Token Label, then select rollObject.
- In the Destination box type the command
current.up. - Clear the Preserve Global Position checkbox.
Consider saving your simulation model.
Step 5 Edit the Properties for Both Lists
In this step, you'll edit the properties for the two lists in the process flow.
First, you'll need to make the List: Sticker Rolls in Use a dynamic list. Once this list is dynamic, it will decrement the rollQuantity label on both the list and the token at the same time. Other activities and objects can then get the value of the rollQuantity label on the token to calculate the remaining quantity of the roll and update its size.
Next, you will update the new List: Rolls in Storage shared asset so that it will act as an alias for the global Storage Rolls list you created in Step 2.
To create this functionality:
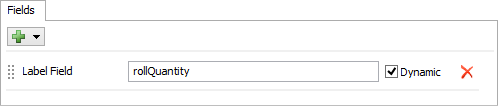
- Click the List: Sticker Rolls in Use asset to select it.
- In Quick Properties, click the Advanced Properties button.
- On the Fields tab, next to the rollQuantity label field, check the Dynamic box.
- Press the OK button to save the changes.
- Click the Toolbox tab in the left pane to open the Toolbox (so that you can sample the Global List in a moment).
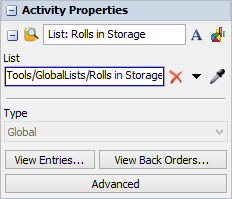
- Back in the process flow, click the List: Rolls in Storage in the Sticker Roll Refill shape to select it.
- In Quick Properties next to the
List box, click the Sampler
button to enter sampling mode.
- In the Toolbox under Global Lists, click Rolls in Storage to select it.
Consider saving your simulation model.
Step 6 Add Activities to Roll Usage Process Flow
In this step, you'll add some new activities to the Sticker Roll Usage process flow to create the sticker roll animation. For now, you'll only add the activities, rename them, and create connections between them. You'll change the property settings for the activities in a later step.
When you're finished, your process flow should look like this:
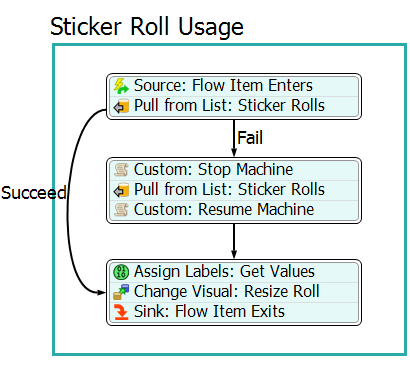
To create this process flow:
- In the Sticker Roll Usage shape, delete the connection going from the second stacked block to the Sink: Flow Item Exits.
- Move the Sink: Flow Item Exits activity down a little to make room for other activities.
- Add an Assign Labels (under Basic) activity in below the second stacked block and above the Sink: Flow Item Exits activity without joining it to any other activities.
- Add a Change Visual activity (under Objects) after the Assign Labels activity to create a stacked block.
- Drag the Sink: Flow Item Exits activity on top of the third stacked block to add it to the end.
- Reconnect the second stacked block to the third stacked block.
- For clarity, rename the following objects:
| Object | New Name |
|---|---|
| Assign Labels | Assign Labels: Get Values |
| Change Visual | Change Visual: Resize Roll |
Check that your process flow looks similar to the one in the beginning of this step.
Step 7 Change the Roll Usage Logic
In this step, you'll edit the properties of the activities in the Sticker Roll Usage process flow. The following is an overview of how the two new activities in this process flow will function:
| Activity | Explanation |
|---|---|
| Assign Labels: Get Values | This activity will create three new labels:
|
| Change Visual: Resize Roll | This activity will change the size of the sticker roll in the 3D model. This activity will use the rollSize that is set in the previous activity to determine the sticker roll's X- and Y-size. The Z-size will be set to whatever it was before (it will not be changed). |
The getlabel command is going to be crucial to the logic in this process flow. The getlabel command will retrieve the values of a label on a token in the process flow or an object in the 3D model. Various activities or objects can use that data to affect how the model functions. The getlabel command has two parameters:
- Object - This parameter indicates which object has the label that you are interested in.
- Label Name - This parameter gives the name of the label you are interested in.
When FlexSim executes the getlabel command, it will return the value of that label. For
example, imagine your process flow had a token with a label named weight with a
value of 15. The getlabel command to get the information from label would be:
getlabel(token, "weight") and it would return a value of 15.
To create this functionality:
- Click the third stacked block in the Sticker Roll Usage shape to select it.
- In Quick Properties under Assign
Labels: Get Values:
- Click the Add button
three times to add a new
label.
- Enter in the following values in the Name and Value boxes on the three labels:
Name Value rollObjectCopy token.pulled.rollObjectrollQuantityCopy token.pulled.rollQuantityrollSize token.rollQuantityCopy / 20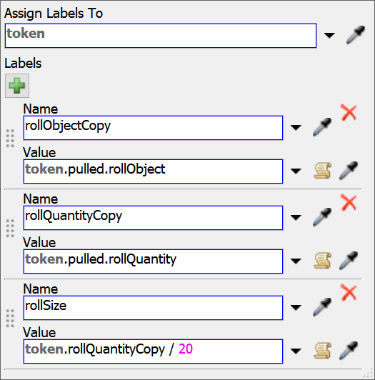
- Click the Add button
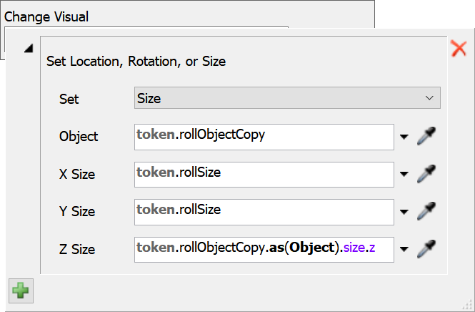
- In Quick Properties under Change Visual: Resize Roll:
- Click the Add button
to open a menu. Select
Set Rotation, Size, or Location.
- Click the Set menu and select Size.
- In the Object box, type
token.rollObjectCopy. - In both the X Size and
Y Sizebox, type
token.rollSize. - In the Z size box, type
token.rollObjectCopy.as(Object).size.z.
- Click the Add button
Consider saving your simulation model.
Step 8 Update the Original Sticker Systems
This step is optional if you want to compare and contrast the first two sticker systems with the new sticker systems. However, if you want the first two sticker systems to have the same functionality, you can attach the first two sticker systems to the Fixed Resource Process Flow and delete the original process flow in the Toolbox.
Step 9 Run and Test the Simulation Model
It's time to test the model for the last time.
Reset and run your model to watch it in action.
As you watch each of the sticker machine systems, each sticker machine should show the two starting sticker rolls. The sticker that is actively being used will gradually shrink until it disappears. Then, the RollOperator will get a new sticker roll from storage and install it on the sticker machine while the sticker machine is using the second sticker roll.
Feel free to view the sticker roll list entries or the individual instances of the process flow if needed.
Conclusion
You might notice as you watch the model run you can already see a few bottlenecks and places where the sticker machines stop running because they run out of labels. After building a model like this, you can then begin studying bottlenecks and experimenting with different variables, such as: how many operators are needed to install stickers on the sticker rolls in time.
This concludes the tutorial about process flow instances. Hopefully you've learned a few best practices about building process flow logic using process flow instances.