Task 1.6 - Add a Custom Location Object
Task Overview
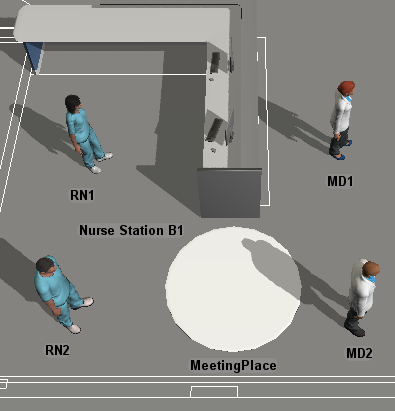
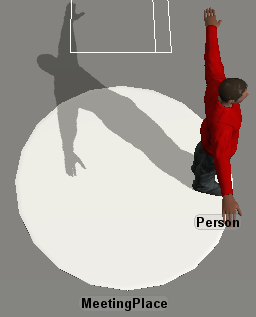
In this tutorial task, you'll learn how to add a custom location object by creating a meeting place where two staff members can consult with each other.
Step 1 Add a Custom Location Object
In this step, you'll create a custom location object: a meeting place where two staff members can consult with each other. Visually, it will look like a circle on the floor:
To add this custom location object:
- Make sure the 3D model is currently the active window and that you are in the FlexSim Healthcare environment. In the left pane, click the Library tab to open the Library.
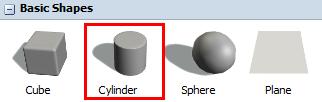
- In the Library under the Healthcare group, click the Prop object to open a menu of location objects. Drag a Cylinder object (under Basic Shapes) into the model. (Use the image in the introduction for this step as a guide for placing objects in the model.)
- Click Cylinder1 to bring up its properties on the Right.
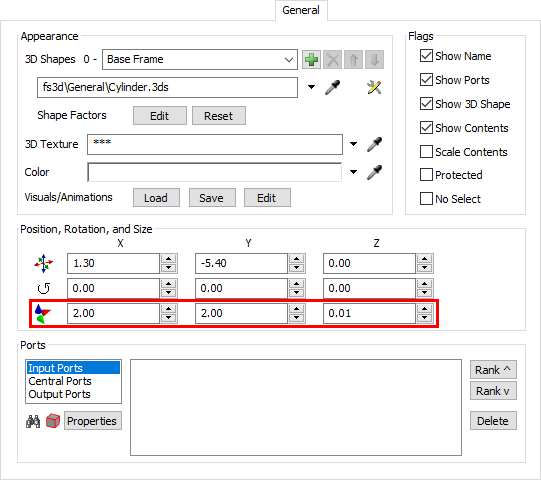
- In the box at the top of the window, rename the cylinder MeetingPlace.
- Under the Visuals section, change the
Size
 properties as follows:
- X-Size: 2.00
- Y-Size: 2.00
- Z-Size: 0.01
In the next step, you'll learn how to add enter instructions for the custom object you just added to the model.
Step 2 Create Enter Instructions
When you're working with custom location objects, you need to assign the object's enter and/or exit instructions. These instructions tell the object which animations it should apply when it is interacting with patients and staff. You can assign different instructions to different types of FlexSim Healthcare objects if needed.
For the meeting place object, you'll create two sets of instructions: one for the first staff member that enters the object and one for the second staff member. You'll create enter instructions that will tell each staff member where to stand and will animate them talking to each other. This animation will loop continuously until the staff members leave the object. The meeting place object won't need any exit instructions, so you won't add any at this time.
To create the enter instructions for this custom location object:
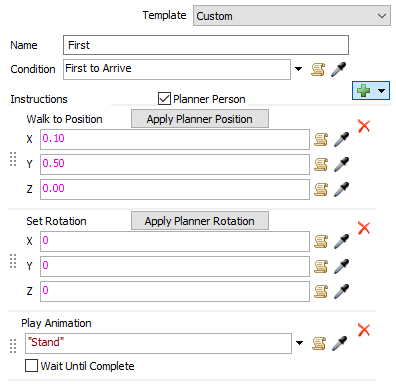
- Ensure that the MeetingPlace object is still highlighted. In Properties, under the Enter/Exit Instruction Instructions section, click the Edit Enter Instruction button to bring up the Enter Instructions window. Confirm that the Template menu is set to Custom.
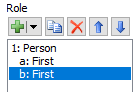
- In the Role list on the left, click the
Add button
 to
add a new role to the list.
to
add a new role to the list. - In the Name box, delete the text and type
Staff. - Click the arrow next to the Condition box to open a menu and select Is an Operator.
- Back by the Role list on the left, click the arrow next
to the Add button
to open a menu. Select
Add Sub Role.
- In the Name box, delete the text and type
First. - Click the arrow next to the Condition box to open a menu and select First to Arrive.
- Click the Apply button to save these changes.
- Next to the Instructions box, click the
Add button to
open a menu. Select Walk to Location to add this
instruction.
- Repeat the previous step to add two more instructions:
- A Set Rotation instruction
- A Play Animation instruction
- Click the arrow next to the Play Animation instruction box to open a menu. Point to Person Animations, then select Stand.
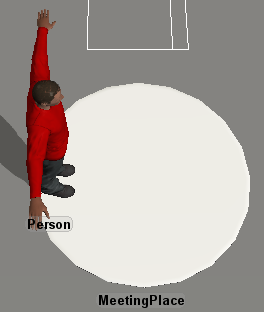
- At the top of all the instructions, check the Planner Person checkbox. You'll see a person appear on the MeetingPlace shape in the 3D model.
- Reposition the Planner Person so that it is on one side of the MeetingPlace shape.
- Click the Apply Planner Position button next to the Walk to Position instructions to change the offsets.
- In the Role list, confirm that the
First role still selected. Then click the
Duplicate button
 to make a copy of this role.
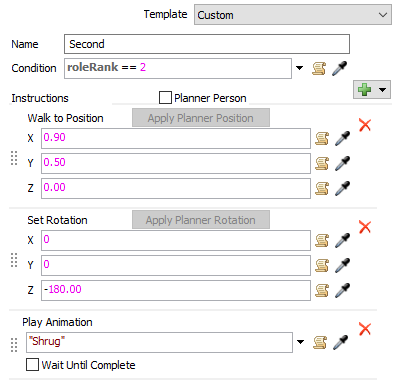
 - In the Name box, delete the text and type
Second. - In the Condition box, type
roleRank == 2. - Click the Apply button to save these changes.
- Click the arrow next to the Play Animation instruction box to open a menu. Point to Person Animations, then select Shrug.
- Reposition the Planner Person so that it is on the opposite side of the MeetingPlace shape.
- Click the Apply Planner Position button next to the Walk to Position instructions to change the offsets.
- In the Set Rotation instructions, change the
Z to
-180.00. - Clear the Planner Person checkbox.
- Press the OK button to save the changes and close the properties window.
You can test your custom object by pointing the Office variable in the Consult container of the Patient Flow at this new object.
Conclusion
This concludes the FlexSim Healthcare Tutorial. By now you should have a good sense of all the different tools that are available to you when building a FlexSim Healthcare model. Be aware that in a normal simulation project, you'd go on to make sure your data inputs were correct by studying the times that it takes to complete registration, examinations, and other treatment times.