Video Recorder
Overview and Key Concepts
The Video Recorder is an object that is added to the Tools folder of the model tree when the Video Recorder option is selected in the Tools menu. The Video Recorder is based on the FFmpeg video solution, and enables the user to record high quality videos of their model, utilizing camera flypaths, layers, and animations if desired. This functionality is obtained by use of output files, sequences, and layers.
The Video Recorder can be accessed from the Toolbox.
Output Files
The Video Recorder allows the user to record multiple output files at one time. Each output file can have a different size, framerate, codec, and file type. This can be especially useful for long recordings with complicated models, where it can take hours to record, since you can record all of the views you want in one run. By default, output files are encoded using a variant on MPEG-4 and written to the .mp4 file format.
Sequences
Each output is made up of sequences. Sequences are what defines when to start and stop recording during your model run. A single output can have as many different sequences as you want, so you can capture only the relevant points of your simulation. However, only one sequence is required to make one file, and by default only one sequence is used per output. If you want more than one sequence in a single output, select the Use Shared Sequences option.
Layers
Layers allow you to record multiple views of a model in a single video. You can customize the size and position of each layer to arrange the views of your model. By default, there is only one layer, and it is sized so that it matches the output size.
Recording a Video
The following sections explain how to record videos.
Recording a Simple Video
The Video Recorder is designed to make recording simple videos of your model as easy as possible. For example:
- Open the Video Recorder window (add an Video Recorder object to your model) by going to the Toolbox, then point to Visual, then select Video Recorder.
- Specify your output file path by clicking the browse button.
- Click the sampler button next to View and click on your model.
- Your video is now ready to record. If desired, set the size, FPS, codec, start and end times, speed, and flypath options to fit your needs.
- Press the Record button.
- Your model will reset and run, and you will see a popup in the top left corner displaying recording progress.
- When finished, the popup will disappear and your video file will appear at your specified path.
Recording a More Complex Video
In this example we will utilize Shared Sequences and some of the advanced layer options:
- Open the Video Recorder window and specify the output file path as above.
- Click the Shared Sequences tab.
- There should be one Sequence available to edit. Set the End field to 30 and the Speed to 2.
- The background of this video will be a solid color. Change the Type to Color and pick a dark blue.
- Add another layer by clicking the Add button
 above the Layers list.
 - Make sure the Type of the new layer is View. Set the View to your model view by using the sampler button as above.
- Change the mode in Size to Custom, and set the length and width to be 20 pixels less than your output length and width.
- From the picklist in the X field, choose Slide In/Out. Change the first popup field to be 10, and have it slide in for 10 seconds. This will make it so that the model view will start off the screen, slide in for 10 seconds, and stop when the left edge of the model view is 10 pixels from the left edge of the video.
- Set the Y field to be 10.
- Switch back to the Output tab. Change the mode from Use Basic Sequence to Use Shared Sequences.
- Using the button, select your sequence
from the drop down list.
- Press the Record button.
The recorded video should display the model view sliding in from the left, stopping centered in the blue background.
The Output Tab
The following image shows the Output tab of the Video Recorder dialog:
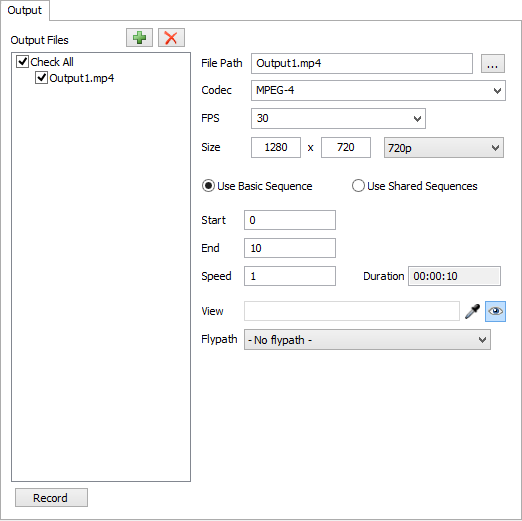
The following sections explain the properties found on this tab:
Output Files
This view lists the names of the output files that will be created when recording. To add
another output file, click the Add button . To
remove an output file, select the desired output in the list and press the Remove button
 . When an output is selected, details about
that output are displayed in the right portion of the tab. If the box next to the output
name is cleared, that file will not be produced during the next recording.
. When an output is selected, details about
that output are displayed in the right portion of the tab. If the box next to the output
name is cleared, that file will not be produced during the next recording.
Record
Click this button to create the output files. The model will reset and run, allowing the Video Recorder to create the output files.
File Path
This specifies where the output file will be saved. The path can be set manually or by clicking the browse button. If you want to use a video container other than .mp4, you can specify the extension here. You can specify any container supported by FFmpeg.
Codec
This is the codec the video will record in. MPEG-4 is the default codec, and will record in high quality. H.264 is a widely accepted codec for recording high quality video in low file sizes. If you want to use a different codec, you can enter in the standard FFmpeg command line syntax for codec options here.
FPS
This field indicates how many frames per second will be recorded. You can save rendering time and output file size by lowering this number. However, values below 30 will cause your videos to look choppy.
Size
This is the size of the video, in pixels. Use the dropdown to select one of the presets, which are standard video sizes. You can also enter custom values.
Use Basic Sequence
Use this option to create simple videos. When you use this option, the following properties are available:
- Start - The start time (in model time) of the video
- End - The stop time (in model time) of the video
- Speed - The model speed
- Duration - The total length of the output video. This is calculated from the previous three properties.
- View - The view used to record the video. Please note that only some views may be recorded by the Video Recorder.
- Enable/Disable Preview - When selected, you will see your model running as the video is recorded. Disable this option to improve recording time.
- Flypath - The flypath to use. None by default.
Use Shared Sequences
This option allows you to create more complex videos, including videos with multiple layers. When you choose this option, you can add and remove sequences to the selected output file. You can create and edit sequences on the Shared Sequences tab.
The Shared Sequences Tab
The following image shows the Shared Sequences tab of the Video Recorder dialog.
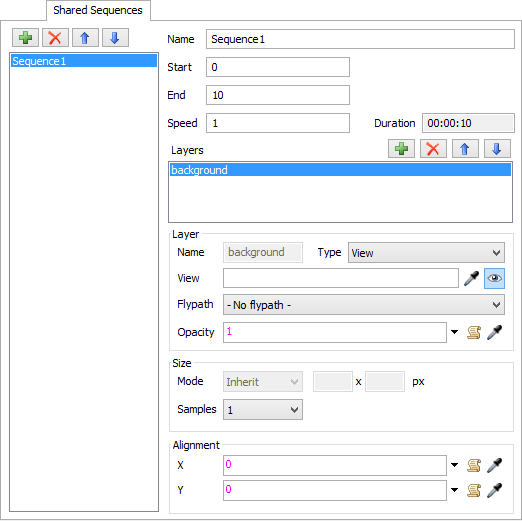
The following section describes the properties available on this tab:
Sequences List
This list shows all the sequences that are available for you to use in a video. You can add, remove or reorder the sequences in this list. The following properties apply to the sequences as a whole:
- Name - The name of the sequence
- Start - The start time (in model units) for the sequence
- End - The end time (in model units) for the sequence
- Speed - The model speed
- Duration - The total video length. This value is calculated from the previous three properties.
As you create sequences, they become available to use on the Output tab.
Layers
This list shows you all the layers that are part of the selected sequence. You can add, remove, or reorder the layers in this list. Layers are drawn so that the each layer is drawn over the layer below it in the list. Thus the layer on the bottom of the list is the background that all other layers are drawn on top of. The following properties apply to the selected layer:
- Name - The name of the layer
- Type - The type of layer. View implies that this layer will record a view of your model. Color means that this layer will display a solid color. You can use the second option to set the color of unused space in your video.
- View - The view used to record the video. Please note that only some views may be recorded by the Video Recorder.
- Flypath - The flypath used by the current layer. Keep in mind that due to how flypaths operate, trying to have multiple layers use different flypaths on the same view will not work.
- Opacity - The opacity of the current layer. You can choose the Static Value option to specify a fixed opacity. You can also use these fields to animate the opacity. Use the Keyframe Animation option to choose times and values for the layer, and choose Slide In/Slide Out to have the layer transition towards that value. Finally, you can enter in your own custom FlexScript to define the opacity of the layer.
- Mode - Set this option to Inherit to have this layer fill the output size. Use Custom to specify a custom size for this layer.
- Samples - If this option is set higher than one, then your video will have high quality anti-aliasing.For example, if you are recording a 1920x1080 layer and you set this value to 2, the Video Recorder will capture a 3846x2160 layer, and use it to smooth out your image. This is called supersampling, and will significantly increase recording time.
- Alignment - The X and Y value specify the offset for this layer from the bottom left of the output area. You can choose the Static Position option to specify an offset with respect to other locations. You can also use these fields to animate your layer. Use the Keyframe Animation option to choose times and locations for the layer, and choose Slide In/Slide Out to have the layer transition into the output area. Finally, you can enter in your own custom FlexScript to define the position and motion of the layer.