Property Tables
Overview and Key Concepts
Property tables are a tool you can use to better visualize and change the properties of objects in your model. As you add objects to your model, each object has a defined set of properties that configure the behavior of that object. As the number of objects in your model grows, it can become challenging to see, much less manage all of the different properties for all of the different objects in your model. While the Properties pane enables simple editing of multiple objects simultaneously, property tables can be much more powerful because they let you both see and compare the property values of multiple objects, as well as change those properties, in an Excel-like table interface that is intuitive and easy to use.
The way that property tables enable this is by viewing the model like a database table. Each object represents a row in this table, and the properties of each object represent fields, or columns in the database table. With this database-like perspective, you can query the table of objects, selecting specific properties that you want to view or edit. You can filter your query, either by certain types of objects, or by group membership, or by certain property values, etc. Finally, you can sort the query by those same, or different, criteria. The results of this query are displayed in a table view, allowing easy comparison of the different objects across different rows of the table, and allowing you to quickly and easily change the properties of the objects in the table, either individually or by changing multiple objects at a time.
Creating Property Tables
There are primarily two ways to create a property table. You can either create a property table using the Toolbox, or you can create one using the Properties pane of a specific object.
Creating a Property Table from the Toolbox
To create a property table from the toolbox, click on the Toolbox tab, press the
 button, and choose
Object Property
Table. This will create a basic property table, showing the name of each object in your model.
Further configuration can be done within the property table tab.
button, and choose
Object Property
Table. This will create a basic property table, showing the name of each object in your model.
Further configuration can be done within the property table tab.
Creating a Property Table from the Properties Pane
To create a property table from the Properties pane, click on an object, and find
a desired pane in its properties.
On the title bar of the pane there is usually a  button.
Press that button and choose Create New Property Table. This will create a new property table
with relevant property fields, as well as a filter that filters by that object type. The corresponding row of
the object you selected will also be highlighted in the table.
button.
Press that button and choose Create New Property Table. This will create a new property table
with relevant property fields, as well as a filter that filters by that object type. The corresponding row of
the object you selected will also be highlighted in the table.
Customizing Property Tables
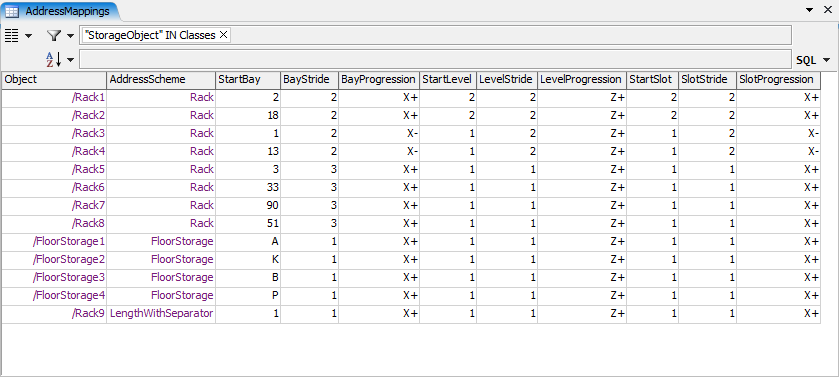
The property table tab includes controls for defining which properties you want to view, how to filter the set of objects for viewing, and how they should be ordered in the table.

Press the  button to define which properties you
want to see in the table. Press the
button to define which properties you
want to see in the table. Press the  button to define the properties by which
to filter objects for display in the table. Once you've chosen a property to filter by, that property
will appear in the filter edit field, and you can click on it to further define the filter expression.
button to define the properties by which
to filter objects for display in the table. Once you've chosen a property to filter by, that property
will appear in the filter edit field, and you can click on it to further define the filter expression.

Finally, you can click on the  button to define how the table should be sorted.
This works similarly to the way you define filtering.
button to define how the table should be sorted.
This works similarly to the way you define filtering.
Object Label Values
You can also select, filter, and sort by object label values. To do this, press the desired
, , or
button. At the top of the dialog you should see a
Label field. Type in the name of the label and press the
 button.
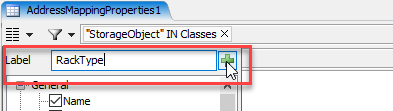
This will add that label to the selection/filter/sort.
Changing Object Properties
Once you have configured the table to show exactly what you need, you can now use the table to not only compare property values across objects, but also to change them, either individually or multiple objects at a time.
To change a single object, you can double-click on the target property cell for that object (or click on the cell and press F2), and type in the value to set it to, then click off the cell. This will immediately apply your entered value to the object's property. Note, however, that some properties do not allow direct editiing like this.
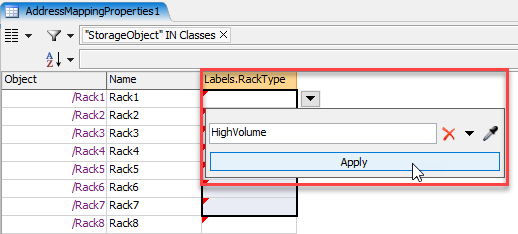
Alternately, you can edit the properties of multiple objects at the same time. When you select
one or more rows of a single property, a
 button will often appear beside your selection.
Press that button to open a dialog for editing the value. Once edited, press that dialog's
Apply button, and the edited value will be applied to all rows that you
have selected in the table.
button will often appear beside your selection.
Press that button to open a dialog for editing the value. Once edited, press that dialog's
Apply button, and the edited value will be applied to all rows that you
have selected in the table.
Exploring Properties
Properties are primarily categorized by specific object classes. For example, fixed resources include properties that specifically configure fixed resource behavior. Nevertheless, there are also several properties that are generally applicable to all classes of objects. These are accessible through the General and Visual categories of the various drop-downs. While these properties work just like any other properties, many are particularly useful for filtering, sorting, and better visualizing your selection. These include the following:
Name
| Property | Category | Potential Uses |
|---|---|---|
| Name | General | Filtering, Sorting |
The Name property shows the name of each object. This is useful for filtering and sorting purposes. If you have consistently named your model objects, you can use the LIKE clause to find objects that have certain patterns in their names. To do this:
- Click the button.
- Choose General > Name.
- Configure the filter to use the LIKE clause, using the drop-down.
- Enter a name pattern. For example, enter Cell_1_%.
The example pattern above will find all objects whose name starts with Cell_1_.
Classes
| Property | Category | Potential Uses |
|---|---|---|
| Classes | General | Filtering |
The Classes property is the array of class names of which an object is an instance. This property is especially useful in filtering. If you want to only look at objects of a certain class in your model, like conveyors, you can filter by the Classes property.
- Click the button.
- Choose General > Classes.
- Enter the class name you want, or choose a class from the drop-down menu.
- Make sure the IN option is chosen.
AllGroups
| Property | Category | Potential Uses |
|---|---|---|
| AllGroups | General | Filtering, Sorting |
The AllGroups property is the set of groups of which the object is a member, either indirectly (through subgroups) or directly. This is very useful in filtering and sorting. For example, if you want to see and edit the properties of only the objects in a certain group, you can filter by this property.
- Click the button.
- Choose General > AllGroups.
- Enter the group name you want, or choose a group from the drop-down menu.
- Make sure the IN option is chosen. See the explanation above for how the IN clause works.
The AllGroups property is also very useful for sorting. Say, for example, you are editing
conveyors (you have added the expression "Conveyor::Conveyor" IN Classes
to your filter).
You want to see all of your conveyors in the table, but you would like to categorize them
in the table by the group you've assigned them to. To do this:
- Click the button.
- Choose General > AllGroups.
This will sort the conveyors in your table by their group membership, so that all conveyors in the same group will be together in the table.
IsSelected
| Property | Category | Potential Uses |
|---|---|---|
| IsSelected | General | Filtering, Visibility |
The IsSelected property is 1 if the object is selected (red-framed), and 0 otherwise. This property is especially useful for visibility reasons. If you are quickly moving between the 3D view and the property table, it is often beneficial to be able to see which objects in the 3D view correspond to which rows in the property table. To do this:
- Click the button.
- Choose General > IsSelected.
- Select desired ranges of rows, and turn the IsSelected property on or off.
- Click back in the 3D view to see which objects have changed.
This operation enables a quickly visible correspondence between the rows of the table and their model objects.
The IsSelected property also allows you to go the other way. You can select a set of objects in your 3D view, and then have the table just show those objects that you've selected in the property table. To do this:
- Click the button.
- Choose General > IsSelected.
- Enter 1 in the field, and make sure the comparison is =.
- Click in your 3D view and shift-select a set of objects in your model.
- Click back into the property table view. As soon as you click into the table view, the table view will update, showing only the objects you have selected in the 3D view.
This feature enables you to quickly view and configure properties for the objects that you select in your model.
Color
| Property | Category | Potential Uses |
|---|---|---|
| Color | Visual | Visibility |
The Color property shows the color of the object. Like IsSelected, this property allows you to easily correlate rows in your table to objects in your model. You can quickly change the color of objects in ranges of rows of the table, in order to see which objects in the 3D view those rows are associated with.
- Click the button.
- Choose Visual > Color.
- Select desired ranges of rows, and change the Color property for those rows.
- Click back in the 3D view to see which objects have changed.
The main advantage of using Color over IsSelected is that sometimes a color change on an object is easier to recognize, especially when you are zoomed out, than finding the red selected frame of an object.
Types of Properties
While all property values return a Variant, properties can generally be categorized into different value types. Below are the set of possible property value types.
Number
A Number property is a property that holds a double-precision floating point number.
Boolean
A Boolean property is a number property that holds either a 1 or a 0 value. When you change these properties, FlexSim's interface will show you a checkbox.
String
A String property is a property that holds a string value.
Node
The Node property will return a node when you get it and take a node when you set it. Alternately you can pass a string when you set it, and it will interpret the string as a path, resolving the reference accordingly. It will first attempt to resolve the path relative to the object you are setting the property on. If it cannot resolve it there, it will resolve the path relative to the model.
Array
The Array property will return an array when you get it and take an array when you set it. Alternately you can pass a string when you set it, and it will automatically parse the string into an array. This string can be in the format you see in global tables:
Array[5]: {1, 2, 3, 4}
Or it can take a json-like form:
[1, 2, 3, 4]
Either of these formats will be properly parsed into an array. This is useful if you are exporting/importing from Excel or a database. You can simply store the value as a string in the database, and the array will be resolved when you set it.
Options
An Options property is a property that can have one of a finite set of values. In FlexSim's interface, you can choose the options in a combobox. When you get the value ( Object.getProperty()) it will give back the number or node value associated with the option. When you set the value ( Object.setProperty()) you can either pass the option's corresponding number/node value, or you can pass an english string that is the option's name, and it will automatically resolve the proper associated value.
Code
A Code property is a property that can potentially hold code logic. In some cases, the property can hold a simple number or a treenode reference, but in other cases, the user has defined logic to be evaluated. When the property has code, then retrieving the property ( Object.getProperty()) will return the full code string.
Unit
A Unit property is a property that corresponds to a measured unit, such as distance, speed, acceleration, time, etc. When you change these properties, FlexSim's interface will show controls where you can define what units the given number should be represented in.
When you get the value for a Unit property (
Object.getProperty()) it returns back a double that is represented in model units,
which are not necessarily the same as the displayed units. If you set the property (
Object.setProperty()) then it assumes the value you set it to is also in model units.
Alternatively you can pass an array into Object.setProperty(), where the first element
of the array is a number, and the second element is a string abbreviation of the units
the value is in. For example, obj.setProperty("Acceleration", [1.2, "m/min/min"])
sets an object's Acceleration property to 1.2 meters per minute per minute.
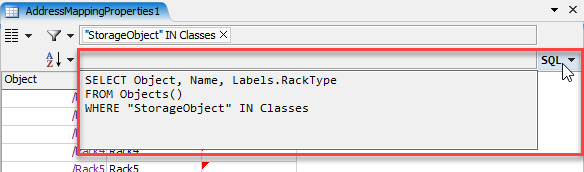
Using SQL Directly
Property tables are an easy-to-use tool for viewing and managing object properties. At their core, however, property tables are just a user interface wrapper around FlexSim's powerful SQL capabilities. On the right side of the property table tab, you will see a SQL button. Press this button to show the full SQL query associated with the table you are viewing.
You can copy/paste this query into a call to the Table.query() command, and you will get the same result as what the property table is showing you. While, for simple scenarios, this doesn't get you much more than you already can do within the property table interface, it does open a lot of possibilities for implementing your own customized functionality programmatically, such as:
- Composing inner join queries that relate objects in the model with other data such as global tables
- Aggregating information on multiple objects with aggregation functions such as AVG(), COUNT(), etc.
- Using the SQL UPDATE and DELETE clauses to either change properties or remove objects from the model
- Using the SQL INSERT INTO clause to auto-build your model
Using the Objects() Table
To query the set of objects in your model, you use the Objects() table in your query. For example:
SELECT Object, Name FROM Objects()
The Objects() table is what would be called in standard SQL a table-valued function. You can optionally pass a parameter into this function to define the 'root' node, whose subtree will be searched for objects. The parameter can either be a path, a name of an object, or a reference to an object in the model.
SELECT Object, Name FROM Objects('MODEL:/FirstFloor')
SELECT Object, Name FROM Objects('FirstFloor')
SELECT Object, Name FROM Objects(Model.find('FirstFloor'))
All of the examples above would give the same result. Here, the 'root' node is the object named FirstFloor in the model. On the other hand, if no parameter is passed into Objects(), then the 'root' node is the model. The query will recursively search the subtree of the root object, finding any objects, and will create a 'virtual' table where each object represents a row in the table.
Programmatically Updating Object Properties
You can also use property tables to update object properties programmatically. This can be done in one of three ways.
- Using the Table class.
- Referencing a property table directly in an UPDATE clause in Table.query().
- Updating the Objects() table with Table.query().
Updating using the Table Class
To update object properties using the Table class, simply interact with the property table normally as if it were a global table.
double speed = 5;
Table propTable = Table("TravelSpeeds");

for (int i = 1; i <=  propTable.numRows; i ++){
    propTable[i]["MaxSpeed"] = speed;
}
Updating by Referencing a Property Table Directly
To update object properties in Table.query() with a direct property table reference, just put that table's name in the UPDATE clause.
Table.query("UPDATE TaskExecuterProps SET MaxSpeed = 5");
This query assumes that, first, you have a property table named TaskExecuterProps in your model, and, second, that property table has a MaxSpeed column. The query goes through every row (i.e. object) in the property table, and sets the corresponding object's MaxSpeed property to 5.
You can also use FlexSim SQL's $ mechanism to pass in values to the function.
double speed = Table("SpeedTable")["TaskExecuters"]["Speed"];
Table.query("UPDATE TaskExecuterProps SET MaxSpeed = $1", speed));Updating the Objects() Table
You can also update object properties by referencing the Objects() table directly. Here you will likely need to add a WHERE clause to filter out the objects you don't want updated.
Table.query("UPDATE Objects() SET MaxSpeed = 5 WHERE 'GroupA' IN Groups");
This query goes through the Objects() table, meaning every object in your model. It then
filters by the expression WHERE 'GroupA' IN Groups. This means it only
wants to update objects whose
Groups
property includes the value 'GroupA'. In other words, it only wants objects that are
members of the group named 'GroupA'. Finally, for those group members, it sets the
MaxSpeed property to the value 5.
Using SQL you can also do things like inner joins to dynamcially update object properties by relational lookups in other tables. For example, you could set up a Speeds table that defines different speeds for objects based on which group the object is a member of.
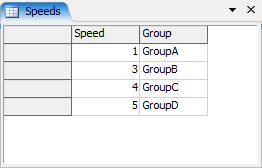
Then you can use an inner join to update objects that are members of the corresponding group.
UPDATE Objects() AS Obj
INNER JOIN Speeds ON Speeds.Group IN Obj.Groups
SET Obj.MaxSpeed = Speeds.Speed
This query goes through all objects in the model (UPDATE Objects() AS Obj),
and then cross references that object
with the Speeds global table, finding the row whose Group value is
one of the elements in the object's Groups property, meaning the object
is a member of that group (INNER JOIN Speeds ON Speeds.Group IN Obj.Groups).
Once it's found that row, it sets the object's MaxSpeed property to
the speed table row's Speed value (SET Obj.MaxSpeed = Speeds.Speed).
These examples demonstrate just a small subset of the capabilities you can harness using property tables in conjunction with FlexSim's SQL engine. For more information on FlexSim's SQL capabilities, refer to the SQL Queries topic, especially its SQL Language Support section. For a general introduction to SQL, see w3schools.com.
The Properties Pane
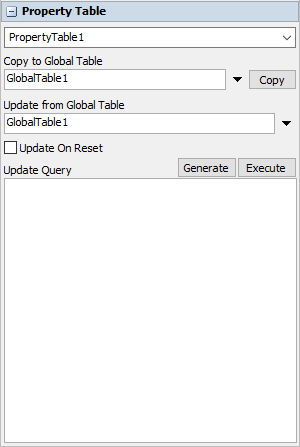
The property table's properties pane allows you do export/import your property table data, allowing you to easily switch between different property configurations.
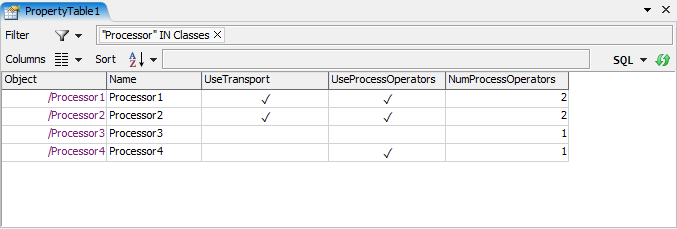
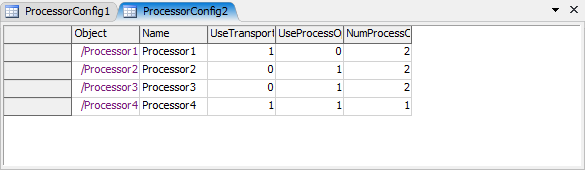
The best way to explain how this works is with an example. Let's say that you have a model with four processors, and you want to experiment with various property configurations. You've created a property table that shows the processors' UseTransport, UseProcessOperators, and NumProcessOperators properties.
You want to save this configuration off. You do the following:
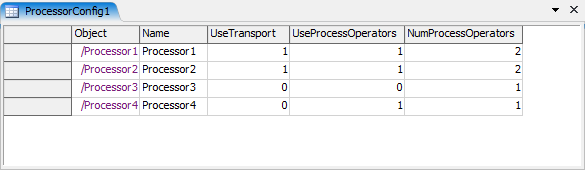
- Create a global table named ProcessorConfig1.
- In the property table properties pane under Copy to Global Table, choose that table from the drop-down, and then press Copy.
This will copy the data from the property table to the global table.
Next you want to create a second configuration. You change various properties in the properties table, then create a second global named ProcessorConfig2 and then copy the property table to that table.
Now that you have saved off these two configurations, you can easily switch between them.
- Beside Update Query, press Generate.
- In Update from Global Table, choose the table you want to update from.
- Press Execute
This will generate an update query based on the current set of columns in the property table. The query should look like the following:
UPDATE Objects() AS Obj
	INNER JOIN $1 AS Src
	ON Obj.Object = Src.Object
SET
	Obj.Name = Src.Name,
	Obj.UseTransport = Src.UseTransport,
	Obj.UseProcessOperators = Src.UseProcessOperators,
Obj.NumProcessOperators = Src.NumProcessOperatorsThe properties of objects in your model, and the property table itself, should update based on the configuration you are updating from. You can then easily update again from the other configuration by choosing that table in Update from Global Table, and pressing Execute again.
How It Works
The query takes a Src table, i.e. the table you want to update from, and matches its Object column with the object references in the model. Then it updates those objects' properties based on the value of the matched row in the Src table.
Properties Pane Fields
Below are the set of fields you can configure in the properties pane.
Name
At the top of the pane, you can edit the property table's name.
Copy to Global Table
This defines the name of the a global table you want to copy to. To copy the table to a global table, enter the global table name, or choose a global table from the drop-down list, then press the Copy button. You can type any name, and if that global table doesn't already exist, it can automatically add it for you when you press Copy.
Update from Global Table
This field you can use to update from a global table you have previously saved to. This field works in conjunction with the Update Query. The global table you specify becomes the $1 parameter in the query.
This field is a dynamically evaluated expression. You can use any FlexScript expression to resolve which table to import from, including, for example, tying it to a model parameter. Using a model parameter is an available pick option in the drop-down.
Update On Reset
If this box is checked, the update mechanism will automatically be executed on each reset of the model.
Update Query
The update query is a query that you can execute manually, by pressing Execute or have it executed on each model reset. As explained above, it allows you to update properties based on saved configurations. While the Generate button auto-generates a query intended for this default configuration switching mechanism, the full query is available to you for customization. The query is passed directly into Table.query(). You can therefore customize it to your model's needs, for example by doing an INNER JOIN with some other table, like the Speeds table mentioned above.
Auto-Building the Model
As mentioned above, you can use the Objects() table, in conjunction with the SQL INSERT INTO clause to actually create objects in the model, and give them property values. For example, copy-paste the following query into a script call to Table.query() and execute it.
INSERT INTO Objects() (Class, Name, Location, OutObjects) VALUES
('Source', 'Source1', ARRAY(0, 0, 0), ARRAY('Queue1')),
('Queue', 'Queue1', ARRAY(5, 0, 0), ARRAY('Processor1', 'Processor2', 'Processor3')),
('Processor', 'Processor1', ARRAY(10, 3, 0), ARRAY('Sink1')),
('Processor', 'Processor2', ARRAY(10, 0, 0), ARRAY('Sink1')),
('Processor', 'Processor3', ARRAY(10, -3, 0), ARRAY('Sink1')),
('Sink', 'Sink1', ARRAY(15, 0, 0), ARRAY())
This will create a connected, fully functioning set of objects in your model. While you likely would not write such a query by hand, this capability enables even model-building to be a fully data-driven activity. You can create a simple script that will read from a table and construct a SQL INSERT INTO query, then run the query to create the objects in the model. While we hope to integrate such functionality into FlexSim's property tables in the future, you already have the tools needed to do this yourself.
Alternately, instead of enumerating the objects in the code, you can use the INSERT INTO SELECT clause. Use this if you have a global table that you have perhaps imported from some external source.
INSERT INTO Objects() (Class, Name, Location, OutObjects)
SELECT Class, Name, Location, OutObjects FROM AutoBuildData
Required Fields for INSERT INTO
When you are auto-building your model using the INSERT INTO clause, you must provide at least one of two special fields in the query, so that FlexSim can know what types of objects to create. Other property fields are optional, and, if not provided, will revert to their default property values.
When using INSERT INTO, you must either include the Class field, or the CopyFrom field. The Class field is the name of the class from which to create an instance. This is something like 'Source', 'Processor', 'Queue', etc. This field is also available for viewing in a property table. Alternately, you can provide a special CopyFrom field. This is a path or name of an object that you want to create a copy of. Using this field, you can create and pre-configure an object in your model, and then create copies of that object in the auto-build step.
The example query below is similar to the previous example, except here an object named TemplateSource has already been created in the model. A copy of that source is created using the CopyFrom field. All other objects are created as an instance of a library class.
INSERT INTO Objects() (Class, CopyFrom, Name, Location, OutObjects) VALUES
(NULL, 'TemplateSource', 'Source1', ARRAY(0, 0, 0), ARRAY('Queue1')),
('Queue', NULL, 'Queue1', ARRAY(5, 0, 0), ARRAY('Processor1', 'Processor2', 'Processor3')),
('Processor', NULL, 'Processor1', ARRAY(10, 3, 0), ARRAY('Sink1')),
('Processor', NULL, 'Processor2', ARRAY(10, 0, 0), ARRAY('Sink1')),
('Processor', NULL, 'Processor3', ARRAY(10, -3, 0), ARRAY('Sink1')),
('Sink', NULL, 'Sink1', ARRAY(15, 0, 0), ARRAY())
See SQL Queries for more information on using SQL in FlexSim.