Key Concepts About Labels
What Are Labels?
Labels are a crucial component of building a model's logic. At its most basic level, a label is a way to store information on a flow item, token, or 3D object. Labels are key to the overall functionality of FlexSim because they can track important information or dynamically change what happens during a simulation based on different conditions in the simulation model.
Every label has three elements:
- Owner - Every label belongs to a specific flow item, token, or 3D object. You will need to know which item, token, or object owns the label in order to reference that label during a simulation run.
- Name - Every label has a name that describes the type of information it contains. You'll use this label name to refer to the label and get information from it. The name of the label is assigned when the label is first created and it won't change throughout the simulation run. Although FlexSim sometimes suggests default label names for certain labels, the ultimate decision about the label's name will be is up to you.
- Value - Every label has a value that contains information about the label's owner. Labels can vary from item to item or from token to token. Values can be any type of data, such as text, numbers, references to other objects, and even arrays. Label values may change during a simulation run.
For example, imagine you want to track the weight of flow items as they move through a simulation model. You could use a label to track this information during a simulation run. Perhaps a label named Weight is assigned to every flow item when it is first created in the simulation model. You could possibly assign a random number between 10 and 30 to this label when it is first created. In this case, the label's owner is the flow item. The label's name is Weight and the label's value will be a number between 10 and 30.
As this flow item moves through various processes in the simulation model, the value of this label might change. For example, after going through a specific process, the item's weight could be reduced by 5. After the item finishes the process, the process could update the value of the item's Weight label. The new value could subtract 5 from the original value to represent its new weight.
Six Basic Uses for Labels in a Simulation Model
Labels have many possible uses, but some of the more common uses are explained in the following sections.
Sorting and Conditional Routing
As flow items move through a 3D model, they could possibly be routed to different downstream objects based on a value of a label. For example, imagine flow items have a label on them called ProductType with a possible value between 1 and 5. A queue could push items to five different processors based on the value in a label. Similarly, a processor could pull items off a list based on the flow items that are within a particular range of numbers on a label that tracks the items weight.
The same thing is true for how labels work in a process flow. For example:
- As tokens move through activities in a process flow, a Decide activity could possibly use a label to determine which downstream activity should receive the token.
- The Batch and Coordination activities could group tokens into partitions based on their labels.
- The Zone can evaluate a token to determine if a token can enter based on whether a label value matches its criteria.
Representing Changes to an Object or Token
Labels can represent an object's current status, physical properties, or other characteristics that you want to track during a simulation run. For example, after a flow item is processed at a work station, the value of one or more of its labels could be updated to reflect the changes that occurred to the flow item after it was processed. For example, if you were simulating a bottling station, a flow item could have a label named Status with a value that changes from "empty" to "filled" to "capped" after it has gone through various processes.
Labels can be assigned to fixed resources or task executers in the 3D model as well if needed. For example, an operator could be assigned a label that tracks whether they are on break or not (and therefore unavailable to work on tasks).
Linking Tokens to 3D Objects or Other Tokens
One of the most important purposes of labels is to link a token in a process flow to an object in a 3D model (such as a flow item, a task executer, or fixed resource). Process flows can control the logic of the 3D model using labels that contain a reference to a 3D object in the model. As the token moves through the activities in the process flow, the activity's logic can be applied to the object in the 3D model.
For example, a token could be linked to a flow item in a 3D model through a label called MyItem that contains a reference to the flow item it represents. As the token moves through a process flow, it could enter a Change Visual activity that changes the flow item's size or color. You would set the Change Visual to read the value of the MyItem label and apply the visual changes to the flow item referenced in the label. See Storing Object References for more information.
Filtering and Restricting
Similar to sorting, labels can be used to filter and restrict flow items or tokens. For example, imagine you want to simulate a dump truck that can only hold a maximum weight of 5 tons. Each flow item in a 3D model or token in a process flow will represent a varying amount of waste that will be loaded into the dump truck. To simulate this kind of system, you could create a Zone in a process flow to represent the dump truck and assign a custom label called Weight to each token. When each token tries to enter the dump truck (the Zone), it will evaluate the value of that token's Weight label and determine whether it would cause the dump truck to exceed its weight limit. If it would exceed the weight, the Zone would not allow that token to enter.
Conditional Decision Making
Labels can make it possible for a simulation model to study how a simulation system is affected by changing conditions. For example, imagine you want to simulate a checkout line at a grocery store and each token will represent a customer coming through the line. Each customer could have any number of items. The clerk takes about 5 seconds to scan each item and put it in a grocery bag. Therefore, the total amount of time the customer spends at the checkout line will depend on how many items he or she has multiplied by 5 seconds. To simulate this kind of system in a process flow, you could create a Delay activity and assign a custom label called NumberOfItems to each token. When the Delay activity receives the token, it would evaluate the token's NumberOfItems label and then multiply that value by 5 to determine the delay time for that token.
Getting Data from a Model
Labels are especially important for tracking statistics in a model. For example, you could have a label on a flow item called Cost that can perform calculations about how much it has cost to produce a particular flow item as it moves through the simulation model. Or you could track the number of items that fail a quality assurance test with a label called QualityAssurance with a possible value of "passed" or "failed." FlexSim could keep track of how many items have a "passed" value as opposed to the "failed" value.
How Labels Work
You'll see references to labels in many different contexts throughout FlexSim. Typically, you'll use a reference to a label in properties for various tools that control logic in FlexSim, such as the Process Flow tool. It's useful to be able to understand a label reference when you see one.
The following are examples of some label references:
item.ProductType
item.Destination
token.Weight
token.puller
current.MyOperator
When it comes to interpreting the syntax of these label references, recall what you
learned in the previous section about how every label has three components: an owner, a
name, and a value. Label references use two of those components. The first part of the label
reference (the one before the dot) is the owner of the label. The second part of the label
reference is the name of the label: owner.labelName
From a logical standpoint, when FlexSim reads that label during a simulation run, it will
substitute the value of the label in the place of the label reference. For example, imagine
you have a label on a token called Weight with a random value between 10 and 30.
Perhaps the amount of time it takes to process that token is conditioned on the object's
weight, with each unit of weight taking 5 seconds to process. You could represent this using
the expression token.Weight * 5.
You could then use this expression in the Delay Time property for a Delay activity in a process flow, which can simulate processing times:
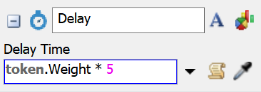
For example, if a particular token's Weight label had a value of 19, its delay time would be 95 (the product of 19 multiplied by 5).
The key takeaway here is to remember that a label is a kind of placeholder for a value that can change from item to time, token to token, or object to object. Any time you see a reference to a label, FlexSim will substitute the value of that label in its place during a simulation run.
Data Types
The following table explains the different data types that are available in FlexSim:
| Data Type | Explanation |
|---|---|
| Numbers | A numeric value, including integers or floating points. |
| Strings | Any kind of text. String values should always be enclosed in quotation marks (" "). |
| Pointers | References to other nodes or objects. The value displayed is the path to the node/object and will be purple. |
| Arrays | Stores two or more values, similar to values in a list or a table. The values in an array can be any data type, such as a number, string, pointer, or array. The values on an array do not necessarily need to all be the same data type. |
| FlexScript expressions | FlexScript code that can be evaluated. |
| Bundles | Data table that stores numbers and strings. |
| Tracked variables | Used for statistics collection. |
| Tables | Advanced FlexScript users can create tables inside labels, which include rows and columns of data. |
| Null | Null values have no data type and no data. |
Best Practices for Working With Labels
The following sections provide a few general guidelines for working with labels in FlexSim:
Plan Out Your Label Strategy
Complex simulation models will likely use many different labels and it's important to be deliberate and thoughtful about how labels will work in your simulation. When you decide to use a label on an item, token, or 3D object, think through questions such as:
- What will this label represent?
- How will the label be added to an item, token, or object?
- What should be the initial value of the label when it is first added?
- How will downstream objects or activities use this label?
- Will any downstream objects or activities need to change the value of this label? If so, why and how?
It might not be a bad idea to write down your label strategy in a word processor document. In this document, you could include the names of the labels you're using, the purpose of the label, and its general use in the simulation model.
Use Intuitive, Descriptive Label Names
What you decide to name a label is entirely up to you, but it's better to give the label a name that is descriptive of what it represents or how it will function throughout the simulation model. Don't try to make your label names so short and brief that they are difficult to understand intuitively.
Use Camel Case Instead of Spaces in Label Names
FlexSim does not place any formal restrictions on what you can name a label and you can technically use spaces in the label's name if needed. However, this is discouraged because it makes it much more difficult to refer to a label with a space in its name using FlexScript.
For example, imagine you have a token with a label called myLabel. To set its value in FlexScript, you'd use the expression:
token.myLabel = 3;
But if you used a label called My Label, you'd have to add several extra elements such as brackets and quotation marks to the expression:
token.label["My Label"].value = 3;
As you can see, it's easier to simply avoid using spaces. As a best practice, it's better to use camel case instead of spaces. Camel case is the use of capital letters in the middle of words, usually to signify multiple words have been joined together. For example, these labels are using camel case: MyLabel and labelName.
Avoid Using the Suggested Default Label Names
FlexSim has a few process flow activities or 3D object picklists that automatically create a label on a token or item. When you use these activities or picklists, FlexSim usually suggests a default label name. For example, when a process flow activity pulls something from a list, it creates a label with a default name of pulled that stores a reference to the object or token that was pulled from the list. You might want to use a more intuitive, easy to remember name for this label instead.
While there is nothing wrong with using the default label names, FlexSim's advanced users recommend replacing the default label names with your own names. Not only will the labels you create be a little more intuitive, but it will help you to be more deliberate and strategic in how you assign and use labels in your simulation model. It will help you to learn more about how labels function logically in FlexSim in general.
Start the Label Name With an Uppercase Letter
Since most of the default names start with a lowercase letter, one way to distinguish custom labels from default labels is to start with an uppercase letter. Also, when FlexSim conducts searches for label names (such as when its using the auto-complete), uppercase letters are treated as being first alphabetically.
Test and Validate Your Labels
Label mismanagement can sometimes cause a lot of problems with the logic of a simulation model. For that reason, it's a good idea to test and validate your labels to ensure they are functioning the way you expected them to function. After you've built a basic process flow that uses labels, try tracking a single token as it moves through the process flow and checking that the labels are being assigned the right values at the right time. You'll also want to check that any conditions that rely on labels are functioning correctly.
Storing Object References
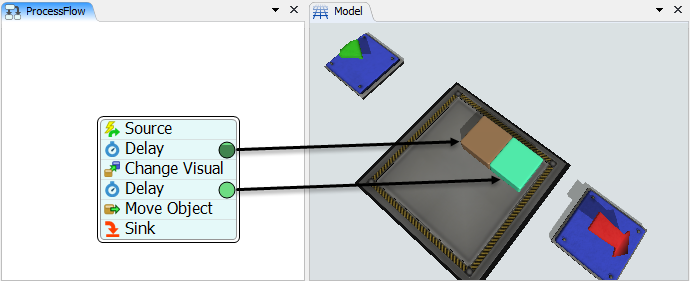
Labels can be used to store references to other objects. This is how you can connect tokens with flow items or with other tokens. For example, suppose you wanted to change the color of flow items on a queue using a Process Flow. You might make a model like the following:
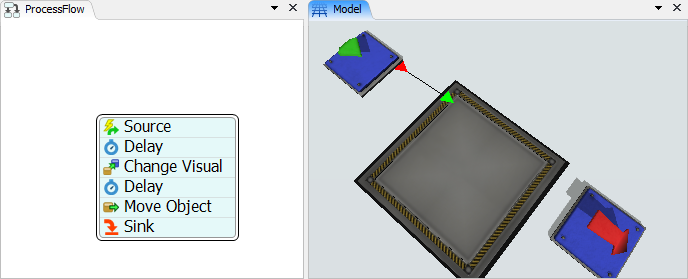
Each time a flow item enters the queue, the Source activity (an Event Triggered Source) creates a token. But how can we connect the new token with the flow item? You can do this easily with labels. The Quick Properties for the Source is shown below:
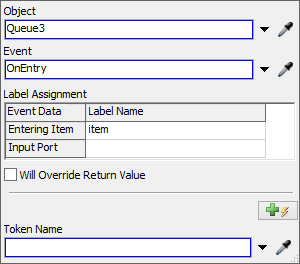
Notice that the Entering Item of the event is assigned to a label on the new token called
item. This means that token.item will return the flow item.
An object reference is a treenode, so you can call any
function that takes a node. A few examples are shown below:
// get the name of the item
string name = token.item.name
// determine if the object still exists
int exists = objectexists(token.item);
// get the containing object
Object container = token.item.up;
// ...
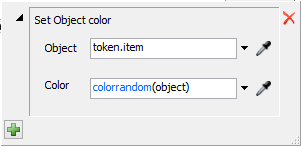
// ...Going back to the example model, you might fill out the Set Object Color popup on the Change Visual activity with the following values:
The effect can be seen as the model runs. The following image shows the item label of both tokens as black arrows, referencing the appropriate flow item.
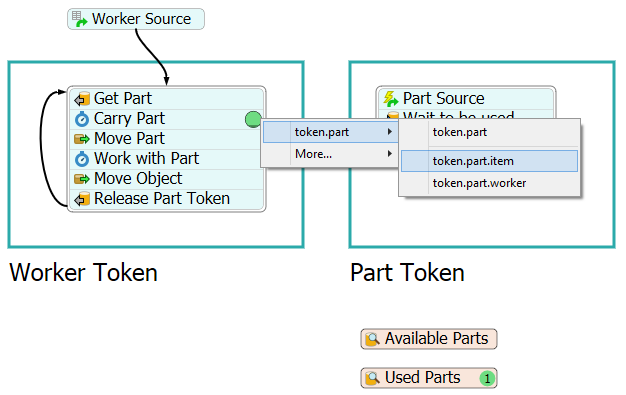
Multiple Label Calls
Sometimes, you may have a token with a label that references another token, and that token has a label that references another object, and so on. For example:
token.item.operator
You can type this in a field manually, or each of the property fields give you a sampler
 button that can make referencing these
nested object references easier. In the image below, the model has been run to a point where
tokens are in the activities. The model is then stopped and the properties window of an
activity is opened. By clicking on one of the sampler buttons and clicking on a token, all
of the valid labels stored on that token will appear.
button that can make referencing these
nested object references easier. In the image below, the model has been run to a point where
tokens are in the activities. The model is then stopped and the properties window of an
activity is opened. By clicking on one of the sampler buttons and clicking on a token, all
of the valid labels stored on that token will appear.
Sampling this way can be very helpful as you build your model. If you need a reference like this, simply run your model until a token with the right labels is visible. Then stop your model, and sample the token.