Presentation Builder
Overview and Key Concepts
The Presentation Builder that will assist you in developing a fly-thru presentation of the model. You can create multiple flypaths each with their own set of flypoints. When run, the 3D view will sequentially fly or move to each flypoint in the flypath. When used with the presentation slide option of the visual tool the presentation builder can develop PowerPoint™ style presentations in 3D. If you do not have a 3D view active, the Presentation Builder will be grayed out.
By default, flypaths are not associated with simulation speed, instead flypaths travel in
real time. That setting can be changed by toggling the Stpowatch button
 . Flypaths also do not start/stop when the model is
started/stopped. The Presentation Builder has its own set of Start and Stop buttons.
However, when using the Video Recorder, you can specify one your flypaths to be run while
recording your video file.
. Flypaths also do not start/stop when the model is
started/stopped. The Presentation Builder has its own set of Start and Stop buttons.
However, when using the Video Recorder, you can specify one your flypaths to be run while
recording your video file.
The Presentation Builder is accessed from the Toolbox.
Creating a Flypath
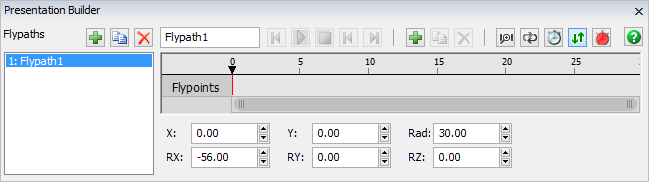
Creating a flypath is easy in FlexSim. Once you have the Presentation Builder open,
move/rotate the 3D view to the position you would like the flypath to start at. Press the
 to add a flypoint. This is similar to a keyframe
in the Animation Creator. Notice that the Presentation Builder automatically moved the
flypath time cursor two seconds ahead of your created flypoint. This makes it easy to add
multiple flypoints very quickly. Move to your next desired position/rotation and click the
again. Continue this process until you have
created a complete flypath.
to add a flypoint. This is similar to a keyframe
in the Animation Creator. Notice that the Presentation Builder automatically moved the
flypath time cursor two seconds ahead of your created flypoint. This makes it easy to add
multiple flypoints very quickly. Move to your next desired position/rotation and click the
again. Continue this process until you have
created a complete flypath.
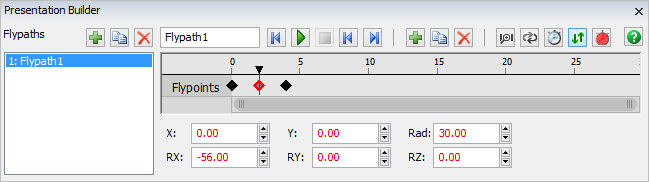
You can always insert new flypoints by moving the time cursor to any spot on the time
line and hitting the . Delete flypoints by
selecting them and pressing the  or hitting
the Delete key.
or hitting
the Delete key.
You can change the zoom of the timeline by either using the mouse scroll wheel or dragging the ends of the bottom scrollbar.
Updating Flypoints
Once a flypoint has been created, the time cursor must be directly over the flypoint in order to update it. When the time cursor is directly over a flypoint, the flypoint diamond will change to a hollow diamond and the position and rotation boxes below will change to red text. The position/rotation boxes display that flypoints current position. You can edit those fields directly to change the position of your flypoint, or you can reposition the 3D view to update your flypoint.
You can move flypoints anywhere along the timeline by clicking and dragging the flypoint to a new position.
Selecting Flypoints
Hold the CTRL key down and click on flypoints to select multiple flypoints.
Hold the ALT key down and click a flypoint to select all flypoints from the clicked flypoint to the end of the flypath.
Running Flypaths in the 3D View
Aside from the controls in the Presentation Builder, you can also fly through flypaths by pressing keys on the keyboard. This is useful when you don't want to have the Presentation Builder open. Press one of the numbers: 1-9 to run the associated flypath (plays the flypath from the list at the given rank number). Press the space bar or the 'N' key, and the view will run the next flypath. Press the 'B' key and the view will go back to the previous flypath.
Properties
Flypaths Toolbar
| Icon | Description |
|---|---|
|
Adds a new flypath. |
 |
Duplicate the selected flypath. |
|
Removes the selected flypath. |
Flypath List
The list of the model's flypaths. Select a flypath to view its properties in the Flypoint Editor.
Flypoint Toolbar
| Icon | Description |
|---|---|
 |
Moves the time cursor to the first flypoint in the flypath. |
 |
Runs the flypath from the current time. |
 |
Stop the current flypath. |
 |
Moves the time cursor to the previous or next flypoint. |
|
Adds a new flypoint at the time cursor's current position. |
|
Duplicates the selected flypoints. |
|
Removes the selected flypoints (same as Delete key). |
 |
Zooms the timeline in or out to make all flypoints fit on the screen. |
 |
Causes the flypath to loop back to the beginning once it hits the last flypoint. |
|
If toggled, the flypath will use the model's run speed instead of real time. This can be useful when working with the Video Recorder. By default this option is off and the time displayed in the timeline is in real seconds. |
 |
Sync the 3D View. If toggled, the 3D view will update it's position and rotation as the current time cursor is moved along the timeline. |
 |
If toggled, moving or rotating the 3D perspective view will cause a new flypoint to be created if not flypoint exists at the current time. |
Timeline
The timeline displays a list of times at the top in seconds. Below that are all the flypoints, or keyframes. You can add any number of flypoints to a flypath.
X, Y
Specifies the x or y location of focus point of the camera.
Rad
The radius field specifies the distance the camera is away from its focus or rotation point.
RX
Specifies the pitch of the camera.
RY
This field specifies the roll of the camera.
RZ
This field specifies the yaw of the camera.