Simulation Control Bar
Overview and Key Concepts
To run a simulation, you'll use the simulation control bar (also called the control bar for short), located underneath the main menu and toolbar. The control bar contains most of the tools and commands that you will need to run your simulation. The control bar essentially has three different groups of tools you can use to control how your simulation runs, as illustrated in the following image:

The following sections explains the different buttons on each section of the control bar and other properties.
Run Control Buttons
The Run Control buttons are the basic tools you will use to start and stop your simulation, as shown in the following image:

These buttons are fairly intuitive to use since they closely resemble the playback controls on a media player. However, a few of the buttons possibly work differently than you might expect. For that reason, you should read the explanation of each button in the following table:
| Icon | Button Name | Purpose | Keyboard Shortcut |
|---|---|---|---|

|
Reset |
|
Ctrl + left arrow |

|
Run |
|
Ctrl + space bar |

|
Stop |
|
Ctrl + space bar |

|
Fast Forward |
|
Ctrl + Shift + up arrow |

|
Skip |
|
Ctrl + Shift + right arrow |

|
Step |
|
Ctrl + right arrow |
Run Time Tools
The Run Time tools help you to monitor how much time has passed in the simulation and to define when the simulation should stop running.
Simulation Clock
The simulation clock indicates the amount of time that has elapsed during the simulation run so far. The simulation clock will start at 0 time units and will progress from there.
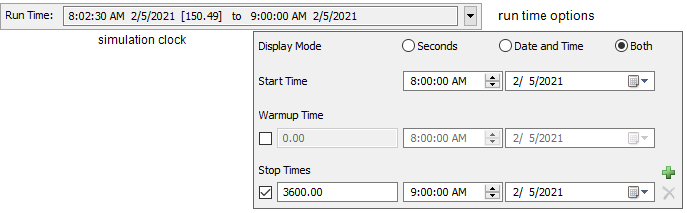
Run Time Options
If you click the drop-down arrow to the right of the simulation clock, the run time options will appear:
- Display Mode - Choose whether to display the time in model time units, date and time text, or both.
- Start Time - Set the date and time that correspond to time 0 in the simulation run.
- Warmup Time - Set the date and time that correspond to the simulation's warmup time.
- Stop Times - Set the time when the model should automatically stop. The model will only stop at the specified time if the stop time is enabled by checking the box in front of the stop time. You can add and enable as many stop times as desired. If no stop times are enabled or the model is run after the last enabled stop time, the model will run indefinitely until you press the Stop button.
Run Speed Tools
The Run Speed tools allow you to change how fast the simulation will move while it is running.

Run Speed
You can use the slider button to manually adjust the run speed.
Simulation Speedometer
Displays the current speed at which the simulation model is running or will run.
Speed Options
Select which speed you would like the simulation to run. Options are:
- 1.00 will run the model at a speed of one displayed simulation time unit per real second.
- Maximum is the fastest speed.
- Custom allows you to type the speed you would like in the box directly below it. Click the Set button to apply the new custom speed settings.
You can also change the Display Mode of the simulation speedometer so that it is defined as a ratio of some other unit per real second. This can be useful if you have different model events that take place over different time spans. In order to run your model in real time you can set the Display Mode to Simulation Seconds per Real Second and then set the run speed to 1.