Sub Process Flows
Introduction to Sub Process Flows
A sub process flow (also called a sub flow for short) is a separate process flow that begins running when it is triggered by another activity or event in a different process flow. Think of sub flows as chunks of self-contained logic that will get executed when they are triggered by certain events in the simulation model or general process flow. If you are familiar with programming terms, you could think of a sub flow as a function or a subroutine.
Sub flows can cut down on the need to create a certain block of process flow activities in multiple places throughout your process flows. You could use sub flows to perform calculations or to simulate more complex procedures that are triggered by specific activities or events in the main process flow. A sub flow could run a simple calculation to dynamically determine a processor's processing time. Or a sub flow could contain a task sequence that will be used by several different task executers at certain points during a simulation run.
For example, perhaps you want to simulate an assembly line of some sort. When items come off an assembly line they will need to go through a set of quality assurance procedures after which the item will either pass or fail. You could simulate this using a sub flow that is triggered once a token gets to a particular activity in the process flow.
How Sub Flows Work
The following list explains how sub flows work from beginning to end:
- During a simulation run, there are a few ways that a sub flow can get triggered. Usually, sub flows are triggered when a token enters a Run Sub Flow or Create Tokens activity. (See Run Sub Flow or Create Tokens for more information.)
- The Run Sub Flow or Create Tokens activity then creates one or more child tokens on the sub flow's Start activity. (See the Start activity for more information.) The child token is linked to its parent token, which is the original token that first entered the activity that triggered the sub flow. When a child token is first created inside a sub flow, it will be a copy of its parent token, meaning that it will inherit all of the labels and data from the parent token. (See Key Concepts About Parent-Child Label Access for more information.)
- The child token will begin to run through the activities in the sub flow. If the child token was created by a Run Sub Flow activity, the parent token will wait on the Run Sub Flow activity while the child token is running through the sub flow. NOTE: A parent token can't be destroyed if it has child tokens in the model.
- When the child tokens reach the Finish activity on the sub flow, the child tokens will be destroyed and any necessary information will be updated on the parent token. (See the Finish activity for more information.)
- The parent token will be released and will move to the next downstream activity in the main process flow. NOTE: The Create Tokens activity will release right after creating the child tokens on the sub flow. The parent token does not necessarily have to be dependent on what happens to the child tokens in the sub flow.
Create Tokens vs. Run Sub Flow Activities
As was mentioned in the previous activity, sub flows are usually triggered when a token enters a Run Sub Flow or Create Tokens activity on the main process flow. Which activity you should use will probably depend on your purpose in using a sub flow. There are two key differences between these two activities, as explained in the following table:
| Should the parent token wait or not? | Do I want the child token to be sent to a Start activity or something else? | |
|---|---|---|
| Run Sub Flow | Use a Run Sub Flow activity if you want the parent token to wait until the child token has completed the sub flow before it is released to the next activity in the main process flow. | Run Sub Flow activities can only send child tokens to a Start activity. |
| Create Tokens | Use the Create Tokens activity if you want the parent token to create a child token and then immediately get released to the next activity in the main process flow. | Create Tokens activities can send tokens to any activity in a sub flow. |
Creating Internal Sub Flows
The following image shows an example of a simple internal sub flow during a simulation run:
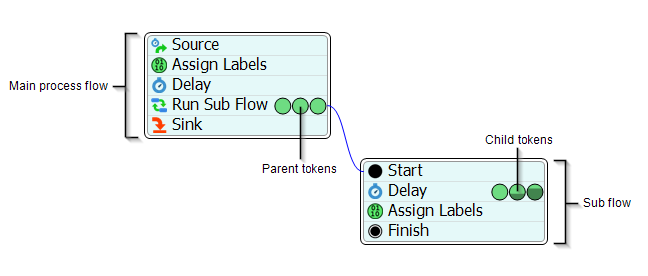
An internal sub flow is a sub flow inside of an existing process flow. Internal sub flows are basically an independent block of activities that begin with a Start activity and end with a Finish activity. Therefore, to create an internal sub flow, simply create a block of activities that begin with a Start activity. After creating the block of activities, link it to the main process flow. See Linking to Sub Flows for more information.
Creating External Sub Flows
The following image shows an example of an external sub flow during a simulation run:
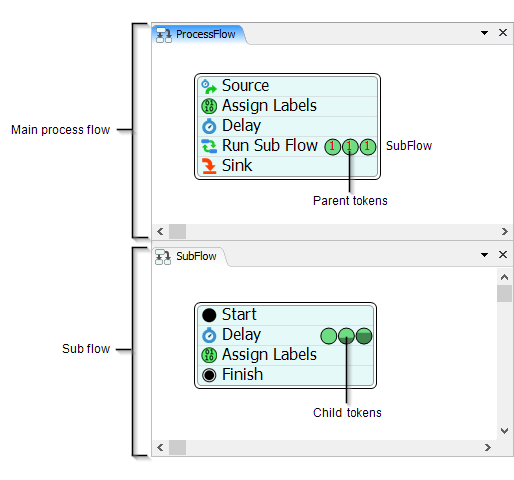
An external sub flow is a separate process flow that was assigned the Sub Flow type when it was first created. It will have its own separate window and will be listed as a separate process flow in the Toolbox.
To create an external sub flow:
- Inside the Toolbox, click the Add button
 to open a menu.
 - Select Process Flow, then Sub Flow.
- The new sub flow window will appear and you can begin adding activities to it. NOTE: Sub flows function best when they begin with a Start activity and end with a Finish activity.
- After creating the block of activities, link it to the main process flow. See Linking to Sub Flows for more information.
Linking to Sub Flows
If you are linking to sub flow from a Create Tokens
activity, you can use the sampler button  next to the Destination property to select the activity (in the
sub flow) where you want to create a child token.
next to the Destination property to select the activity (in the
sub flow) where you want to create a child token.
To link to a sub flow from a Run Sub Flow activity:
- You'll notice that when you first add a Run Sub Flow
activity to the main process flow, there will be an exclamation mark
 to the right side of the activity.
This mark means that you have not yet linked the Run Sub
Flow activity to a sub flow, which is required.
to the right side of the activity.
This mark means that you have not yet linked the Run Sub
Flow activity to a sub flow, which is required. - Click on the exclamation mark to
the right side of the Run Sub Flow activity to enter
sampling mode. You will know you are in sampling mode because your mouse cursor will
change to the sampler icon .
- Now click on the Start activity at the beginning of the target sub flow. If you are linking to an external process flow, you can click anywhere inside a sub flow window to link to that sub flow.
- The Destination property will update to show the sub flow to which it is now linked. You can edit this property if needed.
Picklists That Link to Sub Flows
Some properties on fixed resources have menu options (picklists) that can initiate a sub flows. For example, the Send to Port property has a menu option that allows you to reference a sub flow. You could possibly use this sub flow to implement logic that will determine which output port should receive a flow item.
You could also use a picklist to reference a task sequence sub flow. For example, you can change a processor's settings so that it will use a task executer during its setup time or processing time. If you need a task executer to complete a more complex series of tasks during setup, processing, or transportation, you could create a task sequence on a process flow. Then, you could use the select ProcessFlow: Use Task Sequence Sub Flow on the processor's setup, processing, or transportation properties to initiate that task sequence.
Multiple Start or Finish Activities
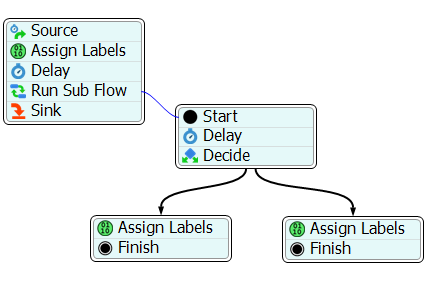
A Start activity may be connected to multiple Finish activities, as shown in the example sub flow in the following image:
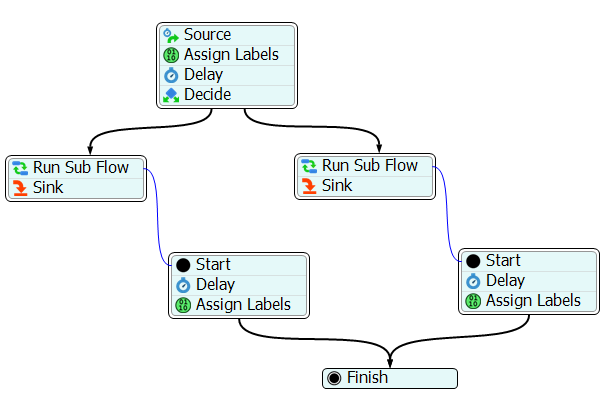
In that same vein, multiple Start activities may share the same Finish activity. Technically, each Start activity would be the beginning of a different sub flow. The following image shows an example of this kind of sub flow:
Key Concepts About Parent-Child Labels
Before reading this section, make sure that you understand the definitions of parent token and child token, as explained in the section about How Sub Flows Work.
One of the advantages of using sub flows it that it will allow you to create links between the labels on parent and child tokens. You can possibly set a child token to update the labels on the parent token (and vice versa) during a simulation run. Ultimately, the relationship you build between the labels on parent and child tokens will have a big impact on the logic of your process flows. For that reason, you should think carefully about the logical relationship you want the parent token on the main process flow to have with the child token(s) on the sub flows:
- Should the child token be independent of the parent token or will it have a dependent relationship? Will the parent token need to access data (labels) from the child token in the sub flow at any point? Or will it merely start a chain reaction of events that will run separately from the main process flow?
- Should the child token have access to the labels on the parent token, and, if so, what kind of access? Giving the child token access can reduce the need to create unique copies of the parent's labels, which helps avoid duplicating data. Also, if the child token's logic is governed by a parent label, then you can change the behavior of all of the children by changing a single label. This helps you keep your logic more centralized.
Label Access Rules and Strategies
The Label Access rules and strategies are explained in more detail on the Create Tokens activities reference page. Pay particular attention to the Create As and Label Access properties and the subsequent properties listed there.
Viewing Parent/Child Relationships on the Token
Once a parent/child relationship has been created, the parent token will display the number of children it has in the process flow view by default. You can change these settings on the Process Flow Properties page if needed. See Changing Process Flow Visuals for more information.

Viewing Labels
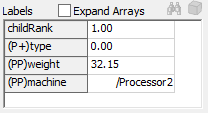
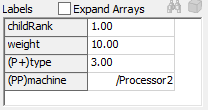
If you click on a child token, the Quick Properties will display all of the labels owned by the child token as well as any labels from the parent token that the child has access to, as shown in the example in the following image:
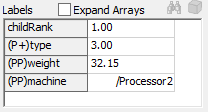
If a label is not accessible to the child, it will not display in this list.
The following table explains the meaning of the symbols on these labels:
| Symbol | Meaning |
|---|---|
| (P) | The label is owned by the parent |
| (PP) | The label is owned by the parent's parent (grandparent), and so forth. |
| + | When it is next to the P, it means that the child token has the ability to write (set) the label. |
For example, in the example from the image above:
- Setting the type label on the child would cause the type label to be set on the parent token.
- Setting the weight label on the child would cause a weight label to be added to the child. The child would no longer have access to its grandparents weight label as reading the label would read it off of the child.
Accessing Child/Parent Tokens
To access a parent token, enter the following in a property field:
token.parent
Child tokens can be accessed by rank through the parent using the command:
token.children[1]
To get the # of children the parent has:
token.children.length