Module Development
Overview and Key Concepts
This document contains details about module development. It is very long and dense with information, all of which is important in understanding how modules work. You should not skim through this document; read it thoroughly before diving into module development.
FlexSim 5.1 introduced a new set of functionalities in FlexSim called modules. Modules represent a collection of technologies that provide a highly flexible way to customize FlexSim functionality, libraries, and objects. They make it easier to maintain and update that functionality across the products' lifetime. Here at FlexSim, modules help us better manage and develop our different products. However, we make module development freely available for use by any FlexSim distributors and users with an enterprise license of FlexSim who see an opportunity for customized functionality.
Module Capabilities
Modules allow you to add functionality to FlexSim. They are the mechanism we use at FlexSim to add powerful features, such as
- Process Flow
- Conveyor
- AGV
- AStar
- Product Tour
- FloWorks (made by Talumis BV, using the Module SDK)
Each of the above features is defined by a module. Each of these features was created using the same resources available to you as a module developer. As a developer, you can design a module to do any or all of the following tasks:
- Incorporate custom or 3rd-party C++ libraries into FlexSim - you can include a C++ library in a module, and then expose that library's functions (or even objects) to FlexSim.
- Add new objects to the 3D library
- Create new FlexScript commands or classes
- Create custom draw code using Direct2D or similar API - ProcessFlow draws its view this way
- Add new user interfaces
- Simplify and extend the existing user interface, including file menus, toolbars, etc.
While modules are very flexible and powerful, making a module can be challenging. If you wish to create a module, you should be very comfortable with FlexSim's tree structure, and, if you want to create an accompanying DLL, you should have a moderate to advanced understanding of C++.
Background
Before FlexSim 5.1's release there were two primary methods for defining custom libraries and functionality in FlexSim: the User Library Method and the Direct Method. Modules were designed to combine the advantages of both methods.
User Library Method
In this method the library developer customizes standard library objects and then adds them to a user library. Further customization of things other than object sets is performed through scripting that fires when the user library is loaded, or when a new model is created, etc.
The primary advantage of this method is that it is relatively easy to maintain over time. When there is a new FlexSim release made, the user library will automatically update with few if any major hiccups. It's also easily pluggable. You just load the library into FlexSim and off you go.
The disadvantages of this method, however, are two-fold. First, the developer is somewhat limited in what he can customize easily. If you're only developing an object set, it's not too bad, but if you want to customize the user interface more aggressively, it becomes very hard because you have to do a lot of scripting to replace various UI windows, customize command code, etc. So for each UI customization you have to create a script that installs that customization into the FlexSim tree. The second disadvantage is that the user library mechanism is very modeler-centric. Its mainly meant for a modeler who creates his cool customized processor, and then adds it to his library so he can later reuse that processor in other areas or models. It doesn't cater very well to developers who want to develop and maintain a specific object set, and be an ongoing provider for their customers. User library objects often use labels for their logic, which infringes on the "end user's space," and if they decide to use the object variables, then they must reference the variables by name, which can be slow.
Direct Development
The second method for custom development is to just develop directly in FlexSim's project and view trees. This is the method that FlexSim used to develop its original FlexSim HC product in the mid 2000s. The idea is to essentially develop directly in FlexSim's project and view trees, creating and maintaining your own defaultproject.fsp and defaultview.fsv files.
This method essentially swaps the advantages and disadvantages of the user library method. First, it provides ultimate flexibility in customizing user interface, library object functionality, and everything else associated with building models and interacting in FlexSim. Objects can also be developed through the more clean standard library method, using C++ object oriented methods, etc.
On the other hand, C++ object development requires compiling the content dll, and since you're taking ownership of the tree files yourself, you need to essentially provide your own install, meaning that the customized functionality isn't pluggable. The other main disadvantage of this method is maintainability. If FlexSim makes a new release of its main product with lots of cool new features that you want to integrate into your custom solution, then you essentially have to start from square 1. This is one reason it took over a year to update FlexSim HC to use FlexSim 5's new features.
Modules
Given the inherent advantages and disadvantages of the two development methods described above, we at FlexSim felt we needed a new solution that both allows for ultimate flexibility in customizing user interface and functionality, so that a FlexSim HC product could have the capability to completely redesign the user's interaction with FlexSim for stream-lined, industry-specific modeling paradigms, while still being able to maintain the functionality, easily integrating newer main-line FlexSim releases into industry-specific products, as well as holding out the option of making such products "pluggable" into the main-line product, so that users could mix and match the functionality that they need. This is the need that brought about the module technologies.
Note: Even though the module technologies allow for much easier maintenance of custom development, this is not to say that by using modules your customized development will automatically be forward-compatible indefinitely. Quite the opposite. By choosing to use the module technologies, you are committing yourself to actively maintain your module as FlexSim makes new releases. The module technologies just make the updating process easier than they would otherwise be for highly aggressive UI customizations. It does not make updates automatic, and in many cases the updating process will still be quite manual. If you would like to create custom objects and have those objects automatically work in future versions of FlexSim, your best option is to use user libraries, not modules.
Getting Started with Modules
Now we'll take you through getting started using modules. If you are developing a module, I would suggest the following:
- Use your own custom FlexSim install folder. Copy the FlexSim folder in program files into your own folder specifically used for your development. I suggest also that your copied development folder be within your My Documents directory, so you don't get any write permissions issues.
- Make sure you have a merge/diff tool. Currently we at FlexSim use Git for our source code management (GitExtensions as the windows front-end), which includes a diff program called KDiff3. You can also use a stand-alone tool like WinMerge. You will need a diff tool to analyze the changes that you or FlexSim make to various XML files.
- Review FlexSim's XML schema, which is documented in the user's manual. Additionally, you should be familiar with how FlexSim's project and view trees are structured; unfortunately, this is just a figure-it-out-on-your-own thing, because we have not documented where functionality is located in the project and view trees.
OK, let's get started. First, we need to add a toolbar button that will save the default state of FlexSim. To do this, create a custom button on the toolbar (through the Global Preferences window) and add applicationcommand("savedefaultviewproject") as the code.
This command goes through the tree and restores your session to its "pristine" state, and then saves defaultproject.fsx and defaultview.fsx as XML tree files. Once you've added this to your user toolbar, hit the button. Look in your FlexSim/program folder and you'll see those XML files. Save copies of both so that you can later compare them to subsequent saves. When this tutorial asks you to save defaults, it means saving the defaulview and defaultproject, rather than the model.
Next, follow these steps:
- Add a node at VIEW:/environment/dev, and give that node number data and set it to 1. This will turn on "developer mode" so you'll have an extra "Modules" right-click menu in the tree view.
- In the tree, go to MAIN:/project/modules. Add a subnode and name it "testmodule".
- Inside of testmodule, add a sub-node and name it
"installdata".
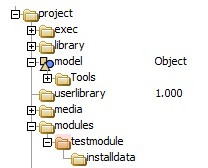
- In windows explorer, go into your FlexSim\modules directory and add a directory named "testmodule". In version 5.1 the FlexSim\modules directory does not exist, so you'll need to create it also.
- Back in FlexSim, close all the windows and hit your user toolbar save button.
- Finally, close FlexSim.
Now if you look in your FlexSim\modules\testmodule directory, you should see a testmodule.fsx and a testmodule.t file. These two files are the same tree, just in different formats. The .fsx file is meant for development purposes, so you can use the XML format for revision control, and the .t file is for distribution purposes. They are essentially that MAIN:/project/modules/testmodule node, saved off as a tree file.
Whenever FlexSim saves defaultproject.fsx or defaultview.fsx (i.e. when you press the new toolbar button), it first goes through MAIN:/project/modules and takes those nodes out of the main tree, and saves them into directories in FlexSim\modules, based on the names of the nodes (it also does some module "packing" logic, but we'll talk about that later). Then, whenever you open FlexSim, it will go through all sub-directories in FlexSim\modules, and it will find any files named <modulename>\<modulename>.fsx or <modulename>\<modulename>.t, and it will load those nodes into MAIN:/project/modules (as well as do some "unpacking" logic, which again we'll talk about later). The end effect is that when you put stuff into MAIN:/project/modules, then save off the project and view, the defaultproject.fsx and defaultview.fsx files remain unchanged from the original (you can check that with your diff tool).
Adding a Node "Addition" to the Module
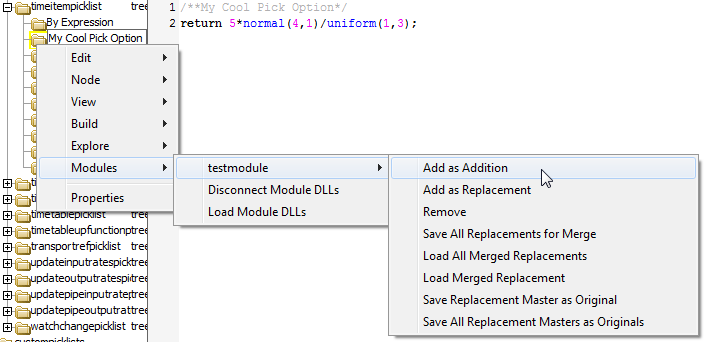
OK, now lets start adding stuff to our module. Open FlexSim and go into the tree view. Let's say that we want the module to simply add a pick option to the set of options for a processor's process time pick list. In the tree view go to VIEW:/picklists/timeitempicklist and add a sub-node somewhere in the pick option list. Give it the name "My Cool Pick Option", and the code:
/**My Cool Pick Option*/
return 5*normal(4,1)/uniform(1,3);
Next, right-click on that node in the tree, and choose in the
right-click menu Modules > testmodules > Add as Addition.
This
essentially tells FlexSim that the node you just added should be part
of
the module. The "as Addition" part means that you just added a new node
to the tree, you didn't change an existing node in the tree.
Next, close all windows and hit the custom save button again on your user toolbar. Now if you look in the XML of the FlexSim\modules\testmodule.fsx file, you should see that your script has been added to the module tree file.
Adding a Node "Replacement" to the Module
The first module change was an "Addition" operation, meaning the module adds a new node to the tree that did not exist previously. The other option for a module is to add a "Replacement" operation. This is where you want the module to change the data and/or sub-tree of a node that already exists in FlexSim. Say, for example, you don't like the default value in the "Statistical Distribution" option of the processor's Process Time pick list. Instead of a mean value of 100, you think it should be 200. So you can make it so that your module replaces the "Statistical Distribution" node in the tree.
To do this, go to VIEW:/picklists/timeitempicklist/Statistical Distribution.
Right-click on the node and choose Modules >
testmodule > Add as Replacement.
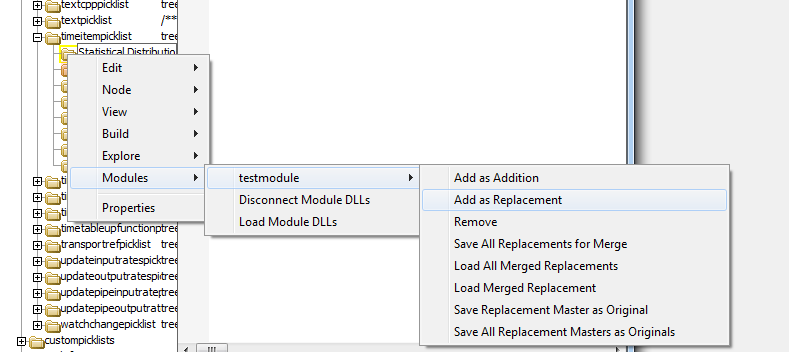
Once you've added the replacement operation, change the 100 to 200. Note that for a replacement operation, it is important to first add the node to the module, and then make the change, not the other way around. We'll talk about why later on. A replacement operation applies to the node you are replacing, as well as all its sub-nodes and object attribute nodes.
For both replacement and addition operations, in
developer mode the node and its sub-nodes will be highlighted according
to the module it belongs to. For example, if you've loaded multiple
modules, nodes for the first module will be highlighted red, nodes for
the second will be green, nodes for the third will be bluegreen, etc. You
can also click on the node and it will show the name of the module it's
associated with and a path to a node in the module that it packs to.
For example if you click on the "My Cool Pick Option" node, to the left
of the node you should see the text "testmodule add /1/1". This means that the
node is an addition operation in testmodule, and the path from
installdata to the node associated with it in the module node is /1/1
(we'll talk about module internals later).
Packing/Unpacking Logic
As mentioned before, when FlexSim saves off the project and view, it first saves off the module nodes to their respective module directories, then removes those nodes from the main tree before saving the main tree. However, it also does some packing and unpacking logic as well. By "packing" we mean that FlexSim goes through and moves all of the nodes that you've added as part of your module into the module node and, for replacements, puts the original, unchanged node back into its original place. By "unpacking" we mean that FlexSim takes all that module information that is stored inside your module node, and puts it into its appropriate location in the project or view trees.The idea is that when you do a save, as long as all of your changes to the project and view trees are properly added to your module, all those changes will be saved into your module tree, and defaultproject.fsx and defaultview.fsx will remain "pristine." So all module changes are truly modular. If you remove your module directory (or just rename it) and open FlexSim, everything will load as if your module was not present. Put the module directory back in its place, and FlexSim loads with all your customizations. Below is the order in which these operations are done when you do a save operation on defaultview or defaultproject:
- Pack modules
- Save module nodes
- Remove module nodes from the project tree
- Save the project or view tree
- Place module nodes back in the project tree
- Unpack modules
When FlexSim first opens, it goes through the following load steps:
- Load defaultview and defaultproject
- Traverse the FlexSim\modules directory, loading module nodes into MAIN:/project/modules
- Unpack modules
Because the module load step happens as part of the tree load step, we avoid any chicken-egg issues that you might get with dynamically loaded user libraries, such as flexscript code that calls module-specific commands, etc. The modules are loaded as if their components were part of defaultproject defaultview, so they integrate automatically into FlexSim's load sequence. For this same reason, once modules are loaded, you cannot "unload" or "reload" them. FlexSim has a command-line option called /excludemodules where you can define comma-separated module names to exclude from the load, or "all" to exclude all modules (this command-line option may only be available in versions after 5.1).
Additional Rules and Caveats
Using the addition and replacement operations, the modules mechanism allows you to customize data and logic in any part of the project or view tree. However, the following caveats apply.
- We have not yet added a "removal" operation, where you might want your module to remove a node that exists in the tree. We may provide this in the future, but for now you can always do a replacement on the node above the node you want to remove, and then just delete the node.
- You should not replace or remove C++ toggled nodes unless you plan on doing your own build and distributing your own custom installation. The code for all C++ toggled nodes has already been compiled into FlexSim's content dll (FlexSim\program\FlexSimcontent.dll) which is installed with FlexSim, so your changes would have no effect. Also, the binding logic defined in the dll, where the dll binds specific nodes to their associated C++ global functions, is based on the order in which the nodes are visited in a depth-first search of the project tree. This means that if your module removes (or adds) a C++ toggled node to the tree, but uses the same dll delivered by FlexSim, everything will break because all C++ nodes visited after that node in a depth-first traversal will be bound to the wrong C++ function.
- For the same reason as the previous point, you cannot change any code in library objects' C++ methods unless you plan on creating your own install. We'll talk about customized C++ behavior later.
- Any nodes that are replaced or added must be addressable by a uniquely defined, named node path in the view or project tree. For example, you cannot replace a node whose name, or whose ancestor may have a name something like "Options / Parameters". Since the / character has special meaning in FlexSim's path syntax, you cannot get a unique named path to that node because the / character will throw the path off. Also if you have multiple nodes with the same name in a sub-tree, you can technically only replace the first node of the set, because the path to all those nodes are the same, and that path would always address the first node. However, this doesn't mean that you cannot change the name of the node once you've added it to your module. Once it's added to the module, you can do whatever you want with it.
- You should only do replace and addition operations on nodes that you know are "static" in the project, i.e. they're not being removed and replaced regularly. For example, you shouldn't have any replace/add operations for nodes inside the model tree, because the whole model tree is replaced whenever you create a new model. Instead you should add scripting nodes to the project that add module-specific nodes to the model when a new model is created.
- Unfortunately the module UI's error-checking mechanism is minimalist at this point, so in many cases you'll need to police yourself on these rules.
Module Internals
To give you a better idea of how the module packing/unpacking
logic works internally, let's look at the module node's structure.
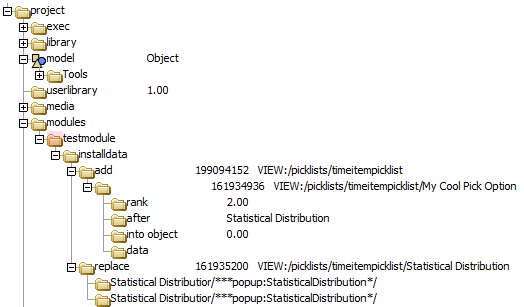
All
packing and unpacking data is stored in the module's installdata node.
This node must be the first node inside the module. First, let's look
at the addition operation.

When you add an addition operation, FlexSim adds a node into installdata that points to the parent node of the node you're adding, and then adds a record inside of that node representing your node. Any other addition operations with the same parent node will be appended inside this parent node. Sub-nodes tell what rank to put the node, whether it needs to be placed in the object data sub-tree, and there is a node where the actual node will be placed when the module is packed.
Now let's look at the replace operation.

When you add a replace operation, FlexSim creates a replace node in installdata that points to that node, and then creates two copies of the node inside the replace node. The first copy is the "original" copy, and the second copy is the "master" copy. Whenever the module is packed, FlexSim swaps the master copy out with the node that you have changed in the tree, so your customized node is placed in the second position before the module is saved. Whenever the module is unpacked, FlexSim swaps your custom node out to the tree and puts the master copy back into the second position in the replace node. The following diagram shows the correct process:
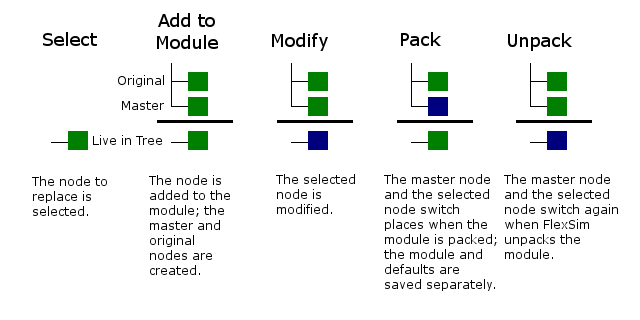
Usually the master copy is the exact same as the original copy, except when you update to a newer version of FlexSim, in which case the master copy may have changed from the original. The original copy is used specifically for this purpose, namely so you can use it to merge changes in newer versions of FlexSim into your module.We'll talk about this in detail later. Also, because of this usage, the original copy is removed before saving the distribution copy of the module node <modulename>\<modulename>.t, so technically testmodule.fsx and testmodule.t are not exactly the same because the original copies of replace operations have been removed from testmodule.t.
For the above reasons, it is important to make sure that you first add the replacement operation to your module before making any changes to the node, because you want the original and master copies to be the correct, "pristine" version that FlexSim distributes, not your changed version. The following diagram shows the incorrect process:

If you accidentally made a change in the tree before adding the node as a replacement, then the master copy will be "dirty", and when you save defaultproject and defaultview, they will be saved in a "dirty" state from FlexSim's distribution.
You can always fix this by doing the following:
- Close FlexSim.
- Replace defaultproject and defaultview with the copies that you made at the beginning.
- Open FlexSim again.
- Right-click on the replace node in the tree (not in installdata, but in the replace location) and choose Modules > testmodule > Save Replacement Master as Original.
Replacing defaultproject and defaultview resets the target node so that when the module is unpacked, the "pristine" node is swapped into the master spot. Since this happens when FlexSim loads, all that remains is to copy the master node into the original node, which happens in step 4.
While fixing this mistake is easy, you should be very careful about doing this too haphazardly. By the fact that you are saving off defaultproject and defaultview, you are creating a fail-safe for yourself, in case you've made changes in the tree that you forget to add to your module. If you make changes and forget to add them to your module, it's OK, because those changes are still saved when you save off defaultproject and defaultview. However, if you frequently replace defaultproject and defaultview with your pristine copy, you may be inadvertently erasing changes that you forgot to add to your module. It is therefore a good idea to regularly do a diff on defaultproject and defaultview with the pristine copy, to see if there are any changes you've made that you've forgotten to add to your module. You should definitely do this before replacing defaultproject and defaultview with your pristine copies. Now, traversing the diff can be challenging because it can be difficult to read the XML. But you just have to bite the bullet and get familiar with the XML format, and get familiar with your diff tool, because you will be using it a lot. You might also want to use the .ffm (FlexSim File Map) format, explained in the user manual, to split up defaultproject and defaultview into different sections, because there may be some differences that are just noise (i.e. in VIEW:/active or sometimes in the model tree if your module initializes a new model with a lot of extra stuff), so by splitting out different parts into different files, you can ignore certain files that you know you haven't changed.
Maintaining Your Module
OK, now let's say you've finished development on your testmodule, which adds an innovative new "My Cool Pick Option" to the Processor's Process Time pick list, and makes the default "Statistical Distribution" mean 200 instead of 100. The module is built off of FlexSim's X.0 release (X being some version like 6, 7, 8...). Now FlexSim releases a new version X.5. You want to make sure that your module works right with FlexSim X.5 and properly integrates any improvements. Since you've only made minor changes to a couple pick options, your module should just automatically update to the new version. That is, unless version X.5 also makes improvements or adjustments to the Process Time pick list.
I should say here that FlexSim reserves the right to make any change to defaultproject and defaultview it deems valuable. We try hard to preserve backwards compatibility primarily for FlexSim models and secondarily for user libraries. But we also try to aggressively improve user interface and add features, and if that means changing the way that the project and view trees are structured, then so be it. We may change some of the options in the Process Time pick list, or we may even move the entire VIEW:/picklists/timeitempicklist node to a different location in the tree, or get rid of it altogether if we decide to use an alternative/better option than pick lists. Now, this is not to say that we are specifically planning to move this pick list any time soon. There is a wide range in regards to how "volatile" a certain location in the tree is. Some features that are relatively new require a lot of adjustments and refactoring, hence somewhat frequent restructuring in the tree. On the other hand, some older features have ossified and are no longer being changed much, either because they are mature or because we need them to remain as they are for backwards compatibility purposes. Or there may be older features that receive new attention, and so refactoring is revived in those areas. The point is that these things remain within FlexSim's discretion as to what will be changed. We expect module developers and maintainers to be in contact with us when we make a new release, to communicate on what structural things have changed, and how those changes will affect their modules. We will not have some verbose list of every single change that has been made to the tree, because first off it would be a hassle for you to search such a long list and figure out what changes apply to your module, and secondly we try not to hamper our development process with extra work in keeping track of every minute change that we make unless we see it as affecting models' backwards compatibility in some way. However, the modules functionality was specifically designed to help you identify those issues, so that when a new release is made and you try to update, you can see specific errors or changes and then get with us saying, "Hey this new version causes errors on my module in this specific spot. What's that change and how do I update my module so it works again?" Then we can go in and remember, "Oh yeah, we made this change for this reason, here's what we changed, and here are some options for updating your module."
OK, let's get back to the module maintenance. Your module should update with no hitches, unless of course version X.5 also makes changes to the Process Time pick list. The way to update the module depends on the kind of change in the new version.
The first possibility is that the path to one or more of your replacements changes in a new release, such that the path saved in the module is invalid. In this case you will get an error when you load FlexSim that says that the location of the module operation was invalid. This will allow you to analyze that location, see what has changed, email FlexSim development and ask us what's changed and why, etc.The second possibility, and this applies only to replacement operations, is that the path to the node remains unchanged, but that FlexSim's new release changes the data and/or sub-tree of the node. In some cases, the module can still replace the node with your custom node without a problem. But in other cases FlexSim may have made changes that are inter-dependent with other changes in the tree, which you haven't replaced, or they may have fixed bugs in places where you haven't really touched much. In such cases you may want to merge those changes into your module replacement node. Below is a diagram describing this operation:
Now, here is where all of that master and original stuff comes into play, because if you originally built your module in X.0, and then load your module in X.5, then the above diagram could be contextualized as follows:
For each node that you have replaced in your module, you have both the original copy, or the node as it was in version X.0. You also have the master copy, which is the node as it is in version X.5. Finally you have your testmodule version, or the node as you have changed it. Your job is to integrate the changes from version X.0 to X.5 into your testmodule version, creating a new merged version.
Let's set up an example. Let's say that from version X.0 to X.5 FlexSim decided that it wanted a comment in the "Statistical Distribution" option in the Process Time pick list. We first need to find out that the change was made, and second figure out how to merge it into our testmodule. Let's set up the example.
First, we'll emulate the X.0 to X.5 change. Follow the steps below:
- Close FlexSim.
- Change the name of FlexSim\modules\testmodules to some other name so that the module doesn't load when you open FlexSim.
- Open FlexSim
- Go to VIEW:/picklists/timeitempicklist/Statistical Distribution
- Insert a comment on line 2 that reads: // Different stuff is here.
- Hit your save button on the user toolbar
- Close FlexSim.
- Rename FlexSim\modules\testmodules to its original name.
- Open FlexSim again.
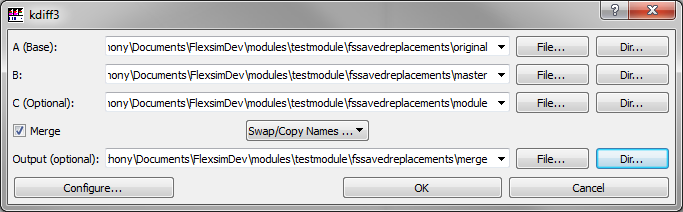
Now, for that replacement operation on VIEW:/picklists/timeitempicklists/By Expression, we have the X.0 version stored in the installdata as the original, we have the X.5 version stored in the installdata as the master copy, and we have our testmodule version stored in the tree. To start the merge, right-click in the tree view, and choose Modules > testmodule > Save All Replacements for Merge. Now go into the FlexSim\Modules\testmodule directory. FlexSim will have created a new directory called fssavedreplacements. In there you'll find 4 subdirectories, one representing each of the 4 boxes shown in the previous diagram, namely original, master, module, and merge. The merge directory will be empty, as this is the directory where you will place your merged copies. Each directory will contain one or more XML tree files, each file representing a specific replacement operation in the module. In our case there should only be one file, namely the file corresponding to VIEW:/picklists/timeitempicklist/Statistical Distribution. Our job is to take the original, master, and module copies, and from those create a merged copy that we can then load back into FlexSim. So let's do it.
As mentioned above we at FlexSim use Git for our revision control, and a diff tool called KDiff3. It is pretty powerful but can be daunting for even expert programmers, so I advise at least skimming through the manual when you have time. You can download KDiff3 independently. We'll use it in this example.
Open KDiff3. You should get a dialog that asks you to specify paths to files or directories you want to diff. You'll see three fields, named A, B and C respectively. For A, specify the directory to the fssavedreplacements\original directory. For B, specify the master directory. For C, specify the module directory. Next check the "Merge" box, and define the output as the merge directory. Then hit OK.
KDiff will do a diff analysis to analyze changes.
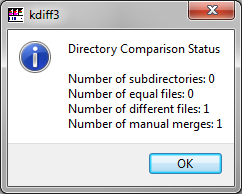
This essentially says that it found 1 file that was different, and 1 merge that you'll want to check. Click OK. Next, go to the main menu and choose Directory > Start/Continue Directory Merge. In the subsequent dialog, press "Do It". This will take you to the change that it wants you to check.
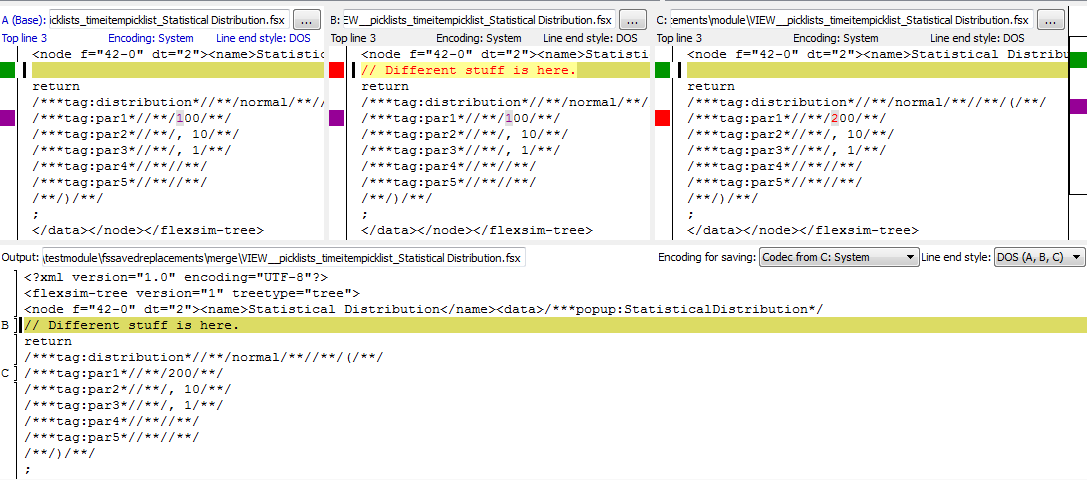
The top pane represents the 3 versions that we started with, and the bottom pane represents the proposed merged version. The top left represents the original A, the top middle represents the master B, and the top right represents your module C. KDiff highlights the areas that are being changed, i.e. the comment is added, and the change from 100 to 200. Note that in the bottom pane the merge essentially gets it right. The 100 value is properly changed, and the comment is added.
At this point there are only a few steps left:
- Hit the save button at the top; we should see that KDiff has saved the file into the FlexSim\modules\testmodule\fssavedreplacements\merge directory.
- Go back into FlexSim, and in the tree's right-click menu choose Modules > testmodule > Load All Merged Replacements. This will load any files in the merge directory into their corresponding replacement nodes in the tree.
- From the same menu, choose Save All Replacement Masters as Originals
Once the merged replacements have been loaded, you can save your module using the toolbar button, and merged replacement will be saved with your model. Because we saved the replacement masters as originals, a merge to a future Y.0 FlexSim will start from X.5 instead of X.0.
I should say that in this example KDiff3 handles the merge pretty seamlessly. In some cases the merge may be much more difficult, especially if the changes span across multiple nodes in the tree. In such a case it may be more practical to simply use KDiff3 to only identify changes from X.0 to X.5, and then do the merge from within FlexSim, by copying and pasting code and/or nodes directly from the master copy to the module copy. But the modules mechanism at least allows you to very quickly identify where things need to be merged.
Best Practices
There is still a lot to be worked out regarding best practices for implementing modules in such a way that when multiple modules are loaded simultaneously, they don't "fight" with each other, or so that one module doesn't inadvertently "hide" the needed UI elements of another module. We expect that some of this will come naturally as we start developing modules. One thing that you can do to easily avoid such issues is, when it is an option, to place data specific to the module inside the MAIN:/project/modules/<modulename> node itself. The installdata node needs to be there, but you can also place anything else in there that you like, and by the fact that it's already inside the module node, you don't need to add it to your module. Also, we've added a node at VIEW:/modules so if you create new UI windows as part of your module, just add a node into VIEW:/modules, name it your module's name, and add it to your module as an addition. Then just start adding GUIs inside that node. This will better avoid conflicts between modules.
Using File Maps to Split the Module Tree File
Here at FlexSim we've found it very useful to split tree files up into multiple different files using a FlexSim File Map (.ffm). This has two main advantages. First, it allows us to filter out any noise changes for a cleaner revision control, since there are often certain parts of the tree that just get changed as you interact with FlexSim, without you intentionally making changes. Second, it allows us to have multiple developers working on different areas of the same project while minimizing the likelihood of merge conflicts.
For this purpose we added some features to the module structure so that you can more easily split your module up into different pieces. Since all your additions and replacements will be saved inside the installdata node, we give you flexibility to do at least some management of the installdata sub-tree.
First off, the packing/unpacking mechanism will only look for nodes in installdata whose name starts with either the text "add" or the text "replace". We also reserve the name "remove" for future development. If it sees a node that starts with none of these names, it will simply ignore that node. This means that you can rename a "replace" node to "replace_experimenter" or some other name, and FlexSim will still interpret it as a replace operation, as long as the first letters of the name are "replace". This allows you to define your own name so that the operation will have a uniquely named path that you can use in your file map to split up different nodes that may be even deeper inside the installdata sub-tree.
Secondly, given the nature of the packing/unpacking logic, the order in which the nodes appear inside installdata should not matter.
These two behaviors allow you to add your own sub-nodes into the sub-tree of installdata and give them your own names, then move different add or replace records up or down in the tree to group them into logical groups that you define, and then use a file map's "split-points" method to split the module tree how you want it to be split.
Implementing Module DLLs
The modules functionality also allows you to customize C++ functionality by implementing a DLL associated with your module. This DLL is similar to standard user DLLs, but with some differences. For starters, module DLLs are loaded when FlexSim starts. Also, using a module DLL, you can implement C++ inheritance of standard library objects, so object development in a module DLL is almost identical to C++ object development in the standard library. Hence if you are going to implement a module DLL, you should be familiar with how the standard library objects work, their methods, etc., and be familiar with C++ inheritance, class methods, etc. Another difference is that when a new version of FlexSim is released, user DLLs do not need to be recompiled, whereas module DLLs will need to be recompiled using the new release's header files.
Let's do a DLL example with testmodule. There is an empty module project in the FlexSim Module SDK, called module_template. Simply copy and paste that file in to your testmodule directory. You may want to rename this folder testmoduleDLL or something like that, but the name is otherwise unused.
You should then open the .sln file in the copied directory using the latest Visual Studio. Once it's open, open the Solution Explorer, which is usually a tab on the side. Right-click the module project, and open it's properties. Be sure to change the Target Name from $(ProjectName) to testmodule, or the name of your module. As a final check, build the solution. It should build without any errors.
In our module, we'll create a slightly customized TaskExecuter. So we'll create a class that inherits from the standard TaskExecuter, but for its offset, it will just travel the x portion of the offset. There are several steps to creating a module class, as follows:
- Add a .h and .cpp file with the name of your class (MyTaskExecuter).
- The header file should look like this:
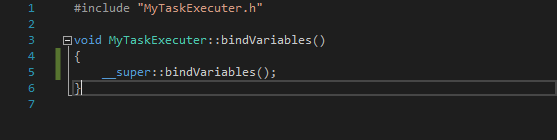
- In MyTaskExecuter.cpp put the following:
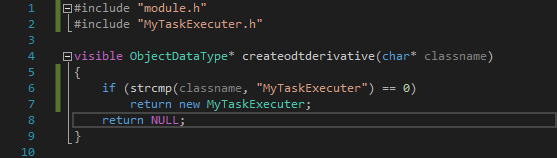
- In the module's primary cpp file (module.cpp), in the createodtderivative() function add a line of code to return an instance of the new class. The function should look similar to this:
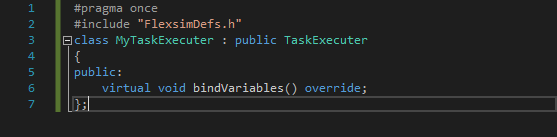
Next, we'll override the beginOffset() method of the TaskExecuter. To do this, first find the declaration of that method in allobjects.h using Visual Studio's find (ctrl-shift-f) to find "beginOffset". Paste it into your class definition, and take off the DLL_FUNCTION piece. Also, add a variable called xOnly. The resulting class definition should look like the following:
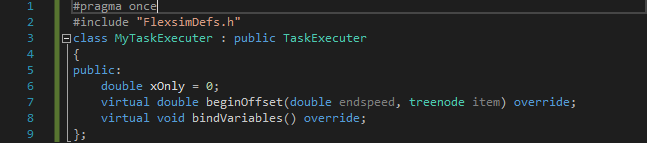
Now go into mytaskexecuter.cpp, and add that method definition. As background, the TaskExecuter has a double[3] member called offsetloc, which is used in defining the location that needs to be offset to. The TaskExecuter also has a method called beginOffsetDefault(), which is a default implementation of beginOffset. So in our method implementation, we'll simply set the y and z components of offsetloc to 0, then call beginOffsetDefault(). The final method implementation should look like the following.

Now build the DLL. At this point the DLL is ready to be integrated into FlexSim, so now we'll go into FlexSim and add the new class to the library. Do the following:
- Open FlexSim.
- In the tree view, go to the library. Copy the TaskExecuter, and the add a node right after it and paste your copy onto that node.
- Rename the copy to "MyTaskExecuter."
- Add it to your module as an Addition.
- Clear the object's variables sub-tree (but don't delete the variables node).
- Clear the object's behaviour sub-tree (but don't delete the behaviour node).
- Inside the object's classes attribute, change "TaskExecuter" to "testmodule::MyTaskExecuter."
- Inside the object's superclasses attribute, change "Dispatcher" to "TaskExecuter."
- Inside the object's variables attribute, add a subnode called xOnly, and give it the value 1
- Create a new model, and use the Save Defaults button
- Close and reopen FlexSim
Now in your library icon grid you can drag your MyTaskExecuter object out into the model, connect it to other objects just like you would any other TaskExecuter, and you should see that the object will only travel the x portion of the offset. So it's using our inherited class method in its beginOffset implementation. To be sure, open the tree of the task executer in the model, and change its xOnly node (in the variables attribute) to 0. The task executer should behave normally now.
Other Things to Know
DLL Details
As shown in the example above, to define a library object as being implemented as part of a module DLL, define the class as <modulename>::<classname> in the object's classes attribute. Also, if you want to toggle a node as DLL and have it reference a function in your module DLL, like you would do in a regular dll, then you need to specify in the text of the dll-toggled node, between the quotes that define the dll to use: "module::<modulename>". For example, if I have a DLL function called myfunc in the testmodule DLL, and I want a DLL-toggled node to link to that function, the text of the node should be as follows: dll: "module::testmodule" function: "myfunc". Otherwise the procedure is essentially the same as for regular DLL's.
Module Dependencies
If your model uses objects or functions from a module, it is dependent on that module. This dependency is saved in the Tools folder of the model tree. There are two application commands that deal with model dependency:
- applicationcommand("assertmoduledependency")
- applicationcommand("ismodeldependent", moduleName)
The first command ensures that the appropriate dependency is created. This happends automatically when you drag a module object from the library into the model. However, many circumstances require you to create the dependency manually. The second simply returns a true or false value if the model depends on the named module.
Updating to a New Version
As mentioned before, whenever FlexSim makes a new release, you will need to recompile your DLL with new header files and libraries. Follow the steps below to update the files:
- Navigate to your module's flexsimcontent directory (flexsim_dev_dir\modules\moduleName\dll_folder_name\flexsimcontent).
- Delete the old flexsimcontent files from your module's flexsimcontent directory.
- Copy the files from FlexSim\program\system\include to your module's flexsimcontent directory.
- Copy flexsim.lib from FlexSim\program\system\lib to your module's flexsimcontent directory.
- Re-compile your DLL.
Again we will reiterate that FlexSim reserves the right to make changes to the standard library as it sees fit, which means we may change methods that are available to module DLLs or do other changes, so your update process may not be as simple as just moving the right header files in. We expect you to get with us if you are having problems updating your module DLL, so we can communicate on what has changed and how to adjust module DLLs accordingly.