Using the AGV Process Flow Templates
Overview and Concepts
To make AGV simulations simpler, FlexSim provides several pre-built AGV process flow templates you can use with your AGV simulation projects. These process flow templates include pre-built sophisticated logic that makes it relatively easy to simulate many if not most AGV systems. The set of available process flow templates are:
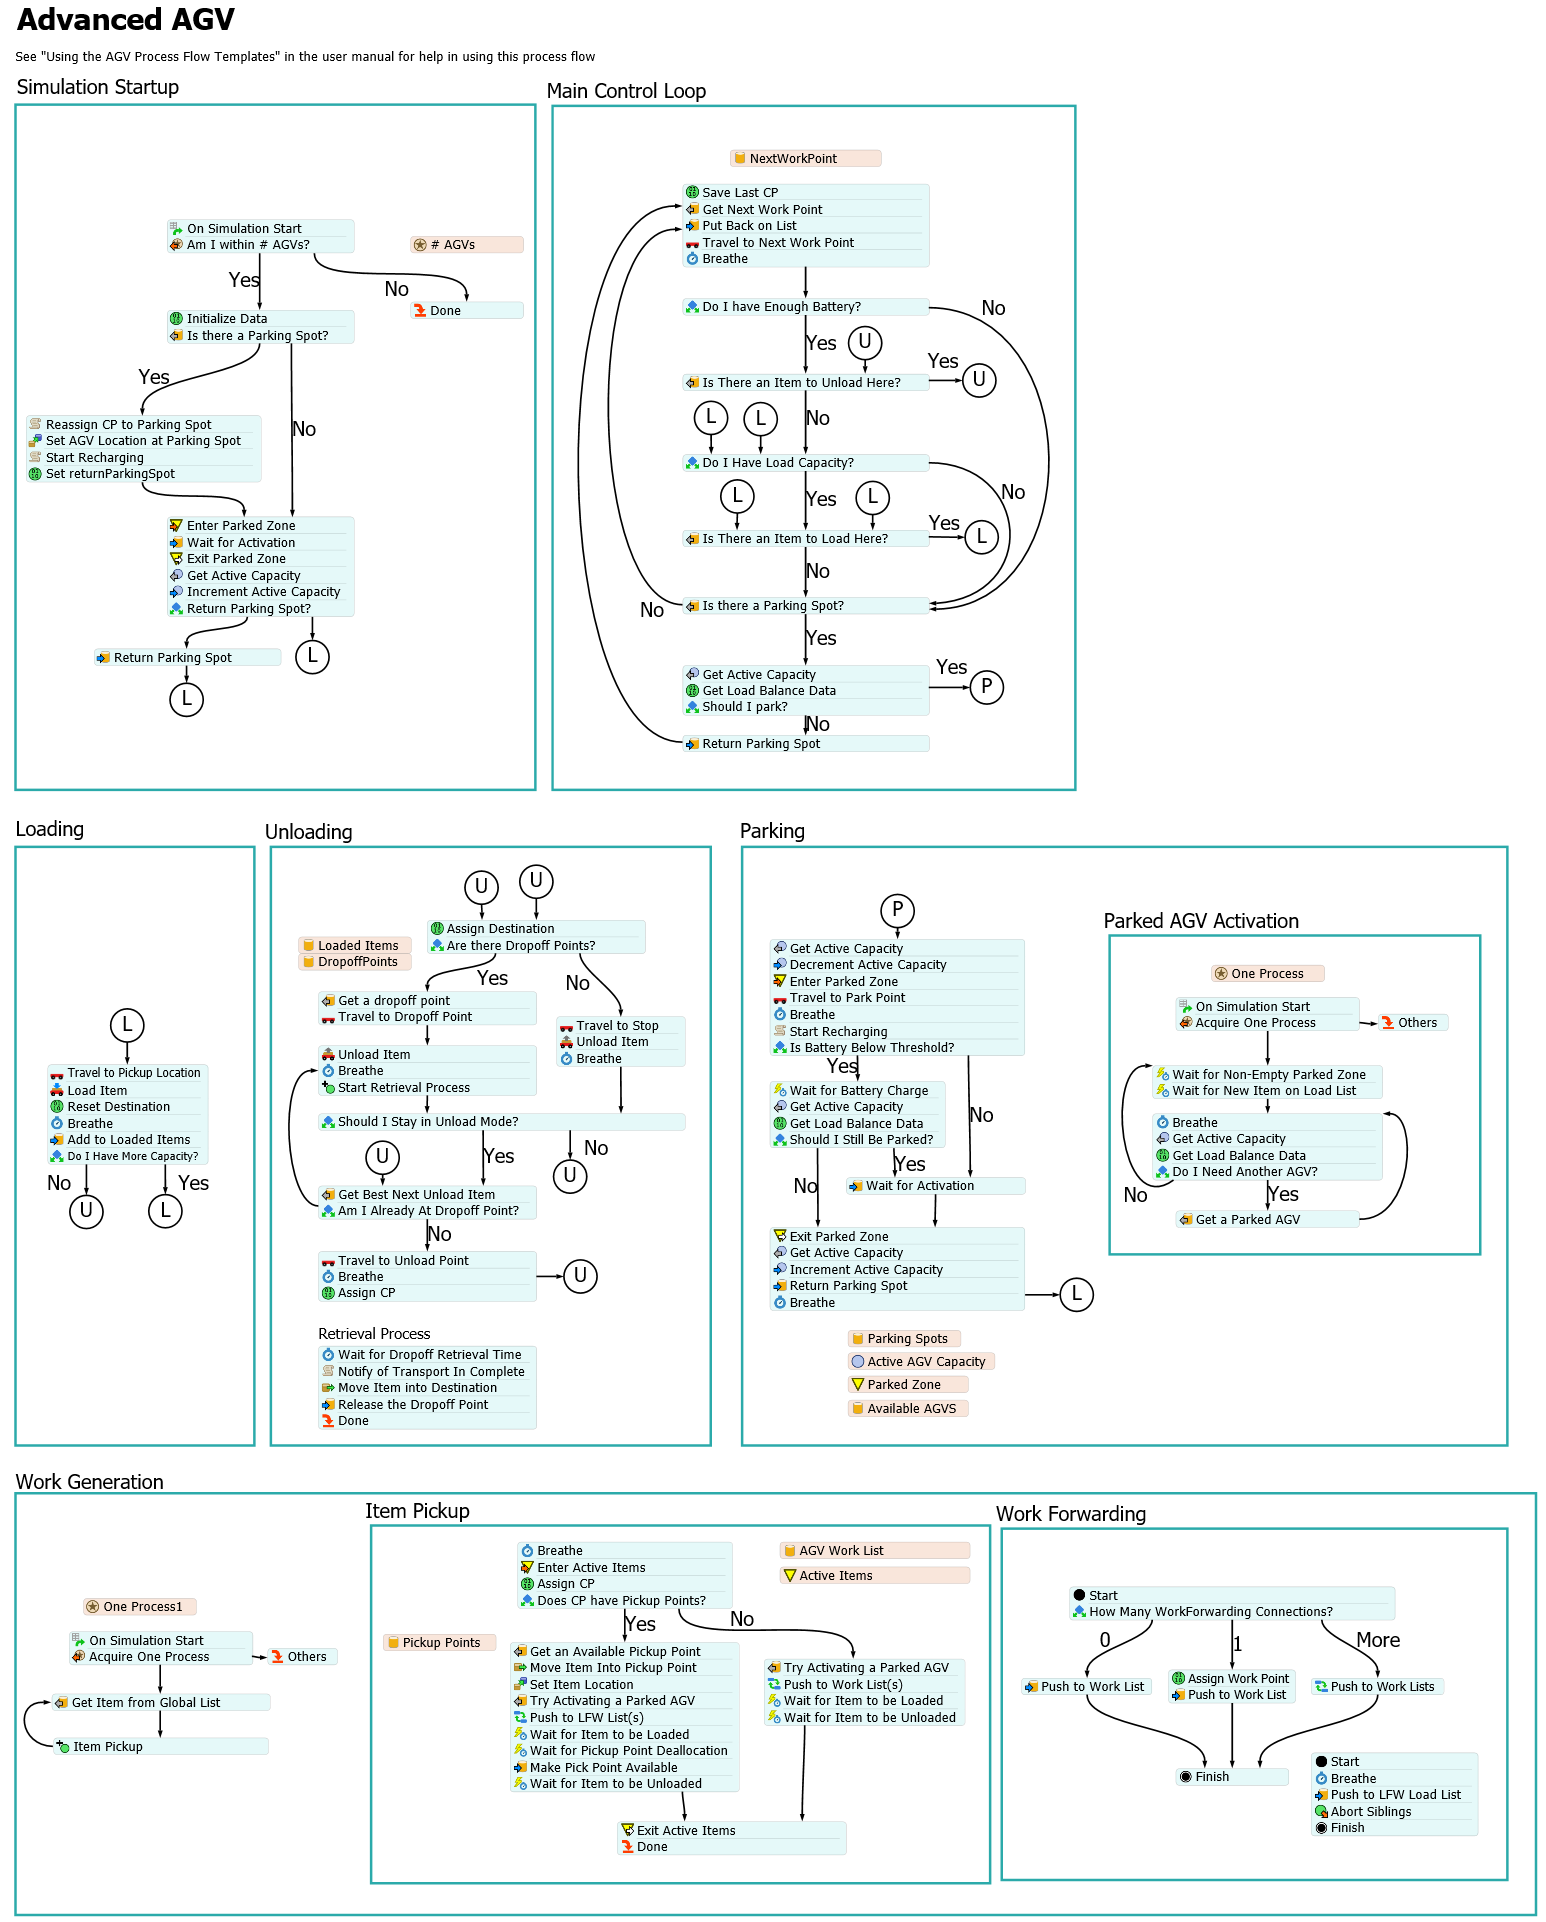
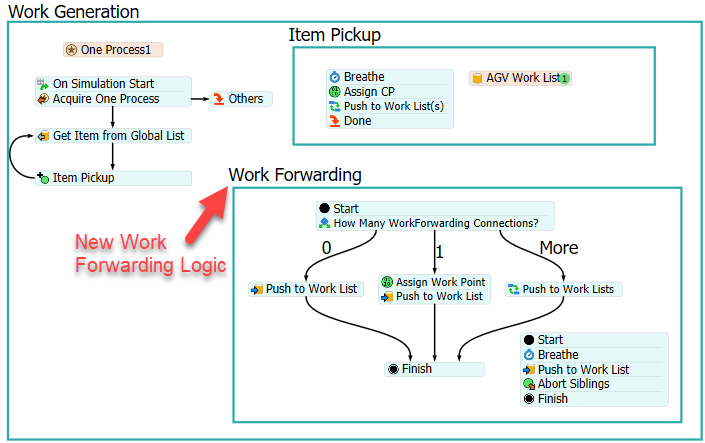
While all process flows work around the same core model design, each process flow progressively adds features and sophistication. The specific differences between process flows will be discussed in detail later in this topic. The image below shows the most sophisticated process flow template, Advanced AGV.
While you may find one of these process flows perfectly sufficient for your AGV simulation project, these process flows are also intended to be launching points for you to customize to your simulation's requirements. If there are features that you need that are not supported by these process flows, you can choose the simplest AGV process flow that implements the features you do need, and then extend it with the additional features that are required.
This topic will make reference to many concepts associated with building task sequence logic. As such, we advise first reviewing Key Concepts About Task Sequence Logic before proceeding with this topic.
Setting Up the AGV Process Flow Template
To set up an AGV process flow template:
- Add an AGV process flow - On the toolbar, click the Process Flow button to open a menu. Point to Add an Object Process Flow and select one of the AGV process flows to create a new process flow template.
- Attach objects to the process flow - In the newly created
process flow, click a blank area to ensure nothing is selected.
In Properties under the Process Flow Instances group,
find the Attached Objects (instances) box. Click the
Sampler button
 by this box to enter sampling mode. Then
click on an AGV in the 3D view. It should now show up in the
Attached Objects box. Repeat this step to add additional
AGVs as needed.
by this box to enter sampling mode. Then
click on an AGV in the 3D view. It should now show up in the
Attached Objects box. Repeat this step to add additional
AGVs as needed. - Configure your AGV network with appropriate connections - Primarily, the network needs a loop of NextWorkPoint connections. To do this, 'A' connect from one control point to another and choose NextWorkPoint. AGVs will follow this loop looking for items to pick up. These control points become the "Work Points" in the system where AGVs find work to do. See Creating Work Point Loops below for more information.
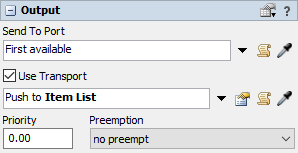
- Configure objects in the model to add work for the AGVs to perform - A global item list named AGVWork will have been added to the model's toolbox. To generate work for the AGVs to do, you push items to this list. You can do this with fixed resources by going to their properties Output pane, check Use Transport, and choose the behavior: Use List > Push to Item List (No Task Sequence). See also Job Dispatching below for more information.

How the AGV Process Flow Templates Drive AGV Behavior
In this section we explain in detail how the AGV process flow templates implement task executer task logic.
AGVs are essentially task executers that have been connected to the AGV path network. As such, all travel tasks will be executed via the AGV travel network. Thus, when you connect a task executer to an AGV network, you are defining the Transportation or Travel aspect of its behavior.
Connecting a Task Executer to an AGV Network
| Transportation or Travel | How do task executers move around? Via an AGV network. |
|---|
Alternately, when you attach an AGV process flow template to an AGV, you are defining both the AGV's Task Sequence Generation and Job Dispatching behavior.
Connecting a Task Executer to the AGV Process Flow Template
| Task Sequence Generation | How are task sequences defined? AGV process flow generates task sequences. |
|---|
| Job Dispatching | Who or what will perform what jobs? AGV process flow handles dispatching. |
|---|
Note that, when using the AGV process flow template, the Item Flows and Routing aspect of task executer logic is mostly still up to you. You can define it through connecting fixed resources, by using another process flow, etc.
| Item Flows and Routing | Where do the items need to go? Mostly still up to you. |
|---|
Task Sequence Generation
| Task Sequence Generation | How are task sequences defined? AGV process flow generates task sequences. |
|---|
The AGV process flow template handles all task sequence generation for the attached AGV.
Work Point Looping
The AGV process flow directs the AGV to travel along a loop of "work points" which you have defined. The AGV decides what to do next at each work point. This loop is a set of control points that are connected together in a loop with the "NextWorkPoint" control point connection. Each of the work points is a place where the AGV will go to see if there is any item that needs to be picked up at that location. If there is no item to be picked up, then the AGV will continue to the next work point, and so on.
The Basic AGV process flow is, as named, the most basic implementation of this looping behavior. The other process flows progressively add sophistication. Yet these additions are mainly to improve the set of choices that an AGV can make when at a work point. At their core, all the process flows do the same thing, that is: check if the AGV should do something at its current work point, and if not, move to the next work point, and repeat.
Job Dispatching
| Job Dispatching | Who or what will perform what jobs? AGV process flow handles dispatching. |
|---|
When using the AGV process flow template, job dispatching logic is handled by a combination of control points, the AGV process flow template, and a global list named AGVWork. This global list is automatically created whenever you use an AGV process flow template. When a fixed resource needs to request an AGV transport for a flow item, it will push the item to the AGVWork global list. Here, the item being pushed onto the list represents the "job." The process flow template will immediately pull the job from the list, figure out where the item is, and push it back onto the AGVWork list, but this time partitioned by the work point associated with that item. Thus when AGVs arrive at these work points, they pull from that work point's partition to see what work is there.
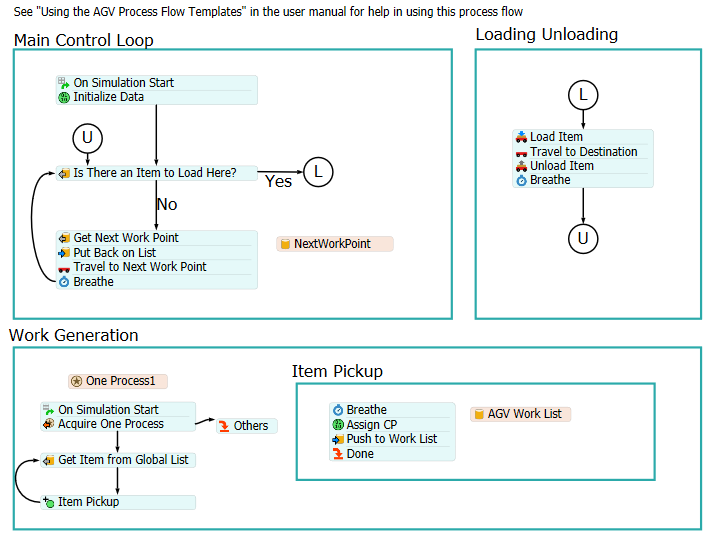
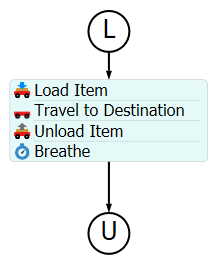
The image below shows the process flow logic of the Basic AGV, wherein the process flow pulls from the AGVWork list, figures out the correct work point, and then pushes the item back onto the list partition.
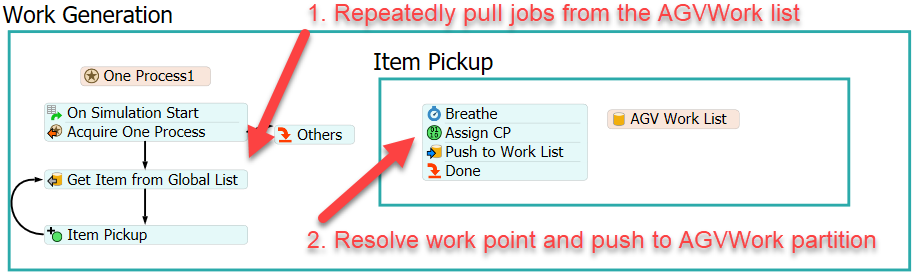
With this work partitioning mechanism implemented, AGVs can query jobs by their location in the 3D model. This enables the work point looping explained above. The key thing to keep in mind is that job dispatching is mostly determined by the location of AGVs and items in the 3D simulation model. When an AGV arrives at a work point, it checks to see if there are any available tasks to work on, such as items to load. If there are things to do at that point, the AGV will take up those tasks. Otherwise it will move to the next work point.
In Summary
| Dispatching Decisions | |
|---|---|
| Resource Selection | The AGV process flow template does not do immediate resource selection. In other words, when a new job arrives (i.e. an item is pushed onto the AGVWork list), that job will not immediately be assigned to a resource. Instead it will wait for an AGV to come to its work point. Thus resource selection is determined by the first AGV to arrive at the work point. This means, in general, that the job will be picked up by the closest AGV to that job. This delayed resource selection can be beneficial because there may be an AGV that drops an item off near to the job location, but AFTER the job arrives. If the logic had immediately performed resource selection, the AGV would have been busy at the time, and it would have dispatched the job to a less-optimal AGV. |
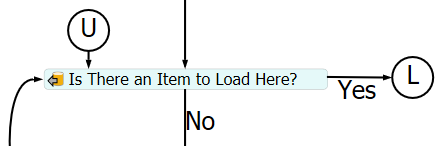
| Job Selection | Job selection is performed when an AGV arrives at a work point. There it looks to see if there is any work to do at that location. This is performed by pulling from that work point's partion of the AGVWork list. You can define prioritization, filtering, etc. by customizing the pull query for the Is There an Item to Load Here? activity of the AGV process flow. If there aren't any available items to load at one of the work points, the AGV would simply move on to the next work point. |
Item Flows and Routing
| Item Flows and Routing | Where do the items need to go? Mostly still up to you. |
|---|
Item flows and routing are still primarily handled by you. You can use fixed resources as you would use them normally, or you can define routing through your own process flow. In other words, the same methods that you would use to connect 3D object flows in a standard simulation model would apply when using the AGV process flow template. See Connecting 3D Object Flows for more information.
The single difference with standard routing is that, once you have decided where you want a flow item to go, you need to push the item to the AGVWork list. Additionally, you should set a label named "destination" on the item that references the target destination. This can be done by using the Push to Item List (No Task Sequence) option in the Use Transport field.
Connecting Fixed Resources to the AGV Network
When using the AGV process flow template, you connect fixed resources to the network the same way as when using the AGV network normally. The only difference is that, once connected, you should make the connected control point part of the work point loop.
Creating Work Point Loops
As mentioned above, AGVs travel in a loop looking for transportation tasks to work on. To enable this, you need to create a work point loop in your AGV network. This is basically a series of control points that are connected to each other in a loop.
To create a work point loop:
- Press and hold the A key to enter connection mode. When you are in connection mode,
your mouse pointer will change to a plus sign with a chain link symbol next to it:

- Click the first upstream control point the AGV will pass over in the work point loop. You will notice as you move your mouse that a yellow line will appear between the object you clicked and your cursor.
- Hover over the second control point you want to connect so that it is highlighted. Click the control point to open a menu. Select NextWorkPoint. A red line will appear to show that the control points are now connected.
- Repeat this process to add more control points to the loop. Make sure that the last control point gets connected to the first control point to create a loop.
Once you've built this loop, you can run the simulation model. The AGVs will loop around the system looking for work.
AGV Process Flow Templates
As mentioned previously, there are several different AGV process flow templates available. These include:
While all process flows use the same core work point looping logic, each adds features to the previous one that give you more flexibility and power. Further, this progression from simple to complex allows you to choose a simplified launch point from which to add your own custom logic.
In this section we describe each process flow template and the features it provides.
Basic AGV
The Basic AGV process flow is the most basic implementation of the work point looping mechanism. It implements a simple work partitioning mechanism as part of its Work Generation process. The AGV's looping logic is also as simple as possible:
- Check if there is an item to load at the current point.
- If there is an item to load at the current point, then load it, travel to its target destination, unload it, and repeat.
- If there is nothing to load, then travel to the next work point and repeat.
Resolving the Next Work Point
In resolving the next work point, and with other features explained later, the AGV process flow uses a useful feature of AGV control point connections. This feature causes the set of control point connections in your model to be represented as a partitioned list. Thus, to retrieve a connected control point or object, the process flow can simply pull from the current work point's partition of the associated list.
Below is an example list associated with the NextWorkPoint connection.
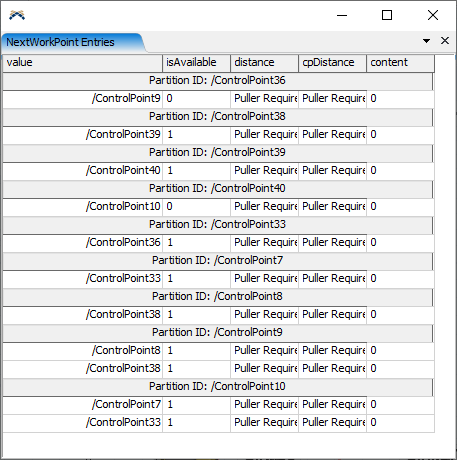
Each partition represents the owner of the connection(s), and the entries of that partition are the connections themselves. For example, in the list above, ControlPoint36 has a NextWorkPoint connection to ControlPoint9.
This feature makes querying control point connections as simple as pulling from a list, enabling easy access to control point connections from a process flow.
Also of note in the figure above is that ControlPoint9 and ControlPoint10 each have two NextWorkPoint connections. This would represent a "branch" in the work point loop. Potential branching is the reason why the process flow first pulls an entry off of the list, then puts it back onto the list when it resolves the next work point.
When the entry is placed back on the list, it is pushed at the end of that partition, meaning that work point will not be chosen when the next AGV arrives. This default behavior allows for a round-robin effect when there are branches in the work point loop. Obviously, you can also customize this as needed.
AGV with Work Forwarding
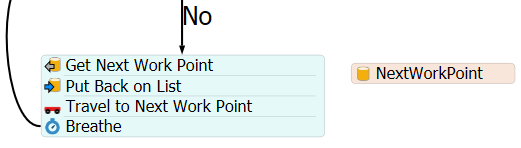
The AGV with Work Forwarding process flow implements the same functionality as Basic AGV, but adds a more sophisticated mechanism for defining where AGVs can find work. This is done by further customization of the work partitioning logic in the Work Generation process. This new logic is shown below.
The logic uses the WorkForwarding control point connection to "forward" work from the item's location to one or more other work points. This allows the AGV to "see" whether there is available work at a location without actually having to travel to that location. Hence you can have fewer work points in your loop, while each work point is "aware" of more locations to load from.
To enable work forwarding:
- Add the AGV with Work Forwarding process flow.
- Attach the AGVs in your model to the process flow (and remove them from any other AGV process flows).
- Add a WorkForwarding connection from the control point where an item is to be picked up to a work point in the work point loop.
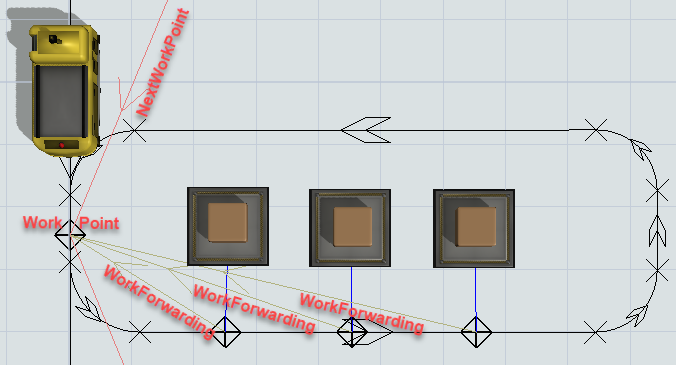
Below is an example of how you might configure a work forwarding situation.
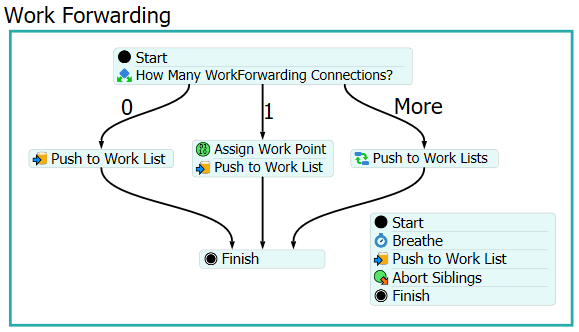
0/1/More WorkForwarding Connections
The process flow's new Work Forwarding process demonstrates that there are 3 different possibilities for work forwarding behavior.
- An item's location has 0 WorkForwarding connections.
- An item's location has 1 WorkForwarding connection.
- An item's location has more that 1 WorkForwarding connection.
0 WorkForwarding Connections
When an item's location has no WorkForwarding connections, the logic works the same as it did in the Basic AGV. It assumes the item's location is the work point, and pushes to that partition.
1 WorkForwarding Connection
When an item's location has 1 WorkForwarding connection, the logic substitues the single connected control point for the item's location, and pushes the item to that connected control point's partition.
More than 1 WorkForwarding Connection
When an item's location has more than one WorkForwarding connection, the logic will actually push the item to the list partition of all of the connected work points. Then, when an AGV at one of those work points assigns itself to the item, the process will abort all of the other list pushes, essentially removing the item from those partitions. This means that a job for transporting an item in your system can be "visible" from multiple work points in your loop. This gives incredible flexibility in defining when and where AGVs are assigned to which items.
AGV with Basic Parking
The AGV with Basic Parking process flow supplements AGV with Work Forwarding with two additional features:
- AGVs can park and wait for work to arrive at their current work point.
- AGVs can load more than one item at a time if you give them a Capacity greater than one.
Basic Parking
This process flow adds decision logic to the AGV's main control loop associated with parking.
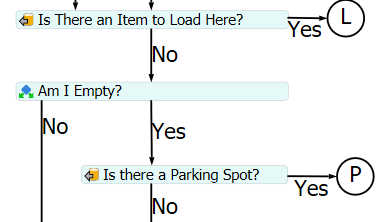
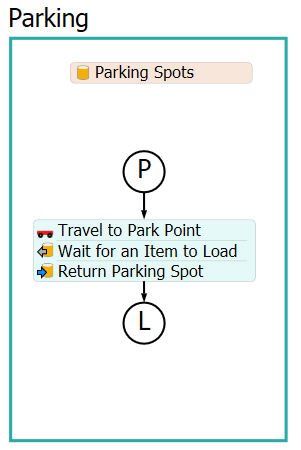
If the AGV can't find something to do, and it is empty, then it will check if there is an available ParkPoints connection. Again, it uses the list feature, wherein it pulls from a list partition associated with the ParkPoints connection. If it finds one, then the AGV will travel to that parking location, and wait until work arrives at that work point.
To add parking functionality to your model:
- Add the AGV with Basic Parking process flow.
- Attach the AGVs in your model to the process flow (and remove them from any other AGV process flows).
- Add a ParkPoints connection from a work point in your loop to one or more control points where you would like AGVs to park.
Below is an example of how you might connect parking locations.
Some important things to note:
- An AGV will always go to an available park point if it is empty and doesn't find something to do at that work point.
- The AGV will wait for work to arrive at that work point.
These implications mean that you need to be smart about designing your work point loop, the number of parking locations available at each work point, and how you define work forwarding. For example, if you have a single parking area that can hold all of your AGVs, then all work should be forwarded to at least the work point associated with that parking area. If not, then you could get into a situation where all of your AGVs are parked while none of them can see new work arriving, because those locations don't forward to the park area work point.
Alternately, you can limit parking area capacity. For example, you can have single parking locations located near or at many different work points in your facility. The benefit of this is that you have AGVs that automatically distribute themselves to different parking locations, and are therefore close to the pickup locations when work arrives. The downside could be that, if you don't do liberal work forwarding, and you get a wave of jobs from the same location, you could have a single or just a few AGVs handling all of the work, while other AGVs are parked because they don't see that work.
Whatever the benefits or downsides of your parking strategy, this process flow provides you with a simple launch point that supports parking. You can customize from here if needed. For example, you could improve the decision process for when an AGV should park, and how it is activated after it parks.
Multi-Item Capacity
The AGV with Basic Parking process flow also adds the ability to load multiple items at a time, when you change the AGVs' Capacity property to be greater than one.
This change primarily adds more sophisticated Loading and Unloading processes.
When an item is loaded, instead of immediately proceeding to unload it, the process will push the item to a Loaded Items internal list. If the AGV has more capacity to load another item, it will jump back into its main control loop, moving to the next work point, and so on.
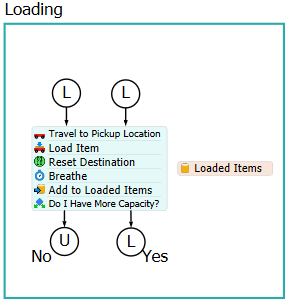
If, on the other hand, the AGV has reached its capacity, it will jump into the Unloading process. Here it finds the best item to unload by pulling from the local Loaded Items list, prioritizing the closest unload locations. Then it unloads at that location.

The AGV will also do opportunistic unloading as part of its main control loop. When it arrives at a work point, if it finds that it has loaded an item that is destined for that work point, it will unload to that location.

UnloadToEmpty
The process flow also adds a process flow variable called UnloadToEmpty. It is a boolean value (1 or 0). If you set the value to 1, then when the AGV starts to unload it will continue unloading until it is empty.
You can define this variable by clicking in a blank area of the process flow and defining the value in the Process Flow Variables pane in Properties.
AGV with Heuristic Parking
The AGV with Heuristic Parking process flow supplements AGV with Basic Parking with two additional features:
- It uses a heuristic to determine whether the AGV should park at a given location.
- It implements battery tracking, and will park and recharge if it gets below a user-defined threshold.
Parking Heuristic
The heuristic the process flow uses is to count up the total number of active items in the system, and compare it to the total active AGV capacity in the system. The number of active items is the number of items that have requested transport but have not yet been delivered. The active AGV capacity is the sum of all the item capacities of all of the currently active AGVs (AGVs that are not parked) in the system.
When an AGV arrives at a work point that has parking locations, and does not find something else to do, it will compare the active items to the active AGV capacity. If the active AGV capacity, minus the AGV's capacity, is still greater than or equal to the number of active items, then the AGV can park. If it is less than the number of active items, then the AGV must stay active. The idea is that you want to generally keep enough AGVs active to handle all currently outstanding jobs.
The process flow also uses the same heuristic in activating AGVs from being parked. When a new item arrives for transport, the process flow will check the number of active items against the active AGV capacity, and if AGV capacity is less than needed, it will attempt to activate a parked AGV.
Battery Tracking
This process flow also adds battery tracking. Here you define BatteryRechargeThreshold and BatteryResumeThreshold, in percent of battery capacity. When the AGV gets below BatteryRechargeThreshold, it will immediately find a parking location, park there, and recharge. Once it has reached BatteryResumeThreshold, it can then be made available for activation.
Note that the battery tracking is primarily implemented as an example for you to customize. It assumes that all parking locations are recharge locations, which is likely not the case in a real life system.
Advanced AGV
The Advanced AGV supplements AGV with Heuristic Parking with two additional features:
- Enabling multiple dynamically chosen pickup locations at the same load location.
- Enabling multiple dynamically chosen dropoff locations at the same unload location.
Pickup Points
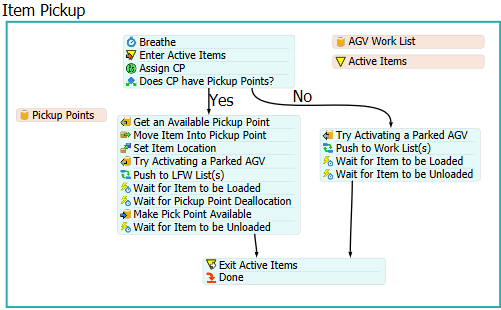
This process flow adjusts the Work Generation process to implement pickup points. When an item is pushed to the AGVWork list, the process, in addition to doing the standard partitioning logic, will also check to see if the item is at a location that contains one or more PickupPoints connections. If so, the process will find an available pickup point (one not already used by another item), and move the item into that control point.
To add pickup point functionality to your model:
- Add the Advanced AGV process flow.
- Attach the AGVs in your model to the process flow (and remove them from any other AGV process flows).
- Add one or more PickupPoints connections from a work point in your loop to one or more control points where you would like items to be picked up from.
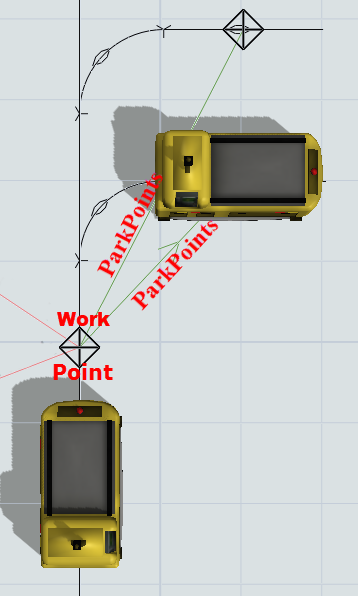
Below is an example of how you might connect pickup points.

Dropoff Points
The process flow also adjusts the Unloading process. When an AGV begins to unload an item, it checks if the destination location has any DropoffPoints connections. If so, it will dynamically select an available dropoff point, travel to that point, and unload the item.
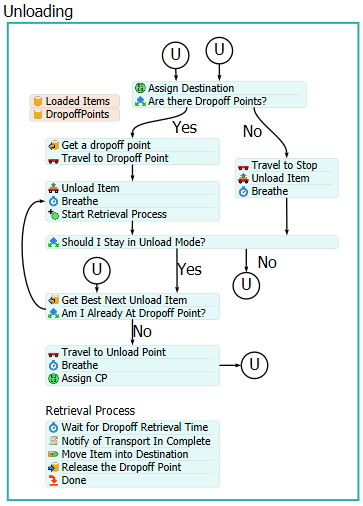
Once it has unloaded the item, it will begin a Retrieval Process. The idea is that there would be some time between the AGV unloading the item, and the drop-off point becoming available again (somebody comes and removes it from the dropoff point, or it is automatically removed). By default, this is simply a delay time that you can define in the DropoffRetrievalTime process flow variable. However, you can customize this process as needed.
To add dropoff point functionality to your model:
- Make sure you've added the Advanced AGV process flow.
- Attach the AGVs in your model to the process flow.
- Add one or more DropoffPoints connections from a destination control point to one or more control points where you would like AGVs to drop off items.
Below is an example of how you might connect dropoff points.