Date Time Source
Overview and Key Concepts
The Date Time Source activity creates new tokens as specified in its Arrivals table. This table defines when and how many tokens should be created either through a date based interface, or a repeated table (daily or weekly schedules). The table also defines a name that will be assigned to the new tokens and label values, if desired. These settings can either have a fixed value or the values can be calculated dynamically. Also, you can either enter the data into this table manually or import a table from an Excel spreadsheet using the Excel Interface.

Overview of Arrival Schedules
The following image shows an example of a possible arrival schedule on a Date Time Source activity:
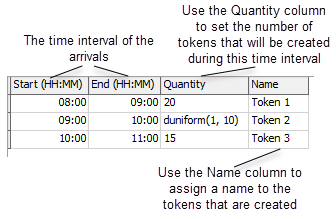
This table has 20 tokens being created between the 8AM and 9AM hour, a random distribution of tokens being created between the 9AM and 10AM hour and 15 tokens being created between the 10AM and 11AM hour. Based upon the Arrival Spacing and Offset / Variability values you can define whether tokens are created at the start time, evenly spaced between the start and end time or randomly spaced between the start and end time.
You can also specify the Time Mode of the schedule. This defines whether the start and end times in the arrival table are based upon your model start time, for instance 08:00 AM in the morning, or based off of time 0. If based off time 0, the times become an offset from 0.
Each Date Time Source activity has an Arrivals table, which controls the schedule for creating new tokens. Each row in the table defines when tokens will be created. The values for the cells under each column can be changed to customize the arrival schedule:
- Start - The start column defines the start of the time interval when tokens will be created. See Arrival Spacing for defining when during the time interval the tokens will be created.
- End - The end column defines the end time of the time interval when tokens will be created.
- Name - For debugging purposes, you can assign a name to the tokens created at this point in the schedule. In this example, the first token that is created will be named Token 1.
- Quantity - The number of tokens that will be created during the arrival's time interval.
- Labels - Additional columns can be added to the arrival table that define labels that will be added to the created tokens. The name of the label will be the name of the column. Labels can be numbers, strings, arrays, pointers, bundles or tracked variables.
Time Mode
The Date Time Source activity offers two Time Modes:
- From Time 0 - In this mode, the start and end time columns are offsets from time 0. For example, if the start field is set to 01:00, then the arrival start time will be 1 hour after the model starts.
- Use Model Start Date/Time - If this mode is selected, the model will jump into the table based upon the model start date and time. For example, if the model start time is Monday at 08:00 AM, then the first arrival will be 08:00 or 00:08:00. Or if the model start time is Tuesday at midnight, the first arrival will be 00:00 or 01:00:00.
Repeating Schedule
Arrival schedules can be set to not repeat, repeat daily, weekly, hourly or a custom repeat interval. If a repeat interval is selected then you can define the Cycle Count meaning the schedule will continue to repeat throughout the model run. Defining the number of cycles for the schedule will determine how many times the schedule will run. For example, a cycle count of 1 will cause the schedule to run once.
You can tie a dashboard Edit box to the Cycle Count
box by creating a dashboard edit box and using the  button next
to the Link box in the quick properties to link to the cycle count.
button next
to the Link box in the quick properties to link to the cycle count.
Dynamic Arrival Values
With the exception of the start and end times and duration, the values in the arrival table may also be defined dynamically using picklists or code. This gives a greater amount of control on how an arrival schedule is defined. Each arrival table has a universal edit below the table that will change based upon the current table cell that is selected. Use the sampler or drop down button of the universal edit to define the value of the table cell.
Using a Date Time Source in Instanced Flows
There may be cases where you are dynamically creating instances of process flow objects during a model run. The Create Person activity creates a new person from the flowitem bin and allows you to define an Instanced Process Flow to attach to the created person. When this happens, any date time source activities in the process flow will begin their schedule based upon the Mode and the Time Mode. If the Mode is set to Date Based or the Time Mode is set to Use Model Start Date/Time, the schedule will begin based upon the current model time. This means that times are absolute, without regard to the creation time of the instance. For example, if a date time source activity has an arrival time of 10:00 for its first entry and a new instance of the object is created at time 09:00, then the first token will be created in 1 hour, at 10:00.
If the Time Mode is set to From Time 0, then the arrival times become relative to the creation time of the instance. For example, if a date time source activity has its first arrival at time 02:00 and a new instance of the object is created at time 01:00, then the first token will be created at time 03:00.
The Schedule Source can also be used to create tokens using relative times.
Connectors
The Date Time Source activity only allows one connector out. See Adding and Connecting Activities for more information.
Properties
The following image shows properties for the Date Time Source activity:
Each of these properties will be explained in the following sections.
Name
Used to change the name of the activity. See Name for more information about this property.
Font
The Font button
 opens a window to edit the activity's
background color and font properties. See
Font for more information
about this property.
opens a window to edit the activity's
background color and font properties. See
Font for more information
about this property.
Statistics
The Statistics button
 opens the activity's statistics
window. See Statistics
for more information about this property.
opens the activity's statistics
window. See Statistics
for more information about this property.
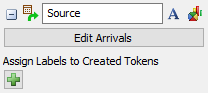
Edit Arrivals
Opens the date time source Arrivals Window.
Assign Labels to Created Tokens
Allows you to add labels to the created tokens. Each label entry is evaluated for every token that is created. For more information on assigning labels, see the Assign Labels activity.
Arrivals Window
The arrivals window is where the date time source's arrival schedule is defined. This window's properties will be explained in the following sections.
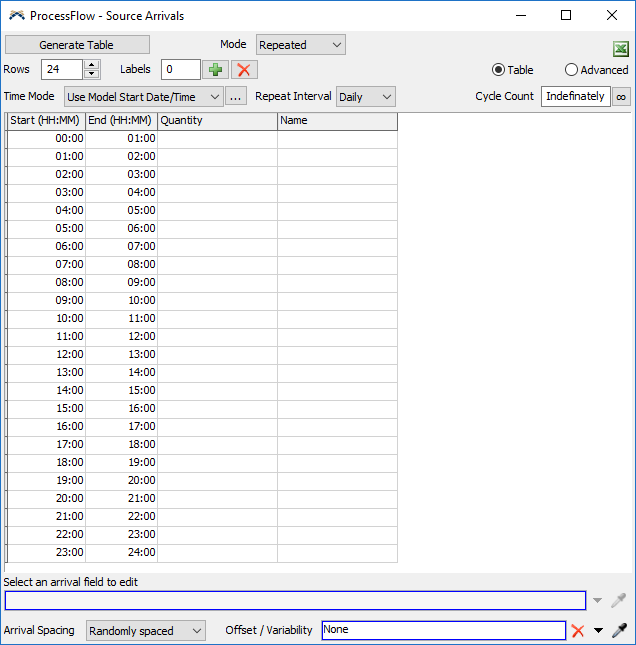
Generate Table
The generate table allows you to quickly generate a daily or weekly repeated table. Click the Generate Table button to display the following popup:
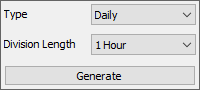
- Type - Choose a Daily or Weekly schedule.
- Division Length - Choose the division length of each arrival. If Daily was selected for the Type and 1 Hour was selected for Division Length then a schedule with 24 arrivals will be generated, one for each hour of the day.
- Generate - Generates a new arrival schedule based upon the type and division length. Note: Generating a table will remove any previously created arrival schedule.
Mode
The date time source offers two arrival modes:
- Repeated - An arrival schedule that can be based on model time 0 or the model start date/time. The schedule can be run once or repeated at any time interval.
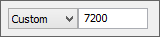
- Date Based - An arrival schedule that is based upon the model start date/time. The calendar graph lets you graphically add arrivals for any days of the year. Individual arrivals can be repeated, but the entire schedule cannot.
Excel Importer
Click the  to add the currently visible table to the
Excel Interface.
to add the currently visible table to the
Excel Interface.
Rows
Displays the number of rows in the arrival schedule. Add or remove rows at the end of the schedule by entering a new number in the box or using the up and down arrows.
Labels
Labels can be added to the created tokens by clicking the  or typing a number directly into the box. Use the
  button
to remove the last label.
button
to remove the last label.
Table / Advanced
The arrival schedule can be viewed using two different methods:
- Table - This view displays the start and end times of each arrival
in a more readable format (days, hours minutes, seconds). The default format is HH::MM.
If the table is set to be a weekly schedule, the table will display the week's arrivals, where the table cells are the arrival quantities.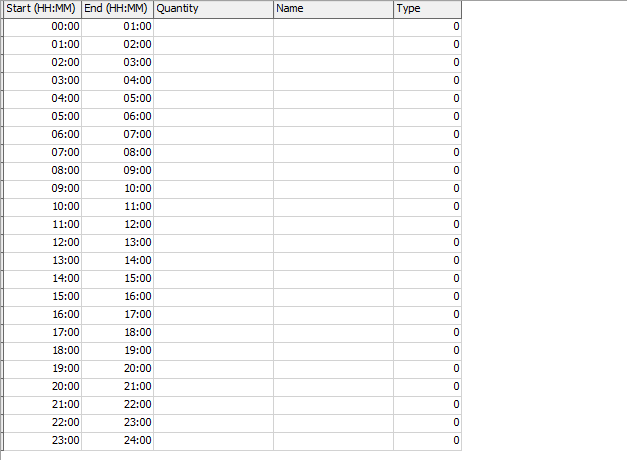

- Advanced - This view displays the start time and the duration of the
arrival using model time units.
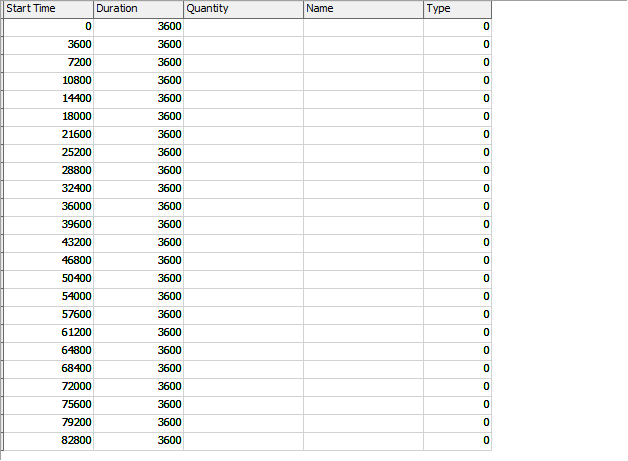
Regardless of which table you view, the data is the same, meaning, if you edit the times, token name or label values in one table, that value will also be displayed in the other table.
Arrival Table
By default there are four columns in the arrival table. Any number of labels can also be added to the schedule.
- Start (HH::MM) - The start of the time interval when tokens will be created. This column's name will change based upon the arrival schedule. By default it displays HH:MM which specifies that the data in the column is of the format Hour:Minute. If the schedule spans multiple days the column will display DD:HH:MM (Day:Hour:Minute). If the start times require further precision to display seconds, you may see DD:HH:MM:SS (Day:Hour:Minute:Second) or HH:MM:SS (Hour:Minute:Second). Times will always be displayed in these time units regardless of the time units of the model.
- End (HH:MM) - The end of the time interval when tokens will be created. See Start above for information on how this column name changes.
- Quantity - The number of tokens that will be
created at this point in the schedule. This can be a number, statistical distribution or
code. For example,
duniform(1, 10)orTable("MyTable")[1][1]. - Name - For debugging purposes, you can assign a name to the tokens created at this point in the schedule.
- Labels - Label columns can be added or removed by changing the number in the Labels field. Each token will be given labels with names corresponding to the column headers and values corresponding to the value of the table cell.
You may define static values through the table or dynamic values using the picklist field directly below the table. See Dynamic Arrival Values for more information.
Select an arrival field to edit
This field will change based upon which cell is currently selected in the Arrivals table. You can use this box and the pull-down arrow next to it to enter dynamic values for the Name, Quantity or Label values in the table. You can select a picklist option from the pull-down menu or you can enter in custom code if you are comfortable with FlexScript.
Arrival Spacing

The arrival spacing defines when tokens will be created for each arrival. There are three arrival spacing modes:
- At scheduled time - Tokens will be created at the arrival's start time. In this mode the end time (or duration) of the arrival is not used.
- Evenly spaced - Tokens will be created at a set time interval starting
at the start time. The first token will be created at the start time. The time interval is equal to
(duration / quantity). - Randomly spaced - Tokens will be created at a random times between the start and end time using a uniform distribution. To use a different distribution, set the Arrival Spacing to At scheduled time and select the desired distribution from the Offset / Variability picklist.
Offset / Variability
The offset / variability will modify the creation time of each token. The value returned by this picklist can be negative or positive. This means you could have tokens created before the arrival's start time or after the arrival's end time. This can be especially helpful when dealing with scheduled appointments. This picklist will be fired once for each token in each arrival.
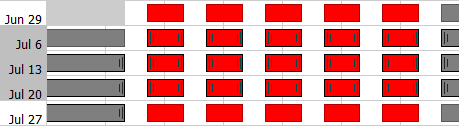
Date Based
If the Mode is set to Date Based, the Arrivals Window will change to look like this:
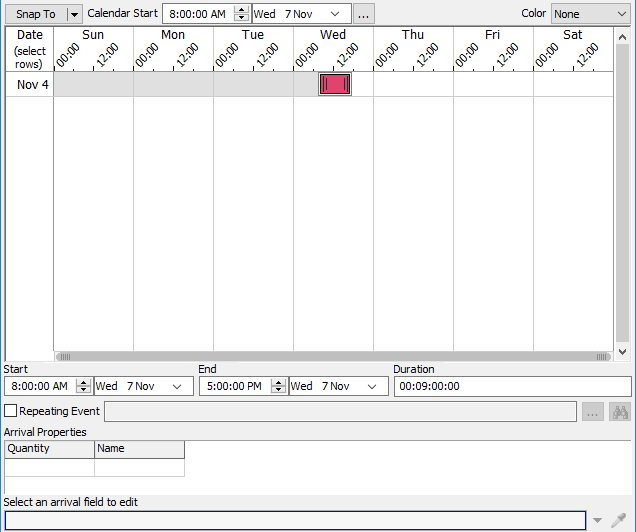
- Graphical / Advanced - Switch between the graphical view and the table view. The advanced view will display all of the arrivals with start time and duration values in model time units.
- Snap To - Specifies the time to snap arrivals to in the view. By default there is no snap to. You can specify the preset 10 min, 15 min, 30 min and 1 hour, or set your own custom snap to time. The custom time is in model time units.
- Calendar Start - Specifies the start date and time of the arrival schedule. Arrivals that occur before the start time will not create tokens, however, the data will remain. This allows you to temporarily turn off parts of your arrival schedule if needed.
- ... - Opens the model settings window.
- Color - Select a label to color the events by. The
color of the event will be equal to
Color.byNumber(labelValue)orcolor(labelValue). - Start - The start date and time of the selected arrival.
- End - The end date and time of the selected arrival.
- Duration - The duration of the selected arrival. Of form DD:HH:MM:SS.
- Repeating Event - If checked, the arrival will become a repeating event. Here you can define how often the repeat occurs and either how many times it repeats or until which date and time it repeats to.
- ... - Displays the properties of the repeating event.
 - If the selected arrival is part of a
repeating event but is not the parent event, this will center the parent event in the
view and select it.
- If the selected arrival is part of a
repeating event but is not the parent event, this will center the parent event in the
view and select it.- Arrival Properties - The arrival properties table will display the quantity, name and label columns of the arrival.
- Select an arrival field to edit - This field will change based upon which cell is currently selected in the Arrival Properties table. You can use this box and the pull-down arrow next to it to enter dynamic values for the Name, Quantity or Label values in the table. You can select a picklist option from the pull-down menu or you can enter in custom code if you are comfortable with FlexScript.
Using the Graphical Table:
- Creating entries - Click and drag anywhere in the white space to create a new down time. Snaps to the Snap To time.
- Modifying entries - Click and drag in the middle of an entry to change the start time of the entry. Drag left or right to change the time along the week, or drag up or down to change weeks. Click and drag at the left or right edge of an entry to modify the duration. Snaps to the Snap To time. Start and end times as well as duration can also be modified through the property below the editor view.
- Selecting weeks - Click and drag along the left
side of the view under the Date column to select a week of entries. Any entries with
their start time in the selected week will be selected.
- Zoom - Hold the Ctrl key while using the scroll wheel to zoom in or out on the mouse location.
- Scroll - Use the scroll wheel to scroll up and down in the view.
- Horizontal Scroll - Hold the Shift key while using the scroll wheel to scroll left and right.
- Bottom Scrool Bar - Click and drag along the bottom scroll bar to zoom in/out and scroll left and right.
- Drag to Copy - Hold the Ctrl key and click and drag an entry to create a copy.
- Ctrl + C - Copy selected entries.
- Ctrl + X - Cut selected entries.
- Ctrl + V - Paste selected entries. If a single entry was copied, the pasted entry will be pasted below the cursor position. If an entire week was selected, the entries are pasted based upon the week that the cursor is positioned over, keeping start times relative to the start of the week.
- Arrow Keys - Select an entry or a week of entries and use the up, down, left and right arrow keys to adjust the entry start times based upon the Snap To time.