Using the Flow Item Bin
Overview of the Flow Item Bin
Before reading this topic, make sure that you are familiar with the Key Concepts About Flow Items first.
You can use the Flow Item Bin to change and customize the visual appearance of the flow items in your simulation model. Using this tool you can:
- Change the color, size, or rotation of the basic flow item shapes
- Add your own custom 3D flow items
- Set default labels or item types on flow items
- Create different shape frames for the basic flow item shapes so that their appearance can change at different stages in the simulation model
This section will provide a high-level overview of the most important elements of the Flow Item Bin, as labeled in the following image:
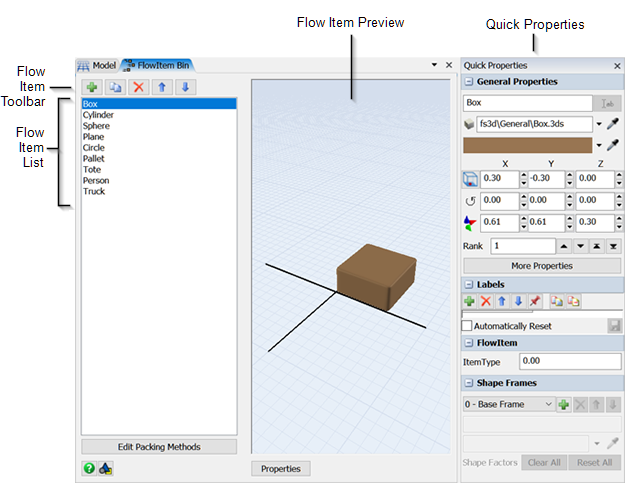
Each element will be explained in the following sections:
Flow Item List
The Flow Item List displays all the default FlexSim flow items as well as any custom flow items you add to the Flow Item Bin. When you click on a flow item, it will appear in the Flow Item Preview.
Flow Item Preview
The Flow Item Preview pane allows you to see a visual preview of the selected flow item. You can also use your mouse to edit the size and rotation of the item in the preview pane.
Flow Item Toolbar
You can use the Flow Item toolbar to add a new custom flow item. You can also use it to copy or reorder the items in the Flow Item List.
Quick Properties
The Quick Properties pane will display the properties for the currently selected flow item. You can use these properties to change the shape, color, size, or rotation of the flow item. You can also use Quick Properties to change the flow item's default labels and itemtype. See Flow Item Labels and Itemtypes for more information.
Opening the Flow Item Bin
To open the Flow Item Bin:
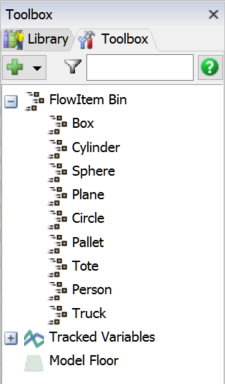
- Open the Toolbox by clicking the Toolbox tab in the left pane or by clicking the Tools button on the main toolbar.
- Click the Expand button
 next to the Flow Item Bin to show all
the currently available flow items.
next to the Flow Item Bin to show all
the currently available flow items. - Double-click one of the listed flow items to open it in the Flow Item Bin.
Changing the Appearance of Flow Items
When an object is selected in the Flow Item Bin, you can see it in the preview pane. You can click the item in the preview pane and the colored cones will appear, allowing you to change the size and rotation of the item. See Moving, Rotating, Resizing 3D Objects for more information about using the colored cones.
You can also use Quick Properties to change the shape, color, size, or rotation of the flow item.
The next two sections about importing custom 3D flow items and shape frames will explain more advanced methods for changing the visuals of a flow item.
Changing the Default Flow Item
To use a different flow item than the default box shape:
- Add a source to the 3D model.
- Click the source to open its properties on the right.
- Under the Source section, open the FlowItem Class menu and select the shape you want from the list. (To see the available shapes, open the Flow Item Bin. See Types of Flow Items for more information.)
Adding Labels to Flow Items
To add a label to a flow item:
- Open the Flow Item Bin and select the flow item to which you want to add a label.
- In Quick Properties under
Labels, click the Add button
 to open a menu.
 - Choose either Number Label or String Label to select the type of label you want to add. If you're not sure what type of label you want to add, select String Label. A new row will appear in the Labels table.
- Double-click the LabelName and give your label a descriptive name such as weight or priority.
- In the blank cell next to the label name, enter the default starting value for the label.