Custom Libraries
Overview
FlexSim lets you create and configure special libraries in addition to the standard library set. These are referred to as user libraries. You can create custom defined functionality on objects, and then add those objects to a library for use in other parts of your model or in other models. You can save these libraries and then load them into other projects later on. You can also define a set of objects in the library to be automatically installed to your model when a new model is created or when you load the library.
You can create new User Libraries and Open User Libraries from the File Menu.
The custom library, or user library, mechanism provides you with flexibility in many areas. The most widely used functionality of the user libraries is to reuse customized objects in a model, but you are not confined to only that functionality. User libraries allow you to automatically install custom objects and data into models, install objects and data into the main project and view tree, and execute code when an object in the icon grid is dropped into the model. All of this functionality stems from two mechanisms within the user library functionality. First is the droppath and dropscript mechanism, which allow you to customize what happens when an object is dropped into that model. Second is the automatic install mechanism, which allows you to install objects or data when the user does operations like creating a new model or opening a model. This topic will discuss these two mechanisms in detail.
Adding Objects to a Custom Library
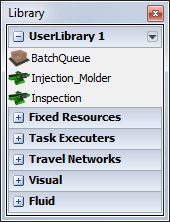
There are several types of objects that you can add to a user library. You will most commonly add a standard object like a Processor or Queue whose properties you have modified to fit a custom modeling situation. You could also start from scratch with a BasicFR or BasicTE object, implement your custom behavior, and then add it to a library. Another possibility is to use a VisualTool as a container of a sub-model, and add the whole sub-model to the library. To add these types of objects to a user library, right click on the object in the 3D model view and select Edit, then Add to User Library.
If you already have User Libraries loaded, a list of those libraries will appear in the right click menu.
You can also add:
- GUIs
- Global Tables
- Flow items
- User Commands (to a custom library)
You can access this capability from the windows in which you edit these respective objects. The figure below shows a menu option in the GUI editor to add the GUI to a library.
Editing Library Objects
When an object is added to a library, a copy of the object is created and put in the library. This means that once it is added in the library it has no more linkage to the original object. It is a copy and can be changed on its own, separate from the original object.
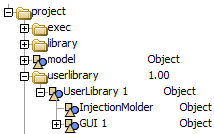
The User Library is stored in the Main Tree in the userlibrary node.
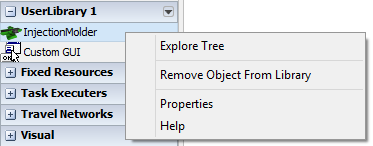
You can also access the properties of your library object through the right click menu on the Library Icon Grid.
Saving and Removing Libraries
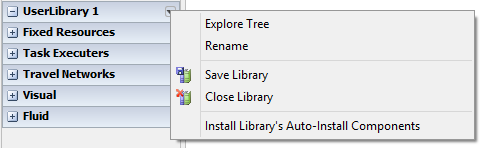
To save or remove a User Library, click the arrow next to the User Library in the Library Icon Grid.
Dropscript and Droppath
The droppath and dropscript mechanism allows you to customize what happens when an object is dropped into the model. This is done by creating a custom object in the user library, and then adding either a "dropscript" or a "droppath" attribute to the object and specifying the data for the dropscript or droppath.
Dropscript
If a dropscript attribute is added, then the dropscript node will be executed as flexscript, and values will be passed into the flexscript function that give it information about the drop.
There are 5 access variables you can get within the dropscript function. They are:
- param(1) - The object that was dropped onto. If the user dragged onto a blank area in the model, then this variable will be 0, or NULL. In such a case, you can usually assume that the user intends to drop it into the model. However, this is not always the case. For example, the user may drop the object into a 3D view that is viewing a subspace of the model, like a VisualTool. To ensure a safe drop in this case, you should use the viewfocus of the view as the drop point: param(5).find(">viewfocus+").
- param(2), param(3), param(4) - The x, y and z location of the drop, respectively. If the param(1) is NULL, then this is the location within the model space (or the view's viewfocus' space). If param(1) is not NULL, then this is the location within param(1).
- param(5) - The view window onto which the object was dropped. Use node(">viewfocus+", param(5)) to get access to the viewfocus of the view.
- Return Value - Your dropscript function should also return a reference to the object you created. This allows FlexSim to do some extra work like checking to see if there were any c++ nodes created, and if so, set a flag to notify you that you need to compile the next time you run the model.
The dropscript mechanism allows you ultimate flexibility with user libraries. You can use it in the standard way, for example to do a regular object drop but also execute some extra code to initialize the dropped object. You can also use it in more non-standard ways. Some ideas may be to use a dropscript to add a curved or straight section to a conveyor belt, or to add levels or bays to a rack object. You could also use a dropscript to add code to triggers of an object, or to set certain parameters of the object. You could add collision spheres to an object, or add a set of functionality to the model's tools folder. There are any number of possibilities.
Refer to the Example for examples on using the dropscript node.
Droppath
The droppath mechanism is a method of indirection. It is a way that you can refer to another object that you want to be dropped when the icon is dropped into the model. This is usually used with automatic install functionality, but it can also be used with an icon in the icon grid. The method of creating a droppath object is the same as for creating a dropscript. You add an object to the library, and give it object data, but this time you give it an attribute named "droppath". You should not toggle the node as flexscript, but should give text data to the droppath attribute and specify in the text a path to another object that should be dropped.
For example, you may give the droppath attribute the text: MAIN:/project/library/NetworkNode. This will effectively cause a network node to be created when you drag your object's icon into the model. You might ask why not just add a network node to the user library, or why not just make them go to the regular library and drop a network node from there. To the former question, if you plan on using this user library for a long time, you may want the network node to be compatible with future versions of FlexSim. You may want to drop whatever is the latest version of the network node, without having to update the user library with each new version. Also, why have redundant data in your user library if all of it is already there in the regular library? To the latter question, it may be useful to have the network node as a droppable icon in your library if the user uses the object often. It reduces the number of mouse clicks needed.
The droppath can either be an absolute path MAIN:/project/library/fixedresources/Processor or relative ..>Processor.
Automatic Install
The automatic install mechanism allows the user library to install objects and functionality to the model when the user performs certain actions like creating a new model, or opening a model. Automatic install is available through FlexSim's user interface for:
- GUIs
- Global Tables
- Flow items
- User Commands (to a custom library)
To create a custom automatic install, you can add special nodes to the user library object. The specific set of valid node names are listed as follows:
- newmodelinstall - This node is installed when the user creates a new model. It is also installed when the library is loaded.
- startupinstall - This node is installed when the library is loaded if the user has designated this library as a library to load during startup.
- loadinstall - This node is installed when the library is loaded explicitly by the user.
- openmodelinstall - This node is installed when the user opens an existing model. You may use this node to check if the model contains the library's components, and if not, installs them. You could also use it to update components in the model if those components are from an earlier version of the user library.
Customizing the Library Icon Grid
There are a few attributes that can be added to objects in your custom library that will affect they way they are displayed by the Library Icon Grid.
Pictures
The picture attribute specifies the path to an image to display in the icon grid. Leaving the path blank will display the object name only. To give your object a Processor image, your picture attribute would contain the path:
bitmaps\processorpicturesmall.png
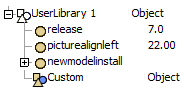
You can also specify the left alignment by changing the picturealignleft node value.
Icon Grid Width and Height
You can designate the size of icons in the library icon grid. Just give the library attributes named "cellwidth" and "cellheight". Each attribute should contain a number that is the width and height of one icon in the icon grid in pixels.
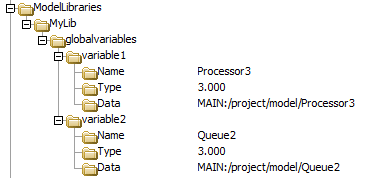
Model Libraries Node
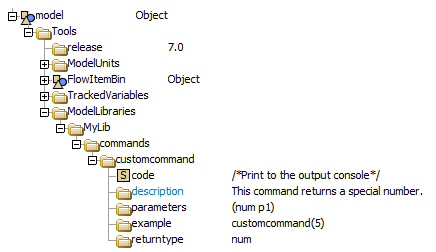
You can add many facets to a model, such as user commands, global variables, global macros, etc. where the definition is "hidden" from the user, so that they don't see it in their User Commands window, Global Variables window, etc. These can also simply refer back to structures in your library, so that you don't have to continually copy stuff into the model when updating. This is done by adding a node named "ModelLibraries" to the model's Tools folder and giving its substructure various data. While you don't need to have a custom library loaded to have this feature be part of a model, it will probably be most used for user libraries, hence we include this information with this topic.
To create this functionality, add a node into model/Tools, and give it the name "ModelLibraries". Inside of that node, add another node, and give it the name of your library, i.e. MyLib. Inside of that node, there are several nodes that can be added. Their name defines their meaning to FlexSim. Names and meanings are listed below:
commands
If you add a node named "commands", you can place commands inside that node. These commands will be accessible to the user to call, and will be documented in the commands documentation, but won't be visible in the User Commands window. The structure of each command should be the exact same as the structure of model/Tools/UserCommands.
commandspath
You can add a node named "commandspath" and give it text data that specifies a path to an alternate location that holds the definition of the commands. In this case the structure of the path's destination should be the exact same as the structure of model/Tools/UserCommands. This allows you to leave your command definitions in the user library, and then just have this node refer to it.

globalvariables
You can add a node named "globalvariables" and give it the same sub-structure as found in Tools/GlobalVariables to define additional global variables that are available to the end user but "hidden" from the "Global Variables" window.
globalvariablespath
Like commandspath, you can redirect the location of where global variables are defined.

fsmacros
Here you can add a node named "fsmacros", give it text data with multiple #define macros. These macros will be visible (blue) to the user and will be added as options in auto-completion hints.

fsmacrospath
Like commandspath, you can redirect the location of where flexscript global macros are defined with the "fsmacrospath" option.

binaries
You can add a node named "binaries" and give it text data that specifies a list of additional .lib or .obj files that you want to link to when FlexSim is compiled. This is only needed if you have c++ toggled code that must be compiled, or if you expect your end users to define c++ code that can access pre-compiled functionality. This text will be added to the "Additional Library Dependency" field during the C++ linker phase. The linker's library path is specified as \program\system\lib in FlexSim's install directory, so to link with a lib file in FlexSim's libraries directory, you would specify a path like: ..\..\..\libraries\MyLib...

binariespath
Like commandspath, you can redirect the location of where linker options are specified with the "binariespath" option.

triggers
You can also add several triggers to fire at certain points. To do this add a node and give it the name "triggers", and add various nodes into that triggers node.
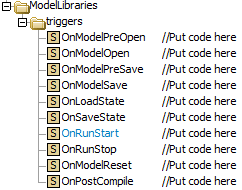
Valid triggers are:
- OnModelPreOpen - Fired immediately after a model tree is loaded, and before any model initialization code is fired.
- OnModelOpen - Fired after a model has been opened and all initialization code has finished.
- OnModelPreSave - Fired just before a model is saved to file.
- OnModelSave - Fired just after a model has been saved to file.
- OnLoadState - Fired when a state load is performed.
- OnSaveState - Fired when a state save is performed.
- OnRunStart - Fired whenever the user presses the "Run" button, as well as whenever the go() command is called.
- OnRunStop - Fired whenever the user presses the "Stop" button, as well as whenever the stop() command is called.
- OnModelReset - Fired whenever the user presses the "Reset" button, as well as whenever resetmodel() is called.
- OnPostCompile - Fired after the user compiles the model.
Example
The following examples show how to use the custom library:
Dropscript Example
Create a new user library by going to File, then New User Library. Click on the down arrow next to the newly created User Library in the Librar Icon Grid and select Explore Tree.
You should now see an empty tree.
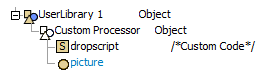
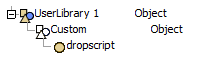
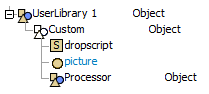
Insert a new object into the library by right clicking on it and selecting Node, then Insert Into, or by left-clicking on it and hitting the Enter key. Expand the user library tree so you can see the node you created by pushing the plus button. Give it the name "Custom". Now add object data to the node by right-clicking on it and selecting Node, then Add Object Data or by left-clicking on the node and hitting the O key. Click the Arrow button to expand theobject. Then insert an attribute node by clicking on the object node and hitting the Enter key. Give the attribute node the name "dropscript". The tree should appears as follows.
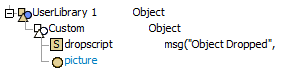
Add text to the dropscript attribute by right-clicking on it and selecting Node, then Add Text Data or by left-clicking the node and pressing the T key. Toggle the node as flexscript by right-clicking on it and selecting Build, then Toggle as FlexScript. Give the attribute the following flexscript text:
		msg("Object Dropped",
				"Onto Object: "
				+ param(1)?.name + "\n"
				+ "X: "
				+ string.fromNum(param(2),2) + "\n"
				+ "Y: "
				+ string.fromNum(param(3),2) + "\n"
				+ "Z: "
				+ string.fromNum(param(4),2) + "\n"
				+ "Onto View: " + param(5)?.name
			)
		);
Click off of the attribute node, then right-click it and select Build, then Build Node FlexScript.
Finally, add a picture attribute to the attribute tree of the object by right-clicking on the drop-script node and selecting Node, then Insert After. Name the new node "picture". The libraries icon grid will only show the object in the grid if the object has a picture attribute. Usually this is a path to a bitmap file that represents the picture that is shown in the icon grid for that object. In our case we won't worry about that and will just leave the picture attribute blank, which causes only the object text to be shown in the grid. The tree should appear as follows.
The library icon grid should appear as follows.
Now drag the Custom icon from the Library Icon Grid into the model. A message should appear.
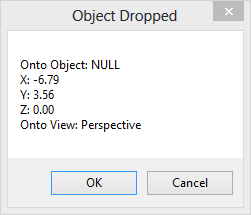
This message is the code of the dropscript being executed. It shows the object that you dropped onto if there is one, an x, y and z location of the drop, and the view window that the object was dropped into. You can also drop it onto another object. Drag a regular library object into your model, then go back to the user library and drag the Custom object onto the object in the model. The following message should appear.
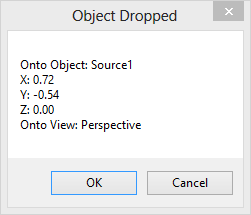
This time the message shows that it was dropped onto Source1. The x, y and z locations are now relative to the source object.
Dropscript Dynamic Parameters Example
In this example, we will have an object that is created through our User Library that will have its size defined by a Global Table.
Create a new User Library as described in the above Dropscript Example.
Drag-and-drop a Processor object from the Library Icon Grid to the 3D view. Right click the Processor and select Edit, then Add to User Library, then UserLibrary 1 to add it to our library.
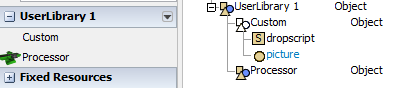
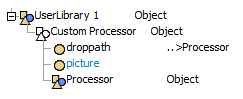
We want to dynamically change the size of our Processor as it is dragged into the 3D view. In order to accomplish this, we will use our Custom object with code in our dropscript node. We don't want our Processor to show up in the Library Icon Grid, so we'll copy it into our Custom object as an attribute node.
Copy the Processor object (left click and hit Ctrl+C). Left click on the Custom object and open the object's attribute tree if it is not currently open by pressing the Arrow button. Hit the enter key to create a new attribute node in the Custom object. Left click the new node and hit Ctrl+P to paste the Processor object. You can then delete the original Processor object.
Create a new GlobalTable through Tools, then Global Tables, then Add. Name the table SizeTable. Make your GlobalTable look as follows:

The values from this table will define the size of our processor.
Back in the Custom object, update the dropscript code to the following:
		treenode ontoObj = param(1);
		Vec3 ontoLoc = Vec3(param(2), param(3), param(4));
		treenode ontoView = param(5);
		Object newProcessor = dropuserlibraryobject(node("..>Processor", c), ontoObj, ontoLoc.x, ontoLoc.y, ontoLoc.z, ontoView);
		Table sizeTable = Table("SizeTable");
		newProcessor.size = Vec3(sizeTable[1][1], sizeTable[1][2], sizeTable[1][3]);
		return newProcessor;
Right click the dropscript node and select Build, then Build Node FlexScript.
Now create a Custom object by dragging and dropping it from the Library Icon Grid to a 3D view. Notice the size of the object has been altered by our dropscript.
Automatic Install Example
For this example, we will have the Processor object from the Dropscript Dynamic Parameters Example be automatically installed when the user creates a new model.
Open the GlobalTable SizeTable. Click on the
 button and select Add to UserLibrary 1,
then As Auto-Install Component.
button and select Add to UserLibrary 1,
then As Auto-Install Component.
Open UserLibrary 1's Tree view by click the arrow next to the User Library in the Library Icon Grid and select Explore Tree.
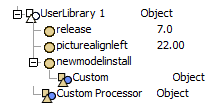
Expand the library's attributes tree by pressing the Arrow button next to UserLibrary 1. The tree should appear as follows.
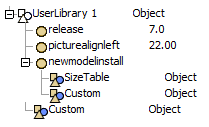
Press the plus button next to the newmodelinstall to expand the node. Notice our SizeTable already appears inside the node. This is important as our Custom object's dropscript refers to this GlobalTable.
Create a subnode of newmodelinstall by left-clicking the node and hitting the Enter key. Copy and paste the Custom object onto this new node.
Now you can hit the "New" button on the toolbar of File, then New Model. You'll notice that there is a Processor1 object in the 3D view and our SizeTable in the GlobalTables. The newmodelinstall folder acts a set of objects that will be "dropped" into the model when a new model is created. The object's are "dropped" in that the same functionality is executed as when you actually drag an object from the icon grid. In the case of a dropscript object, the script is executed as if the object were dropped at the point (0,0,0) in the model.