Task 4.1 - Build the 3D Model and Process Flow
Task Overview
Your goal in this task is to build a 3D model and process flow that will simulate a workstation in which a sticker machine attaches a sticker to a product as it comes through the production line. (See the Tutorial Overview for more detailed information about this simulation model.)
In this task, you will build the first phase of your 3D model of the sticker system and create the basic logic that will control the 3D model using the Process Flow tool.
Step 1 Build the 3D Model
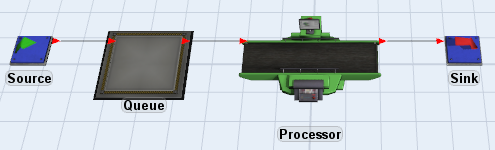
In this step, you'll add the basic objects that will represent your production line in your 3D simulation model. Then, you'll add the objects you'll need to simulate the tool changeover when an employee replaces a roll of stickers on the sticker machine. When you're finished, your model will look like this:

To create this model:
- First you'll create the main production line for your business system. With the
Library open, drag the following objects into your 3D model in this order:
- Source
- Queue
- Processor
- Sink
- Create port connections (A-connects) between each of these objects in the order you added them to the model:
- Next, add an additional Queue which will act as a storage area for the sticker rolls. Place the Queue a short distance from the Processor in the model.
- Add an Operator to the model. The Operator will replace the sticker rolls with a new roll once they've been depleted. Place the Operator somewhere between the Processor and the Queue.
- For clarity, rename the following objects:
| Object | New Name |
|---|---|
| Processor | StickerMachine |
| Queue (the second one) | RollStorage |
| Operator | RollOperator |
Check to ensure that your model looks similar to the image of the model shown in the beginning of this step.
Step 2 Add Activities to the Roll Refill Process Flow
In this step, you'll add the activities that will control the logic of the sticker roll refill process flow. You'll also add a list (a shared asset) to your process flow.
For now, you'll only add the activities, rename them, and create connections between them. You'll change the property settings for the activities in a later step.
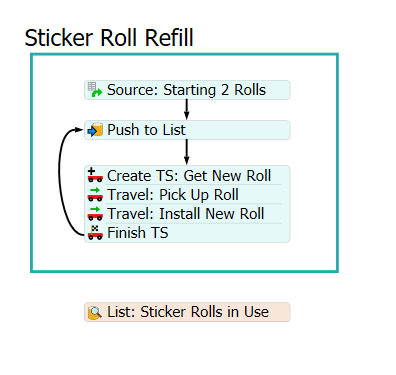
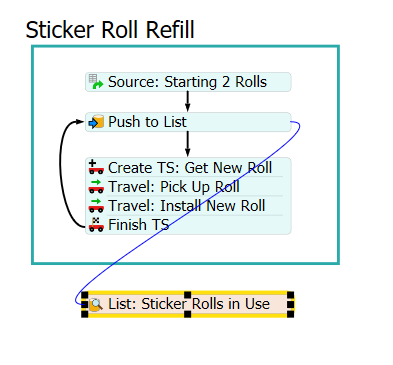
When you're finished, your process flow should look like this:
To create this process flow:
- On the main toolbar, click Process Flow, then select Add a General Process Flow.
- In the Process Flow Library, drag a Container shape (under Display) into your process flow.
- Rename this shape as Sticker Roll Refill.
- Inside the new shape, add the following activities in this order (without connecting
them or making them stacked blocks):
- Schedule Source (under Token Creation)
- Push to List (under Shared Assets)
- Create Task Sequence (under Task Sequences)
- 2 Travel activities (under Task Sequences)
- Finish Task Sequence (under Task Sequences)
- Add a List asset (under Shared Assets) below the Sticker Roll Refill shape. (It will be outside of the shape because this list will be used by multiple activities in the process flow.)
- Rename the following activities and assets:
- Resize the activities to display their full names if needed.
- Join the Create TS: Get New Roll activity and the two Travel activities together in a stacked block.
- Create connections from the Source to the Push to List, then another connection from Push to List to the stacked block with the Travel activities.
- Create a connection from the stacked block to the Push to List activity.
| Object | New Name |
|---|---|
| Source | Source: Starting 2 Rolls |
| Push to List | Push to List: Sticker Rolls |
| Create TS | Create TS: Get New Roll |
| Travel (the first one) | Travel: Pick Up Roll |
| Travel (the second one) | Travel: Install New Roll |
| List | List: Sticker Rolls in Use |
Consider saving your simulation model.
Step 3 Build the Roll Refill Logic
In this step, you will edit the properties for the activities you added in the previous step. The following table provides an overview of how the activities in the Sticker Roll Refill process flow will function:
| Activity | Explanation |
|---|---|
| Schedule Source: Starting 2 Rolls | When the simulation model begins, this activity creates tokens to represent the first two rolls of stickers on the sticker machine in the 3D model. When the Schedule Source creates these two tokens, it will add a label called rollQuantity that will represent the number of stickers that are on the sticker roll when it is first installed on the machine. The rollQuantity label will start with an initial value of 20 stickers. |
| Push to List: Sticker Rolls | When a new roll is installed on the sticker machine, that roll is added to the List: Sticker Rolls in Use. When a roll is empty (because the rollQuantity has been reduced to 0), the token will move to the Travel: Get New Roll activity. |
| Create TS: Get New Roll | When a roll of stickers is empty, this activity will create a new task sequence, which is a series of tasks that will be assigned to the RollOperator. This new task sequence will be called getRoll. By creating a new getRoll task sequence every time a roll of stickers is empty, you'll prevent the RollOperator from being interrupted or diverted to work on other tasks while it is picking up and installing the new roll of stickers. |
| Travel: Pick Up Roll | This activity will add a travel task to the getRoll task sequence. In this task sequence, the RollOperator will travel to the RollStorage queue to get a new roll of stickers. |
| Travel: Install New Roll | This activity will add a second travel task to the getRoll task sequence. After the RollOperator travels to the RollStorage queue, it will return to the sticker machine and install the new roll of stickers. The token will then loop back to the Push to List activity and the cycle will repeat itself indefinitely. |
| Finish TS | This activity declares the sequence of tasks as finished. |
| List: Sticker Rolls in Use | You'll add an additional field to this list that will track and update the rollQuantity label. Every time a flow item is processed by the sticker machine in the 3D model, the list will reduce the rollQuantity by 1. Keep in mind that this list will interact with both the Roll Refill and the Roll Usage process flows at the same time. |
To create this functionality:
- Click the Schedule Source to select it. In
Properties:
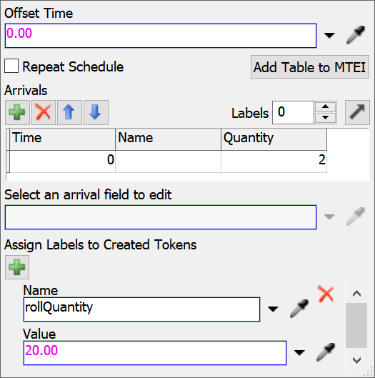
- Under Arrivals, double-click the cell under the
Quantity column and type
2. - Under Assign Labels to Created Tokens, click
the Add button
 to add a new label.
 - In the Name box, type
rollQuantity. - In the Value box, type
20.00.
- Under Arrivals, double-click the cell under the
Quantity column and type
- Click the Push to List activity to select it. Then
click the No Link icon
 to enter sampling mode. Click the
List: Sticker Rolls in Use to link them together.
to enter sampling mode. Click the
List: Sticker Rolls in Use to link them together. - Click the stacked block of Task Sequence activities to
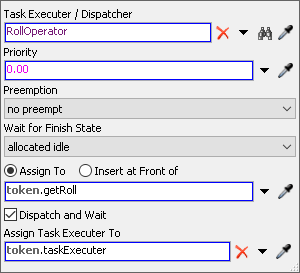
select them. In Properties under Create TS: Get New
Roll:
- Find the Executer/Task Sequence box. Click the
Sampler button
 next to this box to enter
sampling mode. Click the RollOperator in the 3D
model to open a menu. Select RollOperator to assign
the task sequence to this operator.
next to this box to enter
sampling mode. Click the RollOperator in the 3D
model to open a menu. Select RollOperator to assign
the task sequence to this operator. - Next you'll change the name of the label that contains the task sequence.
Click inside the box underneath the Assign To
option and type
Label: getRoll.
- Find the Executer/Task Sequence box. Click the
Sampler button
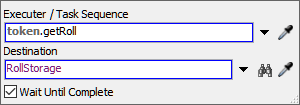
- In Properties under Travel: Pick Up Roll:
- Click the arrow next to the Executer / Task Sequence box to open a menu. Point to Token Label, then select getRoll.
- Find the Destination box. Click the
Sampler button
next to this box to enter
sampling mode. Click the RollStorage queue in the
3D model to open a menu. Select RollStorage to
select the queue as the travel destination.
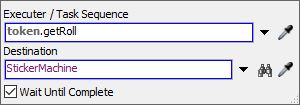
- In Properties under Travel: Install New Roll:
- Click the arrow next to the Executer / Task Sequence box to open a menu. Point to Token Label, then select getRoll.
- Find the Destination box. Click the
Sampler button
to enter sampling mode. Click
the StickerMachine processor in the 3D model to
open a menu. Select StickerMachine to select the
machine as the travel destination.
- In the Properties under Finish TS:
- Click on the box below Task Sequence and enter token.getRoll.

- Lastly, you'll set up the properties for the list. Click the
Sticker Rolls in Use list to select it. In
Properties:
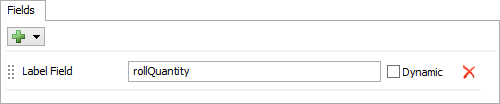
- Click the Advanced button to open up the advanced list properties.
- You'll add a field to this list that will reference and update the
rollQuantity label. With the Field tab
open, click the Add button
to open a menu. Select
Label.
- In the Label Field box, type
rollQuantity. - Make sure the Dynamic checkbox is cleared, then click OK to save the changes.
Consider saving your simulation model.
Step 4 Add Activities to the Roll Usage Process Flow
In this step, you'll add the activities that will control the logic of the sticker roll usage process flow. For now, you'll only add the activities, rename them, and create connections between them. You'll change the property settings for the activities in a later step.
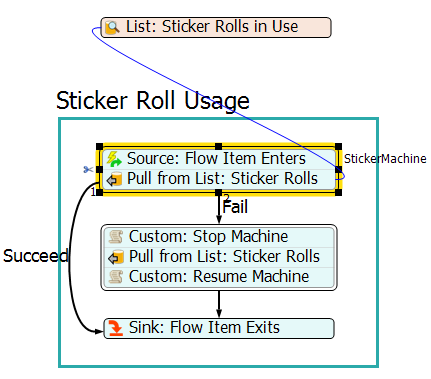
When you're finished, your process flow should look like this:
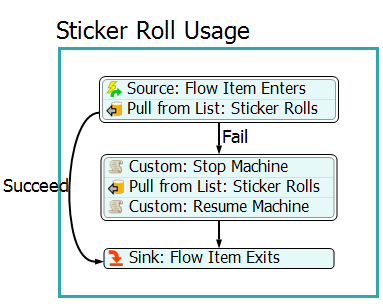
To create this process flow:
- In Process Flow Library, drag a Container shape (under Display) into your process flow.
- Rename this shape as Sticker Roll Usage.
- Create a stacked block with:
- Event-Triggered Source (under Token Creation)
- Pull From List (under Shared Assets)
- Underneath the first stacked block, create another stacked block with:
- Custom Code (under Basic)
- Another Pull From List
- Another Custom Code
- Add a Sink activity underneath the second stacked block.
- Rename the following activities:
- Create a connection from the first stacked block to the Sink activity.
- Click the connection you just created to select it. In Properties in the Name box, type Succeed.
- Create a connection from the first stacked block to the stacked block directly below it.
- Click the connection you just created to select it. In Properties in the Name box, type Fail.
- Create a connection from the second stacked block to the Sink activity.
| Object | New Name |
|---|---|
| Source | Source: Flow Item Enters |
| Pull from List | Pull from List: Sticker Rolls |
| Custom Code | Custom: Stop Machine |
| Pull from List | Pull from List: Sticker Rolls |
| Custom Code | Custom: Resume Machine |
| Sink | Sink: Flow Item Exits |
Consider saving your simulation model.
Step 5 Build the Roll Usage Logic
In this step, you will edit the properties for the activities you added in the previous step. The following is an overview of how the activities in the Sticker Roll Usage process flow will function:
| Activity | Explanation |
|---|---|
| Event-Triggered Source: Flow Item Enters | This activity will listen to the sticker machine in the 3D model. Every time a flow item enters the sticker machine, it will create a new token to represent and track that specific flow item. |
| Pull from List: Sticker Rolls | This activity will pull from the List: Sticker Rolls in Use. When it does so, the list will reduce the quantity of the rollQuantity label by 1. (This label is on the tokens that represent the two rolls of labels in the Roll Refill process flow.) If the rollQuantity is 0 (because the roll is empty and a replacement roll hasn't been installed yet), the token will fail and it will be sent to the Custom Code: Stop Machine activity. If the rollQuantity is not 0, it will succeed (simulating that the sticker machine successfully affixes the sticker to the flow item) and the token will be sent to the Sink activity. |
| List: Sticker Rolls in Use | Every time a flow item is processed by the sticker machine in the 3D model, the list will reduce the rollQuantity by 1. Keep in mind that when the rollQuantity reduces to 0, it will also simultaneously trigger the travel task sequences in the Roll Refill process flow. In other words, once the roll is empty, the RollOperator will travel to the RollStorage queue to pick up another roll. |
| Custom Code: Stop Machine | This activity will stop the sticker machine if both rolls of stickers are empty on the machine. The token will then move to the next activity in this sequence. |
| Pull from List: Sticker Rolls | While the token is in this activity, it will continually attempt to pull from the List: Sticker Rolls in Use. If it fails, it will remain in this activity and try again. It will not succeed until the RollOperator installs a new roll on the sticker machine and the rollQuantity label returns to 20. After this token successfully pulls a sticker from the list, it will move to the next activity in the sequence. |
| Custom Code: Resume Machine | This activity that will restart the sticker machine after the RollOperator installs a new roll of stickers on the machine. |
| Sink: Flow Item Exits | This activity will remove the token from the process flow once the flow item exits the sticker machine. |
To create this functionality:
- Click the first stacked block in the Sticker Roll Usage shape to select it.
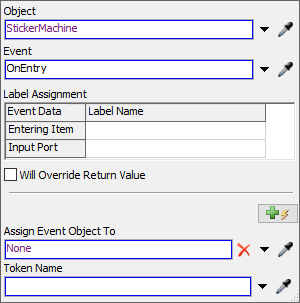
- Next to the Source: Flow Item Enters, click the
No Link icon
to enter sampling mode. Click the
StickerMachine in the 3D model to open a menu. Select
StickerMachine: On Entry. Notice that the following
properties automatically update in Properties:
- With the first stacked block still selected, click the No
Link icon next to the
Pull from List: Sticker Rolls activity to enter sampling
mode. Click the List: Sticker Rolls in Use to link them
together.
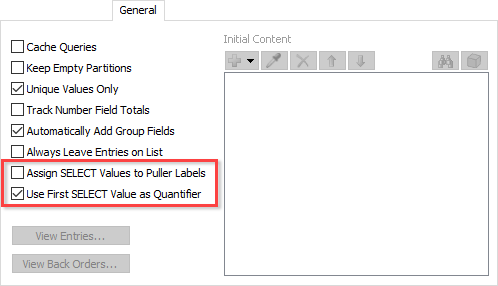
- In Properties of List: Sticker Rolls in Use, press Advanced to open that list's full properties window. Go to the General tab. Clear the Assign SELECT Values to Puller Labels checkbox, and check the Use First SELECT Value as Quantifier checkbox. Press OK to apply and close the properties window.
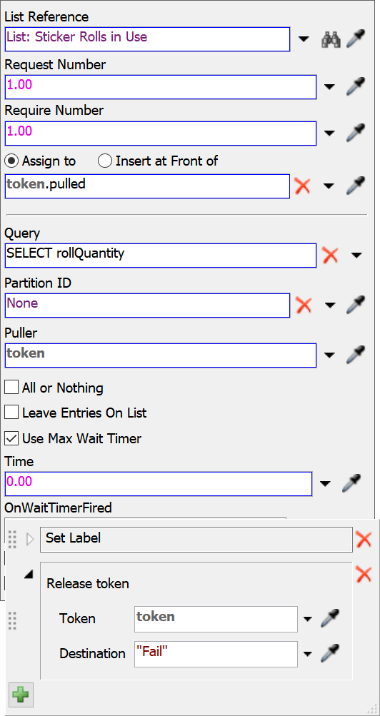
- In Properties of the Pull from List: Sticker
Rolls activity:
- Click the arrow next to the Query box to open a menu. Point to SELECT, then select rollQuantity.
- Check the Use Max Wait Timer box. After clicking this box, an additional set of properties will appear underneath this checkbox.
- Next to the OnWaitTimerFired box, click the
Edit Properties button
 to edit the actions that
will occur when tokens fail.
to edit the actions that
will occur when tokens fail. - Click the arrow next to the Release Token action to expand its properties.
- In the Destination box, type
"Fail". NOTE: Typing2as the Destination would have the same effect since this is the connector ranked 2.
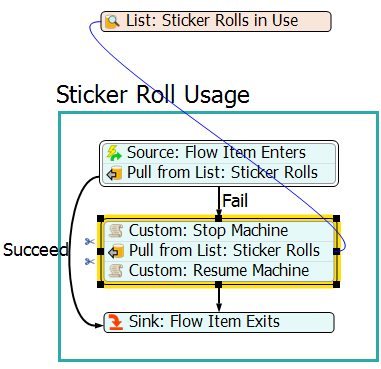
- Click the second stacked block in the Sticker Roll Usage shape to select it.
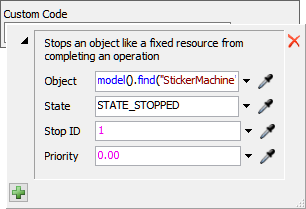
- In Properties under Custom Code: Stop Machine:
- Click the Add button
next to the
Custom Code box to open a menu. Point to
Control, then select Stop
Object. The Stop Object properties will open.
- Click the Sampler button
next to the
Object box to enter sampling mode. Click the
StickerMachine in the 3D model.
- Click the Add button
- With the second stacked block still selected, click the No
Link icon next to the
Pull from List: Sticker Rolls activity to enter sampling
mode. Click the List: Sticker Rolls in Use to link them
together.
- In Properties under Pull from List: Sticker Rolls, click the arrow next to the Query box to open a menu. Point to SELECT, then select rollQuantity.
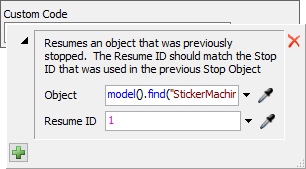
- In Properties under Custom
Code: Resume Machine:
- Click the Add button
next to the
Custom Code box to open a menu. Point to
Control, then select Resume
Object.
- Click the Sampler button
next to the
Object box to enter sampling mode. Click the
StickerMachine in the 3D model.
- Click the Add button
Consider saving your simulation model.
Step 6 Run the Simulation Model
Now it's time to test the model to make sure that it's running correctly. Before you run the model, open the entries for the Sticker Rolls in Use List so that you can see the list in action:
- Click the List: Sticker Rolls in Use to select it.
- In Properties, click the View Entries button to open the list entries. It will be blank before you run your model.
Now reset and run your model and watch it in action.
As you run the model:
- The two rolls of stickers appear in the Sticker Roll Refill process flow.
- As each flow item enters the sticker machine, the rollQuantity reduces by 1.
- When one roll reaches 0, it disappears from the list and the RollOperator travels to the RollStorage queue for another roll.
- While the RollOperator is traveling, the sticker machine begins using stickers from the second roll of stickers.
- After the RollOperator installs the roll on the sticker machine, it appears on the list again and the process repeats itself.
Since the RollStorage queue is fairly close to the sticker machine, the RollOperator always successfully installs the new roll before the second roll is depleted. But if you want to see the sticker machine stop when it runs out of stickers, try moving the RollStorage queue far away from the sticker machine and/or reduce the number of stickers on a roll (by reducing the starting number on the rollQuantity label in the Schedule Source).
Conclusion
Now that you've built the basic 3D model and process flow for your sticker system, it's time to make clones of the sticker systems. The next two tasks in this tutorial will compare and contrast different methods for creating clones of 3D models and process flows. When you complete those tasks, you'll have a better understanding of why it's more effective to use process flow instances to create clones. Continue on to Tutorial Task 4.2 - Create Clones Using Copy and Paste.