The Storage Object Panel
The Storage Object panel defines the look, layout, and filling logic of the storage object.
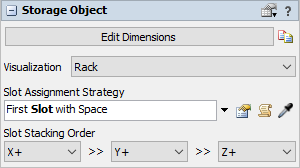
The following properties are on the Storage Object panel:
Edit Dimensions
Opens the Dimensions window.
Visualization
The object's Visualization defines how a storage object should appear in the 3D view. Choose from a list of pre-defined (or custom-defined) visualizations that are defined on the Storage System in the toolbox.
Slot Assignment Strategy
The Slot Assign Strategy is evaluated when a flow item arrives in a storage object and must be assigned a slot. Note that the slot assignment strategy is evaluated only if a flow item is placed into the storage object without having been assigned a slot. If the flow item has already been assigned a slot, through setting the Storage.Item.assignedSlot property, then that assigned slot will take precedence and the slot assignment strategy will not be evaluated.
Slot Stacking Order
The Slot Stacking Order defines how items will be stacked within an individual slot. The user can define one or more axes by which to stack items. The items will be stacked in the order of the axes defined. Example settings are shown below.
| Slot Stacking Order | Sample |
|---|---|
| X+ >> Y+ >> Z+ | 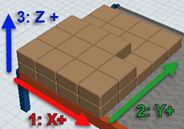 |
| Z+ >> X+ >> Y- | 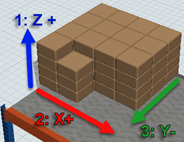 |
Note that the slot stacking order is only visible on Racks and Floor Storage objects. For Gravity Flow Racks, Push Back Racks, and Drive-In Racks, the stacking order is inherent in the nature of the rack type.
The Dimensions Window
The Dimensions window lets you define the dimensions of the slots that make up the storage object. Bay, level, and slot sizes and counts can be defined individually or across the entire object.
The main pane at the top of this tab displays the dimensions of the bays, levels, and slots as they appear when facing the object's pick face. There are also color-coded numbers showing bay, level and slot numbers.
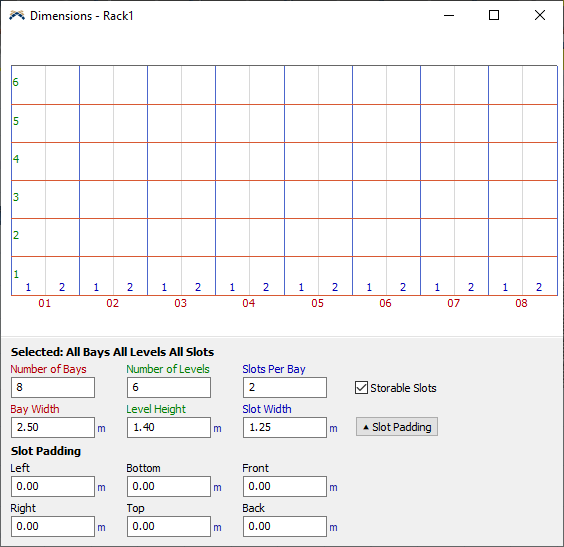
The set of color coded controls below the main pane display inputs for defining various widths, heights, and counts.
If you have not selected any specific cells in the main pane, then any inputs you define will apply across the entire object. If, on the other hand, you select specific cells, then the inputs you define, if applicable, will apply to the specific cell(s) you have selected.
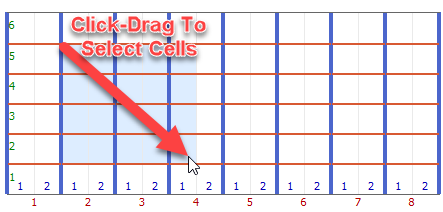
To select a specific set of cells, just press the mouse button at the top corner of the target area, and drag the cursor to the bottom corner. This will select the set of cells contained within the encompassed area.
The following properties are on the Dimensions window:
Number of Bays/Levels/Slots
Defining the number of bays/levels/slots will change how many bays/levels/slots should be in the selected set of cells, or in the entire object.
Bay Width / Level Height / Slot Width
You can also change the corresponding sizes of bays, levels, or slots through their corresponding input controls at the bottome of the window.
Storable Slots
You can also make a set of cells "unstorable" by clearing the Storable Slots checkbox. When a slot is not storable, the pane will show a red X over that slot. You cannot assign items to that slot, and it will be excluded by default from slot searches that are done with the Storage.system.findSlot() method.
Slot Padding
Pressing the Slot Padding button on the right will expand a pane of controls for defining the padding of slots. A slot's padding defines how much space on the edges of a slot cannot be used for item storage. You can individually define the amount of padding for all 6 sides of your slots.