Using the Milestone Collector
About the Milestone Collector
Before reading this topic, consider reading Key Concepts About Getting Data to ensure you are familiar with the overall processes and tools that are involved in getting data from a simulation model.
The Milestone Collector is a tool that you can use to create and track milestones in your simulation model. A milestone is any event that occurs in a simulation run that you are interested in tracking for statistical purposes. For example, imagine you were simulating a health care facility and you wanted to track how long it takes patients to complete the check-in process. You could create a new milestone collector and set milestones for the beginning and end of the check-in process. During a simulation run as patients begin to enter the health care facility, the milestone collector could track when each patient began and ended the check-in process. You could even gather more specific data about when the patient completed specific steps in the check-in process by making each step in the process its own milestone.
After setting up your milestone collector and running the simulation model, you could then export the data or use one of FlexSim's milestone chart templates to visualize the milestone data. A milestone interval is the amount of time it took a flow item or customer to get from one milestone to another during a simulation run. You can gather statistics about the minimum, maximum, and average times between two intervals as needed.
Create a New Milestone Collector
One important concept to keep in mind is that each milestone collector will always have a data table associated with it. If you would like to create multiple tables that will each track different milestone data, you should create a separate milestone collector for each table.
You can add, manage, and delete milestone collectors using the Toolbox. See Using the Toolbox for more information.
Adding Milestones
The first step in setting up a milestone collector is to define your milestones. For that you need to tell the milestone collector which object(s) and events will be considered a milestone. You'll use the Milestones tab on the milestone collector to add the events:
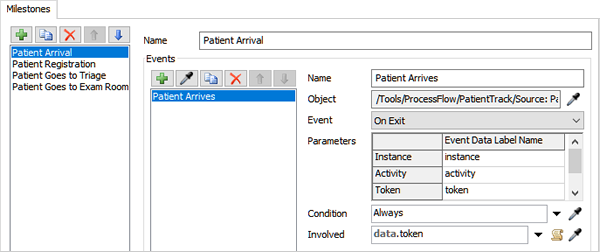
The Milestone List is on the left side of this tab. The Milestone List displays all the milestones that the milestone collector is currently listening to. You'll need to add milestones to this list if you want the milestone collector to listen to them. (See Types of Events for more information about the types of events a milestone collector can listen to.)
Adding Milestones Using the Sampler Button
The sampler button is one of the easiest ways to add a milestone to the collector. To add a milestone using the sampler button:
- Click the Add button
 above the Milestone List to add a new
milestone.
above the Milestone List to add a new
milestone. - With the new milestone selected, you can give the milestone a more memorable name in the Name box.
- In the Events group, click the
Sampler button
 to enter sampling mode.
 - In the 3D model, click the object you want the milestone collector to listen to during a simulation run. The method you will use for sampling the object might differ based on the type of object you are sampling:
- When you click the object, it will open a menu listing all the events that are available for this type of object. Select the appropriate event from the list.
| Type | Explanation |
|---|---|
| 3D Object | Click an object in the 3D model to sample it |
| Process Flow Activity or Shared Asset | Click an activity or shared asset in a process flow to sample it |
| Groups | In the Toolbox under Groups, click the name of the group to sample it |
| Tracked Variables | In the Toolbox under Tracked Variables, click the name of the variable to sample it |
Adding Events Using the Menu
Alternatively, you can use the Add button to
select an event using the menu. To add events using the menu:
- Click the Add button
above the Milestone List to add a new
milestone.
- With the new milestone selected, you can give the milestone a more memorable name in the Name box.
- In the Events group, click the
Add button to
open a menu. Navigate to the object or group that want to select.
Changing the Object or Event
Use the Event List in the Events group to delete, copy, or add any additional milestones as needed.
Editing Milestone Details
The properties in the milestone details are context-sensitive, meaning that different properties will be available depending on the type of event that is currently selected in the Event List. In general, you'll likely use the default settings for the milestone details and you won't need to change them. However, you can use the milestone details to:
- Give Your Event a Custom Name - You can change the event's name if needed.
- Create Labels from Event Parameters - Object-based events have specific parameters associated with them. These parameters contain basic information about the event, such as which flow item or token triggered the event. You can use the Event Details properties to preserve any relevant information from these parameters with a custom label.
- Change the Object or Event - If you selected the wrong object but would still like to use that specific event (or vice versa), you can make that change here.
- Add a Condition - If you want to further filter or restrict the events that the milestone collector listens to, you could add a condition that tells the milestone collector which events to record or ignore. For example, you could specify that it should only record an event if the value of a label on the flow item meets some criteria, such as having a ProductType label equal to 2.
Using a Milestone Chart Template
Once you've set up a milestone collector, you can add a milestone chart template to a dashboard that will display data from that collector. The chart templates that are designed to work with milestone collectors can be found in the Dashboard Library under the Milestone Templates group.
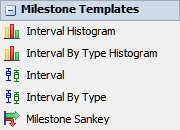
Pick a chart based on the type of statistic you want and the way you want to visualize the statistic. (See Key Concepts About Dashboards and Charts and Overview of Chart Templates - Milestone Templates for more information.) The chart template will auto-generate any additional collectors or calculated tables that you'll need for that statistic.
Viewing a Milestone Collector Table
If you would like to view the raw data collected by a milestone collector during or after a simulation run, you can view the milestone collector table. To view the table:
- With the milestone collector open, click the General tab.
- Click the View Table button to open a table and view the data.
Exporting Milestone Collector Data
You can also export the data gathered by a milestone collector as a .CSV file for analysis by your preferred third party software if needed. To export the data from a milestone collector table:
- With the milestone collector open, click the General tab.
- Click the Export Table button.
- Navigate to the file directory where you'd like to save the .CSV and give it an appropriate file name.