Task 1.4 - Link the Models
Task Overview
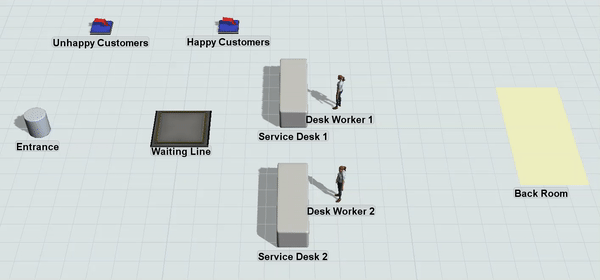
The real power of using FlexSim comes from combining the strengths of the Process Flow tool with the 3D visuals. In this tutorial task, you'll learn how to link a process flow to the 3D model so that the process flow can control the overall logic. You'll also add an additional service desk to see how it affects your business system's overall statistics. When you're finished, your simulation model will look similar to the following image:
And your process flow will control the overall logic of the model:
Using Labels to Connect to the 3D Model
In this tutorial, you'll use labels extensively to link tokens in a process flow to objects in the 3D model. Process flows can control the logic of the 3D model using labels that contain a reference to a 3D object in the model. As the token moves through the activities in the process flow, the activity's logic can be applied to the object in the 3D model using the reference in the label. Consider reading Key Concepts About Labels for a deeper understanding of how to work with labels in a process flow.
In this model, you'll use labels to link tokens to flow items in the 3D model. You'll create a label named customer to link tokens in a process flow to the customers in the 3D model. You'll also create labels to keep track of the resources in the model: the two service desks and the two desk workers.
Step 1 Remove the Flow Logic in the 3D Model
Before you can link the process flow model to the 3D model, you'll need to remove all the old logic that controls the flow of customers in the 3D model. You'll delete the Customers Arrive source and remove the port connections. Then, you'll remove the list logic from the Waiting Line queue, the Service Desk, and the Unhappy Customers sink.
To make these changes:
- Click the Customers Arrive source and press the Delete key to delete it.
- Click the Disconnect Objects button
 on the toolbar
to open a menu. Select Disconnect Objects to enter
disconnection mode.
on the toolbar
to open a menu. Select Disconnect Objects to enter
disconnection mode. - When you are in disconnection mode, your mouse pointer will change to a plus sign
with broken chain link symbol next to it:

- Once you are in disconnection mode, you can remove a connection between two objects. Click the Service Desk processor. (You will notice as you move your mouse that a yellow line will appear between the object you clicked and your cursor.)
- Click the Happy Customers sink to remove the port connection.
- Press the Esc key to exit disconnection mode.
- Click on the Waiting Line queue. In Properties expand the section titled Output.
- Click the arrow next to the Send to Port box to open a menu. Select First Available.
- Click on the Service Desk. In Properties expand the section titled Input.
- Clear the Pull Strategy checkbox.
- Repeat the previous steps to remove the pull logic from the Unhappy Customers sink as well.
Consider saving your model.
Step 2 Add New Objects and Change the 3D Visuals
In this step, you'll add some new objects to the 3D model. You'll add two visual objects: 1) a shape object that will act as the entrance to the customer service center and 2) a plane to represent the back room of the customer service center. You'll also add an additional service desk and two workers to help customers at the service desks. By adding these additional service desks, you'll be able to study the ideal number of service desks and employees that will be needed to meet customer demand.
After you've added these objects, you'll then change the visual properties of some of the objects to make them look more realistic or functional. You'll change the color of the back room area so that it is more visible, you'll make the service desks look more like desks, and you'll change the visual appearance of the workers so that they look different from the customers. When you're finished, your 3D model should look similar to the following image:
To make these changes:
- From the Library, add the following objects to the 3D model:
- A Shape (under the Visual group)
- A Plane (under the Visual group)
- A Processor (under the Fixed Resources group)
- 2 Operators under the Task Executers group)
- For clarity, rename the new objects as follows:
- Click the Back Room to select it.
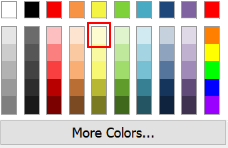
- In Properties, click the arrow next to the color box in the Visuals section to open the color selector. Select the lightest yellow color.
- Change the X-size to 3.00.
- From the Library drag out a BasicFR under the Fixed Resources section.
- Click on Service Desk. In Properties expand the section titled Visuals.
- Click the
 Sampler next to the shape field,
and click on the BasicFR object that you dragged out. This should change the Service Desk
to be a basic box shape like the BasicFR.
Sampler next to the shape field,
and click on the BasicFR object that you dragged out. This should change the Service Desk
to be a basic box shape like the BasicFR. - Click the arrow next to the Color box to open the color selector. Select the second lightest gray color.
- In the Visual Section, change the
following sizes:
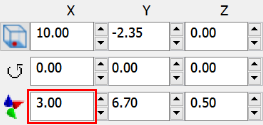
- X-Size: 1.30
- Y-Size: 4.00
- Z-Size: 1.00
- Repeat the previous steps to change the visuals for Service Desk 2 as well.
- Once the shapes have been selected, you may delete the BasicFR object.
- If needed, re-arrange the 3D objects so they look more like the image of the model at the beginning of this step.
| Object | New Name |
|---|---|
| Shape | Entrance |
| Plane | Back Room |
| First Processor | Service Desk 1 |
| Second Processor | Service Desk 2 |
| First Operator | Desk Worker 1 |
| Second Operator | Desk Worker 2 |
Consider saving your simulation model.
Step 3 Add 3D Objects to Groups
As was mentioned in the introduction for the previous step, you added an additional service desk so that you can experiment with how much an additional service desk will affect the customer statistics. In the future, you might possibly want to add any number of service desks so that you can find the optimal number of desks and employees, especially if customer traffic patterns change. In order to make your model scale-able for more than one service desk, you'll want to add the service desks to a group. You'll also want to create an additional group for the desk workers. In a future step, you'll link both of these groups to the process flow.
To create these groups:
- Click the Toolbox tab in the left pane to open the Toolbox.
- Click the Add button
 to open a menu. Select
Group to add a new group.
to open a menu. Select
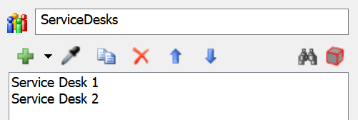
Group to add a new group. - In the name box at the top of the properties window, change the name of this group to ServiceDesks.
- Click the Sampler button
to enter sampling model.
- In the 3D model, sample Service Desk 1 to add it to the group.
- Repeat these steps to add Service Desk 2 to the group as well.
- Close the window by clicking the X in the top right corner. Confirm that the new ServiceDesks group now appears in the Toolbox under Groups.
- Repeat this process to create a second group named DeskWorkers. Add Desk Worker 1 and Desk Worker 2 to this group.
Consider saving your simulation model.
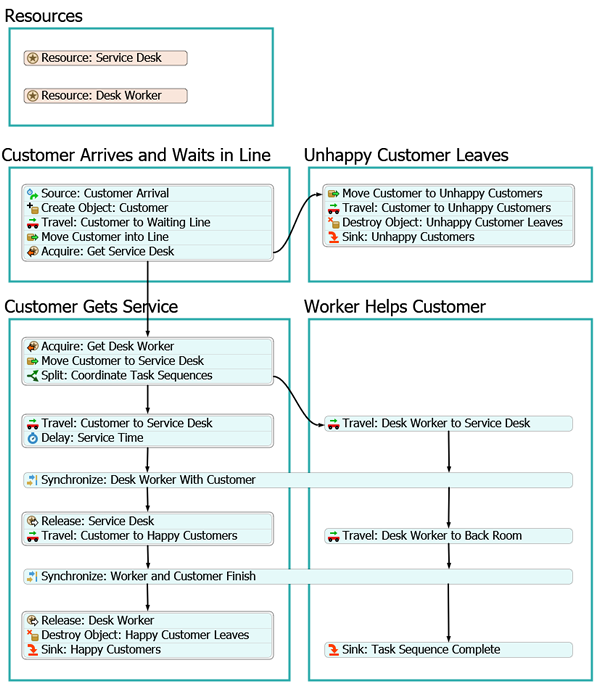
Step 4 Reorganize the Process Flow
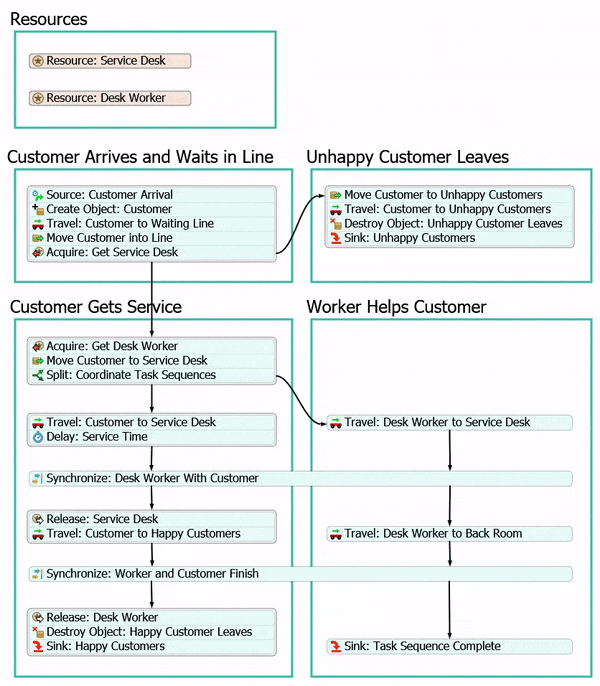
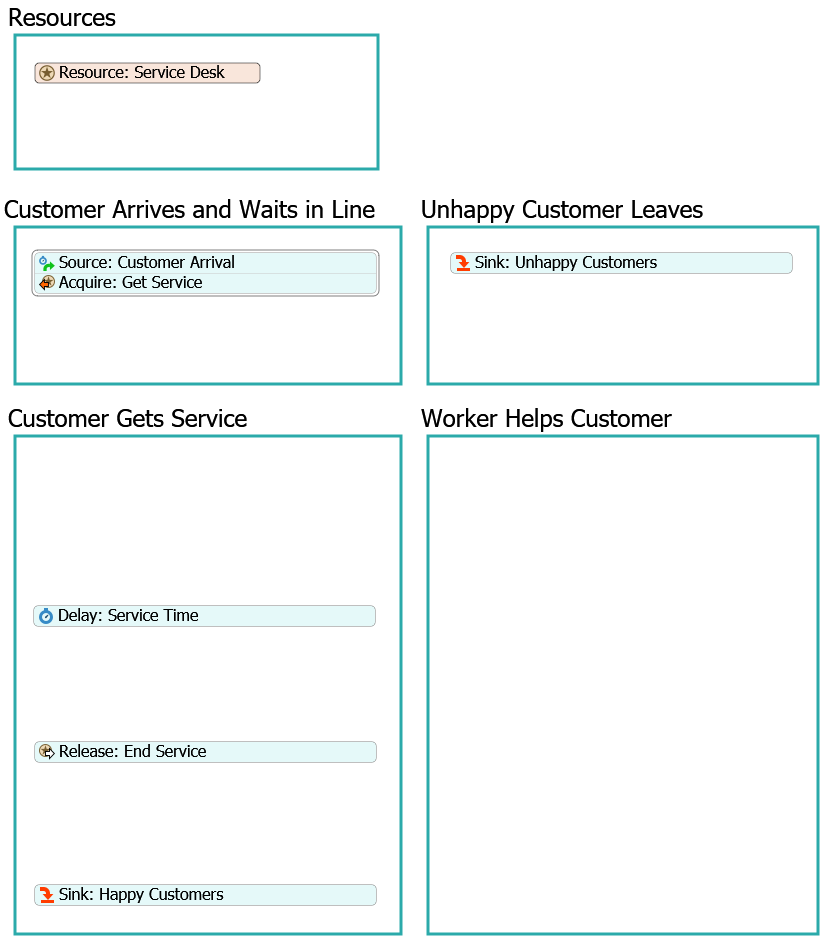
Your process flow is about to become a little more complex. For that reason, it might be a good idea to use some container shapes to keep your activities organized. Adding and naming process flow shapes can help keep your process flow more organized so that you can easily follow the logic of a process flow. When you're finished, your process flow will look similar to the following image:
To make these changes:
- In the process flow, delete the two connectors between the stacked blocks of activities. Be aware that this might cause some error messages to appear.
- From the Library under Display, add 5 Container shapes to the process flow.
- Rename the Process shapes as follows:
- Resources
- Customer Arrives and Waits in Line
- Unhappy Customers Leave
- Customer Gets Service
- Worker Helps Customer
- Move the Resource: Service Desk to the Resources shape.
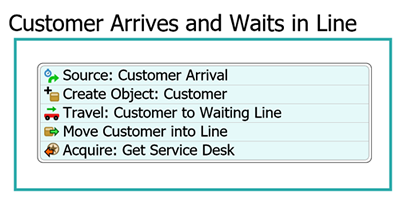
- Move the stacked block with the Source: Customer Arrival to the Customer Arrives and Waits in Line shape.
- Move the Sink: Unhappy Customers activity to the Unhappy Customers Leave shape.
- Click the stacked block with the Delay: Service Time activity to select it.
- Click the Scissors button
 between the activities to separate
all of them and make them loose and unconnected.
between the activities to separate
all of them and make them loose and unconnected.
Consider saving your simulation model.
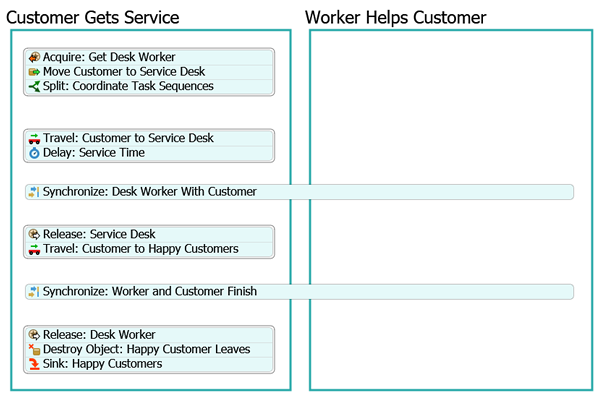
Step 5 Add Additional Process Flow Activities
In this step, you'll add activities to your process flow that will control the logic of the 3D model. When you're finished with this step, your process flow will look similar to the following image:
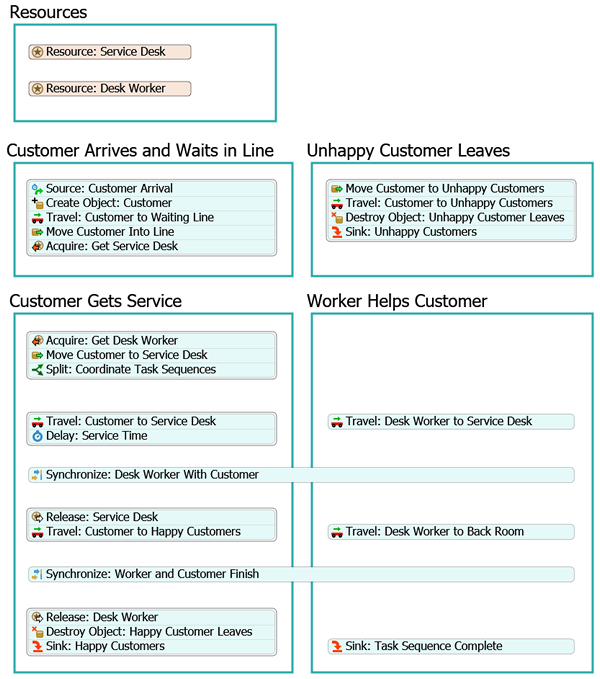
For now, you'll merely add and connect these activities to the process flow. You'll edit the properties to add the functionality in a later step.
To add these activities:
- In the Resources shape, add an additional Resource shared asset (under Shared Assets).
- Change the name of this new shared asset to Resource: Desk Worker.
- In the Library under the Objects group, drag a Create Object activity and drop it in the Customer Arrives and Waits in Line shape between the Source: Customer Arrival and Acquire: Get Service activity.
- Continue to insert the following activities after the Create
Object activity and before the Acquire: Get
Service activity in this stacked block:
- A Travel activity (under Task Sequences)
- A Move Object activity (under Objects)
- Rename the activities in this stacked block as follows:
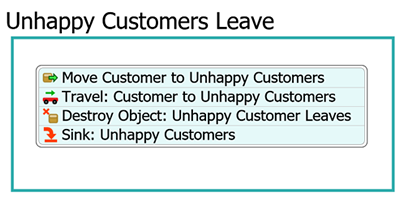
- In the Unhappy Customers Leave shape, add the following
activities before the Sink: Unhappy Customers activity to
create a stacked block:
- A Move Object activity (under Objects)
- A Travel activity (under Task Sequences)
- A Destroy Object activity (under Objects)
- Rename the activities in this stacked block as follows:
- In the Customer Gets Service shape, create a new
stacked block with the following activities (not including the Delay activity):
- An Acquire Resource activity (under Shared Assets)
- A Move Object activity (under Objects)
- A Split activity (under Coordination)
- Also in the Customer Gets Service shape, add a Travel activity (under Task Sequences) and snap the Delay: Service Time activity to the end of this activity to create another stacked block.
- Add a Synchronize activity (under Coordination) after this stacked block, but leave it loose and unconnected.
- After the Release: End Service activity, add a Travel activity (under Task Sequences) to create a stacked block.
- Add a second Synchronize activity (under Coordination) after this stacked block, but leave it loose and unconnected.
- Add the following activities before the Sink: Happy
Customers to create a stacked block:
- A Release Resource activity (under Shared Assets)
- A Destroy Object activity (under Objects)
- Rename the activities in this shape as follows:
- Resize both of the Synchronize activities so that they span across the Customer Gets Service and Worker Helps Customer shapes.
- In the Worker Helps Customer shape, add the following
activities, but do not connect them into a stacked block:
- 2 Travel activities (under Task Sequences)
- A Sink activity (under Basic)
- Rename the activities as follows:
- Move the Travel: Desk Worker to Service Desk activity so that it is parallel to the Travel: Customer to Service Desk activity.
- Move the Travel: Desk Worker to Back Room activity so that it is parallel to the Travel: Customers to Happy Customers activity.
- Move the Sink: Task Sequence activity so that it is parallel to the Sink: Happy Customers activity.

| Activity | New Name |
|---|---|
| Create Object | Create Object: Customer |
| Travel | Travel: Customer to Waiting Line |
| Move Object | Move Customer into Line |
| Acquire: Get Service | Acquire: Get Service Desk |
| Activity | New Name |
|---|---|
| Move Object | Move Customer to Unhappy Customers |
| Travel | Travel: Customer to Unhappy Customers |
| Destroy Object | Destroy Object: Unhappy Customer Leaves |
| Activity | New Name |
|---|---|
| Acquire | Acquire: Get Desk Worker |
| Move Object | Move Customer to Service Desk |
| Split | Split: Coordinate Task Sequences |
| Travel | Travel: Customer to Service Desk |
| First Synchronize | Synchronize: Desk Worker With Customer |
| Release: End Service | Release: Service Desk |
| Travel | Travel: Customer to Happy Customers |
| Second Synchronize | Synchronize: Worker and Customer Finish |
| Release (second activity) | Release: Desk Worker |
| Destroy Object | Destroy Object: Happy Customer Leaves |
| Activity | New Name |
|---|---|
| First Travel | Travel: Desk Worker to Service Desk |
| Second Travel | Travel: Desk Worker to Back Room |
| Sink | Sink: Task Sequence Complete |
Check to make sure your process flow looks similar to the image at the beginning of this step.
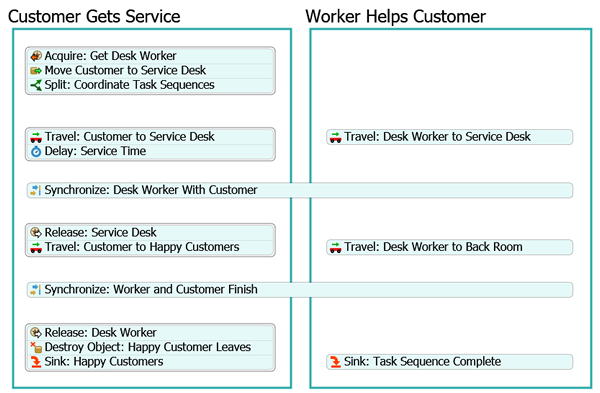
Step 6 Connect the Activities
You'll notice that in the previous step you added some coordination activities (the Split and Synchronize activities). These logic of these activities depends on setting up the connectors between your activities correctly. (See Process Flow Coordination for more information.) For that reason, you'll work on connecting all the activities correctly in this step. The important thing to pay attention to is making sure you connect the activities in the right order so that the connector rankings are correct.
When you're finished, your process flow should look similar to the following image:
To connect these activities:
- Create a connector going out from the Acquire: Get Service Desk activity to the Acquire: Get Desk Worker activity.
- Create a second connector going out from the Acquire: Get Service Desk activity to the Move Customer to Unhappy Customers activity.
- Create a connector going out from the Split: Coordinate Task Sequences activity to the Travel: Customer to Service Desk activity.
- Create a second connector going out from the Split: Coordinate Task Sequences activity to the Travel: Desk Worker to Service Desk activity.
- Create a connector going out from the Delay: Service Time activity to the Synchronize: Desk Worker With Customer activity.
- Create a connector going out from the Travel: Desk Worker to Service Desk activity to the Synchronize: Desk Worker With Customer activity.
- Create a connector going out from the Synchronize: Desk Worker With Customer to the Release: Service Desk activity.
- Create a second connector going out from the Synchronize: Desk Worker With Customer to the Travel: Desk Worker to Back Room activity.
- Create a connector going out from the Travel: Customer to Happy Customers activity to the Synchronize: Worker and Customer Finish activity.
- Create a connector going out from the Travel: Desk Worker to Back Room activity to the Synchronize: Worker and Customer Finish activity.
- Create a connector going out from the Synchronize: Worker and Customer Finish to the Release: Desk Worker activity.
- Create a second connector going out from the Synchronize: Worker and Customer Finish to the Sink: Task Sequence Complete activity.
Consider saving your simulation model.
Step 7 Edit the Customer Arrival Logic
In this step, you will edit the properties for the new activities you added in one of the previous steps. In this step, you'll edit the logic that will affect customer arrivals and the waiting lines. You'll also start setting up some of the labels that will link tokens in the process flow to objects in the 3D model.
The following is an overview of how the activities in this process flow will function:
| Activity | Explanation |
|---|---|
| Resource: Service Desk | Since this shared asset represents the customer service desks in the business system, you'll link it to the Service Desk group you created in a previous step. You'll recall that both of the Service Desk processor objects from the 3D model are members of this group. |
| Resource: Desk Worker | In a similar vein, you'll link this shared asset to the Desk Workers group. |
| Source: Customer Arrival | You won't make any changes to this activity. It will still create tokens to represent customers. It will simulate the random arrival of customers using the exponential statistical distribution. |
| Create Object: Customer | When a token enters this activity, it will create the visual representation of
the customer. It will look identical to the person flow item that you created
in the first tutorial task but it will function more like a task executer. You'll
tell this activity to create the flow item inside the Entrance shape. You'll also create a label called customer that will link this 3D object (the customer flow item) to this token. The label will contain a reference to the flow item that is tied to this specific token. You'll refer to this label throughout the rest of the process flow. |
| Travel: Customer to Waiting Line | This activity will cause the customer to walk from the entrance to the waiting line. |
| Move Customer Into Line | Since the travel activity only moves the customer to the waiting line, you need to move the customer into the waiting line in order for the queue to apply its line logic to the customers. |
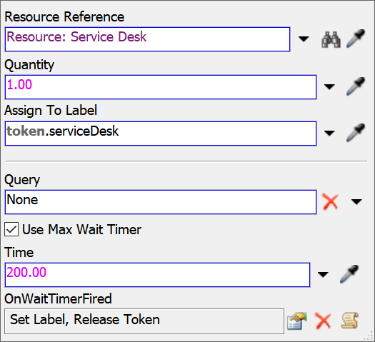
| Acquire: Get Service Desk | Much of this logic will stay the same. However, you'll change the default label
that is assigned to the token that tracks the resource that was pulled by the token.
You'll rename this label serviceDesk for clarity. Recall from the previous tutorial task that the customer will wait in line for an open service desk for a maximum of 200 seconds. If the customer reaches 200 seconds, the token will be sent to the Unhappy Customer activity sequence instead. |
To add this functionality:
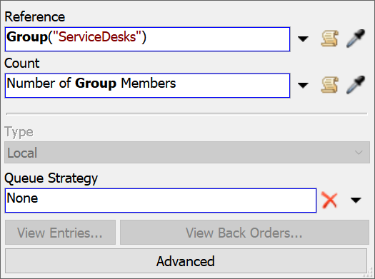
- Click the Resource: Service Desk shared asset to select it. In Properties, click the arrow next to the Reference box to open a menu. Point to Group, then select ServiceDesks.
- Repeat the previous step for the Resource: Desk Workers shared asset, this time linking it to the DeskWorkers group.
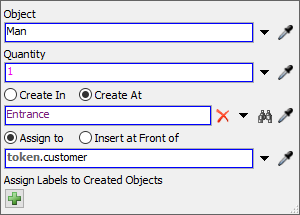
- Click the Create Object: Customer activity to select it. In Properties, click the arrow next to the Object box to open a menu. Point to Flowitems, then select Man.
- Click the Create At button. Then click the
Sampler button
next to this box to enter sampling
mode.
- In the 3D model, click the Entrance to open a menu. Select Entrance from the menu to sample this object.
- In the Assign to box, type
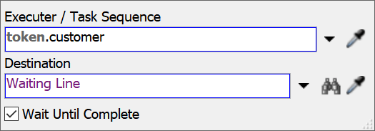
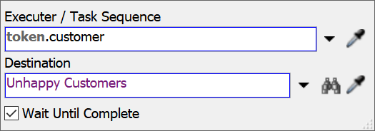
token.customer. - Click the Travel: Customer to Waiting Line activity to select it. In Properties, click the arrow next to the Executer / Task Sequence box to open a menu. Point to Token Label, then select customer.
- Next to the Destination button, click the
Sampler button
to enter sampling mode.
- In the 3D model, click the Waiting Line queue to open a menu. Select Waiting Line to sample this object.
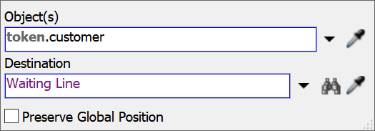
- Click the Move Customer to Waiting Line activity to select it. In Properties, click the arrow next to the Object(s) box to open a menu. Point to Token Label, then select customer.
- Next to the Destination button, click the
Sampler button
to enter sampling mode.
- In the 3D model, click the Waiting Line queue to open a menu. Select Waiting Line to sample this object.
- Click the Acquire: Get Service Desk activity to select
it. In Properties in the Assign To Label box, delete
the current text and type
token.serviceDesk.
Consider saving your simulation model.
Step 8 Edit the Unhappy Customer Logic
In this step, you will edit the properties for the activities in the Customer Leaves and Unhappy Customers Leave shapes. You'll edit the activities that will release the acquired resources and remove both the happy and unhappy customers from the 3D model. The following is an overview of how the activities in this process flow will function:
| Activity | Explanation |
|---|---|
| Move Customer to Unhappy Customers | Since you moved the customer into the waiting line in the 3D model, you'll need this activity to move them out of the waiting line and into Unhappy Customers sink. |
| Travel: Customer to Unhappy Customers | This activity sends the customer to the Unhappy Customers sink. |
| Destroy Object: Unhappy Customer Leaves | This activity removes the customer flow item from the simulation model. |
| Sink: Unhappy Customers | This activity removes the token that was linked to the customer from the process flow. |
To create this functionality:
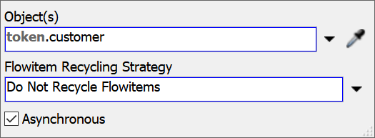
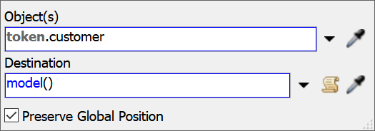
- In the Unhappy Customers Leave shape, click the Move Customer to Unhappy Customers activity to select it. In Properties, click the arrow next to the Object(s) box to open a menu. Point to Token Label, then select customer.
- Click the arrow next to the Destination box, then select Model.
- Check the Preserve Global Position checkbox.
- Click the Travel: Customer to Unhappy Customers activity to select it. In Properties, click the arrow next to the Executer / Task Sequence box to open a menu. Point to Token Label, then select customer.
- Next to the Destination button, click the
Sampler button
to enter sampling mode.
- In the 3D model, click the Unhappy Customers sink to open a menu. Select Unhappy Customers to sample this object.
- Click the Destroy Object: Unhappy Customer Leaves activity to select it. In Properties, click the arrow next to the Object(s) box to open a menu. Point to Token Label, then select customer.

Consider saving your simulation model.
Step 9 Edit the Customer Service Logic
In this step, you will edit the properties for the customer service activities. You'll use two of the Coordination process flow activities for the first time in this step: the Split and Synchronize activities. Coordination activities are useful when you have different processes that will happen concurrently and you want all of them to be synchronized with each other. Unlike other process flow activities, the behavior of Coordination activities is mostly determined by their incoming and outgoing connectors. For that reason, you won't need to edit their properties as much as simply make sure the connectors between the activities do what you need them to do. See Process Flow Coordination for more information.
The following is an overview of how the activities in this process flow will function:
| Activity | Explanation |
|---|---|
| Acquire: Get Desk Worker | This activity will acquire one of the Desk Workers to help serve the customer. You'll assign a label named deskWorker to link this token with the worker that has been assigned to help the customer linked to this token. |
| Move Customer to Service Desk | Since you moved the customer into the waiting line in the previous step, you'll need this activity to move them out of the waiting line and back into the general model. |
| Split: Coordinate Task Sequences | The Split activity will split the incoming token into two identical tokens and release them through each outgoing connector. You'll use these two tokens to synchronize the customer with the desk worker. One token will control the customer and the other will control the desk worker. You'll create the second token as a child token with access to the original token's labels. |
| Travel: Desk Worker to Service Desk | This activity will send the acquired desk worker to the acquired service desk. |
| Travel: Customer to Service Desk | This activity will send the customer to the acquired service desk. |
| Delay: Service Time | You won't make any changes to this activity. Recall that the delay will simply represent the amount of time it takes the desk worker to help the customer. It will use the lognormal 2 statistical distribution to determine how long the customer will take. |
| Synchronize: Desk Worker With Customer | This activity will ensure that the desk worker stays with the customer for the full amount of the service time. The token controlling the desk worker will wait until the token controlling the customer reaches this activity. |
| Travel: Desk Worker to Back Room | This activity moves the acquired desk worker to the back room after the delay time has finished and it is time for the customer to leave. |
| Release: Service Desk | This activity releases the acquired service desk so that another customer can acquire the desk. |
| Travel: Customer to Happy Customers | This activity sends the customer to the Happy Customers sink. |
| Synchronize: Worker and Customer Finish | This activity ensures that the worker and the customer finish at the same time. The token controlling the desk worker will wait until the token controlling the customer reaches this activity. |
| Release: Desk Worker | This activity releases the acquired desk worker so that another customer can acquire the worker. |
| Destroy Object: Happy Customer Leaves | This activity removes the customer flow item from the simulation model. |
| Sink: Happy Customers | This activity removes the token that was linked to the customer from the process flow. |
To create this functionality:
- In the Customer Gets Service shape, click the
Acquire: Get Desk Worker to select it. Click the
Exclamation icon
 to enter sampling mode.
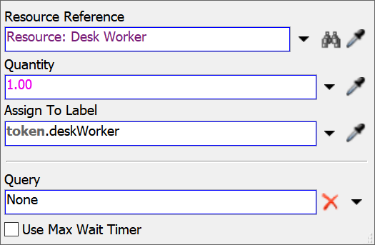
 - Click the Resource: Desk Worker shared asset to link them. A blue line will appear to show they are linked.
- In Properties, in the Assign To Label box, delete
the current text and type
token.deskWorker. - Click the Move Customer to Service Desk activity to select it. In Properties, click the arrow next to the Object(s) box to open a menu. Point to Token Label, then select customer.
- Click the arrow next to the Destination box to open a menu. Select Model.
- Check the Preserve Global Position checkbox.
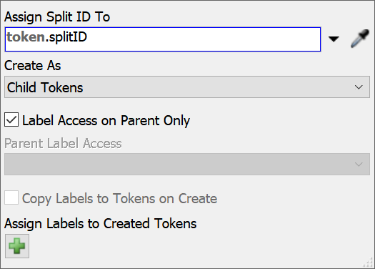
- Click the Split: Coordinate Task Sequences activity to select it. In Properties, click the Create As menu and select Child Tokens. Confirm that the Label Access on Parent Only box is checked.
- Click the Travel: Desk Worker to Service Desk activity in the Worker Helps Customer shape to select it. In Properties, click the arrow next to the Executer / Task Sequence box to open a menu. Point to Token Label, then select deskWorker.
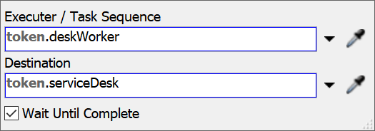
- Click the arrow next to the Destination button to open a menu. Point to Token Label, then select serviceDesk.
- Click the Travel: Customer to Service Desk activity in the Customer Gets Service shape to select it. In Properties, click the arrow next to the Executer / Task Sequence box to open a menu. Point to Token Label, then select customer.
- Click the arrow next to the Destination button to open a menu. Point to Token Label, then select serviceDesk.
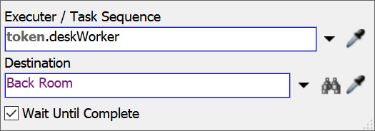
- In the Worker Helps Customer shape, click the Travel: Desk Worker to Back Room activity to select it. In Properties, click the arrow next to the Executer / Task Sequence box to open a menu. Point to Token Label, then select deskWorker.
- Next to the Destination button, click the
Sampler button
to enter sampling mode.
- In the 3D model, click the Back Room to open a menu. Select Back Room to sample this object.
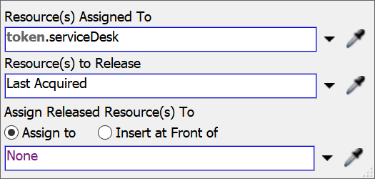
- In the Customer Gets Service shape, click the Release: Service Desk activity to select it. In Properties, click the arrow next to the Resource(s) Assigned To box to open a menu. Point to Token Label then select serviceDesk.
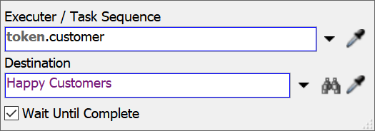
- Click the Travel: Customer to Happy Customers activity to select it. In Properties, click the arrow next to the Executer / Task Sequence box to open a menu. Point to Token Label, then select customer.
- Next to the Destination button, click the
Sampler button
to enter sampling mode.
- In the 3D model, click the Happy Customers sink to open a menu. Select Happy Customers to sample this object.
- Click the Release: Desk Worker activity to select it. In Properties, click the arrow next to the Resource(s) Assigned To box to open a menu. Point to Token Label then select deskWorker.
- Click the Destroy Object: Happy Customer Leaves activity to select it.
- In Properties, click the arrow next to the Object(s) box to open a menu. Point to Token Label, then select customer.


Consider saving your simulation model.
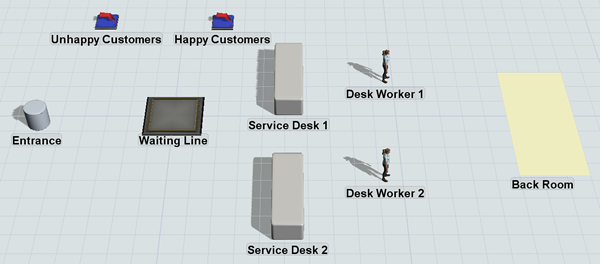
Step 10 Run the Model and Analyze the Results
Reset and run the model.
In the 3D model, the customers should arrive, form a line and get help from the workers at the desk:
The process flow should closely mirror what is happening in the 3D model because it controls it:
Take a look at your process flow charts on your dashboard:
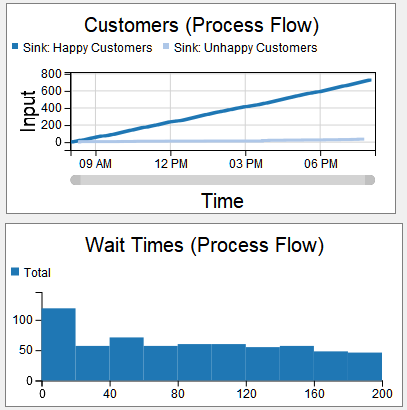
Notice that the addition of another service desk has almost completely solved the problem. The ratio of happy to unhappy customers is much better and the average wait time is greatly reduced.
Conclusion
This concludes the FlexSim Basics tutorial. Hopefully you have a good sense of how easy it is to create a simulation project for nearly any kind of business system using FlexSim. Be aware that you can do even more to model people-based simulation models (like customer service centers) using the People 3D objects and process flow activities. See the FlexSim HC Tutorial for more information.