Task 1.2 - Make a Resource Act Like a List
Task Overview
Up to this point, you've built a basic transportation task sequence for the two task executers in the model. You can actually create this basic functionality without using the Process Flow tool. However, the real power in using the Process Flow tool is how easy it is to create custom model logic, especially for task sequences.
In this tutorial task, you'll add process flow logic that will occasionally interrupt the operator's normal transportation task sequences. You'll design logic that will send operators to a get a drink from the drinking fountain every time they travel more than 100 meters.
In order to create this logic, you'll build an additional section in the process flow for a water break task sequence. Also, recall from the previous tutorial that the resource shared asset is linked to the two operators in the 3D model. In order to create the water break tasks, you'll need the resource shared asset to keep track of the distance the operators have traveled. For that reason, you'll need to change the resource so that it acts a little more like the list. Lists can track and update data about the entries on the list; you can also build queries that pull entries from the list that match specific criteria.
Fortunately, resources actually have an internal list that you can set up to have the same functionality as a list. In this tutorial task, you'll learn how to set up the resource's internal list to track the total distance the operators have traveled in the simulation model and the distance they've traveled since their last water break. You'll also design a query so that your water break task sequence will pull any operators who have traveled more than 100 meters since their last water break.
When you're finished, your model will work similar to the following image:
Step 1 Use the Internal List on a Resource
Now that your basic transportation task sequence is set up, you'll create a series of tasks that will occasionally pull the operator away from their normal transportation tasks and send them to get a drink of water. You'll want to simulate the operator getting a drink from the drinking fountain after the operator has traveled more than 100 meters.
By now you may have noticed that the list and resource shared assets have somewhat similar functions. In fact, resources are simply a special kind of list. The resource you're using in this process flow actually keeps an internal list of the available operators. The Acquire Resource and Release Resource activities push and pull operators from this list.
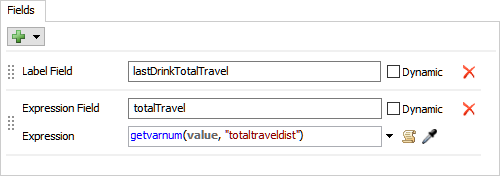
In this step, you'll need to add some fields to this internal list in order to add the water break functionality in a later step. You'll add two fields:
- lastDrinkTotalTravel - You'll add a field that creates a label on the operator called lastDrinkTotalTravel. This label will track the distance the operator has traveled since it took its last water break. The process flow will update this label after each operator takes a water break.
- totalTravel - You'll also add a field that tracks the total distance the operator has traveled since the simulation began running. All operator 3D objects keep track of their total distance traveled as a standard (default) statistic in FlexSim. So, you'll add a field to the resource's list that gets the current value of the statistic.
To add these fields to the resource's internal list:
- Click the Resources: Operators shared asset to select it.
- In Properties, click the Advanced button to open this resource's list properties.
- In the Fields tab, click the
Add button
 to open a menu. Select Label to add a label field to the
list.
to open a menu. Select Label to add a label field to the
list. - Change the name of the label field to lastDrinkTotalTravel.
- Click the Add button
to open a menu. Point to
TaskExecuter, then select
totalTravel.
- You'll use the default settings, so confirm that they look similar to the following image:
Consider saving your simulation model.
Step 2 Add a Water Break Task Sequence
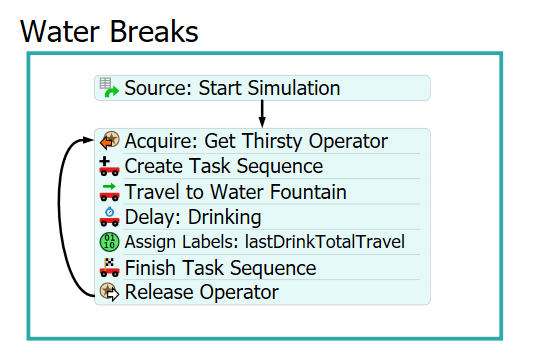
In this step, you'll add some more activities to the process flow. These activities will control the water break functionality. When you're finished, your process flow will look similar to the following image:
For now, you'll merely add and connect these activities to the process flow. You'll edit the properties to add the functionality in a later step.
To add and connect these activities:
- Make sure the process flow is open and active.
- In the Library under the Display group, add an additional Container shape to the new process flow.
- For clarity, rename the Process shape Water Breaks.
- Add a Schedule Source to the Water Breaks shape.
- In the Water Breaks shape, add the following activities to create a stacked block:
- An Acquire Resource activity (under Shared Assets)
- A Create Task Sequence (under Task Sequences)
- A Travel activity (under Task Sequences)
- A Delay activity (under Task Sequences)
- An Assign Labels activity (under Basic)
- A Finish Task Sequence (under Task Sequences)
- A Release Resource activity (under Shared Assets)
- Create a connector from the Schedule Source to the
Acquire Resource. (Point your mouse over the bottom middle
of the activity until your mouse changes to a connector
 icon. Click and drag the connector until
it snaps to the other activity.)
icon. Click and drag the connector until
it snaps to the other activity.) - Create a connector that loops from the end of the Release Resource activity back to the Acquire Resource activity.
- For clarity, rename the activities as follows:
| Activity | New Name |
|---|---|
| Source | Source: Start Simulation |
| Acquire | Acquire: Get Thirsty Operator |
| Create TS | Create Task Sequence |
| Travel | Travel to Water Fountain |
| Delay | Delay: Drinking |
| Assign Labels | Assign Labels: lastDrinkTotalTravel |
| Finish TS | Finish Task Sequence |
| Release | Release Operator |
Consider saving your simulation model.
Step 3 Edit the Activity Properties
In this step, you'll edit the properties for the activities in the Water Break section of the process flow to create a simple transportation task sequence. The following is an overview of how each activity in this section will function:
| Activity | Explanation |
|---|---|
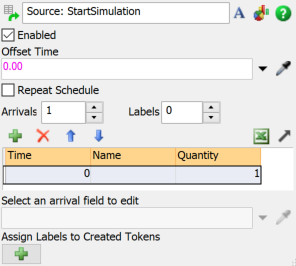
| Source: Start Simulation | This Scheduled Source activity will create one token as soon as the simulation starts. It will then send the token to the Acquire: Get Thirsty Operator activity. After it creates this token, it won't create any additional tokens. The one token will simply loop continuously through the other activities until the simulation ends. |
| Acquire: Get Thirsty Operator | This activity will check the resource's internal list for any operators who have traveled more than 100 meters since their last water break. When an operator on the list matches that criteria, it will acquire that operator. If an operator doesn't match that criteria, it will create a back order on the list. You'll create a label called thirstyOperator on the token to track which operator has been assigned to take a water break. |
| Create Task Sequence | This activity sets up the series of the tasks as a sequence of tasks to be carried out by the assigned operator. |
| Travel to Water Fountain | Sends the operator to the water fountain. |
| Delay: Drinking | This task will simulate the length of time it takes an operator to get a drink from the fountain. |
| Assign Labels: lastDrinkTotalTravel | This activity will record the time the operator last got a drink from the fountain. |
| Finish Task Sequence | This activity designates the sequence of tasks as finished. |
| Release Operator | Releases the operator so that it can work on another transportation task sequence. |
To edit these activity properties:
- Click the Scheduled Source activity to select it. You'll use the default properties for this activity, so confirm that the settings match the following image:
- Next to the Acquire: Get Thirsty Operator activity,
click the Exclamation Point button
 to enter sampling mode.
 - Click the Resources: Operators in the process flow to sample it. A blue line will appear to show that the resource is now linked.
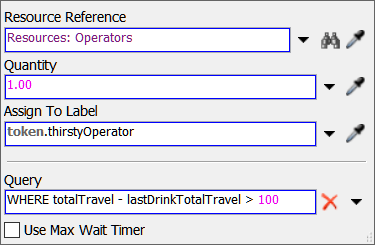
- In Properties for the Acquire: Get Thirsty
Operator activity, change the Assign to Label box
to
token.thirstyOperator. - In the Query box, delete the current text and type
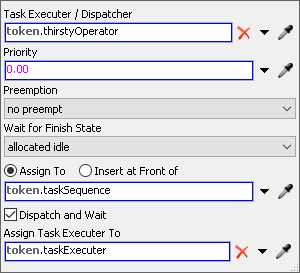
WHERE totalTravel - lastDrinkTotalTravel > 100. - Click the Create Task Sequence activity to select it. In Properties, click the arrow next to the Executer / Task Sequence box to open a menu. Point to Token Label and select thirstyOperator. This will assign the task sequence we are creating to the operator previously acquired. Leave the other settings as their default values. You'll notice that this activity creates a new label on the token called taskSequence. All of the tasks in this sequence will be assigned to the sequence via this label.
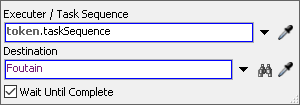
- In Properties for the Travel to Water Fountain activity make sure the default for Executer / Task Sequence reads token.taskSequence.
- Next to the Destination box, click the
Sampler button
 to enter sampling mode.
 - Click the Fountain shape in the 3D model to open a menu. Select Fountain from the menu.
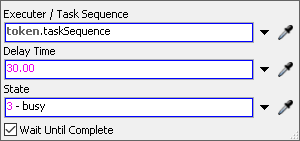
- Repeat step for the Delay: Drinking activity. Then,
change the Delay Time to
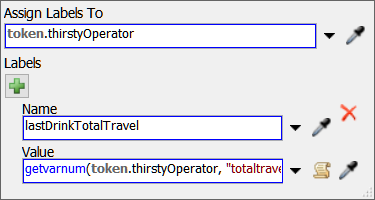
30.00. - In Properties for the Assign Labels: lastDrinkTotalTravel activity, click the arrow next to the Assign Labels To box to open a menu. Point to Token Label and select thirstyOperator.
- Click the Add button
to add a new label.
- In the Name box, type
lastDrinkTotalTravel. - In the Value box, type
getvarnum(token.thirstyOperator, "totaltraveldist"). - We can leave the Finish Task Sequence as its default settings. Make sure the Task Sequence box reads token.taskSequence. This designates the end of the sequence of tasks to be carried out.
- In Properties for the Release Operator activity, click the arrow next to the Resource(s) Assigned To box to open a menu. Point to Token Label and select thirstyOperator.
Consider saving your simulation model.
Step 4 Add Labels to the Operators
In this step, you'll add the lastDrinkTotalTravel label to the operators and set its initial value to 0. You need to do this in order for the logic to work. Unless you set the initial value to 0, this label will return a NULL value when calculating how long it has been since the operator last took a drink. If that happens, the Acquire: Get Thirsty Operator activity won't be able to successfully pull an operator from the resource's internal list.
To add these labels:
- Reset the model.
- Click the Operator to bring up its properties on the right.
- Under the Labels section, click the
Add button
to open a menu. Select Add Number Label.
- Double click the labelName box, delete the current text and type lastDrinkTotalTravel.
- Confirm that the label's initial value is set to
0. - Check the Automatically Reset Labels checkbox.
- Repeat this process for the second operator.
Consider saving your model.
Step 5 Run the Simulation Model
In this step, you'll run the simulation model to ensure that it is functioning correctly. Before running the model:
- In the process flow, click the Resources: Operators shared asset to select it. In Properties, click the View Entries button to view the resource's internal list.
- On the simulation control panel, click the Reset and Run buttons.
Be aware that the following model is being run at speed 10.00:
As the model runs, notice that when the operators travel more than 100 meters, they go to get a drink from the drinking fountain. After their first drink, the resource's list begins tracking the amount of travel from their last drink.
Conclusion
Now you've seen some of the different possible uses for both resources and lists. In the next tutorial task, you'll learn how to use the last type of shared asset: the zone. Continue on to Tutorial Task 1.3 - Add a Zone to Collect Data.