Task 1.1 - Use a List and a Resource
Task Overview
In this first tutorial task, you'll learn how to build a process flow using shared assets. Process flows have three types of shared assets that have different purposes, as explained in the following table:
| Shared Asset | Explanation |
|---|---|
| Resource | Represents a limited supply of some resource that can be acquired and released. It can be used to simulate a supply of goods, services, time, materials, employees, etc. |
| List | Allows you to push or pull tokens, flow items, task executers, numbers, strings, etc. to a list. This is a useful asset for syncing multiple tokens within a process flow or as a more dynamic resource. Process flows can use a list that is local to the process flow itself or could be tied to a Global List in the simulation model. |
| Zone | Can collect statistical information not available for standard activities. It can also restrict access to a section of the process flow based on certain statistics or other criteria. |
Consider reading Key Concepts About Shared Assets for a more details explanation of the three shared assets in a process flow and how they differ from other types of process flow activities.
In this tutorial task, you'll learn how to use resources and lists to build a transportation task sequence in a process flow for two operators. You'll also learn how to link resources and lists to 3D objects in the model. In this model, the list will track the flow items that need to be transported and the resources will represent the operators that are assigned to complete a transportation task.
When you're finished, your process flow will look similar to the following image:
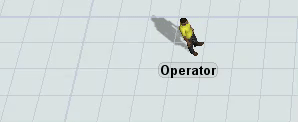
And it will control the two operators as they load flow items from a queue and unload them at one of two processors in the 3D model:
Using Labels to Connect to the 3D Model
In this model, you'll use labels extensively to link tokens in a process flow to objects in the 3D model. Process flows can control the logic of the 3D model using labels that contain a reference to a 3D object in the model. As the token moves through the activities in the process flow, the activity's logic can be applied to the object in the 3D model using this reference. Consider reading Key Concepts About Labels for a deeper understanding of how to work with labels in a process flow.
In this model, you'll use labels to:
- Link tokens to flow items in the 3D model - You'll create a label named pulledItem to link tokens in a process flow to the flow items that need to be transported in the 3D model. You'll also copy the value of this item to a label called FlowItem to tokens in the section of the process flow that handles the transportation task sequence.
- Assign task sequences to an operator - When you acquire a resource in this process flow, you'll create a label on the token called operator that will link the resource to one of the two operators in the 3D model. After the operator has been assigned to a transportation task, this label will be used to dynamically assign this operator to complete all the tasks in the transportation task sequence.
- Dynamically set flow item destinations - A label named destination on the flow item will track which processor the flow item should be transported to. The process flow will copy the value of this label to a matching label on a token called itemDestination and use this in the transportation task sequence.
Step 1 Build the 3D Model
In this step, you'll build a basic 3D model. When you're finished, your 3D model should look similar to the following image:

To build this model:
- Drag the following objects from the Library and place them in the model in this
order from left to right:
- 1 Source
- 1 Queue
- 2 Processors
- 1 Operator
- 1 Sink
- 1 Shape (under the Visual group)
- Move the objects so that they are roughly in the same layout as shown in the image at the beginning of this step.
- For clarity, rename the objects as follows:
- Create port connections (A-connects) from:
- Source to Queue
- Queue to Processor1 and Processor2
- Processor1 and Processor2 to Sink
| Object | New Name |
|---|---|
| Source1 | Source |
| Queue1 | Queue |
| Operator1 | Operator |
| Sink1 | Sink |
| Shape1 | Fountain |
Check to make sure that your model looks similar to the image shown in the beginning of this section.
Step 2 Create an Item List
In this step, you'll create a global list that will track the items that are ready for transport from the queue to the processors. Since this list will contain items, you'll create an item list. Then, you'll change the queue's settings so that it will push all entering items to this new list.
To create the list and update the queue:
- In the left pane, click the Toolbox tab.
- In the Toolbox, click the Add button
 to open a menu. Point to
Global List, then select Item
List. The list properties window will open automatically.
to open a menu. Point to
Global List, then select Item
List. The list properties window will open automatically. - In the name box at the top of the properties window, change the name of the item list to ItemsToTransport.
- You'll use the default settings for this item list, so click the OK button to save the changes and close the window.
- Confirm that the ItemsToTransport list shows up in the Toolbox under the Global Lists group.
- In the 3D model, click the Queue to bring up its properties on the right.
- Under the Output tab, check the Use Transport checkbox.
- Click the arrow next to the box beneath the Use Transport checkbox to open a menu. Point to Use List, then select Push to Item List (No Task Sequence) to open some picklist options.
- Confirm that the List box displays the ItemsToTransport list is the currently selected list. Notice also that when the queue pushes the flow items to the list, it will create three labels on the item, as listed in the Store Data on Item box.
![]()
Consider saving your simulation model.
Step 3 Add Activities to a Transport Task Sequence
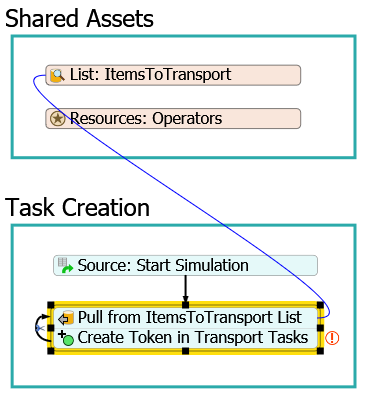
In this step, you'll add activities to a general process flow to build a simple loading and unloading task sequence. This process flow will have three sections:
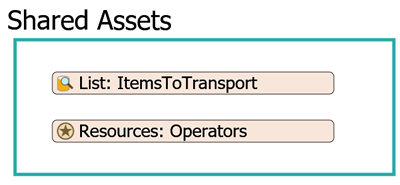
- The Shared Assets section will contain a List shared asset and a Resource shared asset.
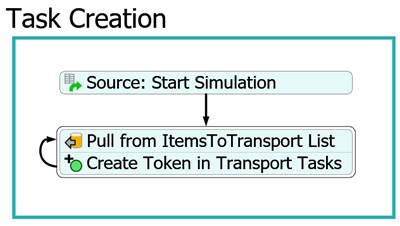
- The Task Creation section will create transportation tasks for the operators.
- The Transport Tasks section will contain the basic loading and unloading task sequence.
When you're finished, your process flow should look similar to the following image:
For now, you'll merely add and connect these activities to the process flow. You'll edit the properties to add the functionality in a later step.
To add and connect these activities:
- On the main toolbar, click the Process Flow button to open a menu. Select General Process Flow.
- In Properties in the Process Flow Name box, delete the current text and rename the process flow OperatorTasks.
- In the Library under the Display group, add 3 Container shapes to the new process flow.
- For clarity, rename the three Process shapes as follows:
- Shared Assets
- Task Creation
- Transport Tasks
- From the Library, add the following shared assets to the Shared
Assets shape:
- A List (under Shared Assets)
- A Resource (under Shared Assets)
- For clarity, rename these shared assets as:
- From the Library, add the following activities to the
Task Creation shape:
- A Schedule Source (under Token Creation)
- A Pull from List (under Shared Assets)
- A Create Tokens (under Basic)
- Create a connector from the Schedule Source to the
Pull from List. (Point your mouse over the bottom middle of
the activity until your mouse changes to a connector
 icon. Click and drag the connector until
it snaps to the other activity.)
icon. Click and drag the connector until
it snaps to the other activity.) - Join the Pull from List and Create Tokens activities into a stacked block.
- Create a connector that loops from the end of the Create Tokens activity back to the Pull from List activity.
- For clarity, rename these activities as:
- In the Transport Tasks shape, add the following
activities to create a stacked block:
- An Assign Labels (under Basic)
- An Acquire Resource (under Shared Assets)
- A Create Task Sequence (under Task Sequences)
- A Load (under Task Sequences)
- An Unload (under Task Sequences)
- A Travel (under Task Sequences)
- A Finish Task Sequence (under Task Sequences)
- A Release Resource (under Shared Assets)
- A Sink (under Basic)
- For clarity, rename these activities as:
Activity New Name Assign Labels Assign Labels: Destination Acquire Acquire Operator Create TS Create Task Sequence Load Load Item at Queue Unload Unload Item at Destination Travel Travel Back to Queue Finish TS Finish Task Sequence Release Release Operator Sink Sink: Finish Task 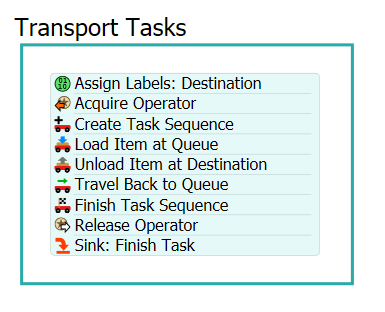
| Shared Asset | New Name |
|---|---|
| List | List: ItemsToTransport |
| Resource | Resources: Operators |
| Activity | New Name |
|---|---|
| Source | Source: Start Simulation |
| Pull from List | Pull from ItemsToTransport List |
| Create Tokens | Create Token in Transport Tasks |
Consider saving your simulation model.
Step 4 Link the Shared Assets to the 3D Model
In this relatively short step, you'll learn how to link shared assets in the process flow to objects in the 3D model. You'll link the ItemsToTransport list in the process flow to the global list by the same name that you created in step 2.
After that, you'll link the resource shared asset to the operator in the 3D model and you'll set its number to 2 so that it will allocate two operators to work on tasks. You might have noticed that you only currently have one operator in your simulation model. Once the resource shared asset is linked to this operator, it will create a second operator after you reset your model. You could change the number of resources available to experiment with how many operators you might need to complete common tasks. Alternatively, you could create a group of operators and link the resource to this group.
To make these changes:
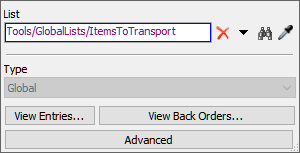
- In the process flow, click the ItemsToTransport List to select it. In Properties, click the arrow next to the List box to open a menu. Point to Global List, then select ItemsToTransport.
- Click the Resources: Operators shared asset to select
it. In Properties next to the Reference box, click
the Sampler button
 to enter sampling mode.
 - Click the Operator in the 3D model to sample it.
- In the Count box, change the number to
2.00. - Press the Reset button on the simulation control panel.
- In the 3D model, click the Operator and drag it to a slightly different position in the model. Notice that there is now a second operator named Operator_1 in the 3D model.

Consider saving your simulation model.
Step 5 Edit the Task Creation Activities
In this step, you'll edit the properties for the activities in the Task Creation section of the process flow. The following is an overview of how each activity in this section will function:
| Activity | Explanation |
|---|---|
| Source: Start Simulation | This Scheduled Source activity will create one token as soon as the simulation starts and sends the token to the Pull From List activity. After it creates this token, it won't create any additional tokens. The one token will simply loop continuously through the other two activities until the simulation ends. |
| Pull from ItemsToTransportList | You'll link this activity to the ItemsToTransportList so that it will pull items
from this list every time a token enters it. If there are no items on the list, the
token will create a back order and will wait at this activity until an item is
available. You'll also add a label called pulledItem to the token which will contain a reference to the flow item that was pulled from the list. |
| Create Tokens in Transport Tasks | When a token enters this activity, it will create a token in the first activity
in the Transport Tasks section of the process flow. The newly created token will
initiate the transport task sequence. You'll also assign a label to the newly
created token that contains a reference to the flow item that was pulled from the
list. Since you don't want the token in the Create Tokens activity to wait while the transport tasks are being completed, you'll create it as an independent token (as opposed to a child token). See Sub Process Flows for more information about child tokens. |
To edit these properties:
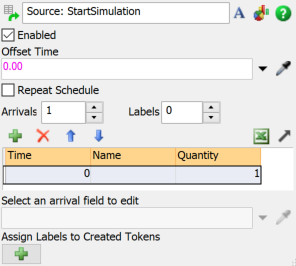
- Click the Scheduled Source activity to select it. You'll use the default properties for this activity, so confirm that the settings match the following image:
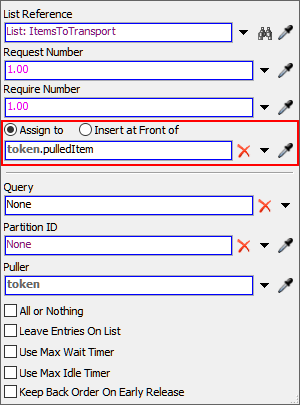
- Click the Pull From ItemsToTransport List activity to
select it. Click the Exclamation Point button
 next to this activity to enter
sampling mode.
next to this activity to enter
sampling mode. - Click the ItemsToTransport List in the process flow to sample it. A blue line will appear to show that the list is now linked.
- In Properties, confirm that the Assign to option
is selected. In the box beneath it, change the text to
token.pulledItemfor clarity. - With the Create Token in Transport Tasks activity
selected as well, click the Exclamation Point button
next to this activity to enter
sampling mode.
- Click the Assign Labels: Destination activity to sample it. A blue line will appear to show that the tokens will be created in this activity.
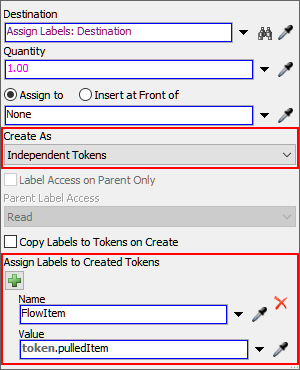
- In Properties, click the Create As menu and select Independent Tokens.
- Under the Assign Labels to Created Tokens, click the
Add button
to add a label to the child token that will be created.
- In the Name box, type
FlowItem. - Click the arrow next to the Value box to open a menu. Point to Token Label, then select pulledItem.
Consider saving your simulation model.
Step 6 Edit the Transport Task Sequence
In this step, you'll edit the properties for the activities in the Transport Tasks section of the process flow to create a simple transportation task sequence. The following is an overview of how each activity in this section will function:
| Activity | Explanation |
|---|---|
| Assign Labels: Destination | When the queue pushes a flow item to the ItemsToTransport list, it creates a label on the flow item named destination that assigns the flow item to one of the two downstream processors. This activity will create a label named itemDestination that will reference this label. This creates a dynamic reference that will tell the operator which processor the flow item should be transported to. |
| Acquire Operator | This activity will attempt to get one of the operators. When an operator is available, the transport tasks will be assigned to that operator. If an operator isn't available, the token will wait at this activity until one becomes available. You'll create a label called operator on the token to track which operator has been assigned to these tasks. |
| Create Task Sequence | This activity sets up the series of the tasks as a sequence of tasks to be carried out by the assigned operator. |
| Load Item at Queue | Tells the operator which flow item needs to be picked up and where to pick up the flow item. |
| Unload Item at Destination | Tells the operator which processor it should transport the flow item to. |
| Travel Back to Queue | Sends the operator back to the queue to begin another set of tasks. |
| Finish Task Sequence | This activity designates the sequence of tasks as finished. |
| Release Operator | Releases the operator so that it can work on another set of tasks. |
| Sink: Finish Task | Destroys the token that was used for this set of transportation tasks. |
To create this logic:
- Click the stacked block in the Transport Tasks to select it.
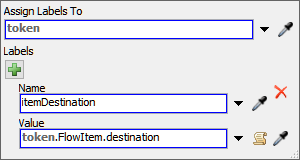
- In Properties for the Assign Labels:
Destination activity, click the Add button
to add a label to the incoming
token.
- In the Name box, type
itemDestination. - Click the arrow next to the Value box to open a menu.
Point to Token Label, then select
FlowItem. The box will now read
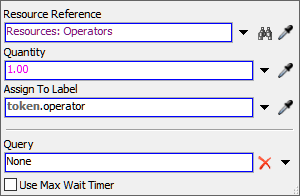
token.FlowItem. Add.destinationto the end of the FlexScript in this box. - Next to the Acquire Operator activity, click the
Exclamation Point button
to enter sampling mode.
- Click the Resources: Operators in the process flow to sample it. A blue line will appear to show that the resource is now linked.
- In Properties for the Acquire Operator
activity, change the Assign To label to
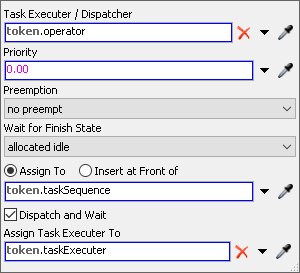
token.operator. - Click the Create Task Sequence activity to select it. In Properties, click the arrow next to the Executer / Task Sequence box to open a menu. Point to Token Label and select Operator. This will assign the task sequence we are creating to the operator previously acquired. Leave the other settings as their default values. You'll notice that this activity creates a new label on the token called taskSequence. All of the tasks in this sequence will be assigned to the sequence via this label.
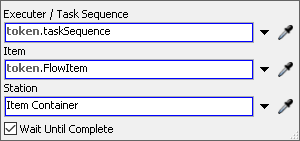
- In Properties for the Load Item at Queue activity, make sure the default for Executer / Task Sequence reads token.taskSequence.
- Click the arrow next to the Item box to open a menu. Point to Token Label and select FlowItem.
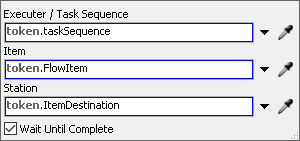
- In Properties for the Unload Item at Destination activity, make sure the default for Executer / Task Sequence reads token.taskSequence.
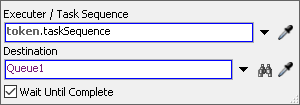
- Repeat for the Travel Back to Queue activity.
Then, next to the Destination box, click the
Sampler button
to enter sampling mode.
- Select the Queue in the 3D model to open a menu. Select Queue from the menu to sample it.
- We can leave the Finish Task Sequence as its default settings. Make sure the Task Sequence box reads token.taskSequence. This designates the end of the sequence of tasks to be carried out.
- In Properties for the Release Operator activity, click the arrow next to the Resource(s) Assigned To box to open a menu. Point to Token Label and select operator.

Consider saving your simulation model.
Step 7 Test the Simulation Model
At this point, you should probably run the simulation model to ensure that the basic travel task sequence is running correctly. Reset and run the model.
In the 3D model, the task executers should alternate between transporting flow items to the processors.
Watch as the tokens first move through the Task Creation section pulling items from the list and sending tokens to the Transport Tasks section. Notice that when a flow item isn't available for transport, it creates a red back order on the list shared asset.
Notice also that when the operators are assigned to the task, they show up as being allocated in the Resources shared asset. While the operators perform the transportation task in the 3D model, the flow items move through the task sequence.
Conclusion
Now you've built a basic transport task sequence using lists and resources. In the next tutorial, you'll learn how to make a resource act a little like the list in order to get some advanced functionality from it. Continue on to Tutorial Task 1.2 - Make a Resource Act Like a List.