Working With Lists
Planning a List
Before creating a list, it might be helpful to think through some of the logistics of how your list will work in your simulation model:
- Why will you use a list? - Take a moment and think through the purpose of your list in your simulation model. Will you use it to prioritize flow items and create logic that will send specific flow items to specific fixed resources? Will you use it to manage and prioritize task sequences? Will you use it for connectionless routing? Thinking through what you want to do with the list will help you create a more effective list.
- What will go on the list? - Will your list contain flow items, tasks, or objects? Your answer will determine what type of list you should initially create. Although you can technically mix different types of objects on a list, it might be better to be disciplined and keep your list focused on one type of object.
- What will push and pull items from the list? - How will items, tasks, or objects get pushed onto the list? Which event in the simulation model will cause them to get pushed onto the list? Which event in the simulation model will cause items to get pulled from the list?
- Which criteria will be used to filter list entries and back orders? - Is the list going to use simple first in first out (FIFO) logic or will something else be needed to determine which list entries or back orders should take priority?
Using the Toolbox
You'll primarily use the Toolbox to create and manage lists. See Using the Toolbox for general information about working with tool components like lists. This topic will explain how to delete and rename lists and other related tasks.
Creating a List
To create a list:
- In the Toolbox, click the Add button
 to open a menu.
 - Point to Global Lists and then select the type of list you want to create. (See Types of Lists for more information.) This will open the List Properties window.
- In the box at the top of the window, give this list a descriptive name to help you identify its purpose in your simulation model.
Adding, Moving, and Deleting Fields
Fields keep track of data about each entry on the list. They are the building blocks that you will use to create queries to filter and prioritize list items. (See Key Terms - Fields for more information.)
For that reason, choosing the list's fields is one of the most important aspects of building a list. Be aware that you can use the pre-built fields or create custom fields of your own.
Adding Fields
To add fields:
- Open the List Properties window.
- On the Fields tab, click the
Add button to
open a menu.
- Select the type of field you want to add.
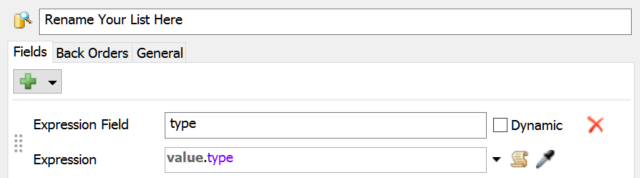
- The new field will appear at the bottom of the Fields tab.
- You can change the name of this field in the Expression Field box.
- If you want to create custom logic and you are comfortable with FlexScript, you can type a custom expression in the Expression box. You can also use the arrow next to this box to select pre-built expressions from a picklist menu.
Moving Fields
To move or reorganize the fields, simply drag the handle on the left of the field to re-position it:
Deleting Fields
To delete fields, click the Remove button
 next to the field.
Connecting 3D Objects to a List
You can use menu options (picklists) on various properties or triggers found in the properties window to connect a 3D object to a list. The method that you use to connect the 3D object will depend on whether you are pushing a flow item, task, or object to a list. The following sections will explain the most common methods.
Pushing and Pulling Flow Items to a List
Fixed resources can push or pull flow items to a list. You'll primarily use the Flow tab on the fixed resource's property window to push or pull flow items.
To push flow items to a list:
- Click on the fixed resource to open its properties on the right.
- Under the Output section, click the arrow next to the Send To Port box to open a menu.
- Point to Use List, then select Push to Item List to open the list options.
- Click the arrow next to the List box to open a menu. Select the list to which you want to push the flow items.
To pull flow items from a list:
- Click on the fixed resource to open its properties on the right.
- Under the Input section, check the Pull box.
- Click the arrow next to the Pull Strategy box to open a menu.
- Point to Use List, then select Pull from Item List to open the list options.
- Click the arrow next to the List box to open a menu. Select the list from which you want to pull the flow items.
Pushing Task Executers to a List
You can push a task executer to a list whenever the task executer is free to be assigned to another task. The list can then prioritize and assign tasks to the available task executers.
To push task executers to a list, you need to set the task executers so that they push themselves onto a list at the beginning of a simulation run and every time they are available to work on another task:
- Click on the task executer to open its properties on the right.
- Under the Triggers section, click the
Add button to
open a menu. Select On Resource Available.
- Click the Add button
next to the On Resource
Available trigger to open a menu. Point to Use
List, then select Push to Task Executer List to
open the list options.
- Click the arrow next to the List box to open a menu. Select the list to which you want to push the task executer.
- Under the Task Executer section of the properties window near the bottom of the tab, make sure that the Fire OnResourceAvailable at Simulation Start box is checked. When this box is checked, the task executer will be pushed to the list immediately when the simulation starts.
Pulling Task Executers from a List
When a fixed resource has a task that needs to be completed, it can pull a task executer from a list:
- Click on the fixed resource to open its properties on the right.
- Check the box for the property for which you would like to use a task executer (such as Use Transport or Use Operator(s) for Process).
- Find the box where you indicate the operator or task executer that should be used for the task. Click the arrow next to this box to open a menu.
- Point to Use List, then select Pull from Task Executer List to open the list options.
- Click the arrow next to the List box to open a menu. Select the list from which you want to pull the task executer.
Pushing and Pulling Tasks or Fixed Resources to a List
If you want to push and pull tasks or fixed resource from a list, you should consider using the Process Flow tool. See the following section about Using Lists in Process Flow for more information.
Using Lists in Process Flow
You can use the Process Flow tool to create custom list logic if you want to use lists in ways that haven't yet been pre-built into FlexSim. The Process Flow tool is especially effective for creating task sequences and working with lists that use abstract values such as numbers and strings. Additionally, Process Flow gives you more flexibility in controlling objects like task executers, when you need to do more than just pushing and pulling from lists.
See Overview of the Process Flow Interface for more information about the Process Flow tool. Also, see Process Flow Tutorial 1 and Process Flow Tutorial 4 for examples of lists in process flow.
Viewing Lists During a Simulation Run
To open a list and view its entries during a simulation run:
- In the Toolbox, double-click the list to open the list properties window.
- In the General tab, click the View Entries and/or View Back Orders buttons.
- A separate window will open that displays the list's entries or back orders. You can dock this window for easier viewing during a simulation run, if needed. See Arranging Windows and Tabs for more information.
- Start the simulation. The list entries and back orders will dynamically update during the simulation run.
Creating List Queries
Although queries are optional, queries are the key to getting the most out of your lists. Queries are the custom logic that will determine which list entries should get pulled first from a list or which back orders should get fulfilled first. Queries can also filter or restrict which list entries will get pulled from a list. See List Features and Key Terms for examples of possible queries.
Where Do You Add Queries?
You don't add queries to the list itself in the list properties window. You add a query to the object or Process flow activity that is pulling from the list.
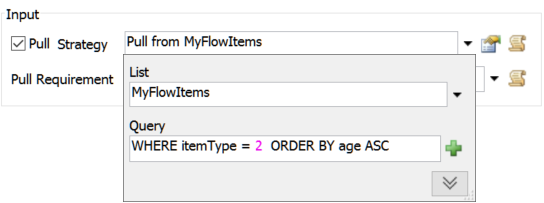
For example, if you set a processor to pull flow items from a list, you would create a query by opening the processor's property window. On the Flow tab, you'd add the query to the Pull Strategy property:
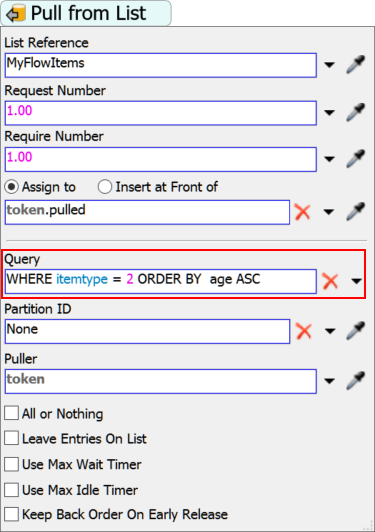
If you were to add a query in the Process Flow tool, you'd add the query to the Query property on a Pull From List activity:
How to Write a Query
List queries use SQL syntax. SQL is a programming language that has mostly been used for querying, filtering, and prioritizing data contained in tables and databases. Since this is very similar to how lists function in FlexSim, SQL is a good fit for querying lists.
If you're already comfortable with SQL, you'll find it very easy to create queries. If you're not, then just be assured that you'll only need a very introductory level to SQL syntax in order to create most of the list queries you're interested in.
You'll primarily use two clauses in this context to create a list query, as explained in the following table:
| Clause | Purpose | Example |
|---|---|---|
| WHERE | Use this clause to filter entries on the list, meaning only entries that meet a specific criteria will get pulled from the list | WHERE weight > 20 In this example, the list will use a field that correlates with a label on the object that represents the object's weight. It will only allow objects with a value greater than 20 to be pulled from the list. |
| ORDER BY | Use this clause to prioritize entries on the list, meaning it will compare the attributes of two or more list entries and determine which entries will get pulled from the list first | ORDER BY weight DESCIn this example, the list will use the object's weight label to determine which entries will be pulled first from the list. The object with the highest weight will get pulled first and so on. |
See Introduction to SQL Queries for a deeper explanation of how to create SQL queries.
Creating Queries Using Picklists
Any time you see a property where you can enter a query, there is a picklist that can help you. Picklists can give you hints and suggestions about how to create a valid list query. To create a query using picklists:
- Find the property where you can enter a list query. (See Where Do You Add Queries? for more information.)
- Click the arrow next to the query box to open a picklist menu. Point to either WHERE or ORDER BY to open a sub-menu showing suggested list fields you could use in your query.
- Click the field you want to filter. The query box will then display a sample query based on your selection.
- Use this sample query as a jumping off point to create your own queries. You can edit the query until it has the correct filters and restrictions that you want to create.
Example of a Query
Imagine your simulation model has 3 queues and these queues are pushing flow items that have a label named type that can have a value of 1, 2, or 3. The queues push the items to an item list with the following fields:
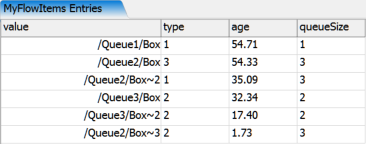
When a processor pulls an item from this list, it could possibly use the query:
WHERE type == 2 ORDER BY age ASC
The WHERE clause in this query filters the flow items by the
type field. In this case, it restricts the processor so that it only pulls
items with an item type that is equal to 2. Therefore, the processor will only pull items
that have a 2.
The ORDER BY clause then uses the age field to prioritize which
items should get pulled from the list. The age field contains data about how
long the flow item has been on the list. The ASC clause means
ascending. It means that it will pull the items that have been waiting the least
amount of time on the list. If you wanted to pull the oldest items first, you would use
DESC (which means descending) instead.
In this example, the processor would pull /Queue3/Box~2 first because it has
a type of 2 and has been on the list for less time than /Queue3/Box.
Testing Queries
Before applying a query to a list, you might want to test it to see if it's filtering and prioritizing the list entries correctly. To test a particular query:
- Open a list to view its entries. (See Viewing Lists During a Simulation Run for specific instructions.)
- Run the simulation model until there are several items on the list. Pause the simulation model.
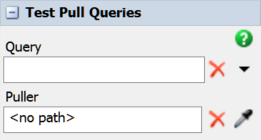
- Click somewhere inside the list entry window. The Quick Properties panel will change to display the Test Pull Queries properties.
- In the Query box, type the query you want to test.
- When you press the enter key, the list will reorder itself based on the query you entered. The entries that will get pulled first are at the top of the list. Review the order of the entries to ensure it matches your expectations.
Back Order Queue Strategies
In the same way that you can use a query to prioritize which list entries should get pulled first, you can also prioritize back orders so that the list will fulfill back orders that have specific attributes first. For example, you could prioritize back orders based on a label on a fixed resource or based on some condition in the model.
When you create a back order queue strategy, you might want to pay attention to when the list evaluates the list of back orders and re-organizes the list. You might want to be mindful of certain conditions in the simulation model that can cause the back orders to be evaluated in different ways.
To create a back order queue strategy:
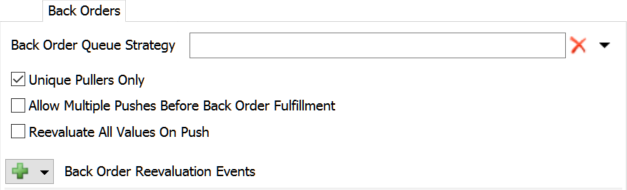
- In the Toolbox, double-click the list to open the list properties window and open the Back Orders tab.
- Type a query into the Back Order Queue Strategy box.
- If needed, you can use the rest of the properties on the Back Orders tab to change when the list will evaluate and re-organize the back orders list:
- Unique Pullers Only - This box is checked by default. When it is checked, only one back order from a pulling object will be available at a time.
- Allow Multiple Pushes Before Back Order Fulfillment - Use this check box if you want an object to push several entries onto a list before the back orders are evaluated and prioritized. For example, you might use this checkbox if you want a batch of items to get pushed onto a list before the back orders are fulfilled.
- Reevaluate All Values On Pushes - By default, back orders on the list will only evaluate new values that are pushed to the list. Use this check box if there are dynamic fields that might change while entries are on the list. Checking this box will re-evaluate the values of fields for all list entries any time something is pushed to the list.
- Back Order Reevaluation Events - Only add reevaluation events if you are using a WHERE clause in your back order queue strategy. Add these events to determine which events in the simulation will cause the back orders to be evaluated.