Schedule Source
Overview and Key Concepts
The Schedule Source activity creates new tokens as specified in its Arrivals table. This table defines the time (in model units) that tokens should be created, the name that will be assigned to the new tokens and the number of tokens to create. These settings can either have a fixed value or the values can be calculated dynamically. Also, you can either enter the data into this table manually or import a table from an Excel spreadsheet using the Excel Interface.

Overview of Arrival Schedules
The following image shows an example of a possible arrival schedule on a Schedule Source activity:
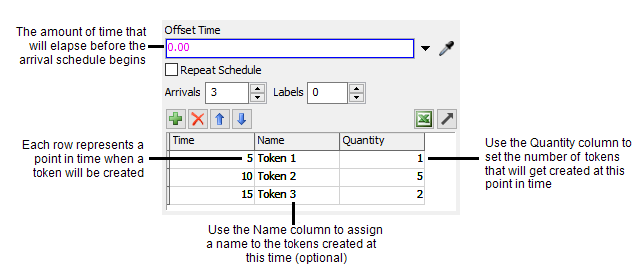
The Offset Time can be used to make a certain amount of time
elapse before the Schedule Source activity will begin the arrival schedule. In the example
used in the preceding image, the Offset Time is set to
100, which means that schedule won't begin until the simulation clock reaches
100 during a simulation run.
For now, skip over the Repeat Schedule checkbox, which will be discussed in a moment.
Each Schedule Source activity has an Arrivals table, which controls the schedule for creating new tokens. Each row in the table represents a point in time that one or more new tokens will be created. The values for the cells under each column can be changed to customize the arrival schedule:
- Time - The time when one or more tokens will be created, relative to the simulation model clock and the offset time. In this example, if the offset time is set to 0, the first token will be created when the model clock reaches 5, the second set of tokens will be created when the clock reads 10, and so forth. However, since the offset time is currently set to 100 in this example, the first token will actually be created when the clock reads 105, the second set of tokens will be created when the clock reads 110, and so forth.
- Name - For debugging purposes, you can assign a name to the tokens created at this point in the schedule. In this example, the first token that is created will be named Token1.
- Quantity - The number of tokens that will be created at this point in the schedule. In this example, only one token will be created when the model clock reaches 105, then five tokens will be created when the model clock reaches 110, and so forth.
- Labels - Additional columns can be added to the arrival table that define labels that will be added to the created tokens. The name of the label will be the name of the column. Labels can be numbers, strings, arrays, pointers, bundles or tracked variables.
With that in mind, let's return to the Repeat Schedule checkbox. If the schedule is set to repeat, it will loop indefinitely. The offset time will NOT be repeated. In the example illustrated in the preceding image, the first token will be created at 105 (because of the offset of 100). Then five tokens will be created at 110 and two tokens at time 120. Then the schedule will repeat itself. One more token will be created at 125, five tokens at 130, and two tokens at time 140, and so forth. This process will last indefinitely until the simulation clock is stopped.
If you want to create a gap between repeats, you can add an arrival at the end of the list with a quantity set to 0. This will cause no tokens to be created at that time. In this example, adding an arrival time of 40 with a quantity 0 will make the arrival times be: 105, 110 and 120 then after the first repeat the arrivals will be 145, 150 and 160.
Dynamic Arrival Values
In the above example, all of the arrival times, token names and quantities were defined
as static values. However, each of the values in the arrival table may also be defined
dynamically using picklists or code. This gives a greater amount of control on how an
arrival schedule is defined. Keep in mind when calculating the time of an arrival, the value
should be a number greater than the previous arrival where arrivalTime = time -
previousTime + modelTime;.
Using a Schedule Source in Instanced Flows
There may be cases where you are dynamically creating instances of process flow objects during a model run. The Create Person activity creates a new person from the flowitem bin and allows you to define an Instanced Process Flow to attach to the created person. When this happens, any schedule source activities in the process flow will begin their schedule as if from time 0. This means that all times are relative to the creation time of the instance. For example, if a schedule source activity has a time of 50 for its first entry and a new instance of the object is created at time 200, then the first token will be created at time 250.
If you require a set schedule that defines an absolute time, use the Date Time Source.
Connectors
The Schedule Source activity only allows one connector out. See Adding and Connecting Activities for more information.
Properties
The following image shows properties for the Schedule Source activity:
Each of these properties will be explained in the following sections.
Name
Used to change the name of the activity. See Name for more information about this property.
Font
The Font button
 opens a window to edit the activity's
background color and font properties. See
Font for more information
about this property.
opens a window to edit the activity's
background color and font properties. See
Font for more information
about this property.
Statistics
The Statistics button
 opens the activity's statistics
window. See Statistics
for more information about this property.
opens the activity's statistics
window. See Statistics
for more information about this property.
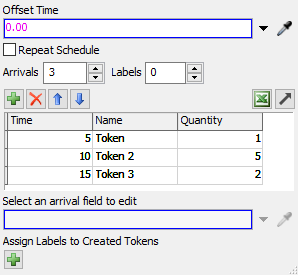
Offset Time
Can be used to make a certain amount of time elapse before the Schedule Source activity will begin the arrival schedule. For example, if the first entry in the arrivals table has a time of 20, and the offset time is 10, the first token will be created at a simulation time of 30.
Repeat Schedule
If the Repeat Schedule box is checked, the schedule will repeat indefinitely during the simulation run. Note that the Offset Time will not be repeated each cycle, but will only be used in calculating the start of the schedule. For example, if the last entry in the Arrivals table is at time 50 and the offset time is 10, the first cycle will end at simulation time 60. The second cycle will end at simulation time 110.
Arrivals
This is where the arrival schedule is defined. (See Overview of
Arrival Schedules for more information.) Rows can be added by clicking the
 button, deleted by clicking the
 , and reordered by clicking the
 and
and
 buttons. You can also set the table
to the desired size through the edit fields. The table can also be added to the
Excel Importer
buttons. You can also set the table
to the desired size through the edit fields. The table can also be added to the
Excel Importer
 allowing you to import data
from Excel.
allowing you to import data
from Excel.
There are three columns in the table:
- Time - The time when one or more tokens will be created, relative to the simulation model clock and the offset time. (See Overview of Arrival Schedules for more information.)
- Name - For debugging purposes, you can assign a name to the tokens created at this point in the schedule.
- Quantity - The number of tokens that will be created at this point in the schedule.
- Labels - Label columns can be added or removed by changing the number in the Labels field. Each token will be given labels with names corresponding to the column headers and values corresponding to the value of the table cell.
You may define static values through the table or dynamic values using the picklist field directly below the table. See Dynamic Arrival Values for more information.
Select an arrival field to edit
This field will change based upon which cell is currently selected in the Arrivals table. You can use this box and the pull-down arrow next to it to enter dynamic values for the Time, Name, Quantity or Label values in the table. You can select a picklist option from the pull-down menu or you can enter in custom code if you are comfortable with FlexScript.
Assign Labels to Created Tokens
Allows you to add labels to the created tokens based upon the arrival entry. For more information on assigning labels, see the Assign Labels activity.