Working With Labels
Overview of Tools That Use Labels
This topic will explain how to create, set, read, and change labels in various tools in FlexSim. Before reading this topic, consider reading Key Concepts About Labels to ensure you understand the basics of how labels work in FlexSim.
Many different tools in FlexSim use labels to control logic. The following sections provides an overview of the tools that use labels the most extensively.
The Process Flow Tool
You can use the Process Flow tool to create the logic of your simulation model. It relies heavily on labels to create model logic that can flexibly adapt to changing conditions. In Process Flow, labels are assigned to tokens. As these tokens move through the simulation model, various activities can create, change, and reference labels on the token to control the model's logic.
If you want to link a process flow to a 3D model so that it will control what happens in the model, you'll need to use labels to do it. That's because labels can contain references to objects in the 3D model, creating a link between what happens on a token and what happens with an object in the 3D model. The most common use is to link a token to a flow item as it moves through a simulation model.
The main way to create and set labels in the Process Flow tool is to use an Assign Labels activity.

The Assign Labels activity doesn't delay a token in any way during a simulation run; it only creates or changes a label on a token. This means you can use an Assign Label activity anywhere in a process flow without slowing down the amount of time the token spends in the process flow. For example, Delay activities do not have the ability to assign or change labels, but you can use an Assign Label activity immediately after a Delay activity to change a label. Perhaps the new label can be changed to represent something about the token that changed as a result of going through the Delay activity.
The Schedule Source, one of the token creation activities, also has the ability to assign labels to a newly created token if needed. It has an Assign Labels property that functions nearly identically to the Assign Labels activity.
Beyond that, certain event-listening activities will use label matching. Sub flows and shared assets (resources, lists, and zones) might also create labels in order to store references to related tokens or linked 3D objects.
This topic will focus mostly on the Assign Labels activity. For more information about these related topics, see:
3D Model
Although the 3D model doesn't use labels as extensively as the Process Flow tool, there are still many possible uses for labels in the 3D model. Labels can be assigned to both flow items and other 3D objects such as fixed resources and task executers.
The most common reason for using labels in a 3D model is to control how objects are routed from one fixed resource to other downstream fixed resources. Ports, lists, and conveyors can all use labels to determine where to route flow items.
Another common reason for using labels is to track information about a flow item's basic properties, such as its weight or a custom status.
The primary way to create and set labels on flow items is to use picklists on triggers that can set or change labels. If you want to create a label on a fixed resource or task executer, you can assign labels in the object's properties under the Labels section.
Statistics Collector
The Statistics Collector uses labels extensively to gather data from a model. It uses labels to listen to events and collect data about various objects in the 3D model or process flow when these events occur. Many of the concepts that apply to using labels in the Process Flow tool will apply to using the Statistics Collector as well. This topic will not discuss how to use labels in the Statistics Collector specifically. See Using the Statistics Collector for more information.
Creating a Label
The method you will use to create a label will depend on which tool you are using. The following sections will explain how to create labels in both the Process Flow tool and the 3D model.
Creating a Label in the Process Flow Tool
The majority of the time, you'll likely use the Assign Labels activity to create, set, and change labels in the Process Flow tool. To use an Assign Labels activity to create a new label on tokens in a process flow:
- Add an Assign Labels activity to the process flow. See Adding and Connecting Activities for more information.
- In Quick Properties, make sure the Assign To box
displays
token. This property means that this activity will assign labels to all incoming tokens. - Under the Labels group, click the
Add
button
 to add a new label.
 - In the Name box, delete the existing text and type a new name that describes the information this label will contain. For example, if the label will represent the token's weight, name the label Weight.
- In the Value box, you will assign the value of the label. See Setting a Label Value for more information.
- Use the Add button
to add any additional labels if needed. Use
the Remove button
 to delete a label if needed.
Creating a Label on Flow Items in the 3D Model
Typically you'll create a label on a flow item when a flow item causes a trigger to fire on a fixed resource:
- Click the 3D object to open its properties on the right.
- Under the Triggers section, click the
Add button to
open a menu. Select an appropriate trigger, that, when fired, should create a label on a
flow item. For example, On Creation or On Arrival.
- Next to the newly added trigger, click the Add button
to open a menu of picklist options.
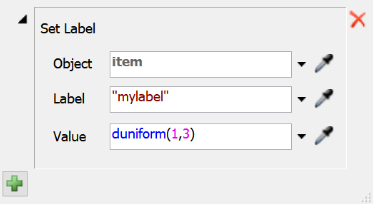
- Find the Set Label picklist option. Depending on the trigger, it might be in the root menu, or it might be in the Data sub menu.
- In the picklist options, confirm that the Object box
says
item. - In the Label box, type the name the label will have, making sure it is enclosed in quotation marks (" ").
- In the Value box, you will assign the value of the label. See Setting a Label Value for more information.
Creating a Label on Fixed Resources or Task Executers in the 3D Model
To add a label to a fixed resource or task executer:
- Click the 3D object to open its properties on the right.
- Under the Labels section, you'll see a table where you can add
and edit labels on the object. Click the Add button
to open a menu.
- The menu will show a list of possible data types. Choose the data type that matches the type of label you want to create.
- The new label will appear in the table below. Double-click the label's name to rename the label.
- In the empty column next to the label name, type the initial value for the label.
Setting a Label Value
The following table explains how to set different types of label values:
| Type of Value | How to Assign |
|---|---|
| Fixed (static) label | Type a number or string (text) as the label's value. For example, if were to type 10 as the value, all object's would be assigned a value of 10 for this label. |
| Reference to a specific object | Use the Sampler button  to select that object or select it from a menu.
 |
| Random statistical distribution | Click the arrow next to the box where you are assigning the label to open a
menu. Point to Statistical Distribution to open the Distribution Chooser.
Select an appropriate statistical distribution and edit the parameters. For example, if you wanted to create three different product types, you could use a duniform distribution strategy with a minimum of 1 and a maximum of 3. See Using the Distribution Chooser for more information about how to use this tool and some of the available statistical distributions. |
| Percentage | To assign a certain percentage of tokens certain labels, click the arrow next to
the box to open a menu. Select By Percentage to open its picklist options.
Use the Add button to add as
many different percentage groups as you need. Then edit the percentages and the
values that will be assigned to those percentages. |
| FlexScript | For more complex options, you can use custom FlexScript code to generate the label value. |
Feel free to experiment with some of the options that are available in the pull-down menus next to the label value properties.
Reading or Referencing a Label
Before reading this section, consider reading How Labels Work for an overview about FlexSim reads and references labels.
Many properties in FlexSim allow you to reference a value so that your simulation model can respond to changing, dynamic conditions. When you want to substitute the value of a label for a property, you can refer to a label using basic FlexScript. If you're not quite familiar with FlexScript, you can use the menu by a property and select options that can show you the available labels in your simulation model.
Many of the activities in process flow have special properties that use the Universal Edit feature. The Universal Edit feature is designed to make it easy to add complex functionality to certain properties without needing to know FlexScript.
You can tell when a property has the Universal Edit feature because it will have a blue border around the property box, as shown in the following image:

Typing token. into a property field will search for the available labels
that you've created in the process flow so far and list these labels in a menu. You can then
select the appropriate label from the list or continue typing the label name manually.
During the simulation run, the property will look for that label on the entering token.
Changing a Label Value
Changing a label's value is similar to the methods you use for creating a label and setting its initial value. The process is identical in the 3D model, but slightly different for a process flow:
- Add an Assign Labels activity to the process flow.
- In Quick Properties, make sure the Assign To box
displays
token. This property means that this activity will assign labels to all incoming tokens. - Under the Labels group, click the
Add button to
add a new label.
- In the Name box, delete the existing text and type the exact name of the label that you want to change. For example, if you want to change a label named Weight, type that exact name in this box.
- In the Value box, you will assign the value of the
label. If you clock the pull-down menu next to this property, there are a few of the
options that might be useful for changing an label are:
- Remove Label
- Increment Label
- Conditional Value