The Address Mapping Panel
The Address Mapping panel defines how storage slots are addressed.
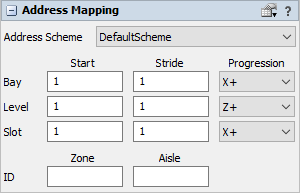
The following properties are on the Address Mapping panel:
Addressing Scheme
The object's Addressing Scheme defines which of the Storage System's potentially multiple addressing schemes is applicable to this storage object. Note that you only need to define this property if your model accesses slots directly by their address, specifically using the Storage.system.getSlot() method.
Start, Stride, and Progression
For the object's bays, levels, and slots, you can define start, stride, and progression settings. These properties work in combination to enable unique addressing of the slots. The Start properties define the number (or letter) that is associated with the first bay/level/slot in the storage object. The Stride properties define how many addresses to skip over when progressing from a given bay/level/slot its next neighboring bay/level/slot. The Progression properties are used to define the direction in which the bays/levels/slots progress, relative to the storage object's local coordinate system.
Below are some examples of how you might use these properties to properly define your addressing system.
- Distinguish Left and Right Side of an Aisle - In many warehouses, the left vs. right side of an aisle are distinguished by the even-odd-ness of the bay numbers. For example, even bay numbers may indicate that the shelf is on the left side of the aisle, while odd bay numbers indicate a shelf on the right side. To accomplish this, you give the storage object on the left side a Start Bay of 2, and a Bay Stride of 2. This means that the "first" bay in that object is numbered 2, the next bay is numbered 4, and so forth. For the object on the right side of the aisle, you give it a Start Bay of 1, and a Bay Stride of 2. This means that the "first" bay in that object is numbered 1, the next bay is numbered 3, and so forth. Thus you can define even bays on the left and odd bays on the right.
- Define Proper Bay Progression for Both Sides of an Aisle - The Bay Progression property allows you to make sure that bay numbers "progess" properly for storage objects on both sides of an aisle. As a picker travels down an aisle, the bay numbers on the right side should progress the same as those on the left side. However, if storage objects in an aisle are oriented so that their pick faces are directed into the aisle, the default Bay Progression setting (X+) causes their bay numbers to increase in opposite directions. Thus, by changing the Bay Progression of one of the storage objects in an aisle to X-, you can make the bay numbers increase in the same direction.
- Define Level "1" Above the Ground - In some warehouses, or in specific racks, you are not allowed to store items on the floor. Further, level "1" is the first level above the ground. In FlexSim, the "first" level of a storage object is at the base of the object, i.e. on the floor. Thus, to customize the object for this situation, first define all slots on this "ground" level as unstorable, then set the object's Start Level to 0. This means that the first level with storable slots, which is above ground, will be numbered 1.
Zone ID
The object's Zone ID defines the zone ID of the object, in relation to its address scheme. The Zone ID, in conjunction with the Aisle ID, allow you to uniquely address slots in a storage object.
Aisle ID
The object's Aisle ID defines the aisle ID of the object, in relation to its address scheme. The Aisle ID, in conjunction with the Zone ID, allow you to uniquely address slots in a storage object.