Task 3.2 - Add Conditional Tasks
Task Overview
In this tutorial task, you'll learn how to create tasks that can change based on varying conditions during a model run. You'll add some constraints to the simulation model that will create these varying conditions. To start, you'll add two additional unloading destinations, for a total of three. Then, you'll add some restrictions to the number of flow items that these queues can accept at a given time by changing their maximum capacity. These limitations will create conditions in which an operator might not be able to unload all the items at a single destination and will have to evaluate whether the queues have room to accept flow items.
You'll create this logic by building a nested sub flow (a sub flow within a sub flow) that uses Decide activities to make decisions dynamically during a simulation run based on whether the destinations have reached their full capacity or not.
When you're finished, your simulation model will operate similar to the following image:
Groups Can Also Act as Arrays
In the previous tutorial, you learned that arrays are data structures that can contain more than one value if needed. To review, you also learned that each element in that array is usually identified by an index, which is a number that indicates the position of the value in the array. In the previous tutorial you created a label that contained an array called GroupOfItems that contained 2-5 flow items that were pulled from the ItemsToTransport list.
But labels aren't the only thing that can contain arrays. 3D object groups actually store information about their members as arrays. Just like you can reference individual flow items in the GroupOfItems array by their index, you can also refer to specific members of a 3D object group by their index. A group member's index is based on the order in which it appears in the group.
For example, in the first step in this tutorial, you'll add two additional queues to the 3D model. Then, you'll add these queues to the Destinations group you created in the previous tutorial:
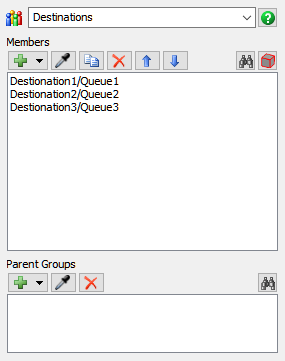
In this example, the Destinations group has an array that contains three queues. Each queue occupies a position between 1-3 in the array, which is its index.
If you want to reference one of the queues in the array, you will need to use its
specific index. Using the example in the preceding image, the FlexScript expression
Group("Destinations")[2] would return a reference to Queue2 in the
Destination2 plane. The expression Group("Destinations")[3] would return a
reference to Queue3 in the Destination3 plane.
Recall that the expression .length will return a value that indicates how
many elements are in a specific array. In this same way, the expression
Group("Destinations").length would return a value of 3 because there are 3
members in the Destinations group.
Step 1 Modify the 3D Model
In this step, you'll add two additional destinations to the 3D model. Then, you'll add some constraints to your model by restricting how many flow items each queue can hold at a given time. When you're finished, your model will look similar to the following image:
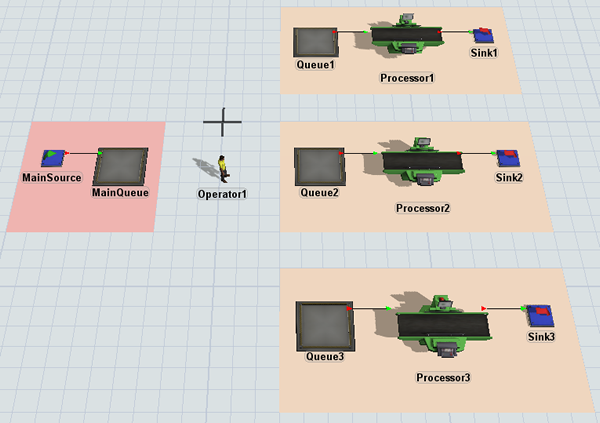
To make these changes:
- Click the Destination1 plane in the 3D model to select it. (It's the orange one.)
- Press Ctrl+C to copy the plane and all the objects on it. Click somewhere blank in the model to de-select the original plane. Press Ctrl+V to copy the plane.
- Repeat this step to add a third plane.
- With the second copied plane selected, in Quick Properties, change the name of the plane to Destination2.
- Rename each of the 3D objects on the second copied plane so that they all end in a 2, such as Queue2, Processor2, and Sink2.
- Repeat these steps to change the name of the third copied plane to Destination3 and renaming all the objects on the plane so that they end in 3.
- Click Queue1 to select it. In Quick Properties in the
Queue tab, in the Max Content
box, type
2. Click the OK button to save the changes and close the properties window. - Repeat this step for Queue2, changing its
Max Content to
1. - Repeat this step for Queue3, changing its
Max Content to
3. - When you copied the two planes, FlexSim should have automatically added Queue2 and Queue3 to the Destinations group. To confirm this, open the Toolbox in the left pane. Double-click the Destinations group to open its properties window. Confirm that the two new queues are in this group.
- Close all of the group windows.

Check to ensure your model looks similar to the image shown at the beginning of this step.
Step 2 Reorganize the Process Flow
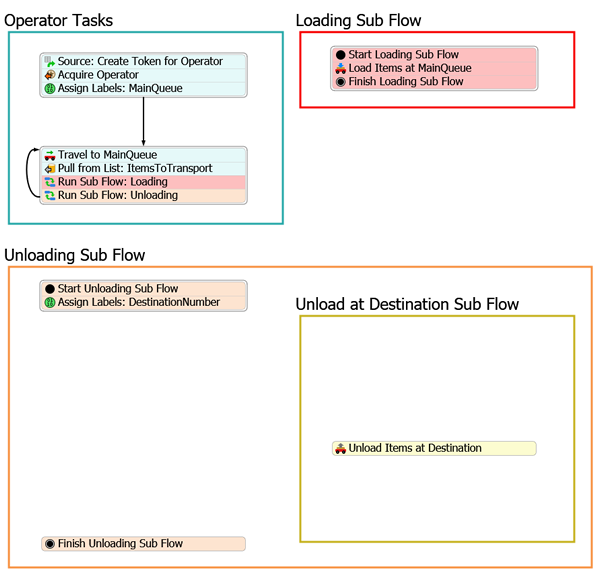
In this step, you'll change the process flow by reorganizing the shapes and activities in the Unloading Sub Flow. This sub flow is actually going to contain a sub flow within a sub flow, so you'll create the organization for that logic. When you're finished, your process flow should look similar to the following image:
For now, you'll merely reorganize some of the shapes and activities in the process flow. But you will make a small change to the Run Sub Flow: Unloading activity at the end of this step.
To reorganize the process flow:
- Move the Unloading Sub Flow shape so that it is below the other shapes and resize it so that it is much larger.
- Add a Shape (under Flowchart) and move it so that it is inside the Unloading Sub Flow.
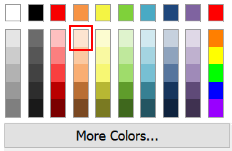
- Rename the new shape Unload at Destination Sub Flow.
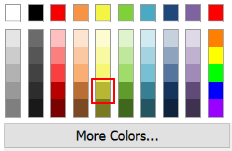
- In Quick Properties, use the color selector to change the color of the Unload at Destination Sub Flow shape to the second darkest yellow.
- Click the stacked block of activities in the Unloading Sub
Flow to select it. Click the Unlink buttons
 to separate the
Unload Items at Destination activity.
to separate the
Unload Items at Destination activity. - Move the Unload Items at Destination activity into the Unload at Destination Sub Flow shape.
- Right-click the Unload Items at Destination activity to open a menu. Select Edit Activity Visuals to open a properties window.
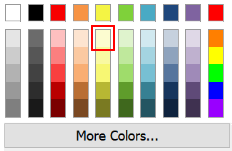
- Open the Background Color selector and choose the light yellow color.
- Rename the Assign Labels: Destination activity as Assign Labels: DestinationNumber.
- In the Operator Tasks shape, click the
Run Sub Flow: Unloading activity to select it. In Quick
Properties in the Quantity box, delete the current text and
type
1.
Consider saving your simulation model.
Step 3 Add Activities to the Unloading Sub Flow
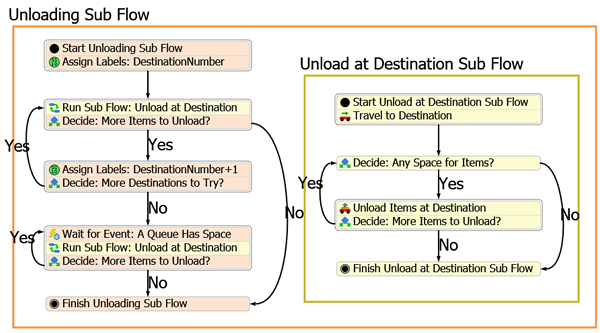
In this step, you'll add some additional activities to the Unloading Sub Flow process flow. These activities will eventually control unloading logic for the 3D model. When you're finished, your process flow should look similar to the following image:
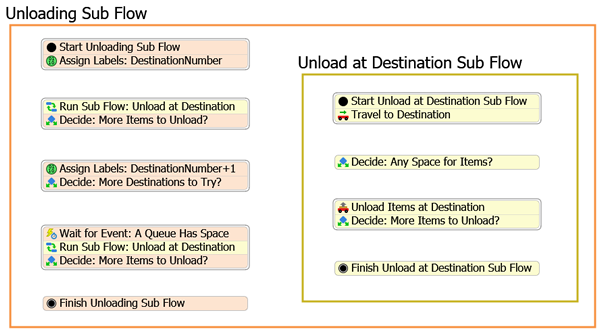
For now, you'll merely add these activities to the process flow. You'll add connections and edit the properties to add the logic in a later step.
To add these activities:
- In the Unloading Sub Flow shape, create a stacked block
with the following activities:
- A Run Sub Flow activity (under Sub Flow)
- A Decide activity (under Basic)
- Rename the activities as follows:
- Right-click the Run Sub Flow: Unload at Destination activity to open a menu. Select Edit Activity Visuals to open a properties window.
- Open the Background Color selector and choose the light yellow color.
- Right-click the Decide: More Items to Unload? activity to open a menu. Select Edit Activity Visuals to open a properties window.
- Open the Background Color selector and choose the light orange color.
- In the Unloading Sub Flow create a stacked block with
the following activities:
- An Assign Labels activity (under Basic)
- A Decide activity (under Basic)
- Rename the activities as follows:
- Change the color of both these activities to light orange.
- Click the stacked block with the Run Sub Flow: Unload at Destination to select it. Press Ctrl+C to copy the stacked. Press Ctrl+V to copy the activities.
- Move the newly copied stacked block so that it is between the Assign Labels: DestinationNumber +1 stacked block and the Finish Unloading Sub Flow activity.
- Add a Wait for Event activity (under Basic) to the beginning of the newly copied stacked block.
- Rename the Wait for Event activity as Wait for Event: A Queue Has Space.
- Right-click the Assign Labels: DestinationNumber+1 activity to open a menu. Select Edit Activity Visuals to open a properties window.
- Open the Background Color selector and choose the light orange color.
- Repeat the previous step to change the color of the rest of the activities to light orange (except for the yellow Run Sub Flow activities).
- In the Unload at Destination Sub Flow shape, create a
stacked block with the following activities near the top of the shape:
- A Start activity (under Sub Flow)
- A Travel activity (under Task Sequences)
- Rename the activities as follows:
- Add a Decide activity (under Basic) under the stacked block, but leave it loose and unconnected.
- Rename this activity Decide: Any Space for Items?.
- Add another Decide activity, appending it to the Unload Items at Destination activity to create a stacked block.
- Rename this activity Decide: More Items to Unload?.
- Add a Finish activity (under Sub Flow) under the last stacked block, but leave it loose and unconnected.
- Rename this activity Finish Unload at Destination Sub Flow.
- Right-click the Start: Unload at Destination activity to open a menu. Select Edit Activity Visuals to open a properties window.
- Open the Background Color selector and choose the light yellow color.
- Repeat these steps to change all the activities in the Unload at Destination Sub Flow shape to a light yellow color.
| Activity | New Name |
|---|---|
| Run Sub Flow | Run Sub Flow: Unload at Destination |
| Decide | Decide: More Items to Unload? |
| Activity | New Name |
|---|---|
| Assign Labels | Assign Labels: DestinationNumber+1 |
| Decide | Decide: More Destinations to Try? |
| Activity | New Name |
|---|---|
| Start | Start Unload at Destination Sub Flow |
| Travel | Travel to Destination |
Consider saving your simulation model.
Step 4 Connect the Activities
You'll notice that in the previous step you added some Decide activities. The logic of Decide activities depends on setting up the connectors between your activities correctly. For that reason, you'll work on connecting all the activities correctly in this step. The important thing to pay attention to is making sure you connect the activities in the right order so that the connector rankings are correct. Do your best to ensure that you follow these steps in this exact order.
When you're finished, your process flow should look similar to the following image:
To connect these activities:
- Create a connector going out from the Assign Labels: DesinationNumber activity to the stacked block starting with the RunSub Flow: Unload at Destination activity.
- Create a connector going out from the Decide: More Items to Unload? activity to the Assign Labels: DesinationNumber+1 activity.
- Click the connector you just created to select it. In Quick Properties in the
Name box, type
Yes. - Create a connector going out from the Decide: More Items to Unload? activity to the Finish Unloading Sub Flow.
- Click the connector you just created to select it. In Quick Properties in the
Name box, type
No. - Create a connector going out from the Decide: More Destinations to Try? activity looping back to the stacked block starting with the Run Sub Flow: Unload at Destination activity.
- Click the connector you just created to select it. In Quick Properties in the
Name box, type
Yes. - Create a connector going out from the Decide: More Destinations to Try? activity to the stacked block starting with the Wait for Event: A Queue Has Space activity.
- Click the connector you just created to select it. In Quick Properties in the
Name box, type
No. - Create a connector going out from the Decide: More Items to Unload? activity looping back to the beginning of the that same stacked block, the one starting with the Wait for Event: A Queue Has Space activity.
- Click the connector you just created to select it. In Quick Properties in the
Name box, type
Yes. - Create a connector going out from the Decide: More Items to Unload? activity to the stacked block starting with the Finish Unloading Sub Flow activity.
- Click the connector you just created to select it. In Quick Properties in the
Name box, type
No. - Create a connector going out from the Travel to Destination activity to the Decide: Any Space for Items? activity.
- Create a connector going out from the Decide: Any Space for Items? activity to the Unload Items at Destination activity.
- Click the connector you just created to select it. In Quick Properties in the
Name box, type
Yes. - Create a connector going out from the Decide: Any Space for Items? activity to the Finish: Unload at Destination Sub Flow activity.
- Click the connector you just created to select it. In Quick Properties in the
Name box, type
No. - Create a connector going out from the Decide: More Items to Unload? activity looping back to the Decide: Any Space for Items? activity.
- Click the connector you just created to select it. In Quick Properties in the
Name box, type
Yes. - Create a connector going out from the Decide: More Items to Unload? activity to the Finish: Unload at Destination Sub Flow activity.
- Click the connector you just created to select it. In Quick Properties in the
Name box, type
No.
Consider saving your simulation model.
Step 5 Edit the Main Unloading Sub Flow Logic
In this step, you'll create the logic that will control the main activities in the unloading sub flow (the orange activities). The following is an overview of how the activities will function:
| Activity | Explanation |
|---|---|
| Start Unloading Sub Flow | Every sub flow needs to begin with a Start activity. When the Run Sub Flow activity sends child tokens to a sub flow, it will always send them to this activity. You'll use the default settings for this activity. |
| Assign Labels: DestinationNumber | You'll change the previous settings you used for this activity in the previous tutorial. You'll rename the label that is assigned to tokens to DestinationNumber and assign it an initial value of 1. You'll use this label later to refer to one of the queues in the Destinations group by the order in which they appear in the Destinations group (their index). |
| Run Sub Flow: Unload at Destination (first one) | This activity will create one child token and send it to the Unload at Destination Sub Flow. You'll also create a label on the child token called Destination. Using the DestinationNumber label you created in the previous activity, you'll be able to reference the first queue in the Destinations group in the 3D model. You'll set that queue as the first destination. |
| Decide: More Items to Unload? (first one) | After the Unload at Destination Sub Flow finishes running, it will move to this activity. This activity will check to see if there are any other items that need to be unloaded by seeing if there are any items left to unload in the GroupOfItems array. If there are items left over, the token will be routed to the next downstream activity. If all the items have been unloaded, it will send the token to the Finish Unloading Sub Flow activity. |
| Assign Labels: DestinationNumber+1 | If there are more items to unload, this activity will increase the DestinationNumber label by one. Recall that this label will tell the process flow which queue in the Destination group is the current destination that the operator should attempt to unload items at (using its index number). If the operator just tried Queue1, it will try Queue2, and so forth. |
| Decide: More Destinations to Try? | Since the previous activity will increase the DestinationNumber label by one, you'll need this activity to make sure that this label doesn't increase beyond the number of Destinations that are currently available in the model. This Decide activity will compare the current value of the DestinationNumber value against the number of queues that are currently in the Destinations group in the 3D model. If the destination is less than or equal to the number of members in the Destinations group, that will mean there are still more destinations at which the operator can attempt to unload items. If so, the token will be looped back to the first Run Sub Flow: Unload at Destination activity and the unloading sub flow will run again at the next destination. If not, the token will move to the Wait for Event: A Queue Has Space activity. |
| Wait for Event: A Queue Has Space | If a token reaches this Wait for Event activity, it's because all of the queues in the model were currently at their maximum capacity. The token will wait here until a flow item exits one of the queues and clears up space for that flow item. Since you'll be listening to a group of queues, you'll update the Destination label so that it will have a reference to the specific queue that triggered the event. Then, the token will move to the second Run Sub Flow activity. |
| Run Sub Flow: Unload at Destination (second one) | If a token reaches this activity, it means that one of the queues now has space to receive a flow item. It will then need to run the Unload at Destination Sub Flow for the Destination that triggered the event in the previous activity. |
| Decide: More Items to Unload? (second one) | After the Unload at Destination Sub Flow finished running, it will move to this activity. This activity will check to see if there are any other items that need to be unloaded by seeing if there are any items left to unload in the GroupOfItems array. If there are items left over, the token will be looped back to the Wait for Event activity. If all the items have been unloaded, it will send the token to the Finish Unloading Sub Flow activity. |
| Finish Unloading Sub Flow | Every sub flow needs to end with a Finish activity. The parent token on the Run Sub Flow activity will wait at that activity until all of its child tokens have reached the Finish activity. You'll use the default settings for this activity. |
To create this logic:
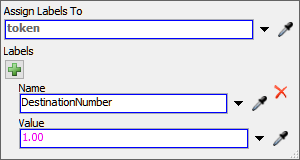
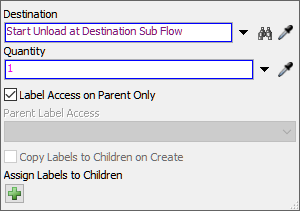
- Click the Assign Labels: DestinationNumber activity to
select it. In the Name box, change the text to
DestinationNumber. - In the Value box, delete the existing text and type
1.00. - Click the Run Sub Flow: Unload at Destination activity
to select it. Click the Exclamation Point button
 next to this activity to enter
sampling mode.
next to this activity to enter
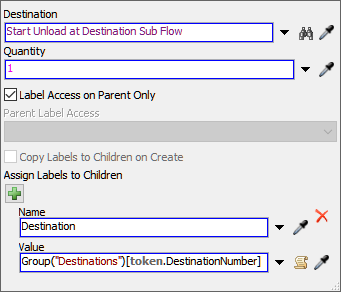
sampling mode. - Click the Start Unload at Destination Sub Flow activity to sample it.
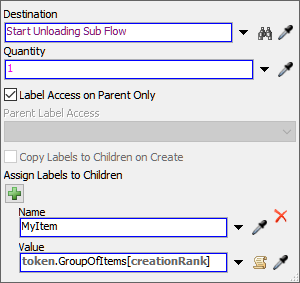
- In Quick Properties under the Assign Labels to Children
group, click the Add button
 to add a label.
 - In the Name box, type
Destination. - In the Value box, type
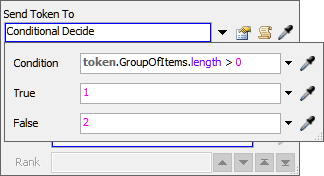
Group("Destinations")[token.DestinationNumber]. - Click the Decide: More Items to Unload? activity to select it. In Quick Properties, click the arrow next to the Send Token To box to open a menu. Select Conditional Decide to open a properties window.
- In the Condition box, delete the current text and type
token.GroupOfItems.length > 0. - Skipping ahead again, repeat these same steps for the second Decide: More Items to Unload? activity so that their properties are identical.
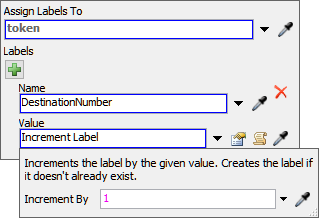
- Click the Assign Labels: DestinationaNumber+1 activity
to select it. In Quick Properties, click the Add button
to add a label.
- Click the arrow next to the Name box to open a menu. Point to Token Label, then select DestinationNumber.
- Click the arrow next to the Value box to open a menu.
Select Increment Label to open up a properties window.
You'll use the default value of
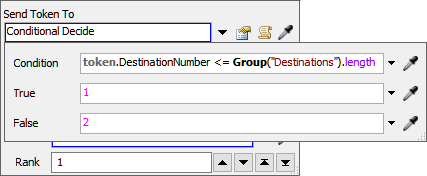
1so just click outside of the window. - Click the Decide: More Destinations to Try? activity to select it. In Quick Properties, click the arrow next to the Send Token To box to open a menu. Select Conditional Decide to open a properties window.
- In the Condition box, delete the current text and type
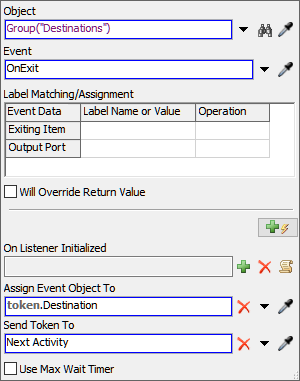
token.DestinationNumber <= Group("Destinations").length. - Click the Wait for Event: A Queue Has Space to select it. In Quick Properties, click the arrow next to the Object box to open a menu. Point to Group, then select Destinations.
- Next to the Event box, click the
Sampler button
 to enter sampling mode.
 - In the 3D model, click any one of the Queue objects to open a menu. Select On Exit.
- Click the arrow next to the Assign Event Object To box to open a menu. Point to Token Label, then select Destination.
- Click the Run Sub Flow: Unload at Destination activity
to select it. Click the Exclamation Point button
next to this activity to enter
sampling mode.
- Click the Start Unload at Destination Sub Flow activity to sample it.
Consider saving your simulation model.
Step 6 Edit the Unload at Destination Sub Flow Logic
In this step, you'll create the logic that will control the activities in the Unload at Destination Sub Flow (the yellow activities). The following is an overview of how the activities will function:
| Activity | Explanation |
|---|---|
| Start Unload at Destination Sub Flow | Every sub flow needs to begin with a Start activity. When the Run Sub Flow activity sends child tokens to a sub flow, it will always send them to this activity. You'll use the default settings for this activity. |
| Travel to Destination | This activity will tell the operator to travel to the one of the destination queues in the 3D model. You'll use the Destination label that was created on the Run Sub Flow activity that created this child token to determine which queue is the current destination. |
| Decide: Any Space for Items? | This activity will determine whether the current destination has reached its maximum capacity or not. If it has not reached its maximum capacity, then the token will be sent to the Unload Items at Destination activity. If the queue is full, the token will be sent to the Finish Unload at Destination Sub Flow activity. |
| Unload Items at Destination | When each child token reaches this activity, it will tell the operator which flow items to unload and which location to load them at. You'll use the Operator label to indicate which operator should perform this task and you'll use the MyItem label on each child token to tell the operator which items it should load from the MainQueue. The Destination label that you set in the previous activity will tell the operator to unload the items at Queue1 in the 3D model. |
| Decide: More Items to Unload? | After the operator has finished unloading one flow item, it will move to this activity. This activity will check to see if there are any other items that need to be unloaded by seeing if there are any items left to unload in the GroupOfItems array. If there are items left over, the token will be routed to the next downstream activity. If all the items have been unloaded, it will send the token to the Finish Unload at Destination Sub Flow activity. |
| Finish Unload at Destination Sub Flow | Every sub flow needs to end with a Finish activity. The parent token on the Run Sub Flow activity will wait at that activity until all of its child tokens have reached the Finish activity. You'll use the default settings for this activity. |
To create this logic:
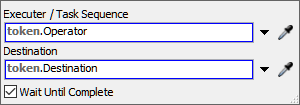
- Click the Travel to Destination activity to select it. In Quick Properties, click the arrow next to the Executer / Task Sequence box to open a menu. Point to Token Label, then select Operator.
- Click the arrow next to the Destination box to open a menu. Point to Token Label, then select Destination.
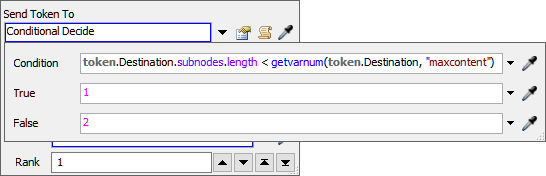
- Click the Decide: Any Space for Items? activity to select it. In Quick Properties, click the arrow next to the Send Token To box and select Conditional Decide to open a properties window.
- In the Condition box, type
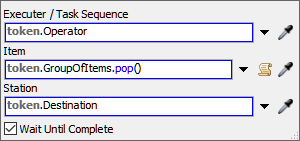
token.Destination.subnodes.length < getvarnum(token.Destination,
			"maxcontent")
. - Click the Unload Items at Destination activity to
select it. In Quick Properties, in the Item box, type
token.GroupOfItems.pop(). - Click the Decide: More Items to Unload? activity to select it. In Quick Properties, click the arrow next to the Send Token To box and select Conditional Decide to open a properties window.
- In the Condition box, type
token.GroupOfItems.length.
Consider saving your simulation model.
Step 7 Run the Simulation Model
Reset and run the model:
As you watch, the operator will start dropping off items at the first queue. When the first queue reaches its maximum capacity of 2 flow items, the operator will move on to the second queue. If the second queue has reached its maximum capacity of 1, then the operator will move to the third queue.
If your model isn't behaving exactly this way, check your properties to make sure you didn't accidentally skip a crucial step. Generally you can figure out which activity is causing problems by checking which activity has tokens at the time an error occurs.
Conclusion
This concludes Tutorial 3. In this tutorial, you built a model with some fairly complex transportation logic. Hopefully you can see how with a little bit of knowledge of FlexScript and some conditional logic using Decide activities, you can make some pretty robust simulation models for any kind of business system you need to simulate.