Assign Labels
Overview and Key Concepts
The Assign Labels activity creates or modifies labels on various objects. Labels can be used to store important data about various objects. You can assign labels to any object that owns labels which includes, but is not limited to:
- An incoming (entering) token
- A parent token
- Flow items
- 3D objects such as an Operator or Processor
- A process flow

To define the labels to create/modify click the
 button under the
Labels section. Labels may be numbers, strings, treenodes
(objects) or arrays (intarray, doublearray, stringarray, treenodearray). If a label is set
that does not currently exist on the Assign To object, the
label will created. If the label already exists, then the value will be overwritten with the
new value.
button under the
Labels section. Labels may be numbers, strings, treenodes
(objects) or arrays (intarray, doublearray, stringarray, treenodearray). If a label is set
that does not currently exist on the Assign To object, the
label will created. If the label already exists, then the value will be overwritten with the
new value.
Non-Label Assignment
The Assign Labels activity can also be used to add data to any node in the form of
subnodes. If the Assign To is a label node or some other node
in the model that is not an object with labels, then sub nodes will be added for each label
entry. To reference a label node rather than the value, use the command
label(token, "labelName"). This can be useful when storing large amounts of
data that is not used to determine model logic. This functionality can be used to create a
table on a token's label. To explore the table, right click on the label in Quick Properties
and select Explore as Table.
Tracked Variables as Labels
It is often useful to be able to track the history of a value as it changes throughout
the model run. Or perhaps you want to wait until a value gets above or below a certain
point. One way of doing this is by creating and setting a global tracked variable.
Alternatively, if you select the pick option Add Tracked
Variable from the Value boxes, a tracked variable will
be created on the assigned label. This label will have the apperance of a label with numeric
data but you have both the ability to store a history of all of the values as well as listen
to whenever that value changes through a Wait
For Event activity. Once a tracked variable is added to a label, the value can be
updated using standard picklist options or the setlabel() command.
Connectors
The Assign Labels activity only allows one connector out. See Adding and Connecting Activities for more information.
Properties
The following image shows properties for the Assign Labels activity:
Each of these properties will be explained in the following sections.
Name
Used to change the name of the activity. See Name for more information about this property.
Font
The Font button
 opens a window to edit the activity's
background color and font properties. See
Font for more information
about this property.
opens a window to edit the activity's
background color and font properties. See
Font for more information
about this property.
Statistics
The Statistics button
 opens the activity's statistics
window. See Statistics
for more information about this property.
opens the activity's statistics
window. See Statistics
for more information about this property.
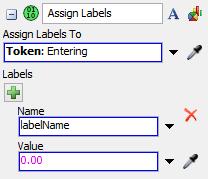
Assign To
The Assign To box determines which token or object will be assigned a label. By default this activity assigns labels to the entering token.
Labels
When you click the Add button
, a new set of properties will appear:
- Name - The name of the label that will be created or modified on the Assign To object.
- Value - The new value of the label. You can enter a static number or string into this box or choose one of the picklist options from the drop down for a more dynamic value. Use the eye dropper to get references to objects, object labels or other data. Values entered here may be a number, string, treenode (object), array, or process flow variable. The value could also be defined using code.