Webserver
System Requirements
Because the Webserver is actually running FlexSim models and rendering the graphics, the system requirements for the Webserver are the recommended system requirements for FlexSim itself. In addition, the Webserver must also compress and stream the graphics, dashboards, etc., so if anything, it is doing a bit more processing than a normal run of FlexSim. Add to that the fact that multiple people can log in and run models simultaneously, and the necessary system resources multiply accordingly.
FlexSim Webserver on a Virtual Machine
Virtual Machine platforms have not generally supported 3D graphics acceration without specialized hardware and/or software configurations. Without graphics acceleration, a system will not meet FlexSim's minimum requirements. VM platforms are evolving, and more and more are able to accelerate some 3D workloads. Please check your platform's 3D acceleration features to see if they meet FlexSim's minimum requirements for OpenGL.
Between the high hardware requirements and need for accelerated graphics, FlexSim has not tested the Webserver in Virtual environments. While you may be able to create a Virtual Machine environment where FlexSim works well, you may also encounter issues that are VM-specific that have not been tested. As such, we do not recommend running the FlexSim Webserver in a Virtual Machine.
Overview and Key Concepts
FlexSim's Webserver is a query-driven manager and communication interface for FlexSim. It allows you to run FlexSim models through a web browser like Google Chrome, FireFox, Internet Explorer, etc.
The WebServer now has its own installer which can be found on the FlexSim downloads page.
When you start the FlexSim Server using the desktop shortcut, your computer will begin to host a website that looks like this:
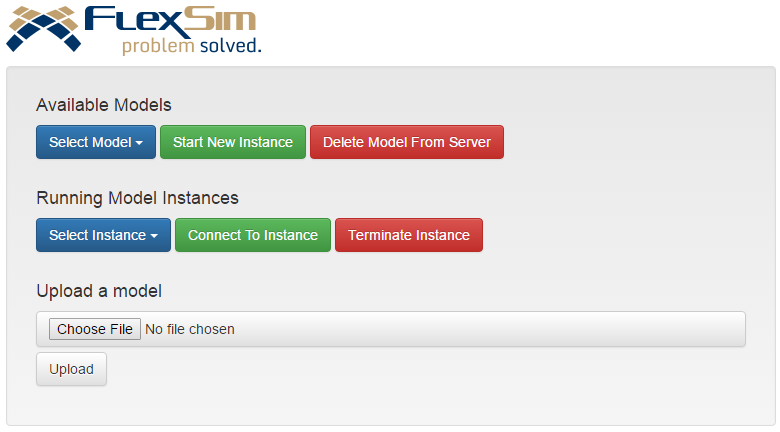
This website can be accessed by typing the address http://127.0.0.1/ into a browser. The Webserver looks for models in FlexSim's projects directory ('Documents/FlexSim 2017 Projects' for example).
To start a new instance of FlexSim, select a model to run and click Start New Instance. The Start New Instance button will gray out until FlexSim has started and the model is open. Once that occurs, the drop down under Running Model Instances will populate with the newly created instance. Select the instance and click Connect To Instance to view the automatically generated web interface for your model. Our Test Model had a 3D view and a Dashboard open side by side:
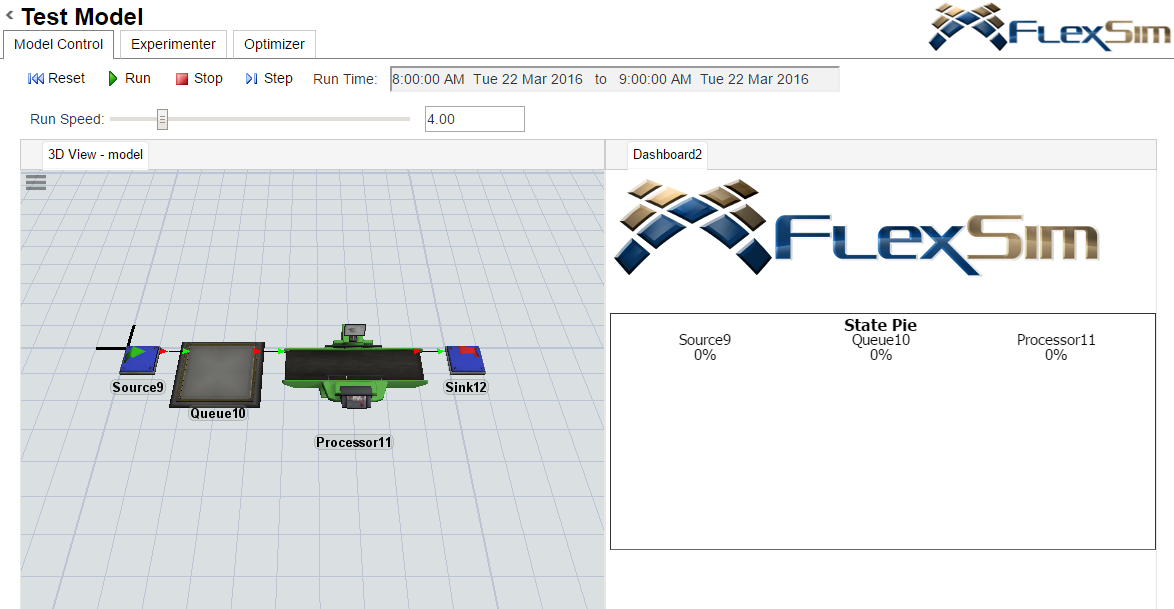
The interface that is displayed will match the interface of the model. You can rearrange the interface the same way you interact with FlexSim's windows. Click and drag on the window's tab to undock it, or right click and select Float. You can also close views by right clicking the window tab and selecting Close. Once undocked, you will see options for docking that window in various locations in the interface.
3D View
You can control your model in the browser using the controls at the top. You can also interact with open 3D views in your model. Left click to pan, right click to rotate, and either right-and-left click or use the mouse wheel to zoom. Additional buttons for panning, rotating, and zooming are generated for tablet devices and smartphones.
Dashboards
Dashboards are also displayed in real time. You can even reposition and resize dashboard statistic widgets. If the model's dashboards contain input widgets like text fields, tables, buttons, etc. you will be able to interact with these elements.
Experimenter / Optimizer
If your model has an Experimenter, a standard interface is generated for running experiments. Use the tabs at the top of the window to move between the Model Control, Experimenter and Optimizer. You can define experiment variables, run times, optimization values and other parameters.
Tablets and Smartphones
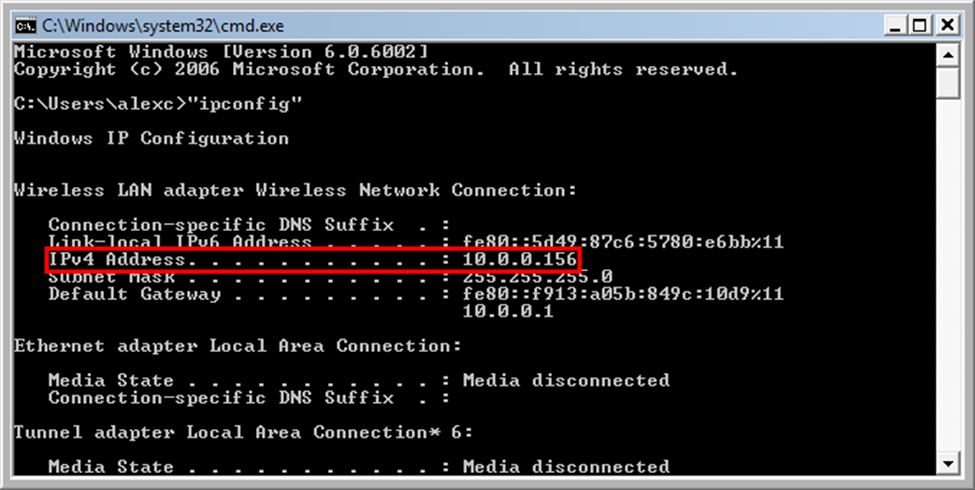
To connect other devices such as tablets and smartphones to this server, the address 127.0.0.1 will not work. The other device will need to be connected to the same local area network or wireless local area network as your computer. You will need to find the ip address of your computer. To do this, click the start button and type cmd.exe, which will open a black command prompt. Enter ipconfig and press enter. Your IPv4 Address should be entered as the URL in the browser in the device.
Developing Custom Web Interfaces
The FlexSim Webserver allows you to start a simple test webserver without installing any webserver software like Apache or IIS. If you want to deploy a webserver using IIS, see Using FlexSim Webserver with IIS. You can create custom webserver applications using queries provided by FlexSim or user defined queries contained in the model. To get exact details on what a query returns, enter the query in the URL bar of the browser to view the reply (for example: 127.0.0.1/webserver.dll?availablemodels).
The following queries are available. You can also enter 127.0.0.1/webserver.dll into the URL bar to display this list.
General
- webserver.dll?availablemodels returns an xml list of the models available to run on the server using the createinstance query.
- webserver.dll?allfiles returns an xml list of all files in the model directory on the server.
- webserver.dll?configuration returns an xml list of all parameters specified in the 'flexsim webserver configuration.txt' file.
- webserver.dll?uploadmodel uploads the model to the server, if this feature has been enabled in the 'flexsim webserver configuration.txt' file. A form such as the form in index.html uploads a model (or another file, such as an excel table) to the model directory.
- webserver.dll?deletemodel=my%20model deletes the model (or another file) from the model directory on the server, if this feature has been enabled in the 'flexsim webserver configuration.txt' file.
- webserver.dll?downloadfile=modeldata%2Ecsv downloads a file from the model directory on the server, if this feature has been enabled in the 'flexsim webserver configuration.txt' file.
Instances
- webserver.dll?instancelist returns an xml list of the models running on the server and their instance numbers. These are the valid possibilities for queryinstance and terminateinstance queries.
- webserver.dll?numinstances returns an xml number representing the number of instances running on the server including from other users. This can be used for load balancing multiple servers.
- webserver.dll?createinstance=my%20model starts an instance of FlexSim running the model specified (here it's 'my model.fsm') and returns a short xml reply containing the instance number.
- webserver.dll?queryinstance=my%model&instancenum=1&... queries an instance of FlexSim. FlexSim decides how to reply to the request. This is the gateway to the main functionality of communicating with a model. See Instance Queries for more information.
- webserver.dll?terminateinstance=my%model&instancenum=1 terminates the first instance of FlexSim running 'my model.fsm' on the server and returns a short xml reply.
Libraries
- webserver.dll?getlibraries returns a list of the files in the libraries directory on the server.
Modules
- webserver.dll?getmodules returns a list of the files in the modules directory on the server.
Jobs
- webserver.dll?submitjob should be the action of an HTML form like this one containing a job description in JSON format. The reply will be an id for use with getjobresults queries.
			<form action="http://127.0.0.1/webserver.dll?submitjob" method="POST">
				<input type="hidden" name="job" value='{"modelname":"my%20model","timeout":3600,"priority":5,"setupcommands":
					[{"command":"settable=modelparameters","data":"values=[[\"firstParam\",0],[\"secondParam\",2],[\"thirdParam\",\"hello\"]]"},
					{"command":"setrunspeed=100000000"},{"command":"setstoptime=86400"},{"command":"toolsnodefunction=setupscript"},{"command":"run"}],
					"resultcommands":[{"command":"getnodedata=/Tools/TrackedVariables/WorkInProgress"},{"command":"getnodedata=/Tools/modeloutput"}]}'>
				<input type="submit">
			</form>
The JSON object must have a "modelname" field, which is the name of the model on the server. It can have a "timeout" field, which is the maximum number of seconds to wait for the model run to complete. It must have a "setupcommands" field, which is an array of command objects. It must have a "resultcommands" field, which is an array of command objects. Command objects must have a "command" field, which is the part of a queryinstance query after webserver.dll?queryinstance=my%20model&instancenum=1&id=1&... Command objects can also have a "data" field, which is the body of the HTTP request, typically containing data from POST requests. Command objects can also have a "verb" field, which is usually "GET" or "POST".
The job will be done as soon as the server is able to make more instances of FlexSim. A createinstance query will be created, followed by a queryinstance=my%20model&instancenum=1&defaultpage query, whose replies are ignored. The replies to each of the setup commands are then stored, followed by polling the model with queries like queryinstance=my%20model&instancenum=1&id=1&getrunstate. When the runstate is 0 (when the model is finished running), the replies to the result commands will be stored. A complete summary of the run in JSON format can be sent as a reply to a getjobresults query.
Instance Queries
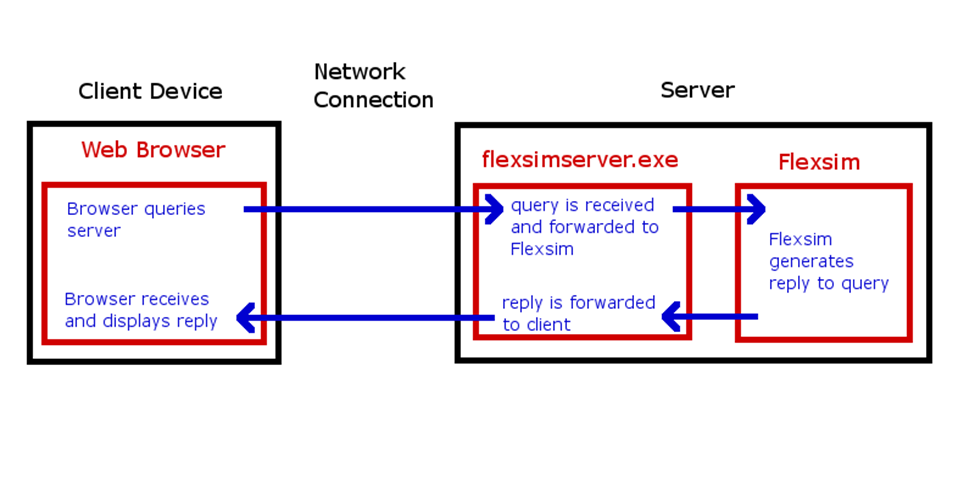
Once an instance has been created, the webserver can communicate with FlexSim through query handlers. These allow you to both send and receive data from FlexSim. Query requests to the server are handled as seen in this picture:
A list of default queries is available at MAIN:/project/exec/globals/serverinterface/queryhandlers. Using these as templates you can create your own custom query handlers by adding subnodes to the MODEL:/Tools/serverinterface/queryhandlers node. These queryhandler nodes should be toggled flexscript. The name of the node corresponds to a value passed in by the query. For example, webserver.dll?queryinstance=Test%20Model&instancenum=1&reset executes the queryhandler located at MAIN:/project/exec/globals/serverinterface/queryhandlers/reset. Parameters may be added to the query to pass additional information. For example, webserver.dll?queryinstance=Test%20Model&instancenum=1&customquery=1&count=5.
Custom functionality and custom query types for querying the model can also be written for a model by making a flexscript node at MODEL:/Tools/serverinterface/sendreply. This node must call webcommand("httpsendreply", replynode); once to send a reply to the query. This will send a reply in different forms, depending on the type of data in the node given as a parameter. If the node has string data containing a syntactically correct HTTP reply with HTTP headers as defined by http://www.w3.org/Protocols/rfc2616/rfc2616-sec6.html, then it will be sent as-is, giving developers full access to send any type of HTTP reply desired. Refer to the code in MAIN:/project/exec/globals/serverinterface/sendreply for an example, which can be copied and edited as needed. Remember that the defaultPage and getRunState queries are used by the job interface.
Default Page
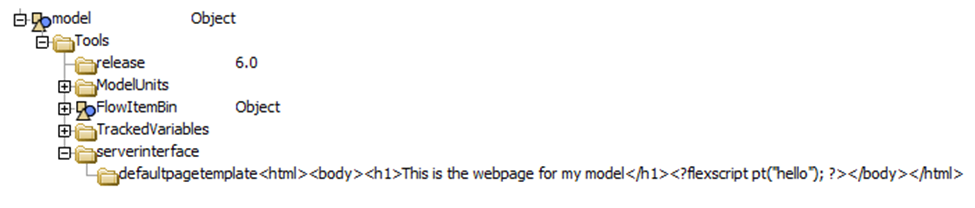
The default webpage for a model is generated by using a template found in the tree at MAIN:/project/exec/globals/serverinterface/pagetemplates/default. An html page can be made for a specific model by putting the html into a node created at MODEL:/Tools/serverinterface/defaultpagetemplate. This page can include the php-like <?flexscript ?> tags to generate dynamic material. This will override the default page of the model.
Using FlexSim Webserver with IIS
If IIS is configured to use the iisnode module, it can also manage instances of FlexSim and interact with FlexSim's webserver interface. This requires IIS 7.x with IIS Management Tools, ASP.NET, and the URL Rewrite module for IIS.
All interaction should be the same except for three major differences: visibility, threading and authentication.
- IIS is run in the background, so FlexSim instances will not be visible on the server. This makes it harder to debug any problems.
- IIS use multiple threads to respond to requests in parallel, so the order of replying to requests could be different.
- Access to models in the Model Directory can be restricted when Windows Authentication is enabled (both in IIS and in 'flexsim webserver configuration.txt'). Directories named after usergroups defined by the domain controller are restricted. Users are only given access to restricted directories named after usergroups which they belong to.
Allocating Windows Memory
There is a Windows Registry setting that limits the amount of memory (desktop heap size) that Windows will allocate for non-interactive processes. The registry path is:
HKEY_LOCAL_MACHINE\System\CurrentControlSet\Control\Session Manager\SubSystems\Windows
This key has a value that is a long string with more key/value pairs:
		%SystemRoot%\system32\csrss.exe
		ObjectDirectory=\Windows
		SharedSection=1024,20480,512
		Windows=On
		SubSystemType=Windows
		ServerDll=basesrv,1
		ServerDll=winsrv:UserServerDllInitialization,3
		ServerDll=sxssrv,4
		ProfileControl=Off
		MaxRequestThreads=16
The SharedSection key defines, in its 3rd parameter, the amount of memory that can be allocated by IIS. By default, this is 512. If you need to open multiple instances of FlexSim through the webserver, you may need to increase this number to beyond the total amount of memory that all your instances will use simultaneously. This number will vary based upon the memory requirements of the models that are being run.
Be sure to reboot your machine after making any changes.
Configuring IIS
IIS requires some additional configuration to work with FlexSim. The steps are outlined as follows:
Windows Server operating systems and 64 bit operating systems may have some additional complications.
- Here is how to configure IIS from a fresh install of Windows Server 2012:
- Open the Server Manager.
- In Server Manager, select Dashboard, and click Add roles and features.
- In the Add Roles and Features Wizard, on the Before you begin page, click Next.
- On the Select installation type page, select Role-based or feature-based installation, and click Next.
- On the Select destination server page, select Select a server from the server pool, select your server, and click Next.
- On the Select server roles page, select Web Server (IIS), and click Next.
- On the Select features page, click Next.
- On the Web Server Role (IIS) page, click Next.
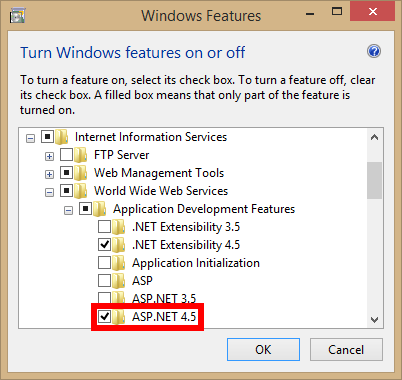
- On the Select role services page, note the preselected role services that are installed by default, expand the Application Development node (under World Wide Web Services), and then select ASP.NET 4.5.
- On the Summary of Features to Install page, confirm your selections, and then click Install.
- In the Add features that are required for ASP.NET 4.5? box, click Add Features. Then click Next.
- On the Confirm installation selections page, click Install.
- Here is how to configure IIS from a fresh install of Windows 8:
- In the Turn Windows features on or off dialog box, click Internet Information Services to install the default features.
- Expand the Application Development Features node (under World Wide Web Services) and click ASP.NET 4.5 to add the features that support ASP.NET.
- Download and install URL Rewrite.
- Download and install iisnode.
- Make sure that FlexSim is installed in a directory that is accessible by IIS and your models are in a directory that is accessible by IIS (for example, not in C:\Users\...).
- Make sure that the FlexSim Server is installed. Download it here: FlexSim downloads page
- Run the FlexSim Server once outside of IIS. This allows it to configure some dependencies through NPM.
- Replace any %DOCUMENTS% or %PROGRAMFILES% macros in the directories in 'flexsim webserver configuration.txt' with the full path of the directory.
- Copy the contents of the FlexSim Server directory into C:\inetpub\wwwroot.
- Copy the entire flexsimweb folder (not just its contents) from the FlexSim program directory to C:\inetpub\wwwroot.
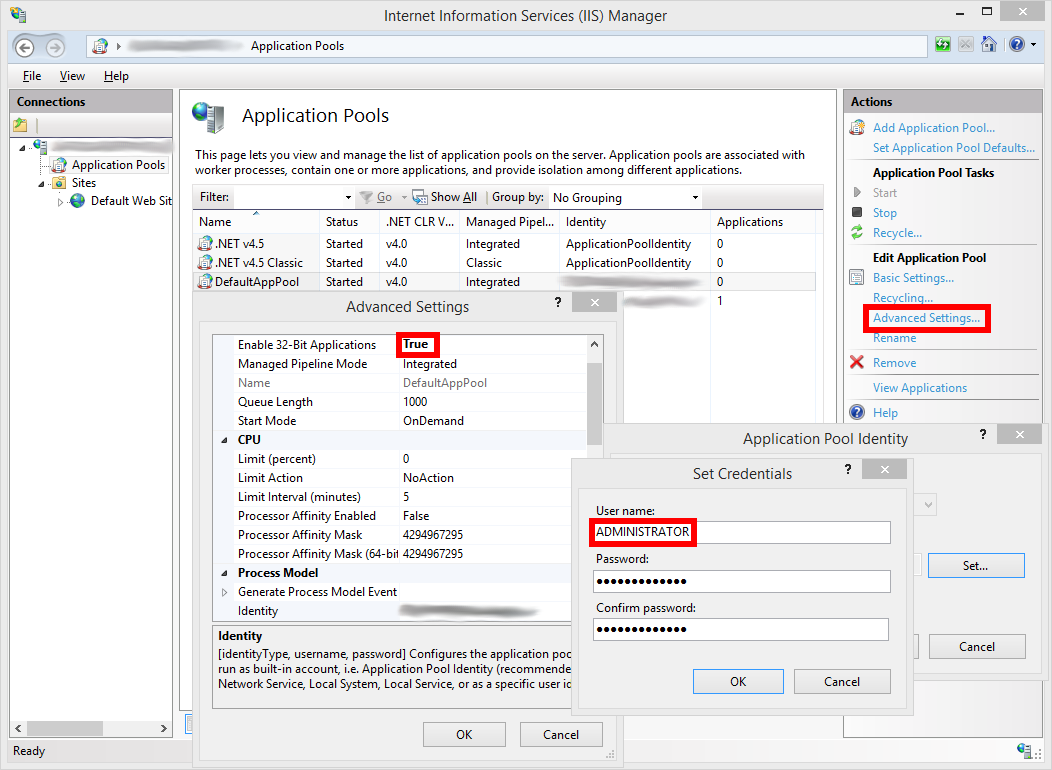
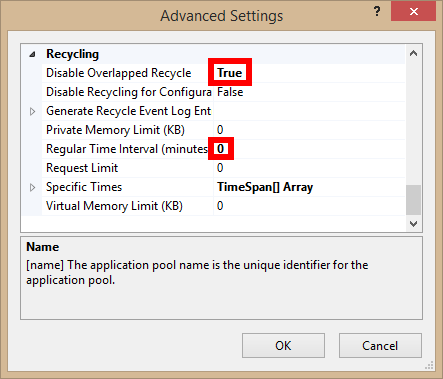
- Go to the Advanced Settings of the DefaultAppPool, in the IIS Manager.
- If you are running a 32-bit version of FlexSim, enable 32-bit Applications (otherwise leave this option set to FALSE).
- Change the Application Pool Identity to ADMINISTRATOR. There will be many permissions issues avoided by doing this.
- To prevent more than one instance of the server running at once, enable Disable Overlapped Recycle.
- Set Regular Time Interval (minutes) to 0. This prevents periodic recycling of the server process.
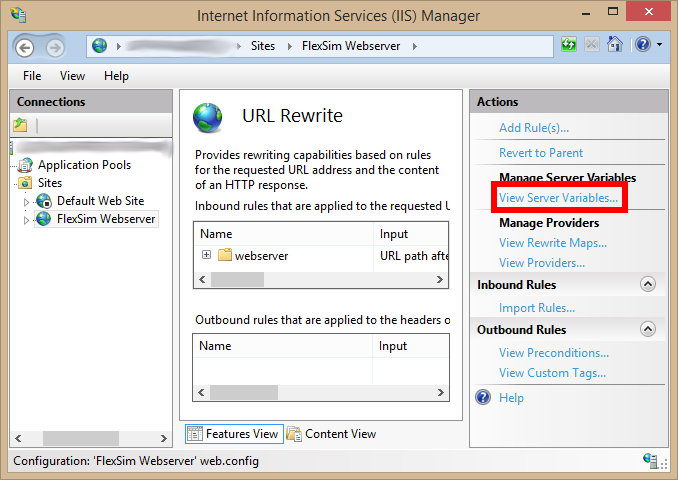
- Go to URL Rewrite under the Default Web Site, still in the IIS Manager.
- Click View Server Variables...
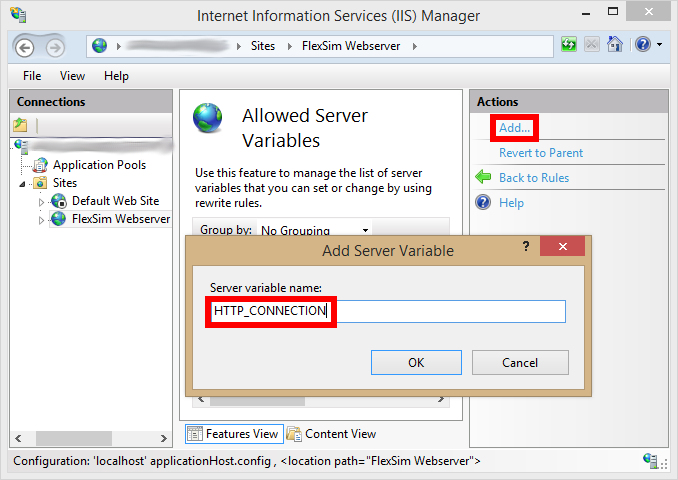
- Click Add... and then enter HTTP_CONNECTION into the popup.
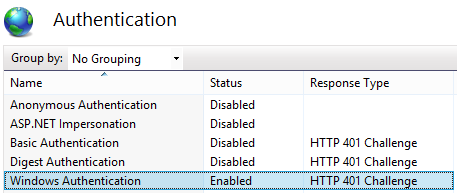
Windows Authentication in IIS
Under Sites/Default Web Site, double click on Authentication. Enable Windows Authentication.