Code Editor
Overview and Key Concepts
The Code Editor window allows you to edit code for picklists and triggers throughout FlexSim. The window can be used as a floating window (default), or it can be docked into the main FlexSim window in any configuration. Just click the tab or the title bar and drag it over the Dock Windows icon.
Throughout FlexSim you will see  buttons.
Clicking this icon will open the Code Edit window and allow you to edit that picklist or
trigger's code. Alternatively, many right click menus (like in the Tree Window) have the
option to select Explore, then As Code that will also open a Code Edit window.
buttons.
Clicking this icon will open the Code Edit window and allow you to edit that picklist or
trigger's code. Alternatively, many right click menus (like in the Tree Window) have the
option to select Explore, then As Code that will also open a Code Edit window.
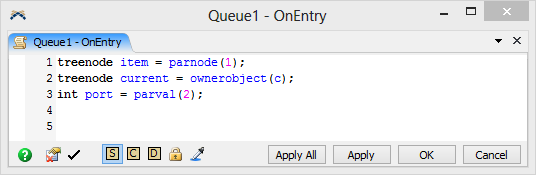
When you open up the Code Editor, you'll likely see some header statements that will look something like this:
		treenode current = ownerobject(c);
		treenode item = parnode(1);
Within the code window, you can specify whether you want your code to be interpreted as
FlexScript or compiled as C++ (in which case you will need to compile your model). You can
also check the FlexScript syntax by pressing the
 button.
Code Builders
When you are editing code in the Code Editor, or entering values in a picklist field, the Library (left pane) changes to display a list of Code Builders.
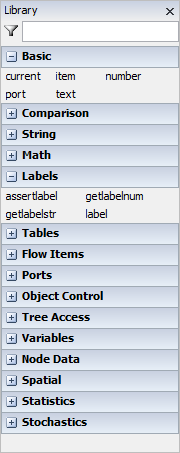
These Code Builders can be dragged into your Code Editor or picklist field to give you the correctly formatted command. Use the tab key to select each commented section of the template code. ie /*"labelname"*/

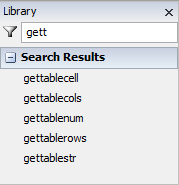
You can also filter the Code Builder list by typing in the
 field.
DLL Functionality
You can also specify the given field as accessing a function from a dll. In this case you would not provide the code as the text, but would provide the path to the dll as well as the name of the function to call. To create such dll you would need to use a special Visual C++ project. This project is available on the user community. The code field itself will need to specify two strings, each enclosed in quotes. The first string is the path to the dll. The second string is the name of the function. When you press the DLL radio button a message will appear that will let you create a template specifying the two strings.
Locking Code
There is also a "Locked" checkbox at the bottom of the view. This checkbox should only
apply to FlexScript or C++ code. It lets you lock the code state of the field to either
FlexScript or C++. In the main Build menu, there are two options to make all code either
C++ or FlexScript. We provide this option so that modellers can have both the ease of use of
FlexScript (code works immediately when editing in FlexScript, without having to compile) as
well as the run-speed of C++ (since it is compiled, it runs much faster than FlexScript).
While in the model building phase you can use FlexScript, so that your code is interpreted
immediately after you write it. Then, once your model is ready to run, you can choose the
Build > Make all code C++ option, compile, and run to get the speed of C++. However, there
may be some code that you write that cannot be converted from FlexScript to C++ or vice
versa because it uses features specific to that language. In this case you would click the
 to lock the code state of the given field. This
would also be important if you chose one of the menu options: Make all code C++ or Make all
code FlexScript.
to lock the code state of the given field. This
would also be important if you chose one of the menu options: Make all code C++ or Make all
code FlexScript.
Properties
The Code Editor has the following properties:
The tab bar displays the current object and trigger/picklist being edited.
| Icon | Description |
|---|---|
 |
Displays this help page. |
 |
Removes all template code. Template code may be found in picklists and triggers and takes the form of: /***popup:Conditional*/ and /** \nCondition: *//***tag:expression*//**/ |
|
Checks syntax for compile errors. |
 |
Toggles the current code as Flexscript. |
 |
Toggles the current code as C++ code. Editing C++ code requires compiling the model. |
 |
Toggles the current code as DLL linked. |
|
Locks the toggled state of the code. This does not lock the code from being edited, but rather locks the Flexscript, C++ and DLL toggle. This can be necessary if you want your object triggers to be C++ code as the property editors automatically toggle the code to be Flexscript. |
 |
The Sampler allows you to insert code into your code editor to reference objects, set labels, get values, etc. |