Run Animation
Overview and Key Concepts
The Run Animation activity can trigger an animation on a 3D object in the simulation model. You can use any of the animations that come pre-programmed with the standard FlexSim objects or you can create your own custom animations. If desired, you can have the token wait in the Run Animation activity until the animation completes. This can be useful for syncing. See the Animation Creator for more information about creating custom animations.

Connectors
The Run Animation activity only allows one connector out. See Adding and Connecting Activities for more information.
Properties
The following image shows properties for the Run Animation activity:
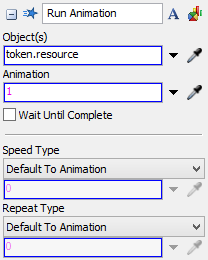
Each of these properties will be explained in the following sections.
Name
Used to change the name of the activity. See Name for more information about this property.
Font
The Font button
 opens a window to edit the activity's
background color and font properties. See
Font for more information
about this property.
opens a window to edit the activity's
background color and font properties. See
Font for more information
about this property.
Statistics
The Statistics button
 opens the activity's statistics
window. See Statistics
for more information about this property.
opens the activity's statistics
window. See Statistics
for more information about this property.
Object(s)
Use the Object(s) property to select the object that will be
animated. To run animations on multiple objects at the same time, you can pass a
treenodearray of objects into this property. Alternatively, you can create a
group of the objects you want to animate. To reference a group in the
Object(s) property, click the pull-down menu next to this
property and select Groups to see a list of all the groups that
have been created for this simulation model (or type Group: groupName directly
into the box).
Animation
Use the Animation property to determine which animation on the object should be run. This should be either a number that is the index of the animation or a string that is the name of the animation on the object.
To view the animations that are available for any 3D object:
- Right-click on the object in the 3D model to open a menu.
- Select Edit then Animations to open the Animation Creator.
- On the bottom panel, look for the Animation menu. Click the arrow on this menu to open the full list of the currently available animations.
You can either type the name of the animation or its index number. The index number is
the order in which the animation appears in the Animation menu.
For example, an Operator object has three animations (listed in this order): Walk,
WalkLoaded, and Stand. The Walk animation would be index 1, WalkLoaded would be index 2,
and so forth. If entering the name of the animation directly, be sure to put quotes around
the name so the Universal Edit will recognize it as a string. For example,
"WalkLoaded".
Wait Until Complete
If checked the token will remain in the Run Animation activity until the animation is finished.
To check or change an animation's Repeat Type setting:
- Right-click on the object in the 3D model to open a menu.
- Select Edit then Animations to open the Animation Creator.
- Select the desired animation from the Animations and Components pane.
- In Quick Properties, look for the Repeat Type menu.
- Click the menu and select Do Not Repeat or Repeat Set Number. If you selected the latter option, make sure you indicate how many times the animation should be repeated in the Repeat Value box.
Speed Type
If set to Default To Animation, the speed at which the animation will run is be defined by the animation. You can override the animation's speed by either specifying a duration or a multiplier.
- Use Duration Of - Enter the duration of the animation in the box below in model time units.
- Multiply Speed By - Enter a multiple in the box below to increase or decrease the animation's speed by the specified value.
Repeat Type
If set to Default To Animation, the repeat type of the animation will be defined by the animation. You can override the animation's repeat type with the following options:
- No Repeat - The animation will not repeat.
- Repeat Immediately - The animation will repeat as soon as it finishes.
- Repeat # Of Times - Enter the number of times the animation should repeat in the box below.
- Repeat After Time - Specify the time duration the animation should run before repeating. Enter the time in model units in the box below. You may specify a time that is less than the total animation time.
- Repeat After Time Once Ended - Once the animation is finished, specify how much time between animation repeats. Enter the time in model units in the box below.