Event-Triggered Source
Overview and Key Concepts
The Event-Triggered Source activity creates tokens in response to an event during a simulation run. When that event occurs, it will create a token. If the event has data associated with it like a flow item or port number, you have the option to save that data off as a label on the created token. If the data is an object like a flow item, a reference to that flow item will be saved on the token label for later use. You can also assign a name to the created token.

To get a deeper understanding of how the Event-Triggered Source activity works, you might want to consider reading these topics first:
As a more advanced feature, the Event-Triggered Source also has the ability to override the return value of the event it is listening to.
When this activity is first created, a red exclamation mark
 shows up to the right of the activity
notifying you that a link to an event is required for this activity to function. This link
may be a direct pointer which can be created by clicking on the exclamation mark and then
clicking on an activity or object and selecting an event, or the reference may be set
through the quick properties.
Connectors
The Event-Triggered Source activity only allows one connector out. See Adding and Connecting Activities for more information.
Properties
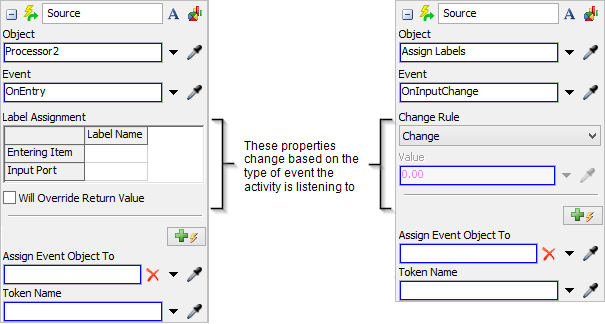
The following image shows properties for the Event-Triggered Source activity:

Name
Used to change the name of the activity. See Name for more information about this property.
Font
The Font button
 opens a window to edit the activity's
background color and font properties. See
Font for more information
about this property.
Statistics
The Statistics button
 opens the activity's statistics
window. See Statistics
for more information about this property.
Object
Use the Object box to select the object that the Source activity will listen to. You can listen to events on:
- An object in the model.
- An activity in the Process Flow.
- The current instance object (See Process Flow Instances for more information.)
- A group of objects. In this case, the activity will listen to the defined event on all members of the group.
Use the Sampler button
 to select the object and choose which
event to listen to. When you hover over an object with valid events, a list of those events
will be shown. Selecting an event this way will change both the
Object box and the Event box and
will cause the interface to change based upon the event type.
Event
Use the Event box to select the event that the Wait for Event activity will listen to. The Event box is connected to the object you selected in the Object box. When you use the Sampler button to select an object in the Object box, a menu will appear that lists all the different types of events that are available for that object. (This menu is created dynamically based on all the possible events related to that object.) The event that you select from this menu will automatically be listed in the Event box. You can change the event type by clicking the drop down arrow next to the Event box and selecting an event.
Label Matching/Assignment and Change Rule
The Label Matching/Assignment or Change Rule properties will appear after you've selected an object and event to listen to. See Label Matching/Assignment for more information about these sets of properties.
Add Events
You can listen to more than one event on an Event-Triggered Source. To add an event in
addition to the original event, press the Add Event button
 . Additional events will have
a Delete button
 button if you need to remove them.
Assign Event Object To
Assigns a reference to the event-firing object to the specified label or node. This is useful if you are listening to multiple objects (perhaps from a Group) and need to know which object fired the event. This box is not required and can be left empty.
Token Name
Use the Token Name box to determine the name that the newly created token will be given. Tokens are not required to have a name so this box is empty by default. You may give the token a static name like Token or it may be dynamic by using a picklist or through FlexScript. These names do not change the behavior of your Process Flow but can be useful for debugging purposes.