Decide
Overview and Key Concepts
The Decide activity will send a token to one of two or more possible activities based on conditions that you define. In other words, the Decide activity can determine the next activity that a token should be diverted to.

The Decide activity can use many different methods to determine which activity the token should go to next, such as:
- Sending the tokens to the next activities in round robin order
- Assigning the token to the activity that has the longest or shortest queue (based on the number of tokens that are waiting at that activity)
- Diverting a certain percentage of tokens to one activity while another percentage goes to a different activity
- Sending a token to various activities or outcomes based on a value in a label on the token
- Assigning tokens to one of the next activities at random
You can also use the Decide activity to create looping functionality. After evaluating a condition or a label on a token, the Decide could send the token back to the top of the loop or cause a token to exit a loop.
Connectors
The Decide activity allows any number of connectors out. The Decide does not allow other activities to be snapped to it as doing so would remove all connectors from the Decide. See Adding and Connecting Activities for more information
You will need to understand how connectors work in order to use a Decide activity. The following list explains a few important concepts to keep in mind:
- Each outgoing connector has a number (also sometimes called a rank) based on the order in which you created them. When you create an outgoing connector from the Decide activity to another activity, this connector will automatically be assigned a number (rank). For example, the first outgoing connector you create will be assigned a rank of 1, the second will have a rank of 2, and so forth. You may have noticed that this is similar to how port connections work between objects in the 3D simulation model.
- You can re-rank outgoing connectors. You can use the properties in the Decide activity or on the connector to change the ranks of the outgoing connectors. You can also disconnect the connector from the Decide activity and then reconnect it to move that connector to the last rank.
- Connectors can have names. You can also assign a name to a connector for a more visual reference if needed.(Double-click a connector to create a name). If the Decision property returns a string (text), the Decide will search it's connectors for a connector with a name that matches the given string.
- Sending to a connector that doesn't exist. If the Decision property returns an invalid rank or a connector name that doesn't exist, the token will remain in the Decide activity and not be released. This can also be done by returning a negative number in the Decision property.
- Connectors are not required, but encouraged. Though
visually it is easier to follow the flow of a token when connectors are leaving a Decide
activity, they are not required. The Decision property can be
given an activity to send to without being connected to it. This could be done by using
the
getactivity()command or storing a reference to an activity on a token label.
Properties
The following image shows the properties for the Decide activity:
Each of these properties will be explained in the following sections.
Name
Used to change the name of the activity. See Name for more information about this property.
Font
The Font button
 opens a window to edit the activity's
background color and font properties. See
Font for more information
about this property.
opens a window to edit the activity's
background color and font properties. See
Font for more information
about this property.
Statistics
The Statistics button
 opens the activity's statistics
window. See Statistics
for more information about this property.
opens the activity's statistics
window. See Statistics
for more information about this property.
Decision
You will use the Decision box to determine the logic that the Decide activity will use to send tokens to the next activities. When you click the arrow next to the Decision box, it will display a menu of many possible options, such as:
- Conditional Decide - This option will test the token to see if it passes a simple test or not. If it passes, the token will be sent out one connector. If it fails, it will go out another connector. For example, you could test to see if the token has a particular value in one of its labels or not. If the label has that value, it passes.
- By Percentage - Sends a certain percentage of the tokens out one connector, a certain percentageout another connector, etc.
- Connector/Activity by Case - Sends tokens to a connector name/number or an activity based on certain variables, such as the value of a label.
- Random Connector - Sends the token to any of the outgoing connectors at random.
- Shortest/Longest Queue - Sends the token to the activity that has the longest or shortest queue (based on the number of tokens that are waiting at that activity)
- Round Robin - Each token will be sent to one of the outgoing connectors sequentially. For example, if there are 3 outgoing connectors, the first token will go to connector 1, the second to connector 2, and the third to connector 3. This will then repeat sending the next token out connector 1 and so forth.
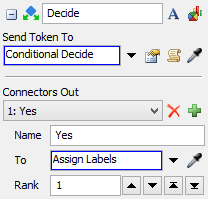
Connectors Out
You can use the Connectors Out properties to add, edit, or delete the Decide activity's outgoing connectors.
The Connectors Out menu displays all the outgoing connectors that currently exist for the Decide activity. The connector will be listed by its connector rank and name. (If you haven't assigned a name to the connector, the menu will only display its connector rank.)
If the Connectors Out menu is blank, that means that you
have not created any outgoing connectors yet. Click the Add
button  to create a new connector to an
activity. The Delete button
to create a new connector to an
activity. The Delete button
 will remove the connector that is
currently selected in the Connectors Out menu.
will remove the connector that is
currently selected in the Connectors Out menu.
After selecting a connector from the Connectors Out menu, you can edit its following properties:
- Name - Use this box to give a name to the currently-selected connector. Connectors are not required to have names, but can help make your Process Flow chart more readable and allow you to reference connectors by name.
- To - This box displays the name of the activity that the currently-selected connector is connected to. NOTE: By default, identical activity types have the same name. For example, all Delay activities are called Delay by default. If you need to distinguish between the different activities, you might want to rename them for clarity.
- Rank - This box lists the rank (connector number) of the currently-selected connector. The ranks are assigned by the order in which you created the connector. You may change the rank by typing a new value into this box or by using the up and down arrows.