Using Object Templates
What Are Object Templates?
Object templates enable you to build and configure your model using the object-oriented principle of inheritance, by creating template instances of objects in your model. A template instance is like any other object in FlexSim, except that it has a special link to its template, enabling several useful features:
- By default, template instances inherit property values from their template object. This means that when you change a property on the template, all instances automatically get that new property value.
- You can selectively override properties on each instance. Here the instance's property value becomes independent from its template. The mechanism for defining overrides is automatic by default: as soon as you change the property on the instance, FlexSim automatically marks that property as overridden. Alternately, you can explicitly define which properties are overridden versus inherited.
- Template inheritance can be multi-layered. A template instance can itself be a template for other instances, creating a kind of "family tree" of inheritance.
Using this flexible inheritance functionality can make building and configuring models much faster. You can configure object properties on a few key objects in your model, and those properties will be inherited automatically by many other objects.
Creating Template Instances
Almost any 3D object in FlexSim can be a template. You make an object into a template simply by creating template instances of that object. To do this:
- Click on an object in your model.
- In properties on the right, expand the Template pane.
- Under Instances press
 .
.
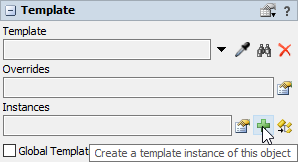
This will create a template instance of the object.
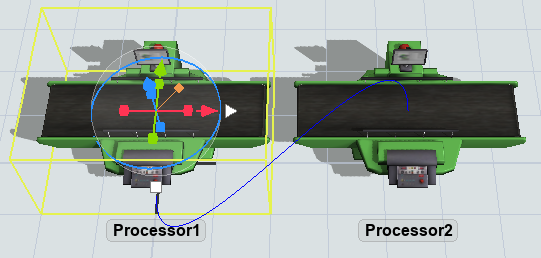
Blue bezier lines are drawn to indicate inheritance relationships. They protrude out of the bottom of template objects and into the top of instance objects.
Managing Instance Inheritance
When you create a template instance, most properties of that instance will be inherited. The text styling of properties distinguishes inherited versus overridden values.
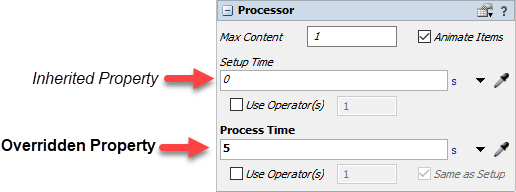
Properties that are displayed in italics are inherited properties, whereas properties that are displayed in bold signify an overridden property.
As soon as you change an inherited property on an instance, its display will change from italics to bold, signifying that the property is now overridden. Subsequent changes to the property on the template will no longer be reflected on the instance.
You can also directly view and edit the list of overridden properties:
- Click on the template instance you want to analyze.
- Expand the Template pane in properties.
- Under Overrides, press
 .
.
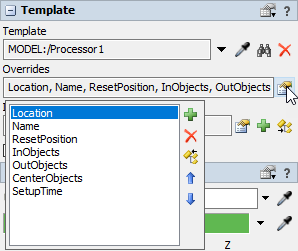
A popup window will appear with a list of the object's overriden properties. You can add to,
remove from, and reorder this list as needed. You can also select an override and press
 . This will remove the override from the instance, but
apply its value to the template, asserting the instance's current value on the template and all
sibling instances.
. This will remove the override from the instance, but
apply its value to the template, asserting the instance's current value on the template and all
sibling instances.
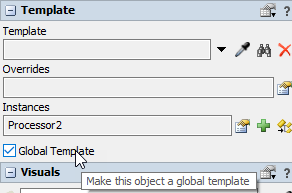
Global Templates
You can also make any object in your model into a global template. A global template creates a draggable icon in the library. When you drag this object into your model, it automatically creates an instance of that global template. To do this:
- Click on the object you want to make a global template.
- Expand the Template pane in properties.
- Select the Global Template checkbox.
The object will appear in the library on the left. You can then drag instances of the object into your model.
When you have made an object a global template, that object will also appear in the Toolbox. If you double-click on the template in the Toolbox, it will center that object in the 3D view and highlight it so that you can edit its properties. You can also right-click on the object and add it, as a global template, to a user library. This enables reuse of the object in other models.
User Libraries and Global Templates
Global templates added to a user library through the toolbox are different than standard objects added to the user library. When you drop a global template from a user library into a model, then if there is a global template with the same name in the model, it will update that global template, instead of just adding a new object to the model. Consequently, it will also update all of the template instances of that global template. This enables easier updates from user libraries to objects in your model. It is like re-installing the new object into the model, with all of its updated behavior.
Technical Details
Template inheritance is enabled through object properties. When you set a property on an object that has template instances, it will propagate the change to instances by effectively calling Object.setProperty() on each of the object's instances. Further, it overrides a property by storing the property's unique name in an override list on the object. The important point here is that the set of inputs that can be inherited are determined by the set of named properties that an object supports. If a certain piece of object data does not have a corresponding named property, then that data cannot be inherited. Also, supported properties are generally confined to object inputs, i.e. data that you define on the object when you are building your model. Data such as statistics, state values, etc. do not support properties and therefore cannot be inherited. That said, most object inputs do support inheritance.
3D object inputs that are not inheritable as of FlexSim version 21.2 are:
- Navigator properties
- An object's animations and components
- Fluid object properties
- Some people properties
- Internal connections of a visual tool
There are also some named properties which inherently do not support inheritance, mostly because inheritance does not make sense for those properties. These are:
- AllGroups (read only)
- IsSelected (used for 3D manipulation)
- Class (read only)
- Classes (read only)
- Container
- Location.X, Location.Y, Location.Z (redundant with Location)
- Rotation.X, Rotation.Y, Rotation.Z (redundant with Rotation)
- Size.X, Size.Y, Size.Z (redundant with Size)
- Color.Red, Color.Green, Color.Blue, Color.Alpha (redundant with Color)
- Template
- TemplateInstances
- TemplateOverrides
- Dimensions (redundant with other storage object properties)
Prototype-Based OOP
FlexSim's object template mechanism uses a prototype-based modeling style instead of a class-based one. Templates are themselves objects in your model, and as such, can be integrated in with the model as you define them. This design enables a more cohesive model-building process, where you are defining the object and building the model at the same time, instead of switching between two phases of class building then instantiation/model building. On the other hand, if you prefer a more class-based model-building approach, you can easily set your templates apart in an area of the model where you can define them separately, then use just template instances to actually build the model.